


Colin Nicholls
-
Posts
1,741 -
Joined
-
Last visited
-
Days Won
2
Posts posted by Colin Nicholls
-
-
Yeah, so my simple project needed some actual content in it, after which, the Insert Measures action worked as expected. So, I can't reproduce the problem - yet.
So this doesn't explain why my more complicated project did not work as expected when I inserted measures into the timeline. More investigation on my part is required.
-
I'm only seeing 3.4.4 on the download page - but that's for "Focusrite Control". Is the driver a different versioning number?
Appears so. I think the driver version I'm using is 4.36.5.612.
-
(Note: Ripple Editing is not relevant in this context)
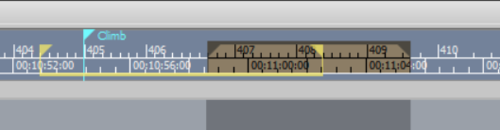
In my project, I selected all tracks and chose "Insert Measures" from the Project menu. I specified 8 measures, and checked ALL the options to slide Markers, Tempo and Time Signature changes.
The markers to the right of the insert point moved appropriately, but the Time Signature change did NOT. I ended up with my 4/4 measures of recorded data sitting in a project location with 7/8 time signatures.
Of course, I didn't immediately notice and carried on working. So my project is a bit of a mess now.
I then tried to duplicate this in an empty project:

This time, even though ALL the checkboxes were selected (see above) the Time Signature change was respected but the MARKERS to the right of the insert point did not move:

I haven't noticed this problem in earlier builds and I'm currently running 2019.09.
Anyone else experienced this?
-
SONAR was shipped with a limited (or special edition) version of TruePianos that contained only the Amber module, if I recall correctly. I also had the "full" version from way before SONAR started bundling it. But if you have your installers and your password/activation code safe, you can re-install the full product.
If you no longer have the full installers or your activation code, well, yeah, you might be out of luck.
Personally, I'm using Pianoteq STAGE instead of Truepianos these days.
-
 1
1
-
-
It's a valid Use Case.... try submitting it to the Feedback forum and get it on the list of possible enhancements. The developers have been very good about adding minor workflow improvements in recent updates, it might make the cut.
-
You mean, convert multiple tracks into a single track with take lanes per original track?
-
@Chuck E Baby has already explained this as well as I could, but hopefully you will all forgive me for adding a link to my own post where I describe the process of changing meters of bars in the middle of a project timeline...
Blog Post: Timeline Editing in Cakewalk, Reloaded
It seems appropriate. Good luck, @Christian Jones !
-
 1
1
-
-
What is your version of Windows? What audio IO hardware are you using?
-
I've taken a break from Polar Blue and I'm using Boston Flowers as my daily driver for a bit. It's real nice, thanks again for this.
-
1
-
-
5 hours ago, Chris Hall said:
I really like the included guitar modeling vst. Then I accidentally unlocked the demo for the full thing for 2 weeks and fell in love.
When it ran out I tried to buy it via the links but I guess that software doesnt exist anymore - just their newer, different stuff. And they're crazy expensive.
Can I buy the one from Cakewalk still? I wrote a bunch of songs with those and now they sound bad

This exact thing happened to me.. I thought I'd unlocked TH3 to the "Post-Gibson Hiatus" version, and found tons of cool stuff in there. Some time later I went back to use them and found the "Unlocked Cakewalk" version was actually pretty limited, and no option to upgrade to the full TH3.
The newer versions aren't the same, and, yes, are crazy expensive.
I discovered I could upgrade my Guitar Rig 4 (can't remember which SONAR edition this came with) to the latest version 5 for not very much, and that's what I'm currently using.

I agree, though... the full TH3 looked and sounded very nice.
-
1
-
-
IT DEPENDS.
Seriously, there is no "right way". I have used compressors before and after EQ before and after reverbs... it's all about the end result you are trying to get.
I could think of a few critical takeaways from FX chain building:
The most important thing to "get" is that compressors color the output differently depending on how hot their input is. So gain staging - setting the audio level at each step in the chain - becomes important.
Try putting an EQ before a compressor and then compare with after - you'll get different results (let alone if you don't pay attention to gain staging). What is best for your particular application will depend on what you're trying to do.
-
3
-
-
12 minutes ago, Jeremy Jensen said:
I actually 100 percent agree with this. It's getting kinda frustrating in the timeline, to be honest. I was excited about the timeline selection when I heard about it, but, in practice, it's something I would rather just have the ability to turn off. Not a dealbreaker, obviously, but it would be nice.
I added a second ruler to the timeline and found the extra space made a difference to my ability to click in the timeline area and get the expected results.
-
1
-
-
I think all theme designers strive for this, but you might try this one:
-
1
-
-
Cakewalk By Bandlab does need to check in with home base every couple of months or it will revert to demo mode.... That said, your problem might be different.
-
This changed during the X-series rollouts. There was some forum noise about the changes at the time...
>> Depending on where I you hovered over the clip would determine what state the tool was in.
The bottom line, for me, is that if I use the "Smart" Tool, this is pretty much the case. Is it exactly the same as in 8.5? No, and to be honest, I don't recall how differently it used to work.
Is there a specific function you're missing? Be comprehensive in your description and we'll see if we can describe how it works now in the latest release.
-
An option to increase the font size of the text in the Time Ruler would be awesome. I run my 3840x2160 display at 125% and it's at the limit of tolerance, for me.
I understand this would not be for everyone's taste, but us older folks would sure appreciate it.
Thanks for your consideration.
-
3
-
 2
2
-
-
Try it and see... it's non-destructive, right? You still have the audio from each speaker even if they were all talking at the same time.
-
I don't use lenses and I don't see why I should, just to get my backups to include my preferences. But I'll check them out.
-
Where does Cakewalk store user configuration preferences? For example, command module customizations; display options; anything changed in the Edit-Preferences dialog; etc.
The reason I ask is that when I back up my files, I'd like to include my customized Cakewalk settings. It doesn't seem to be in %APPDATA% or %HOMEPATH% or %LOCALAPPDATA%.
-
Hi @Tez, I have aux tracks in some projects, but not currently in the one I've been working on these last few months. The Aux Track/Dropout saga has been very interesting to follow.
-
I figured I'd post an update and wrest this thread back on track from @Tez's successful hijack... ?
To recap, my last post described my use of "bcdedit /set disabledynamictick yes" in my Windows 10 1903 environment to see if this improved things...
The result is a definite "maybe". It didn't eliminate my random Audio Dropout toast notifications but it might have reduced them somewhat. Not enough for me to think that the problem was resolved.
This week I decided to bite the bullet and revert my OS drive to an earlier version. I used the vendor's OS Recovery Partition to bring my workstation back to the out-of-the-box Windows build 1803 environment.
I've spent the last couple of days re-installing all my applications and sample libraries and VSTs, and co-incidentally, yesterday Bandlab also dropped the 2019.09 release of Cakewalk, which I'm now running. Many thanks to @Noel Borthwick , it includes improved audio dropout notification diagnostics!
So... with my current environment of Windows 1803 and CbB 2019.09, after a solid session working in Cakewalk, I have not observed any random audio dropouts. Yet!
(OK, not quite true. I did experienced a (0) and a (13) last night when I was getting things set up, but nothing since then.)
The difference (so far) is night and day.
I wish I could say definitely what the root cause is, but given that I've just reinstalled EVERYTHING, and also a new release of Cakewalk... it's perhaps not quite fair but I think I'm gonna point the finger at Windows 1903.
Needless to say I have disabled Windows Update (using WinAeroTweaker which has worked for me in the past) and it will be a while before I'm willing to enable it again.
I'll let y'all know how I get on in the coming days.
-
>> We’ve added useful information to help you diagnose the cause of a dropout.
I thank you
-
I don't use system image backups, but I use Free FileSync to make duplicate copies of all my creative project source files (and other artifacts i have created, like custom sample libraries) and installers (so I can reconstruct my DAW if necessary).
I use two rotating external USB hard drives as destinations and cycle between them. The most recent drive goes into my "go bag" in case our neighborhood catches fire.
FreeFileSync lets me specify a list of directory trees to mirror on to the USB drive. It only copies (or deletes) changed files. It's pretty fast, and I run it after each session.
-
I have the Focusrite Control installer for 2.3.4 if anyone needs it

Latest Focusrite Drivers?
in Cakewalk by BandLab
Posted
Yeah, I did that. I'm offered the download for Focusrite Control 3.4.4. I'm sure that if I installed it, it would install the actual driver with the updated version number.
Sorry for the confusion. In my case, at least, I'm getting very good performance with the older driver and no incentive to update it, although I probably will at some point.