msmcleod
-
Posts
6,931 -
Joined
-
Last visited
-
Days Won
36
Everything posted by msmcleod
-
 The Export Audio dialog respects selection, so if you've only got the end fade out selected, that's all it'll export. For a complete song export, either select nothing (CTRL + SHIFT + A), or select everything ( CTRL + A) before opening the Export Dialog. Personally, I prefer to go with no selection when using the Export Audio dialog.
 -
Do this: Select all the clips you want to delete automation from From the main menu: Edit -> Delete Special Uncheck everything apart from clip automation Click OK.
-
Articulations are not sent 'on the fly' every time the now time is moved. This is intentional so as not to flood the MIDI queue with events during editing. Articulation events are only sent if the transport is engaged (i.e. playing/recording/scrubbing), or when you click on an articulation section. If you want an articulation event to be sent when editing, click on that articulation section in the PRV.
-
Yes, something definitely up here. We'll look into it. In the meantime, a workaround is to ensure you give each clip a unique name in the clip inspector.
-
Thanks for reporting this @Toy - we've identified the cause of this issue, and it's been fixed for the next release.
-
Bandlab stems saving as wavs, no blx to be found
msmcleod replied to Darkjanggo TDI's question in Q&A
You're better opening the project directly within Cakewalk, by selecting "Browser BandLab Projects" from the File menu. -
@jkoseattle - I'll do my best to explain... As you know there are 3 types of tracks within Cakewalk: - Audio Tracks - MIDI Tracks - Instrument Tracks An instrument track is actually just a combination of a MIDI track and an Audio track, where the clips view shows the MIDI part, and the track view shows the Audio part. The inspector shows an Audio/MIDI tab so you can get more granular control, but behind the scenes there is actually two separate tracks. A Simple Instrument Track is an instrument track whose MIDI channel is set to Omni (i.e. all MIDI channels). A Per-Output Instrument track is an instrument track with the MIDI channel set to a specific channel. Other than that, they are exactly the same. What Append Instrument Track does, is take the next highest available MIDI channel and the next highest available Audio Output of the current synth, and assign them to the new instrument track. So if your existing instrument track is set to MIDI Channel 1, and is getting its audio from Synth Audio Output 1 L&R, appending an instrument track will create a new instrument track wired to the same synth instance, but set to MIDI Channel 2 and sourced from Synth Audio Output 2 L&R. You can keep on going until you run out of MIDI channels or available synth audio outputs. TIP: Although you can use Append Instrument Track on an existing Simple Instrument Track, it's usually inadvisable, unless you first change the MIDI Channel of the existing simple instrument track to Channel 1. You can do that in the inspector, when the tab is set to MIDI. That way, the MIDI channel / Synth Audio Port assignment will match up as you continue to append tracks. You can also fix-up the MIDI Channels afterwards if you forget. When using Append Instrument Track on an existing split instrument track, it does the same, except you get a separate Audio / MIDI track created. But the same thing happens: the MIDI track gets the next highest available MIDI channel, and the Audio Track gets its source from the highest available synth Audio Output. Of course, as I mentioned in an earlier post - you still have to map MIDI channels to audio outputs internally within the plugin itself. For synths such as Kontakt, you may also have to create the audio outputs within the plugin. Append Instrument Track is greyed out if you've run out of MIDI channels or you've run out of synth spare synth audio outputs.
-
This sounds like a mismatch between the Windows Sound sample rate and Cakewalk's sample rate, when using the same audio interface for both Cakewalk and Windows Sound. Windows has a nasty habit of forcing the sample rate back to 48KHz. Either make sure the sample rate matches by changing your Windows Sound sample rate to match Cakewalk's, or use a different audio interface for Cakewalk if you have one.
-
@jkoseattle - the console issue is not something we've seen before. Is it possible you're running out of memory? The East West libraries can be pretty big if you use a lot of them. Could you post your current machine specs, i.e. RAM, CPU + speed ? The other thing that could cause this might be a MIDI feedback issue if you're using any loop back devices?
-
It depends... if your pedal has a line level input, then you don't need a re-amp box. If it's just got a HiZ guitar input, then you will need one. Most of the time you can get away with a passive DI box rather than a dedicated re-amp box. You should be able to get a passive DI box for around €15 - €20.
-
PluginBoutique has been selling Melda stuff for years FWIW.
-
Great purchase if you don't want to create your own.
msmcleod replied to Steve Harder's topic in Articulation Maps
I've seen a few of these, as we worked with BablyonWaves to help them get these out, and a lot of work has gone into these. Some of the more complex libraries have far more than just simple key-switches. -
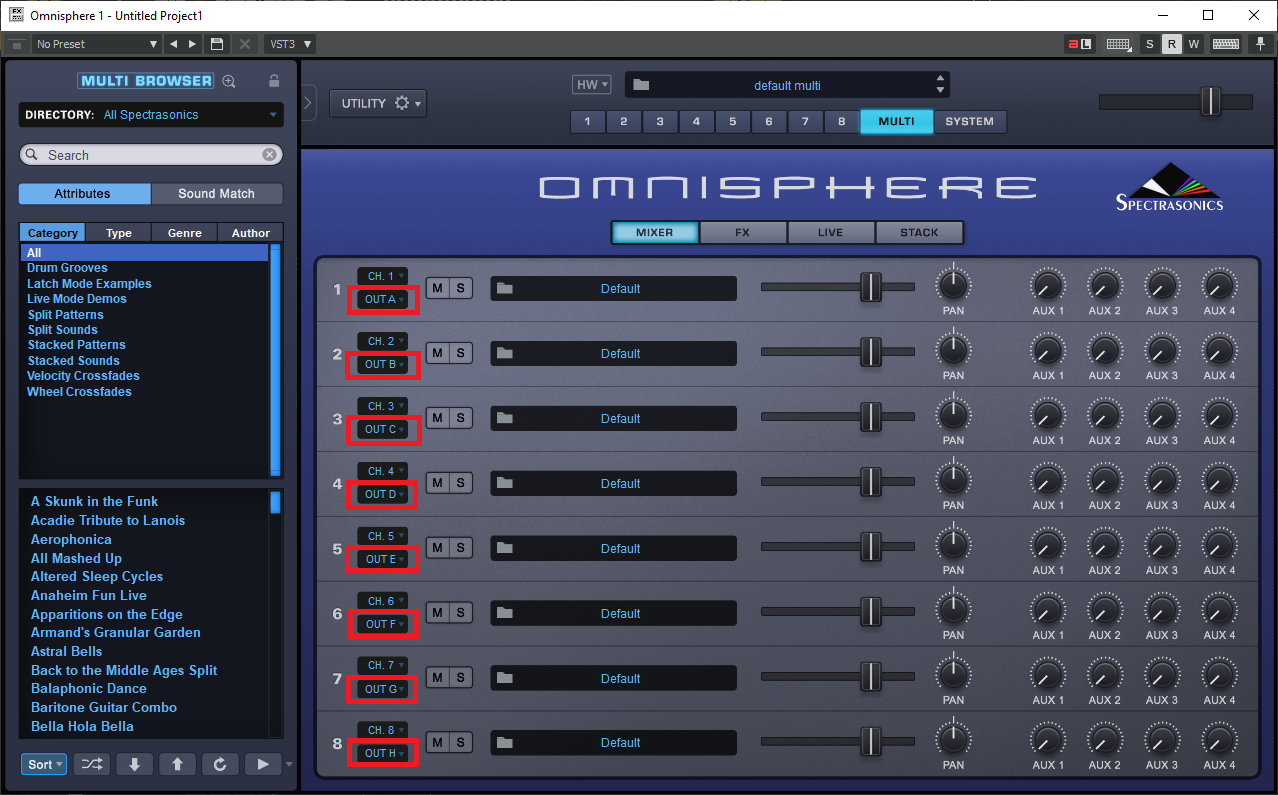
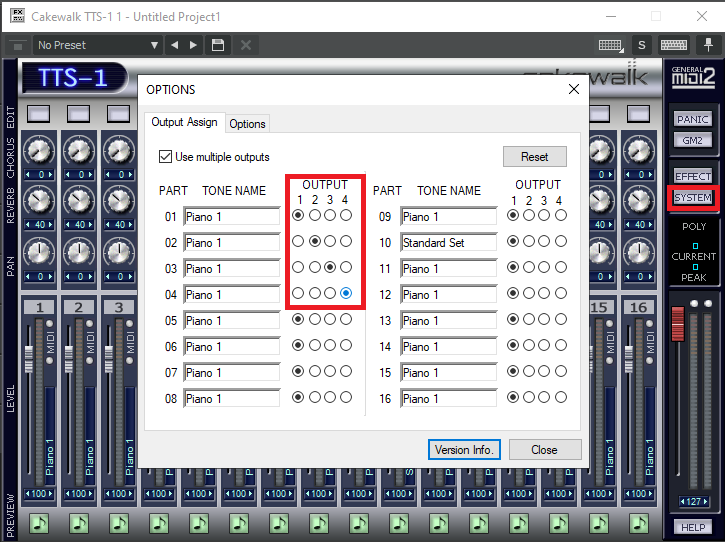
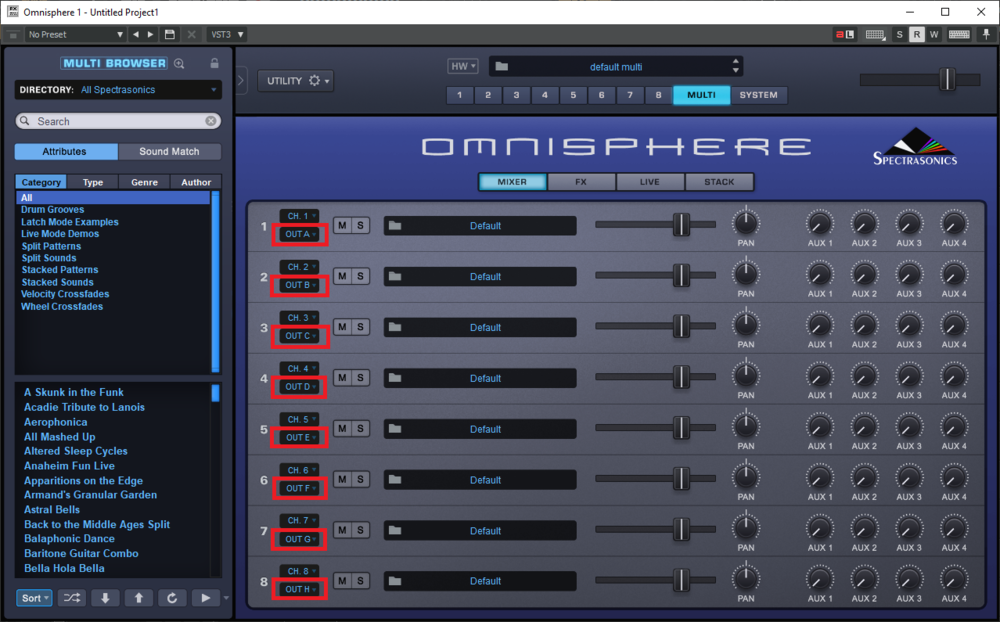
@jkoseattle - it sounds like you're using per-output instrument tracks. While Cakewalk will automatically assign the each track to the appropriate MIDI ports / audio outputs of the instrument, it's still up to you to internally assign the MIDI ports to Audio ports within the plugin itself. For example, within TTS-1 this is done here: Within Omnisphere: If you've forgotten to do this for one of the MIDI channels, and it's still mapped to the same output as MIDI Channel 1, then any audio volume changes on that channel will also affect channel 1's output.
-
Easiest way to move all plugin manager presets to a new machine
msmcleod replied to Sven's topic in Cakewalk by BandLab
They're stored here: %APPDATA%\Cakewalk\Cakewalk Core\Plug-in Menu Layouts ...so you should just be able to copy them across. I suspect however, that the presets rely on each plugin being in the same location as it was on your old machine. For those that aren't, you'll probably need to re-categorise them. -
bug report <Ripple Edit All> unexpectedly deletes clips
msmcleod replied to jimlynch22's topic in Feedback Loop
It's not a bug, it's working correctly. When you Ripple Edit All to the left, everything between the destination point and the start of the dragged selection is deleted, and overwritten by everything from the start of the dragged selection to the end of the project. What results were you trying to achieve? -
bug report Articulations incorrectly selected by lasso
msmcleod replied to jimlynch22's topic in Feedback Loop
Articulations aren't stored in the same clip as the notes, they are in their own single clip which always starts at measure 1. -
bug report cursor tool intermittently stops functioning in the PRV
msmcleod replied to jimlynch22's topic in Feedback Loop
Things to check: 1. You're using the smart tool, and not one of the others ( tip: F5 will engage the smart-tool, the other tools can be engaged using F6 thru F10) 2. All of the relevant smart tool functions are enabled: The other thing to check is that you've got the correct track active in the PRV track pane, and it's not locked.
-
For the most part this will work, however the "Extract Keyswitch Articulations" command may have unexpected results in some circumstances as it'll pick up the first articulation that matches that key. If you just happened to have another articulation overlapping that one in the same group, only one of them would win out either partially or wholly replacing the other. Also remember that you're limited to 255 articulations per articulation map, regardless of how many groups you use. There is however, nothing stopping you from creating more than one articulation map for the same instrument (e.g. one articulation map for "left hand" articulations, and the other for "right hand" articulations).
-
The new UI is much nicer IMO.
-
Upgrade to the latest release.
-
My old MidiSport 8x8s occasionally blue-screens once or twice a year (usually after a Windows update). A driver re-install usually cures it. I also have a MidiTech MIDIFace 8x8, which has been rock-solid ever since I bought it... just in case you're looking for an alternative.
-
Exported tracks all have project length??
msmcleod replied to kzmaier's topic in Cakewalk by BandLab
The "Tracks" category is different from the "Tracks through entire mix" category. It's only the Tracks category that detects the individual track length when there's no selection. -
You can only have one map lane per articulation group, not per instrument. The solution is to put all keyswitches that are mutually exclusive to each other in their own articulation group. Keyswitches that can be activated at the same time as others, should go into a different articulation group.
-
In the meantime you could always use the Page Up/Down keys.
-
Are you sure all you're doing is double clicking the MIDI file and playing? AFAIK the audio export directory is only created when the Audio Export dialog is opened.