msmcleod
-
Posts
7,209 -
Joined
-
Last visited
-
Days Won
39
Everything posted by msmcleod
-
According to the MIDI Spec: Start Byte Hex Binary Description 1 FA 111 1010 Status This message is transmitted when the Play or Start button of the master sequencer or drum machine is pushed. Once the message is received, the device resets its internal song position to 0 and begins to play at the reception of the next Timing Clock message. There should be a delay of at least one millisecond between the transmission of the Start message and the Timing Clock message to give the receiver time to respond. The receiver, however, should be able to start immediately, even if the delay is less than one millisecond. This is exactly what Cakewalk is doing. The drum machine should not be starting until it receives the Timing Clock message, which isn't sent by Cakewalk until the count-in has finished.
-
 Cakewalk is Windows only.
 -
This should work, but not quite exactly the same as in the PRV due to the Arranger/Articulations using a different UI technology to the rest of CbB. The trick is to stop short of the edge, and it'll scroll:
-
Band in a box 2022 sale (and some life observations…)
msmcleod replied to Yan Filiatrault's topic in Deals
Eli Krantzberg has a great tutorial on using BIAB for Songwriting on Groove 3. I loved the different methods he showed of generating ideas, and using parts from what might seem disparate styles in your existing session. To be honest, I've never been that into the middle-of-the-road styles that BIAB generally has, but it's amazing what you can do by using just one part out of context. Here's the course overview: Tutorial 1 - Creating a Melody (7:25) In this first video, use the Band-in-a-Box Melodist function to create a melodic idea for a chord progression and arrangement in a DAW. Tutorial 2 - Exploring the Melodist Maker (10:26) Learn to use the Melodist Maker to create a custom Melodist and hear how it interacts with different styles. Three separate melodies are generated and brought into the DAW, where they're edited together to create a single, unified melody that matches the chords and arrangement. Tutorial 3 - Using the Chord Wizard (7:31) Next, discover the Band-in-a-Box Audio Chord Wizard and hear how it's used to generate chords and tracks supporting a melodic vocal idea for a song chorus. Tutorial 4 - Creating Harmonies (7:15) Explore Band-in-a-Box's ability to generate doubling and harmony parts from existing audio. Hear examples on vocals and guitar! Tutorial 5 - Creating a Guitar Part (7:27) Learn how the Band-in-a-Box MultiRiff feature is used to create multiple variations of a guitar part - based on your chord progression and rhythms - with custom shots and pushes. Tutorial 6 - Creating Better Harmonies (7:40) In this video, discover Band-in-a-Box's advanced harmonizing options, including the ability to export MIDI conversions alongside the generated audio. Tutorial 7 - Creating a Piano Part (8:19) Learn how to have Band-in-a-Box create a fully fleshed out piano part based on your original simple chords, in your choice of musical styles, using RealTracks. Tutorial 8 - Creating an Arrangement (10:36) See how the Auto Generate Chord Substitutions and Auto Generate Chord Reharmonization functions can be used to reinvigorate a simple melody, with examples in various styles. Tutorial 9 - Creating a Solo (11:24) Next, explore the Band-in-a-Box Soloist Maker and its ability to custom design solos and fill lines. Tutorial 10 - Creating an Intro (8:50) Hear the Band-in-a-Box's intro generating feature in action as it's used to create inspiring intros to match specific styles and chord progressions. Tutorial 11 - Creating a Chorus (6:31) In this video, see the Band-in-a-Box automatic generation feature in action, creating a chorus that harmonically and stylistically matches the preceding verses. Tutorial 12 - Generating Random Ideas (5:47) Finally, learn how Band-in-a-Box is used to generate random ideas based on your user input. Individual parts from multiple ideas can be used either independently or in combination as the basis for songwriting inspiration! -
(not a bug) Sustain pedal not released on Stop
msmcleod replied to Jeremy Murray-Wakefield's topic in Cakewalk by BandLab
This isn't a bug - Zero All Controllers is the MIDI standard for dealing with this. The only reason people have started disabling this is due to Native Instruments hijacking CC #1 (modulation) for things like cut-off freq / volume. Why they did this, who knows, but it was a very bad idea. I've just got used to pressing and releasing my sustain pedal when this happens, or hitting the panic button. -
FYI... Crotchet = 1/4th note Quaver = 1/8th note Semi-Quaver = 1/16th note Demi-Semi-Quaver = 1/32nd note Hemi-Demi-Semi-Quaver = 1/64th note. I could go on... but it gets silly!
-
Once or twice, although only when discussing sheet music. Demisemiquavers are far more common.
-
As a user, my #1 reason for using CbB is its support for the Mackie C4, which is a major part of my workflow. Most other DAW's don't support it, and those that do don't support it properly - i.e. you have to turn the pots several times to go from min to max, whereas within CbB you just turn it quickly for big increments and slowly for small ones. In fact, this bad implementation on other DAW's was the #1 reason for people not buying the C4, leading to Mackie eventually discontinuing it.
-
Tascam To Release New Cassettes For Portastudio
msmcleod replied to Tim Smith's topic in The Coffee House
I used to use the Yamaha MT1X, then the Yamaha MT8X. I found the best cassette for these was the Maxell XLIIS. I did use the Maxell UDII for general listening though. It was a really good cassette. In fact my only reason for not getting a replacement cassette based portastudio was because you just can't get the cassettes any more. -
We've had this issue reported before through BandLab support, again with a TR-8S. From what I can tell, from Cakewalk's point of view it's sending out the correct MIDI messages as per the MIDI specification, and certainly with my Alesis SR-16, it's behaving exactly as it should with count-ins. Unfortunately I've not got a TR-8S to play with, but it does look like the TR-8S is not adhering to the MIDI spec in this case.
-
How do I add FX to Multiple Tracks?
msmcleod replied to justinpbrown71's topic in Instruments & Effects
1. You can only do this from the FX Browser, not the console view. 2. You can't, although I'm sceptical as to the usefulness of this in practice. It's unlikely you'd use exactly the same fx preset for any significant number of tracks. If you do want this, you can CTRL + drag the effect from one track fx bin to another track's fx bin. -
How do I add FX to Multiple Tracks?
msmcleod replied to justinpbrown71's topic in Instruments & Effects
You can also put an effect on multiple tracks by dragging from the browser, then holding down CTRL before you drop. Just remember to press CTRL after you've started dragging: -
It might work, but bear in mind a virtual machine will be significantly slower, and there's no guarantee that USB emulation will work. A dual boot might be a better solution... although good luck with getting Windows 7 to actually install. The last time I tried to install Windows 7, it wouldn't activate due to Microsoft retiring telephone activation for Windows 7.
-
Band in a box 2022 sale (and some life observations…)
msmcleod replied to Yan Filiatrault's topic in Deals
Just a heads up - I'm getting a lot of crashes with the BIAB 2022 plugin. This doesn't seem to be a CbB issue, as it crashes Reaper too. Studio One 5 doesn't crash, but frequently pops up error dialogs. I've raised a support ticket with PG Music. The crash only seems to happen when the UI is open, so you can mitigate the issue for now by turning off the audio engine before opening the plugin UI. You can switch off the engine by clicking this button: If it's white as shown above, this means the engine is running... so just click it to turn it off before opening the BIAB plugin UI.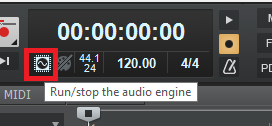
-
Copy Paste Crash, No Dialogue and No Dump - Bug
msmcleod replied to Tez's topic in Cakewalk by BandLab
This was reported a few days ago - it has been fixed for the next drop. -
Apologies... it was Reastream I was using. I'm not sure what the best solution here is. You could try using Reaper as a bridge between CbB and Jamulus via Reastream. Other alternatives could be VB Audio ASIO Bridge, or ASIOLink. Any solution is going to introduce extra latency though.
-
But before that it was called Byzantium...
-
Well, it's really a bass drum so you hit it with a..... hmm, maybe not.
-
It could be the panning in the audio interface. Last week I thought everything sounded a bit narrow, and it turned out I'd switched off the stereo link for the DAW output within Scarlett Mix Control, and both channels were panned dead centre.
-
You should be able to use Rearoute in Sonar. I've used it in CbB before without issues.
-
Two things to check: 1. The velocity curves for your TD-11 sounds are likely different from the ones in the SI Drum Kit. When you're tracking, if possible track listening to the sounds you're actually going to be playing the drums back on, rather than the internal TD-11 sounds. Unfortunately SI Drum kit is a pretty basic instrument and doesn't allow you to change the velocity curves, but you may be able to within the TD-11 itself. 2. Check if D-11 is sending out CC or pitch bend changes, e.g. for the hi-hat pedal, or hit position on the pad. You may need to remove these from your MIDI track after recording.
-
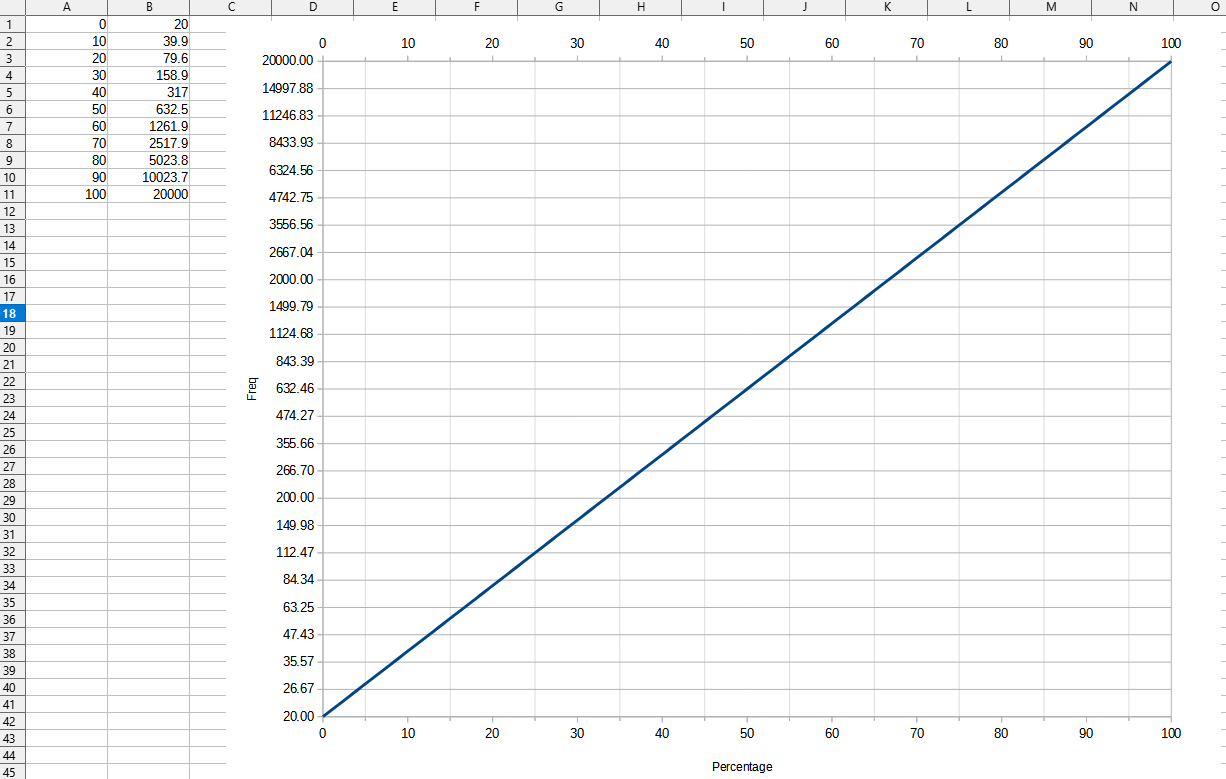
The node value is a percentage value between 0 and 100. The easiest way to set it to a specific value is: 1. Set the Now time over the node you want to edit 2. Move node up and down, looking at the widget display ( the one that shows 447.7Hz on your screenshot). Holding down SHIFT will lock the node horizontally while you move it vertically. This should give you some idea of the percentage/freq relationship. It's a logarithmic scale, but I've flattened it to make it easier to look up:

-
I can also (thank?) it for the endless rain...
-
The {clipname} tag only works when the export category is Clips.
-
@Jordi - thanks for the report. I've found the cause of the crash and it'll be fixed for the next drop.