msmcleod
-
Posts
6,905 -
Joined
-
Last visited
-
Days Won
35
Everything posted by msmcleod
-

[ SOLVED ] Stream Deck - run a CAL script?
msmcleod replied to sadicus's topic in Cakewalk by BandLab
CAL scripts can be bound to keys (or MIDI notes) in Key Bindings - so the easiest thing is to bind the key first, then get stream deck to invoke it. -
Solved - Suttering Playback - Problem was Windows Driver
msmcleod replied to ant_in_wales's topic in Cakewalk by BandLab
Freezing is really just a short-cut to a bounce, so you can always bounce the buses to new tracks using "Bounce to Track(s)" Alternatively, as @gustabo has mentioned, Neutron can be very CPU hungry. Bypass each "family" of FX individually to see if you can narrow down the one that is causing the most CPU hit, and consider putting in an intermediate bus between your existing buses and the master bus, putting a single instance of the problem plugin on that bus. Other things to try: 1. Make sure your Cakewalk projects directory and global audio directory are excluded from any virus scanner or cloud sync app. 2. Try disabling your network interface - this may not actually be an issue, but I've been caught out 3 times wasting hours trying to troubleshoot performance issues only to find Microsoft was downloading an update in the background. 3. Double check your audio settings, and systematically try different configurations - by systematically, I mean: a) Write down your current settings b) Either change the settings one at a time and compare, or write out a table of the various settings going through the combinations. The settings to try: Audio->Playback & Recording: Plug-In Load Balancing on/off Use MMCSS / Enable MMCSS for ASIO Driver (try all three combinations) Audio->Configuration File: ThreadSchedulingModel - try models 1,2 and 3 (click "Reload Config Settings" after changing this) There are 12 different combinations of the above - you could try each one, and see which one performs best: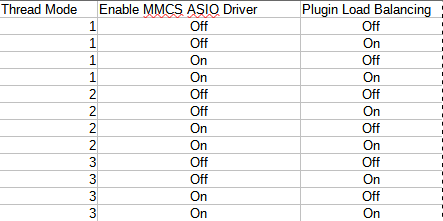
-
Advice needed for using a 4 port MIDI interface with CbB
msmcleod replied to Philip Jones's topic in Cakewalk by BandLab
FWIW I used to use the MIDIMan interfaces, but the drivers do not play nicely with Windows 10 any more. I'm using two MIDITech MIDIFACE 8x8 (one in the studio, one in my office) - they also do a 4x4 version. It's class compliant, but has no issues with heavy MIDI traffic. -
Advice needed for using a 4 port MIDI interface with CbB
msmcleod replied to Philip Jones's topic in Cakewalk by BandLab
Check your MIDI driver mode in preferences ( MIDI -> Playback and Recording). If it's set to UWP, change it to MME (or vice versa), then restart Cakewalk and try again. Note that you can't change MIDI driver mode while there's a project loaded. -
If it's Windows 7 64 bit, then CbB should work fine. It's not officially supported any more so you'll get a warning on setup. In the future there will come a time when we're forced to use Windows 10 API calls to support newer features, but for now Windows 7 is working fine.
-
FWIW - I can run SONAR Platinum on a Dell Vostro 1700 laptop (Intel Core Duo at 2.2Ghz with 4GB Ram) on Windows 7 32 bit, and CbB on Windows 10 64 bit on the same machine (it's a dual boot). I have zero problems recording 16 simultaneous tracks, while playing back 32 tracks. Obviously there's a limit to how many VST's I can use, but I've found the ProChannel and Sonitus FX to be very light on CPU - and in any case, the Sonitus FX are exactly the same as they were in Sonar 8.5. I've not seen any noticeable performance difference between Sonar 8.5 and CbB - in fact, in anything, there have been optimizations since 8.5 which make it slightly more efficient. I've also had no issues loading Sonar 8.5 projects into CbB - although to be fair, I did convert most of them at the time of SONAR X3.
-
Solved - Suttering Playback - Problem was Windows Driver
msmcleod replied to ant_in_wales's topic in Cakewalk by BandLab
First, download and run LatencyMon - this should tell you if there are any bottlenecks in your system configuration. Beyond that, freezing tracks can help to free up resources. -
2 MIDI Keyboards Simultaneously Active?
msmcleod replied to musikman1's topic in Cakewalk by BandLab
Just to put things in context - 3ms latency is what you get if you're speakers are 1m (just over 3') away from you, which I suspect is the minimum distance most people have between their monitor speakers from their ears. If you have a mic 12" away from a speaker, you've already introduced almost 1ms latency, as it takes approx 0.9ms for the sound to travel from the speaker to the mic... then think of a drum kit mic'd up, and how far the overheads or room mics are from their source. These kind of latencies really aren't anything to be worried about. -
Unable to drag and drop WAV to track window.
msmcleod replied to Philip Jones's topic in Cakewalk by BandLab
The most common cause for CbB not allowing drag & drop is because it's running as adminstrator. Windows blocks drag & drop for programs running as administrator for security reasons. Check you're running it as administrator - if you are... don't. -
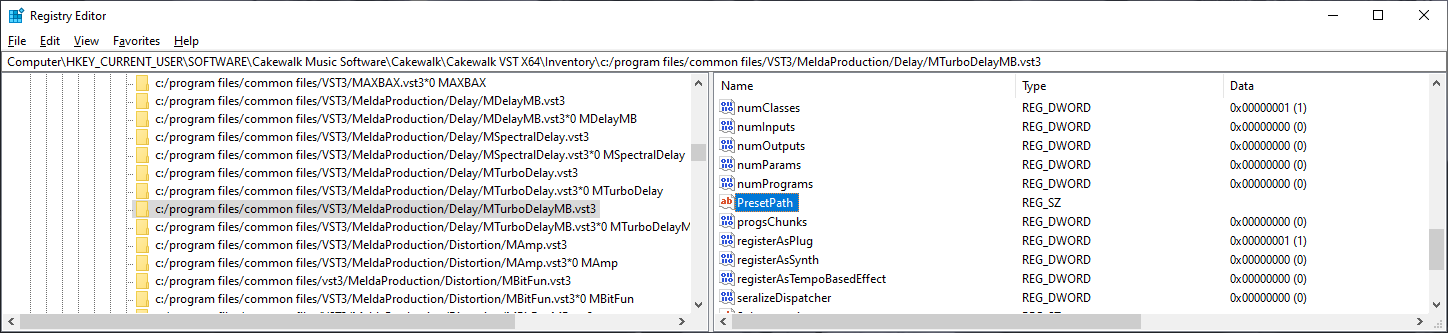
Is there a central location for plugin presets?
msmcleod replied to Keni's topic in Cakewalk by BandLab
I don't think there's a standard location by default. However, Cakewalk does support a default location per plugin behind the scenes... Under each plugin entry in the registry, there's a PresetPath key. You can change this to a specific path, which will cause Cakewalk to open this directory by default when loading/saving presets for this plugin: This was added way before my time as a staff member, so I'm not sure why it's not been exposed in Cakewalk itself... but it does work.
-
2 MIDI Keyboards Simultaneously Active?
msmcleod replied to musikman1's topic in Cakewalk by BandLab
He's right you know... there's a crackle that starts at around 4:55. Not very loud to start of with, but gets more noticeable as it goes on. -
Event List change multiple notes to same pitch?
msmcleod replied to sadicus's topic in Cakewalk by BandLab
Another way of doing this is via the PRV. If you click on the pitch on the keyboard on the left, it will select all notes of that pitch. You can then drag them to a new pitch. -
If the whole pane isn't there, from the PRV View menu, select "Show/Hide Controller Pane". Otherwise click the "+" button in the bottom left, select "Velocity" from the type dropdown and click OK.
-
[SOLVED] Bounce multiple tracks to 1 stereo track?
msmcleod replied to Salvatore Sorice's topic in Instruments & Effects
Either select the tracks before you go into the Bounce to Track(s) dialog, or click the chevron to the right of the sources - this will allow you to select tracks, and mute/solo them while in the dialog. Remember to also select any Aux tracks if your tracks rely on them. -
Be really careful not to use the switch/contact stuff on faders or pots - it'll strip the carbon. Either use the fader stuff, or use something like WD-40.
-
The tempo map is re-calculated after any change in the tempo track / tempo inspector, and while tempo changes in the tempo map have a slight hit on CPU, it's pretty insignificant compared to actually entering the changes - hence the slight delay after making changes in the tempo track. On other words, the hard work is done up front at the tempo editing stage. Once the tempo map is calculated, reading the tempo changes is pretty cheap. And the advantage of using a varied tempo map is a more natural sounding project that is also visually snapped to the grid.
-
[SOLVED] Bounce multiple tracks to 1 stereo track?
msmcleod replied to Salvatore Sorice's topic in Instruments & Effects
Setting the source to "Tracks" will bounce tracks individually, creating multiple separate bounces for each track. Just set the source category to "Entire Mix" and select only the tracks you want to bounce together in sources. -
Some MIDI instruments support "note stacking" - in other words, if you play middle C twice it'll play two middle C's on top of each other. When you let go of the note, one of them will stop playing, and the other will continue playing. Other instruments don't support note stacking. They will either ignore the second middle C, or stop the first middle C to play the second one. As soon as it receives the first note off, it'll stop playing. The easiest way around this is to create a new track with a new instance of the instrument.
-
Export/Save Kurzweil K2500x Sounds?
msmcleod replied to Salvatore Sorice's topic in Instruments & Effects
This video pretty much says it all. I would add a couple of things, based on my own experience with Sample Robot. 1. You can export as a ready made Kontakt instrument - i.e. a single .nki file, rather than importing the separate files as shown in the video. 2. I normally write down the answers to the wizard questions in a notebook as I'm auditioning all of the sounds within a hardware module. This way, I can build a project with up to 128 different patches and let it do the whole lot in one go. Of course in this case I set Program Change to the appropriate patch number rather than zero as in the video, so it changes patch automatically when moving on to the next sound. Then I just hit the start button and come back 24 hours or so later to export it. It's worth mentioning that it's not just for hardware instruments. I've sampled a bunch of my favourite Omnisphere sounds so I can play them on my V-Machine. The V-Machine does support VSTi's but is way too under powered to host Omnisphere natively. With samples (using SampleLord VSTi) it plays without any issues. No need to take a computer with you for live use - just a small box the size of a VHS cassette. This also opens up the possibility of using sampled versions of your software synths in Cakewalk too, using a fraction of the CPU than the original VSTi. -
I'm pretty sure there aren't any hidden options. AFAIK the only controls that are available are what show up in the knobs for each sound. However, each sound originally comes from either Rapture or Dimension. So if you have Rapture Pro or Dimension Pro, you could use that and you'll get full control.
-
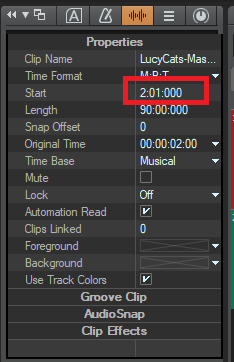
If you know exactly where you want the clip to go and you don't want to zoom out, the quickest way is to type in the new clip start in the clip inspector. This will work for all selected clips, assuming of course you want them all to be moved to the same time location.
-
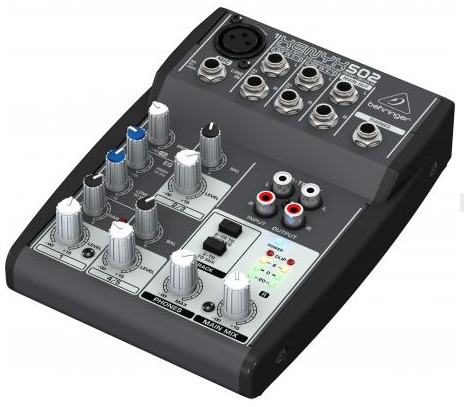
In the past, I've always used Camtasia... but it's expensive, and I only used it because it was for work and I didn't need to pay for it! I still think this is the best software for when you've only got voice + screen capture (i.e. no other cameras). For software "how-to" videos, the editing features are so slick and easy, it's hard to beat. Nowadays, if I don't need audio I'll use ScreenToGif, otherwise I'll use OBS. OBS is not only free, it has the flexibility of as many video & audio sources your system can handle. I've got a few NLM's to choose from for editor, pretty much all from Magix! I tend to favour Movie Studio Platinum 2023 as I've used various versions of Movie Creator over the years. What I don't do though, is even try to route audio from Cakewalk or in the box. Instead I use a small 5 channel mixer - it's a T-Bone (Thomann) mixer, almost identical to the Behringer XENYX 502. You should be able to pick one up new for less than $50: I plug a mic into the one XLR input it has, then take an analog output from my audio interface and plug that into channels 2+3. The main L/R output then goes to my onboard soundcard's line input. That way OBS is using my onboard soundcard, and Cakewalk is using my audio interface. If I needed separation between the voice and the audio from cakewalk, I could use an additional audio interface for OBS, but it's very rarely needed. I did have some success using my Focusrite 18i20 with OBS while using my RME DigiFace USB in Cakewalk. In this setup, audio from Cakewalk was routed via ADAT out from the DigiFace to the Focusrite's ADAT input, and the mic plug directly into channel 1 of the Focusrite. This worked fine, but it meant doing everything in my studio, rather than being able to do it in the house... so the 5 channel mixer wins out for now.
-
The QCON should be sending a Touch On message, either when you move the fader or when you touch the fader (if it's touch sensitive). This should be followed by a Touch Off message, either when you remove your finger from the fader (if it's touch sensitive), or after a pre-determined timeout. If it's not sending the touch on/off messages, then Cakewalk will auto punch-out if you've not moved the fader after 250ms. However if it's sending the touch on message and no touch off message and/or the QCON is continuously sending fader levels, then you'll get the behaviour you're seeing. I have similar issues on the Yamaha 01X, except in my case it's not automatically engaging automation recording when I move the fader. If automation read is off, touch automation always works. If it's on, then either its hit & miss, or I have to use the 01X's auto-edit mode - basically I have to hit the select button while 01X "auto edit" is on to punch in/out automation. I hooked up MIDI-OX to monitor what the 01X was receiving/sending, and it looks like it's not sending fader movements shortly after receiving fader automation, and by this I mean there's literally no MIDI activity coming from the surface (so it's not the MackieControl.dll or Cakewalk). I suspect this is some internal protection mechanism to avoid the user fighting against the motor and breaking the fader. Surfaces that have real touch-sensitive faders shouldn't have this issue, because as soon as you touch the fader it knows you're in control and it'll stop reacting to volume changes from the DAW. When I get the chance, I'll try a real Mackie MCU and see if it shows similar results.
-
If you've got Melodyne installed, you can just drag the audio clip on to the time ruler.
-
Install X2 first, then install Cakewalk by Bandlab afterwards. I've got both running ( as well as X1 and SONAR Platinum) with no issues. I've never needed to revert to X2 to load projects though, as they all load fine in CbB. The only two reasons I've got X2 installed is (a) RMix and (b) to compare the behaviour of features when tracking down bugs.