


msmcleod
-
Posts
6,958 -
Joined
-
Last visited
-
Days Won
36
Everything posted by msmcleod
-

Please, help applying tempo map from Melodyne to a project SOLVED
msmcleod replied to Billy86's topic in Cakewalk by BandLab
AFAIK Cakewalk's tempo extraction always uses Melodyne's automatic tempo detection, rather than any corrections you make within Melodyne itself. The most common way to transfer tempo maps between applications is via a MIDI file, so the following steps should work: 1. In Melodyne, export the tempo map as a MIDI file. 2. Open Cakewalk (with no project loaded), ensuring "Allow Only One Open Project at a Time" is unchecked within Preferences->File->Advanced 3. In Cakewalk open the MIDI file you exported in step 1 using File->Open 4. Open your other project. 5. In the MIDI file project, open the Tempo Track Inspector and select all the tempos 6. Use Copy Special to copy the tempos (i.e. select only the tempos in the dialog) 7. In your other project, set the Now Time to time zero then use Paste Special to paste the tempos. -
FWIW Sonar will have true Start/End markers.
-
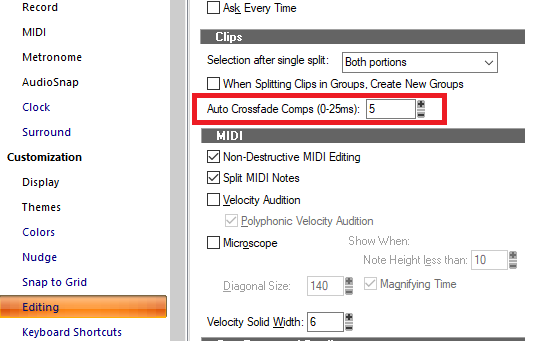
[SOLVED] Auto Crossfade not working like I expect
msmcleod replied to Christian Jones's topic in Cakewalk by BandLab
First check auto-crossfade is actually enabled: Second, check your auto-crossfade times in preferences: Lastly, currently auto-crossfades only work for splitting when using the mouse tool (i.e. ALT + left click). Using the "S" shortcut to split doesn't auto-crossfade - this has been fixed for the next CbB update.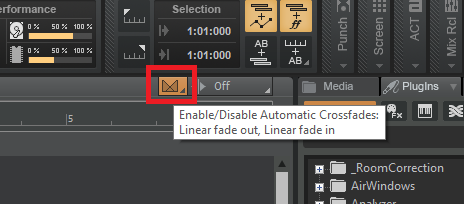
-
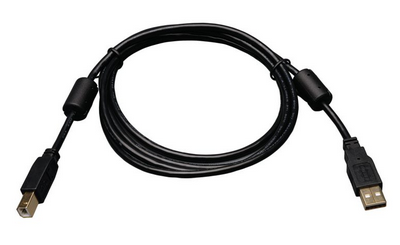
Ticking can be caused by electrical interference. If your audio interface is USB, try using a cable with at least one ferrite choke on it, e.g:
-
Ability to disable channel/track selection on faders?
msmcleod replied to Geoff Merson's question in Q&A
The only other solution I can provide is another control surface. The KORG nanoKONTROL 2 is a pretty cheap solution, and works extremely well with CbB. I've got one attached to the wall in my studio by my vocal booth area so I can easily adjust things, start/stop, and undo/redo takes without having to move from my position. The only downside is the faders are quite small. The nanoKONTROL Studio works equally well and has much bigger faders and has select buttons, but it's more expensive. If you have an Android tablet/phone there's also TouchDAW, and there's TouchOSC for the iPhone/iPad. TouchDAW is a faithful emulation of the Mackie Control, whereas TouchOSC is fully configurable. I've used TouchDAW a few times and it works very well. The only reason I stopped using it was because I preferred the tactile control of a real Mackie Control rather than a touch-screen. Other than that, the only thing I can suggest is to try to find a desktop app that emulates a MIDI controller. Anything that can bind on-screen faders/knobs to MIDI CC's would work, and you could set up a profile using the ACT Control Surface. All of the software options above require you to use a MIDI Loopback driver such as loopMIDI or loopBe. -
The UI is being updated to use vector graphics so it can be scalable and DPI aware. The button icons will likely be updated but will all be in the same place as before, so there should be zero changes to your workflow.
-
SI-BASS, SI-STRING - USE OF SAMPLES IN CHORD PROGRESSION
msmcleod replied to Milton Sica's question in Q&A
Try this one: Using pitch markers in the Track view -
To me, the biggest differences in modern sounding prog (and by that I mean modern prog rock bands such as Spock's Beard, Big Big Train, The Flower Kings etc.. rather than prog metal), are the vocals and drums. The vocals in many 70's recordings are generally quieter in the mix than the up-front vocals of modern recordings. Also the way the vocals are treated e.g. tight delay's or obvious reverbs in the 70's compared to the more detailed, drier (but not dry-sounding) vocals of today. The drums, again, are not only quite often way back in the mix, they're also pretty cluttered/mono sounding (probably due to recording constraints and a bounce or two). The kick and snare are far more prominent in modern productions, and the rest of the kit makes better use of the stereo space. I was just listening to the 2004 remix of Genesis' Cinema Show (from "The Platinum Collection"), and it's far more modern sounding than the original 1973 recording. Despite all the instrumentation being the same, it certainly doesn't sound old to me in the way the original does.
-
SI-BASS, SI-STRING - USE OF SAMPLES IN CHORD PROGRESSION
msmcleod replied to Milton Sica's question in Q&A
@Milton Sica - Maybe I'm misunderstanding your question, but have you looked at changing them to groove clips, and using pitch markers? How Groove Clips work in Cakewalk Using pitch markers in the Track view -
Ready do give up after years of trying to use Cakewalk
msmcleod replied to Joe Dun's topic in Cakewalk by BandLab
Good call. Actually, if all of your notes are "on grid", then you're as well unchecking both "Fill Durations" and "Trim Durations". The only reason those options are there are to show a readable staff view representation for completely unquantized performances. -
For really in-depth tutorials, personally I found the Groove 3 SONAR Platinum tutorials very useful. Up until that point, I was mostly only using features available in CWPA 9. The other set of tutorials that is very good is the Streamworks Audio series on SONAR X2: https://www.youtube.com/watch?v=TR1DLE2UIfM&list=PLKRYWdEpbc5PgUgvrNuSvVyfv5qkll0qj . They also do a series on the features added in SONAR X3. Both these tutorials go through every feature in depth. Over 99% of the material is still applicable to Cakewalk by BandLab, as although new features have been added to CbB, the existing features are mostly the same (the new Bounce/Export dialog being a notable exception). Obviously new features like the Arranger and Articulation Maps aren't covered. Both Creative Sauce and X.L.Ohh have good videos on those features. One other thing that has changed in Cakewalk by BandLab is the way snap works in the Staff View. The Staff View now follows the global snap, however durations are set within the Staff View itself. With snap off, the staff view snap is essentially set to 1/32.
-
Ready do give up after years of trying to use Cakewalk
msmcleod replied to Joe Dun's topic in Cakewalk by BandLab
Sounds like your display resolution is set to 1/4 note. Change it to 1/32: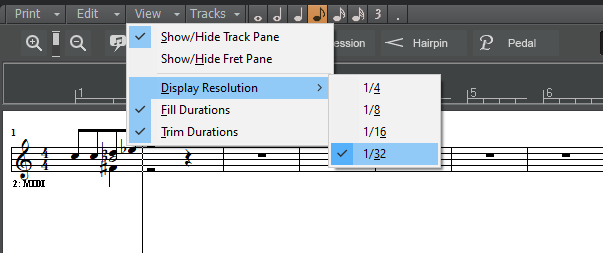
-
I think it's important to remember that Cakewalk is very much a linear DAW, rather than a pattern based DAW. I actually started using Cakewalk (CWPA 7) in 1997 coming from 10 + years using a pattern based sequencer (mainly MusicX on the Amiga), and it did take a while to change my writing workflow. Using the arranger to try to emulate a pattern based workflow can work to an extent, but isn't going to result in a very satisfying experience, and you'll start hitting issues. This is especially true if you have tempo/meter/key changes and use any generative VSTi's. In saying that, it there are things that might help: Bear in mind you can have both multiple arrangements and multiple arranger tracks, so there's nothing stopping you using smaller sections at the start, committing your arrangement (or inserting it later in the timeline), then creating an additional arranger track with longer sections. You can then base your new arrangement on a combination of the longer/shorter sections. Committing your arrangement using Linked Clips can also help here if you want to changes to one clip to affect the other clips you've repeated. Also, don't restrict yourself to creating an arrangement. The editing features of the arranger track essentially allow you to arrange as you go along, rather than relying on creating an arrangement and committing it.
-
Request: "Auto-fade when Splitting Clips" option in Preferences
msmcleod replied to HOOK's topic in Feedback Loop
A long, long time... it was definitely there in Cakewalk Pro Audio 7 (which was the first version I bought back in 1997). I never used it until a few years ago though (and to be fair, I didn't understand what it did until then either ? ) -
Request: "Auto-fade when Splitting Clips" option in Preferences
msmcleod replied to HOOK's topic in Feedback Loop
I think it's worth us looking at an easy way of removing cross fades (unfortunately under the hood, this is not easy at all!) In the meantime, the best advice I can give is: 1. Don't cross-fade too early in your project. 2. If you have cross-faded, use Snap By rather than Snap To. 3. If you really do have to cross-fade as you go along, consider committing your comps regularly, thus removing the need for the cross-fades altogether. In fact, I'd say this is good practice for most operations - make a decision, then commit to it. You'll end up with a far simpler project, and you'll remove the temptation to go back and second-guess yourself. -
Ian Dury and The Blockheads – Hit Me With Your Rhythm Stick
-
Yes - Rhythm Of Love
-
This kind of thing is certainly a possibility, and yes - this is exactly what Cakewalk is interpreting the change as. If the synth changes things internally it shouldn't be a problem, but if it informs Cakewalk that a change has been made, then it will dirty the project.
-
I think both of these suggestions are good ones and can be considered. Repeats for arranger sections was discussed at one point, but proved difficult at the time and was largely seen as a "nice to have" - after all, you can easily duplicate the section as many times as you want. However, it shouldn't be difficult to do this now - essentially it would build a temporary "play" arrangement with the current arrangement + repeats rolled out (which it actually already does in other places). The only tricky part would be the UI - i.e. actually providing the repeats editor, and also giving the correct position feedback with relation to the arrangement in the inspector. The lack of scrolling I see more of a bug, and should definitely be fixed. Given our workload regarding Next / Sonar however, I can't give any ETA on this.
-
Something, such as a CC message is altering a parameter in the synth which causes it to tell Cakewalk it's been changed, and that is what is setting the modified state. Things to check: 1. There are no CC messages on your synth track that could be altering parameters. 2. That MIDI output isn't enabled on other synths, when you don't need it. It could be that another synth is sending MIDI out which this synth is picking up. I'd start with checking which CC messages the synth responds to first though... then look at what could be sending them.
-
Sounds like you've got ripple edit on - turn it off.

-
If you want some of these inside your DAW, there's a few free/paid options around: RMI Electrapiano - RMI-EP: https://plugins4free.com/plugin/2482/ Mellotron M400 - Tapeotronic: https://plugins4free.com/plugin/799/ Hammond Organ - Spinet Hammond VL-122: https://plugins4free.com/plugin/1490/ ARP ProSoloist - ProSolo: https://plugins4free.com/plugin/1491/ ARP Quadra - Quadra ($39) https://store.cherryaudio.com/bundles/quadra-synthesizer ARP 2600: tonus 2620: https://plugins4free.com/plugin/2669/ CA2600 ($25) https://store.cherryaudio.com/bundles/ca2600-synthesizer The free ones are all 32-bit, but so far I've had no issues running them with both BitBridge and JBridge.
-
Не получается вывести звук из микрофона в Cakewalk
msmcleod replied to Dikona's topic in Cakewalk by BandLab
That's some seriously misleading instructions there from the manufacturer, when it's absolutely essential that you use Phantom Power. @Dikona - Although you can get boxes to give you phantom power for your mic, your still going to run into other issues using the Realtek for recording. Your onboard Realtek device is probably fine for mixing/playback, but for recording you really need a real audio interface. Something like the Focusrite Scarlett Solo or a Presonus AudioBox will do the job for less than $100, and you'll probably pay half that if you go for a used interface. Don't be put off by the fact that it's used, as many people sell these entry-level interfaces when they want to upgrade to an interface with more inputs & outputs. -
Camel The Snow Goose Medley Live at BBC The Old Grey Whistle Test 1975
-
Cutting Crew - Any Colour


