


msmcleod
-
Posts
6,909 -
Joined
-
Last visited
-
Days Won
35
Everything posted by msmcleod
-
Assuming you've got a full size keyboard, to the right of the function keys, you'll see the Print Screen, Scroll Lock and Pause buttons. Scroll Lock stops the clips view from scrolling when the now time goes off to the right. Pause causes the screen to update only once a second - I think this is what you're referring to.
-

Best way to connect Sonar MTC to MOTU MIDI Express XT
msmcleod replied to norfolkmastering's topic in Cakewalk Sonar
In the past, I've always found Cakewalk is better as a slave than a master... mind you it's been a long time since I've done it, and PC's were a lot slower then! -
Try this: 1. Select the existing synth track (or if a split instrument, the synth audio and MIDI tracks) 2. Save it as a track template. 3. In the new project, insert the track template. 4. In the old project, copy special making sure it copies track envelopes 5. In the new track, make the first newly inserted track the active track and ensuring the now time is at zero 6. Paste into the new project At that point you should have a copy of the synth and its envelopes in the new project, so you can now copy the envelopes as necessary to other tracks.
-
Something else will reside where it used to be. It's not fully baked yet though.
-
Cannot figure out why Export different than mix I hear
msmcleod replied to dougalex's topic in Cakewalk Sonar
Audio export runs at a much higher speed, and unfortunately not all plugins work properly when they're running at top speed (the vast majority do though). It could of course be project corruption, in which case re-creating the problem track will probably fix it. The way to determine this is to do a real-time export. If the real-time export works, then it's a plugin problem; if it's still wrong, then look at recreating possible problem tracks. -
Cannot figure out why Export different than mix I hear
msmcleod replied to dougalex's topic in Cakewalk Sonar
^^^ This... well actually, not your master bus, but the master fader for your hardware output. Your hardware output fader should always be at 0.0, then adjust your master fader accordingly. It's fine to also have your master bus fader at 0.0, but you must have your hardware output fader at 0.0 for it to export at the same volume.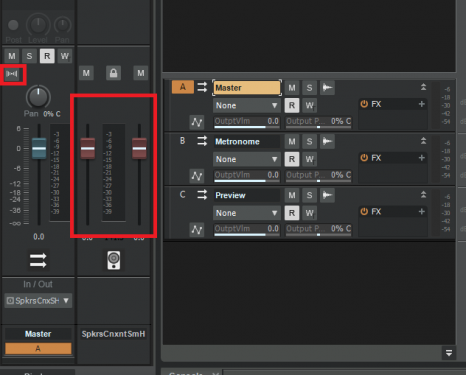
-
@Milton Sica - it's always worth running your English translations back to Portuguese just to check it makes sense. Sometimes it just needs rephrasing for the translator to do a decent job.
-
Do NOT do this. Running a program as administrator gives a program unrestricted access to all aspects of your machine. Any plugin will also have unrestricted access, and given that these can come from any source (esp the free ones), this is extremely risky. Sometimes it's necessary to do this temporarily for older plugins (i.e. Cakewalk Dimensions), but you should not run as administrator as a matter of course. You can disable the prompt as follows: Disable the UAC dialog box via User Account Control Settings 1. Press the Windows key, type control, and select Control Panel. 2. Select User Accounts from the list. 3. Now, click the User Accounts option. 4. Go to Change User Account Control settings. 5. Now drag the bar slider to Never notify. 6. Press the OK button to apply the selected setting. 7. Click Yes on the UAC window that opens.
-
If you're only using delay, Pre/Post will be the same thing. Pre/Post only comes into play when you have other processing going on - i.e. Pre delays before any other processing, Post adds delay after other processing. Using Pre and a delay only on one side of a stereo signal could radically affect how MS processing is handled.
-
@chamlin - not seeing any issues with that workflow here. I set an 8 measure loop, with a 4 measure punch in/out in the middle, and it's correctly recording the 4 measures every time. What might be the issue, is: "Then, without touching any settings, I hit record again, but this time, my recorded tracks are offset 7 measures forward, which results in the recording being misaligned, and 7 measures not recording" Check your "On Stop, Rewind to Now Marker" setting in TV Options. If this is unchecked, and you don't touch anything before pressing record again, then recording will start where you left off (assuming that's between the punch points). I'd recommend either: - Making sure "On Stop, Rewind to Now Marker" is checked, and ensuring the now time is at the beginning of the loop before you start recording (pressing W once or twice will ensure this). Then when you stop, it'll automatically rewind back to the beginning of the loop for you, so you can immediately press R. OR - Get into the habit of pressing W before pressing R again so you start at the beginning of the loop. If neither of these solves your problem, please post a video of what is happening ( Screen2Gif is a free and easy to use utility for grabbing screen videos). Be sure to record the whole screen, as the state of other options in the control bar may give us a clue to your setup and what could be causing the issue.
-
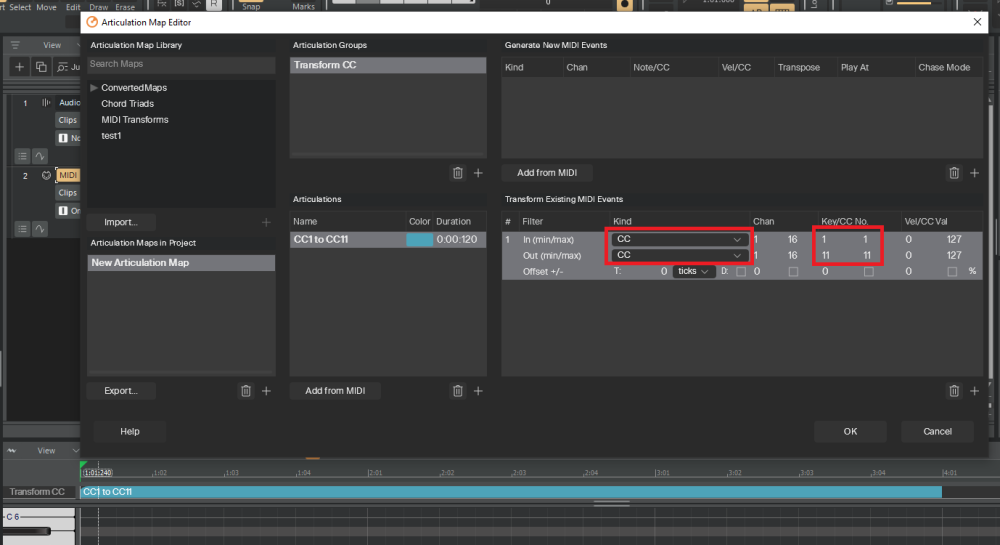
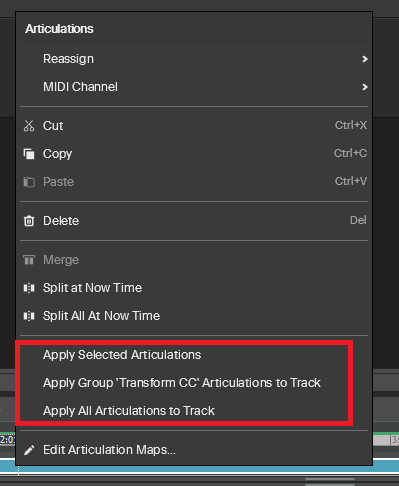
You could use an articulation map to transform CC#1 to CC#11 or vice-versa. This will transform the CC#1 to CC#11 in real time without you having to modify the underlying MIDI events. If you want to change the MIDI events later, you can right click on the articulation and use one of the Apply options. This will change transform the MIDI data directly, and remove the articulation from the articulation lane: Note that you can have more than one transform per articulation, and a single articulation map can have up to 255 articulations, so you can build up a collection of transforms you use regularly, then simply draw the appropriate articulation in the PRV when required.
-
For audio clips, you've got 2 options: 1. Nudge the clip by 50ms; or 2. Put a delay effect in your FX bin. Channel Tools has the ability to delay tracks by small amounts, both in ms or samples. For MIDI clips, again 2 options: 1. Nudge the clip by 50ms; or 2. Use the Track Delay in the inspector. CbB only allows this to be specified in ticks, whereas Sonar you can specify the delay in either ticks or ms. For CbB, this means calculating the equivalent ticks value for 50ms. There are 960 ticks per quarter note, and tempo is specified in beats (quarter notes) per minute. So: 1. Multiply your tempo by 960 to give ticks per minute (e.g. 120bpm x 960 = 115,200 ticks per minute) 2. Divide by 360,000 to give ticks per millisecond (e.g. 115,200 / 360,000 = 0.32 ticks per millisecond) 3. Multiply this by the delay time in ms, e.g. 0.32 x 50ms = 16 ticks. So a delay of 16 ticks at 120bpm is 50ms.
-
In general, cheaper mixers with a USB interface only provide a stereo mix to your computer, so you can't record the individual channels. For multi-track recording, you need a multi-track interface. There are some mixers that are also multi-track interfaces, e.g. Tascam Model Series (Model 12, 16, 24 and 2400 ) - these also work as stand-alone mixers and recorders, so you get the choice of sending multiple tracks to your computer or recording multiple tracks to an SD card which you can then import into your DAW. Soundcraft Signature MTK series - similar to the Tascam Model series, except it only offers multiple track recording over USB to your DAW - i.e. you can't record to an SD card. DO NOT confuse the non-MTK series with the MTK series - e.g. the Signature 24 is stereo only, whereas the Signature 24 MTK is multi-track. This is reflected in the price, so if you think you're getting a bargain, double-check it's the right model. Zoom L8, L12, L20 - These offer both multi-track recording over USB to your DAW and SD card recording. The mixer is typical digital mixer setup rather than an analog mixer setup. AFAIK, all of the above mixers, with the exception of the Tascam Model 12 and Tascam Model 2400 record pre-EQ. In other words, it'll send the signal to your DAW before any EQ is added. This is because they're primarily designed for live use, where you'd record the clean signal to SD card/computer, and use EQ / Faders for the live mix. FWIW, this was the blocker for me with these products (the Model 2400 wasn't available at the time), so I opted for an Allen & Heath Mixwizard WZ3 analog mixer connected via its direct channel outs to 2 x Fostex VC8's which in turn go to an RME Digiface USB. If you don't mind not using a mixer, you any audio interface with ADAT inputs will suffice. For years I used the Focusrite 18i20 with a Behringer ADA8000 connected to it via ADAT - this gave me 8 inputs via the 18i20, and a further 8 inputs via the ADA8000. All the major manufacturers do equivalents, each with their own unique features. What you're looking for is an interface with at least 8 analog inputs as standard, and an ADAT port for additional inputs. As far as ADAT expanders go, the Behringer ADA8200 has now replaced the ADA8000 and has better pre-amps. Focusrite have their own equivalent expander in the Octopre, and there are plenty of others by other manufacturers.
-
Doesn't the Backup/Restore Settings feature in preferences work with these interfaces? I don't have these exact ones, but the last time I used them to switch between my RME and Focusrite, it worked fine.
-
I believe you can load VST3 in SONAR 8 by hosting them Patchwork from Blue Cat Audio. You insert patchwork into your track as a VST2 effect, then load the VST3 within Patchwork itself.
-
SysEx view is there. You're probably using the Basic workspace - set it to Advanced or None.
-
yeah, it's just not my controller of choice. The physical footprint for 16 faders is amazing (especially compared to the Mackie MCU, and even more so the HUI which is huge). But I can't get over only having one rotary control, and the rubber transport buttons just aren't as nice as proper mechanical transport buttons. My controller of choice in my office is a modded Yamaha 01X - the mLAN card has been removed, and replaced with a dongle that routes the CS I/O to the MIDI ports at the back. It still works as a digital mixer too - just not as an audio interface. Next to it is a Mackie C4, which I'm so used to I really can't live without!
-
I may have a FaderPort 16 - but it's boxed up in the attic at the moment.
-
With all of these tariffs flying around, be careful where you buy stuff. AFAIK Plugin Boutique is based in the South of England (or at least it used to be), so I doubt there'd be any surcharges for EU customers beyond them charging VAT. TC Electronic is owned by Music Tribe (i.e. Behringer) - who are based in Germany, so I doubt there'd be any import/export charges to content with. I guess there could be some new customs charges that have only just kicked in post-brexit. If you're a US customer however, what you don't want to do is buy a US product from a vendor based elsewhere, as you could end up covering the tariff the vendor pays to import the product, then also pay again for it to be imported back into the US. If the vendor has branches / offices in the US, this may not be an issue... but best to check.
-
I had a slightly dodgy earth in my house for years - it was functional as far as safety was concerned, but caused noise in the studio. I used an online UPS in the studio to cure the issue. They're the most expensive, but have the advantage of always running through the battery and generating their own clean sine wave. Obviously you need one powerful enough to give enough power to all of your equipment. Note there are three types of UPS available: Offline/Standby - is normally off, but kicks in when power is lost Line-Interactive - Similar to offline/standby, but monitors the input, and regulates it/cleans it up/ offers surge protection. Battery power will kick in not only when power is lost, but if the power is deemed to be below or above a certain level. Online - Is always on. Mains is turned into DC, goes through the backup battery, then is converted to AC again from the battery. It's the online one that I got. Since getting the house rewired and earth redone, I've not needed to use it, but it definitely helped at the time.
-
Setting up an in ear click track on Yamaha Mixer
msmcleod replied to RICHARD HUTCHINS's topic in Cakewalk by BandLab
Not 100% sure about this mixer and how its connected... but it looks like you've got both L&R connected to your stereo out. If you want only your backing track to FOH, only connect the right output to your FOH. If you want both click & backing in the monitor, connect both L&R monitor outputs to your monitor. -
I've got a FaderPort 16, and it works seamlessly in both CbB and Sonar using MackieControl. Can you post a screenshot of: 1. Your Control Surfaces tab within Preferences 2. Your Mackie Control panel.
-
If you don't want the pan to be sent for whatever reason (e.g. maybe you've changed your mind, or you've decided to set it within the synth itself), you can right click on the pan knob and select "Disable Control" from the context menu. This will effectively give a setting of "no value" for the pan and a CC10 won't be sent.
-
Do you have Spatial Sound or any sound enhancements enabled in Windows? If these are enabled, then they'll be applied when playing through Media Player.
-
1. Connect the output of the tape track that has SMTPE on it to the input of your SMTPE unit. 2. Connect the MIDI output of your SMPTE unit to the MIDI IN on your MIDI interface. 3. Within Cakewalk/Sonar, go to Preferences->Project/Clock, set Source to SMTPE/MTC - adjust the PPQ/Time Format to match the SMPTE code (if you can't remember, just match it to whatever the SMPTE unit is currently set to). Bear in mind, the SMPTE unit might actually be sending MTC rather than SMPTE - I know my old PPS100 was set to do that - so you might get away with not having to adjust anything. 4. Press Play in Sonar 5. Press Play on the tape machine If you're transferring stuff from tape, then replace step 4 with: 4.1 Connect your tape outputs to audio interface inputs 4.2 Add the required number of audio tracks to match the tape's audio tracks - set the sources to match the audio interface inputs 4.3 Arm the tracks 4.4 Press Rec in Sonar


