


msmcleod
-
Posts
6,931 -
Joined
-
Last visited
-
Days Won
36
Everything posted by msmcleod
-
Which is why I always have my VST scan settings set to Manual....
-
Just checked... it's been there since at least SONAR 1 XL... so around 20 years
-
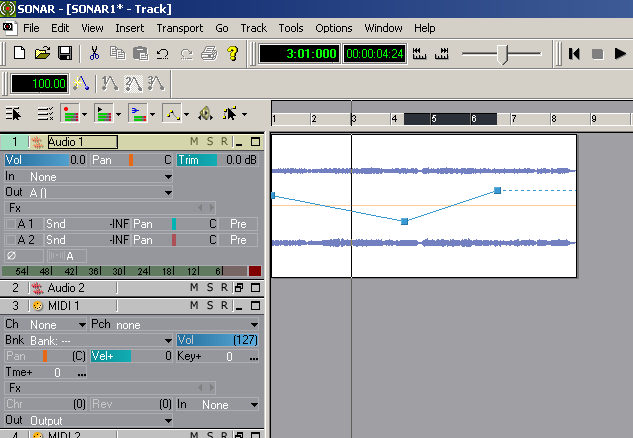
For vocals, I used to split the clips at various points, then use clip gain automation to adjust the levels. Nowadays, I use a vocal rider plugin and bounce the results to another track. If I like the results, I'll delete or archive the original track.
-

Windows update thread -20H2 current ( also, impact on CW )
msmcleod replied to aidan o driscoll's topic in The Coffee House
Same here - even though a failed update can "restore" the original image (and there's the built in restore function even if it succeeds), I don't fully trust it. Being able to just re-image a known working system is great. -
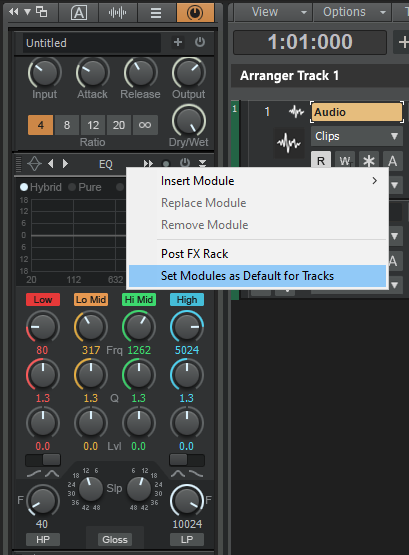
The default ProChannel module list hasn't been changed recently, so it's more likely you've accidentally changed the default ProChannel module list yourself. To fix this, populate the ProChannel with the modules you want, right click on one of the module's header, and select "Set Modules as Default for Tracks": This will then become your new default.
-
It really depends on how the software detects the machine. I quite regularly clone/restore drives, and most seem to work fine, but others seem to think something is different. Depending on your cloning software, the drive partition id's should be cloned as well. This should be enough for most software. You could go a stage further and edit the serial number of the cloned drive so it matches the one you've copied... assuming of course, you've got software that lets you do that. However, you may find you can't have both drives plugged in at the same time if you do that though (i.e. you'll need to clone your original to a drive image, remove the drive, attach the other drive then restore the image). These aren't the only things companies use however - some may use aspects of your CPU, your network adapter MAC address, the size & number of your fixed disks, and any number of random combinations. As long as its going back to the same physical machine, for the most part you should be ok... but there will no doubt be exceptions.
-
Just right click on the chord - you can give it any name you like, and optionally give a guitar grid as well.
-
I used this program called SharpEye about 10 - 15 years ago. It scanned in your sheet music (using a standard flat bed scanner) and converted it to a MIDI file. It worked pretty well: http://www.visiv.co.uk/ I only used the demo version at the time, as I only needed it for one project. I think it maybe got one or two notes wrong out of the whole score. I did try it out with handwritten scores, just for giggles.... that worked too!
-
If you're using ASIO mode on the 18i20, and you're using Focusrite's own ASIO driver, you should have absolutely no problems with dropouts in normal use. I've personally had issues with Izotope Ozone... this could be a factor. Also, the LP64 needs a lookahead buffer so it significantly increases latency, but it shouldn't cause dropouts. You could try resetting your AUD.INI by going to Preferences->Audio->Configuration File, and clicking the "Reset Config to Defaults..." button. The only thing I'd recommend changing from the defaults is "Thread Scheduling Model", which I have set at 2. Having a very low DroputMsec value will cause issues, but the default of 250 should be absolutely fine. Also make sure your Cakewalk program directories, plugin directories, any sample directories used by plugins and your Cakewalk project directories are excluded from virus scanners / cloud sync apps. FWIW I'm using a 1st gen 18i20 with a 3rd gen i7 + 16GB RAM, and I'm using an ASIO buffer size of 64. I hardly ever get dropouts, and if I do, I just up the buffer size to 128.
-
I got this with Addictive Keys when doing a scan in CbB while the XLN online installer was actually still open! To be fair, it did work fine when I created an instrument track and I got no message at that point.
-
I wouldn't say it's the most direct route, it's just a different one. To summarise: If you're using Mackie mode, you get full transport control and two way communication between Cakewalk and your control surface. That means, all the Mute/Solo/Record Arm/Select buttons (as well as the transport buttons) light up to reflect what is on the tracks in Cakewalk. The downside is, you can't use the control surface for ACT MIDI learn - instead you need to set up plugin mappings externally (either by editing MackieControl.ini, or using C4Mapper to do this for you). If you're using the nanoKONTROL Studio in assignment mode, you can control both transport and use ACT MIDI Learn for VST's. But the communication is one way: the controller sends the values to Cakewalk, but there's no visual feedback on your control surface. Having a separate controller allows you to use Mackie mode for your nanoKONTROL Studio, and the separate one for ACT MIDI Learn for VST's. Yes, you can assign them, and they are remembered. If you're using Mackie mode, the mappings are stored in MackieControl.ini which is loaded on startup. This means you have to pre-assign them before your start Cakewalk (e.g. using C4Mapper). If you're using ACT MIDI Learn, you can add/change parameters on the fly and they'll be remembered for that VST/VSTi. Here's a couple of videos that explain it pretty well: Using ACT MIDI Learn on VST's : https://youtu.be/UK24ySULnf0 Using ACT for transport/fader control: https://youtu.be/ObsW0t5FnzM
-
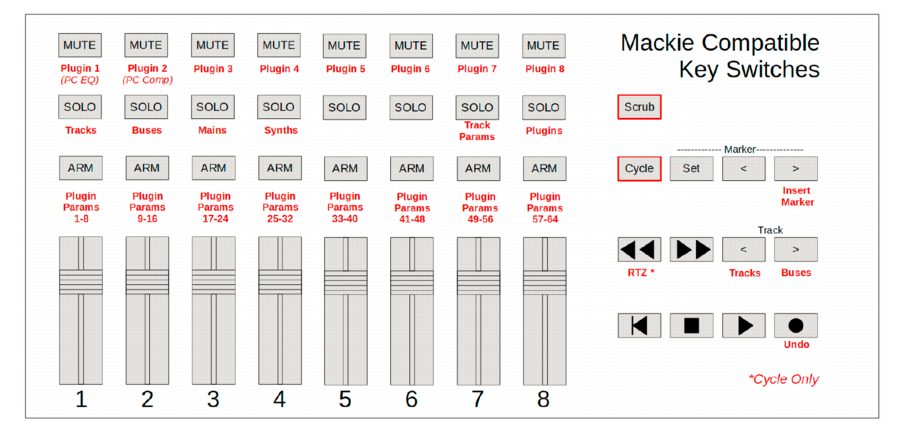
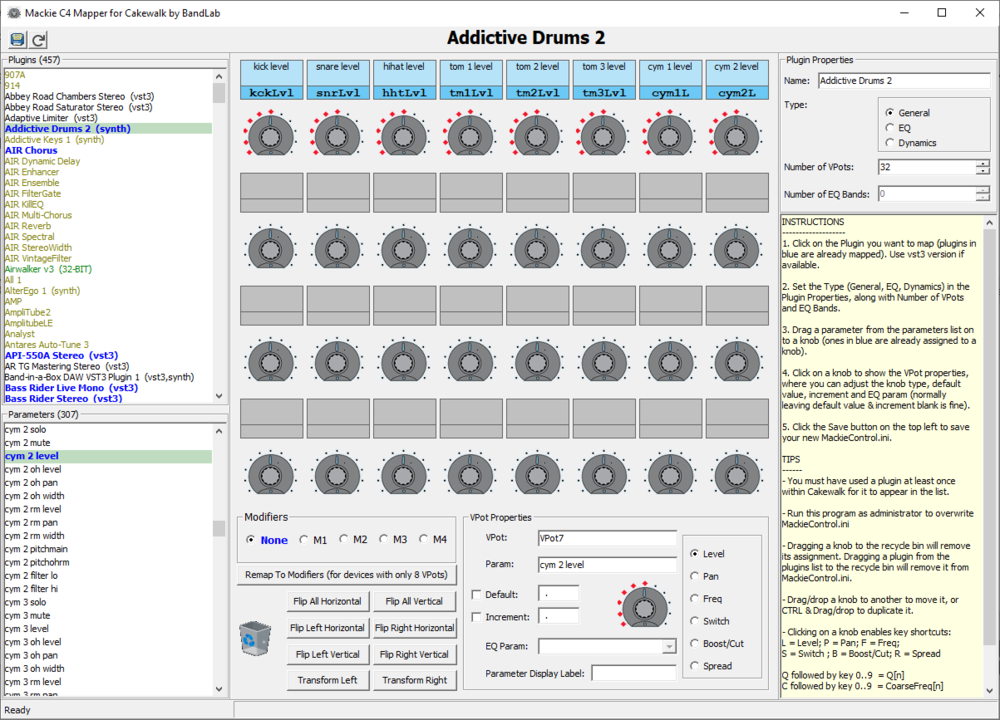
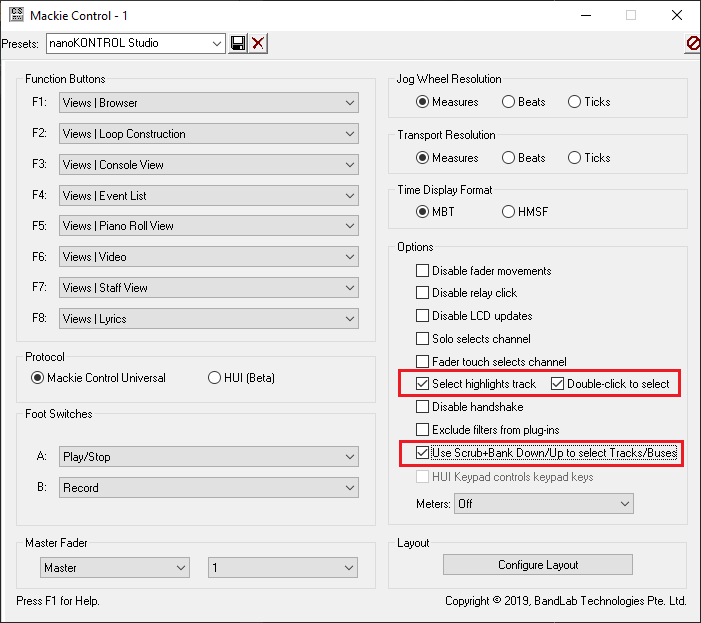
I use the nanoKONTROL Studio on my dev machine pretty much daily. I can't recommend it enough to be honest... it's a great controller. A few points to consider though: 1. Bluetooth only works in UWP mode, which may be an issue if you've other MIDI devices that need to run in MME mode. It works fine with a cable in MME mode tho. 2. MIDI Learn for virtual instruments isn't really an option if you're using it as a transport controller using the Mackie protocol (which is what I do). This is true for any control surface in Mackie mode. There are other options for controlling virtual instruments (i.e. by putting it into synth rack mode), and combining it with custom mapping settings in MackieControl.ini. My C4Mapper utility can help here (remember to use only the top 8 rotaries): Alternatively, consider getting something like a nanoKONTROL 2 or Akai midimix to run along side it, so you can use the nK Studio for your transport, and the other controller for VSTi's via ACT Learn. If using the nanoKONTROL 2 for ACT, it should be set to just send out CC's (While pressing and holding down the SET MARKER and CYCLE buttons, connect the USB cable from your computer to the nanoKONTROL2 and engage CC mode). 3. You can get both transport control and VST learn if you use ACT, but it's one-way - so the lit buttons on the nanoKONTROL Studio won't light up to reflect the track MSR statuses within CbB. In this case the nanoKONTROL Studio needs to be in Assignable mode (hold down Scene and Cycle buttons, turn the nanoKONTROL Studio on to set it to assignable mode). You can use the Korg editor to assign CC's, the use the NK Studio's Scenes functionality to switch between the CC's used for transport, and the CC's used to control VST's... just make sure the CC's you assign for each scene are different so they don't get mixed up. 4. Finally, if you are using the nanoKONTROL in Mackie mode, make sure you: - put it into SONAR mode ( turn on the nanoKONTROL Studio while holding down the Scene and Fast Forward buttons ) - use the Korg KONTROL editor software to configure the Scene button as Scrub - Configure your Mackie Control settings as following: ... more details here: http://www.cakewalk.com/Documentation?product=Cakewalk&language=3&help=NewFeatures.41.html
-
I normally click on the track name to focus it.
-
Struggling with vocals in the mix
msmcleod replied to RICHARD HUTCHINS's topic in Cakewalk by BandLab
If you're still really struggling getting the vocals to sit properly, you could try using Trackspacer by WavesFactory: https://www.wavesfactory.com/audio-plugins/trackspacer/ Basically, it carves out the EQ in other tracks to make space for your vocals... it's much better to learn how to do it yourself though. -
IIRC on the 18i8, it's a setting with the Scarlett MixControl software ( on the 4i4, 2i4, 2i2 & solo it's a switch ).
-
Are you using the correct inputs and set them up properly? When using a guitar, it should go into the TRS input and the input should be set to INST (as opposed to LINE) When using a mic, it should use the XLR input ( and if it requires phantom power, this should be switched on ) The TRS input is not suitable for microphones, and the XLR input is not suitable for instruments (such as guitar).
-
The history setting in Cakewalk is an undo history not a history of the clipboard.
-
BSODs are not normally caused by applications - they're usually a sign of bad hardware, bad drivers, or a corrupt windows installation. If you're running SSD drives, check that they're not on their way out - there should be software provided by the SSD manufacturer that can check the health of your SSD. If your SSD is bad... backup ASAP, and replace it. Next do the usual checks on your system from an elevated command prompt, in this order chkdsk c : sfc /scannow dism /online /cleanup-image /checkhealth dism /online /cleanup-image /scanhealth if any of the above show errors, you can run to the following to repair your installation: dism /online /cleanup-image /restorehealth If you're not getting any errors, it's likely to be a driver or hardware problem. A badly seated or damaged memory stick could cause this, so try re-seating your memory sticks and run a memory diagnostics. If all is ok here, make sure your drivers are up to date - if there was corruption found and/or fixed earlier, it's worth re-installing just in case parts of the drivers couldn't be repaired.
-
I notice in your screenshot your record bit depth is set to 16. With it set to 16, regardless of any of the other settings, your raw track data will be saved as 16 bit integer. In other words the original 24 bit audio coming from your audio interface is being converted to 16 bit. This WILL cause a significant loss in quality, and may explain why there's an audible difference. I strongly recommend setting this to 24. You can set this to 32 or 64, however this won't make any noticeable difference to your audio quality. The only reason I can think of to have this set to 32 or 64 is if you routinely use an external audio editor integrated into the Utilities menu. The external editor will be using Cakewalk's raw audio file, so you may want to take advantage of 32/64 bit FP in any external processing.
-
A clip drag/move operation is in fact a combined copy/paste operation, so: 1. The original copied/pasted clip in the clipboard is replaced by the clip you're moving 2. As the copy/paste within the move is complete (i.e. it was done as a single operation), the clipboard is cleared Any drag/move operation could essentially render the original clipboard contents invalid, so it's necessary to clear it before performing that operation. This is especially true in the case of audio, as the audio itself isn't copied to the clipboard - just its position within the audio files on disk (which may have changed by any subsequent move).
-
Setting the Record Bit Depth to 32 will record in 32 bit floating point; setting it to 64 will record in 64 bit floating point.
-
Tired of having less control with new licenses.
msmcleod replied to kitekrazy1's topic in The Coffee House
I had exactly the same "joy" with buying another Antares plugin (mic modeller). My old AVOX 4 plugins (Throat & Aspire) are activated to iLok... but the new plugin is using their new auth system. I use Aspire & Throat on multiple machines (I've actually got 2 copies, each auth'd to a different iLok), so I didn't want it losing its iLok auth so I can easily go between machines. I installed the new plugin, being careful to only select mic modeller... it proceeded to delete Aspire & Throat. I had to then go back to the old AVOX 4 installer and install Aspire & Throat (and only those two) again... thankfully it didn't blow away mic modeller. -
Behringer X-Touch - Having issues getting it to show up in CWB
msmcleod replied to Patrick Azzarello's question in Q&A
Try switching your MIDI driver mode from UWP to MME (or vice versa) within Preferences->MIDI->Playback and Recording. You can't change this if you've got a project loaded, so change it before opening any project. -
The SI Bass plugin is transposed by an octave (i.e. when you play C3, a C2 sounds). I guess the idea was that the notes were more accessible for playing with a smaller ranged keyboard.
-
Same here... I thought they were the same thing, but apparently there's a difference: https://tapeuniversity.com/industry/industrial-mro/difference-duct-tape-gaffers-tape/ TLDR... - Gaffer Tape has a matt finish and leaves no adhesive behind when you peel it off (i.e. it's meant to be temporary) - Duct Tape has a shiny finish and is a PITA to remove, leaving half of the adhesive behind (i.e. it's meant to be permanent) So if you've been using Duct Tape on your stands and you wonder why they're a mess... you should've been using Gaffer Tape.


