


Heinz Hupfer
-
Posts
560 -
Joined
-
Last visited
Everything posted by Heinz Hupfer
-

So I'm playing with the new Sonar
Heinz Hupfer replied to Terry Kelley's topic in Cakewalk by BandLab
HI:) Here on 4K I find all Fonts are very good readable, much better than in CbB! Nearly everything is in White not grey, pretty good! Bassman. -
So I'm playing with the new Sonar
Heinz Hupfer replied to Terry Kelley's topic in Cakewalk by BandLab
HI:) I used Modulation, just the first CC I found:) Transform does always work with Velocity, but often not at all and visual result is displayed only sometimes! Opened an older Project and Transform refuses to work. No chance: I've sent this file to the bakers but got never an answer! (2 years ago! I the switched to Reaper) Bassman. -
So I'm playing with the new Sonar
Heinz Hupfer replied to Terry Kelley's topic in Cakewalk by BandLab
HI:) Could you please confirm that when you drag the Transform Box (modify the CCs) to left or right, the selection of the CCs gets lost. I have to first unselect Transform, select the wanted CCs, select Transform again then can modify the CCs in the Box again. (Video down below, you can see that it does strange things! The Result is just seen one time) Doesn't happen with Modifying Up/Down. Bassman. -
So I'm playing with the new Sonar
Heinz Hupfer replied to Terry Kelley's topic in Cakewalk by BandLab
HI:) The first I tried as I installed it was the Transform Tool ind the PRV and it makes the same Nonsense as in CbB. Doesn't work or incorrectly. Making a video from it when I have time to! Bassman. -
Introducing Cakewalk Next and our new brand identity
Heinz Hupfer replied to Jesse Jost's topic in News & Announcements
HI:) To overhaul the UI is very nice and definately needed, but much more important would be to overhaul the midi engine. So buggy! Everytime I work with Midi in CbB, 1 hour at the latest problems occur. Transform Tool doesn't work anymore, Tracks stop sending out midi, pasting CC Data or Midi Data occur in other tracks than expected, and so on. The problems occur randomly, so they are not reproducable. No chance to give the bakers a project, cause after restarting everythings fine again until the next sit in. Changed therefore to Reaper (for the moment), but would like to come back to my beloved Cakewalk! (More than 30 years, since Shareware 0.97) So let's see what the Update looks like:) Bassman. -
HI:)2Pre-" As Base 57 mentioned: I've never heard a "very good" De-Esser, so I took a Dynamic EQ and do some "Pre-" Levelling with Clip-Automation. Then, if you have harmonies, you can blend "s" and "t" for the harmonies completely out, you only need one of the sybillances. I would use Melodyne for that! For sure only if Harmonies and Main Voice do sing the same lines;) Bassman.
-
HI:) danke, das war mir bekannt;) Ich weiss nicht mehr genau, aber das Problem war vermutlich dass bei Installation einer neuen Version dies wieder geändert wurde, deshalb hab ich das mit einem INS File gemacht. Arbeite seit nem halben Jahr aufgrund Midi/PRV Problemen mit Reaper, deshalb bin ich seither nur noch Beobachter. Vielleicht werden die Probs ja mit dem nächsten Update behoben, dann komm ich vielleicht wieder zurück, aber im Moment bin ich mit der anderen DAW äusserst zufrieden. Hat auch seine Mankos, wie wohl alle Progs... Bassman.
-
Lock zoom levels together for multiple different views?
Heinz Hupfer replied to quattj's topic in Cakewalk by BandLab
HI:) Perhaps you can make this with Autohotkey! Make 2 Shortcuts for Autohotkey for zooming IN/OUT For Zooming in: (1 Step) Zoom In Track View Switch Focus to Piano Roll View Zoom In Piano Roll View Switch Focus back to Track View Same with Zoom Out. Should work I think. Not tried out yet:) Bassman. -
HI:) I've 3 42" 4K TV Monitors with 3840x2160 and 150% Scaling in Win 11 and everything is fine with Cakewalk. Definitely not blurry! Not Cakewalk, Reaper, Cubase or Studio One... Cubase has very little Menufont and can't resize it with a FontSizer for example. Cakewalk is very good to read in all windows! Bassman.
-
How do I split multiple tracks at the same point?
Heinz Hupfer replied to Mark Bianchino's question in Q&A
HI:) Set the Cursor and select all Tracks you want to split or press Ctrl + A to select all and then press "S" to split the Clips. Bassman. -
HI:) Never seen those problems with freezing, but I had a lot of Problems with Midi+PRV, Transform Tool isn't working always, CC Data arise in other tracks they should not, Midi Data refuses to send to synths, can't copy CCs to other lanes a.s.o Greatest problem with midi the bugs, they are not reproducable:( Many other Users do have the same problem! Can't send any project to the bakers, doesn't make sense, every time on restarting CbB the problems are gone! So after more than 30 years working with Cakewalk I decided to switch to Reaper, with a heavy heart, cause I love Cakewalk. I'm staying in the forum and will see, perhaps someday the problems are gone and I will switch back;) Bassman.
-
HI:) I hope I can find all scripts. Cause of a lot Midi Glitches and Problems with PRV, which are not reproducable I switched to Reaper last summer and not working with CbB at the moment, but stay in Forum for sure, CbB was my beloved DAW the last 30 years:) OK, let's see, Move Notes Up/Down and Left/Right you can do with the NUMPAD! As far as I can see I deleted the Insert Note Script, but it's very easy to write it over the weekend! I attach the other scripts and load many other scripts into my cloud! The Problem in CbB is that CAL sometimes work and sometimes not, that's like Transformtool to stretch midi ccs in the PRV and working with CC Lanes, they will only sometimes work:( I have all functions on my Midi Controller, but I have to take a look how I did it, I'm sure I can change the length from the notes on grid basis.... Here the link: https://1drv.ms/u/s!Al2mKojzOW0Mk51-R-Da9Wrjq4QTxQ?e=hHoB40 Attached also the PRV Mode(PDF)ParPl-8 - PRVMode (Pre1-B1).pdf from my Controller where all functions are listed, so we can find the scripts for sure! MOve notes on grid is made with NUMPAD arrows (Nudge, set up in CbB settings, Nudge Settings, I set one to Grid(Snap)) Greetz;) Bassman. P.S. Here it is the Insert Note CAL (insert From 1 NOTE 36 100 960) . Inserts a Note at Edit Cursor with Midi Channel 1,s Note Number 36, C3, Velocity 100 and quarter length at Timebase 960) With this CAL it will be easy to insert other notes with different Note Numbers and different lengths and give the CAL a Shortcut!Insert_Note.cal EDIT: UPS instead of From it should be written Now for the Now Time, From is the From time, Thru the Thru Time.Insert_Note.cal Note_Length.cal Note_Length_+10.cal Note_Length_-10.cal Transpose +12.cal Transpose -12.cal Velocity +1.cal Velocity +3.cal Velocity -1.cal Velocity -3.cal LEGATO.CAL Insert_A#3.cal Insert_A3.cal Insert_B3.cal Insert_C#3.cal Insert_C3.cal Insert_C4.cal Insert_D#3.cal Insert_E3.cal Insert_F#3.cal Insert_F3.cal Insert_G#3.cal Insert_G3.cal Insert_D3.cal
-
Hi:) I have CAL S ripts set to Shortcuts for this: Select next/previous note (TAB and Shift TAB, no CAL) Move note left/right Move note up/down Lengthen/shorten note Velocity +- Insert notes All for Grid or ticks. I can load them up tomorrow or look at: If you download all,in the CAL Directory are the corresponding files! Greetz;) Bassman
-
AZ Controller Preset for Novation LaunchControl XL
Heinz Hupfer replied to Heinz Hupfer's topic in Instruments & Effects
HI:) If you start with Gain Access Mode, there's no Gain Knob anymore, I so often accidentically changed Gains so that I decided to have it only in Level Mode. (Long Press "Solo" Button) You can see here this Mode: Shows the Level of the selected Track in Stereo. Shortly before the Red lights is -18 dB, the Sweet Spot. You can then change the Gain of the following 7 Channels too...sometimes we have the same Audiomaterial on a lot of tracks, so Gain Staging is a bit quicker:) The Rotors 1-8 in Gain Access Mode now have a new AZController Function to save and recall Positions for that CbB Session. Go to a positon and move one of the 8 Rotors all the way to the left. If you then want to recall this position, just activate GA-Mode and push the Rotor all the way to the right. So you have 8 Positions to Save and Recall, but it's not saved with the project! It was not documented, just updated the Word and Pdf Files a few minutes ago. Everything else is fine in the documents I hope;) Bassman. -
AZ Controller Preset for Novation LaunchControl XL
Heinz Hupfer replied to Heinz Hupfer's topic in Instruments & Effects
HI:) Just Double Press the "Mute" Button (2 times within 400 msec.) . You can see the Mute and Solo States on the Button Leds, press Shift or Ctrl (Track Select left and right or double press "Record Arm" and "Solo" Buttons (my favorites)) to see other states of the selected tracks. Double Press Device Button and with Shift you can see more options in the List, LP is long Press, SP Short Press and DP Double Press! The first 8 Cells are the Buttons on the right, then the 24 Rotors, a line of other Infos, the Faders and the Buttons, for example in the first row down the 13th cell you can see the actual measure of the Play Cursor, Use the 1. Fader in Normal Mode (Device and Mute" Buttons not blinking) and you can see it rising, the right cell to the right are the names of the markers) If you press the GainAccess Button you can see the Fader Values and the names of the selected Tracks! I think you'll love this list if you work with it, especially very helpful with the ACT Mode and Plugins or the ProChannel Mode (Long Press "Mute" Button, you can see the values of the controls and don't have to open ProChannel to see what happens in the EQ or Compressor! Have fun;) (Double Press "Device" Button to see the list, Double Press "Mute" Button and you can see the values of the ProChannel of the selected Track. Then press "Send Select Down/Up" to switch to the next/previous track and the values are changing (hopefully;)), so no need to open ProChannel, just work with the list! Please read the documents, there are a lot of informations in it. I have not actualized it for a long time, so if you can find wrong things please correct it ans send it to me! Thanks;) Nice that someone uses this Preset. I know it's completely overloaded but I just wanted to show the possibilities of AZController. Cause I switched to Reaper (massive Midi Glitches in CbB caused me to work with another DAW!), I do use Cakewalk just for older Projects. I love CbB, but since I have to work a lot with Midi it's sometimes a mess to work with and I'm very happy with Reaper at the moment and made a similar Controller Preset with ReaLearn in Reaper so I have almost the same Controller:) Gain Access Mode is the most used Mode I think, so just write if you have Problems! Some things don't work correctly, especially the Edit cursor in CbB do sometimes work and sometimes not, that's very buggy in CbB and it was in Cakewalk! Have fun with the preset! Greetz;) Bassman. -
HI:) @jackson white Never used it, but as I see, I have to take a look on it, thanks;) Bassman.
-
HI:) On small speakers it's not possible to hear frequencies under 100 Hz for example. So instead of rasing 80 Hz (Key of E) on the Bass, use the first, second and third Overtone in the mix. 160, 240 and 320 Hertz, depends on the Key the song is, so in "G" the frequencies are around 100, 150 and 200 Hz. (Just download a frequency table, 1.Overtone x2, 2. x2,5, 3. x4) Try it out;) Greetz, Bassman.
-
Is CPU Intel 12700 (without K) good for Daw ?
Heinz Hupfer replied to Sakini's topic in Computer Systems
HI:) Bought a 12700k 2 weeks ago and I'm very happy with it. First I got Problems with heat and a loud FAN, but I accidentically put the CPU FAN in a wrong direction on the Cooler? Now I have temperature form 42° to 55 ° C. I dimmed the CPU to MAX 100W and in my largest projects I have a MAX from 10 - 15% CPU Load, when I had with the same Projects 30 - 45 % Load on an 9700k. If I need more Performance I can raise the speed and the MAX Power, but absolutely not necessary, don't think that my projects are getting bigger. For sure the 12700 with 65 Watt will be not as "loud" , but it's only 33 dB (I'm listening at 80-85 dB) at my listening position in studio, not really loud. I couldn't hear my 9700k, that was great, but I can live with these 33 dB;) Greetz;) Bassman. -
HI:) First of all I make a copy of the Track and Archive it! I'm starting with Clip Gain automation for too loud and too soft pieces. Listen with the rest of the Arrangement For Voices next I lower sharp "s", "t", "sch" and perhaps "P", not with automation. Sometimes I cut those and put it on another track and now I can make them softer. Never heard a really good Deesser! Then Compress everything, but not too heavy, max 3:1, 5-6 dB Gain Reduction. On Bass or Synths much more, 8:1 (10 dB) Next Equalize it. Effects for the Track. Perhaps change again some pieces, with Reverb and Delay you can hear bad behaviours much more. At the End Track Automation with the Rest Mix. I don't like Compression so I always try to use it very subtle. Hope that helps;) Bassman.
-
[SOLVED]Problem with porting Projects to another PC
Heinz Hupfer replied to Heinz Hupfer's question in Q&A
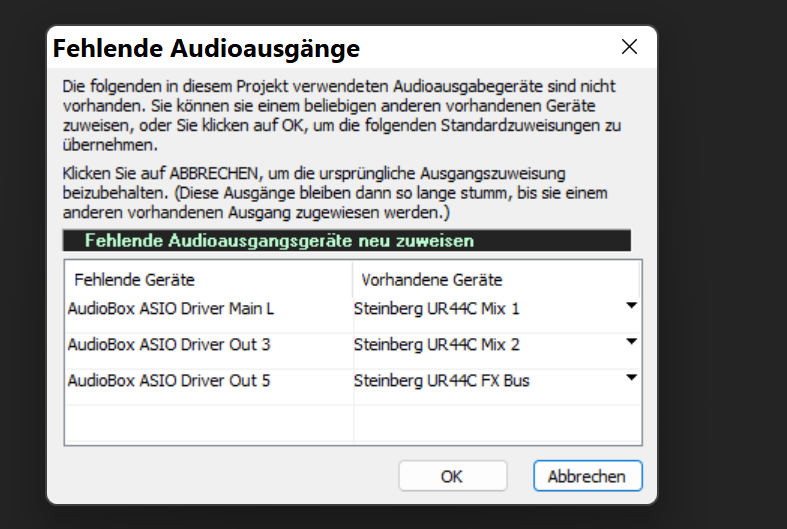
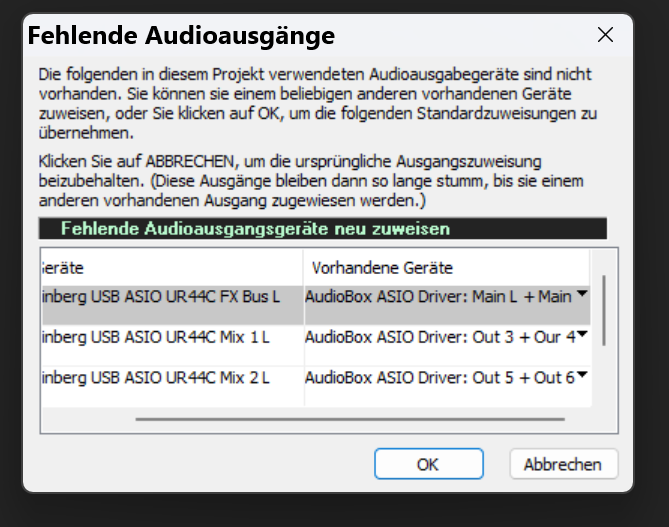
HI:) Solved! Renaming the Outputs on both PCs did the trick, I just numbered them correctly and now it works. @Kurre Thanks for pointing me in the right direction. It seems they are ordered Alphabetically! Thanks to all for helping;) Greetz;) Bassman. -
[SOLVED]Problem with porting Projects to another PC
Heinz Hupfer replied to Heinz Hupfer's question in Q&A
HI:) @Cactus Music 2 complete different Interfaces, as you can see in the pictures. Steinberg UR44C in my Office Machine and Audiobox 1818VSL in my Studio PC. Now, yesterday I did a complete New Install of Win 11 and CbB (Studio PC) cause of some glitching Problems with a large Project and the same problem occurs with this Outputs 5 and 6, it shifts to the out 1 and 2. doesn't happen if I deactivate 5 and 6 in the device manager on the Office PC (I do not use "really" these Outputs, they are Dummy outputs for the Master Bus, muted for output) Means, I have a Mixbus with a Send to Outputs 1 and 2 (The Send I use for Loudness of my Monitors), which goes to the Masterbus with A Loudness Meter on it, but goes to Outputs 5&6 muted. On 3&4 I have a second Monitor Pair with a second Send(Small Speakers). Mixloudness with Mix Fader, feeding the Loudness Meter on Masterbus. So if I deactivate 5 and 6, the order is on both PCs the same, on activated 5 and 6 , these become 1 and 2 on the other machine. But why? Greetz;) Bassman. -
[SOLVED]Problem with porting Projects to another PC
Heinz Hupfer replied to Heinz Hupfer's question in Q&A
HI:) @Cactus Music On both are the newest drivers installed, but I can see an FL Studio driver greyed out in the audio devices in office but not in studio. Perhaps this interferes with the list? don't think so, it was installed since a year or so.... Trying out... @Kurre There's no possibilitiy to order them! @sjoens For sure I can click and reorder them in this window, but then I have to order it on every project port from office, and I do it a lot vice versa! Not very practicable! And it always worked before... Greetz;) Bassman. -
HI:) 2 PCs with different Soundcards. Porting from my Studio to my Office all is fine, the Outputs are in correct order, look here: In the other direction it changes the order since the last update: FX Bus from UR44C is in first place but it should not be, these are the Outputs 5/6 on UR44, so what happened? Can I change this again? Thanks;) Bassman.
-
Can a song in C major key uses black note?
Heinz Hupfer replied to Lummy Keen's topic in The Coffee House
HI:) This upper Song is in G Major! So you have: G Am Bm C D/D7 Em and F#m5- In addition you can use the Dominant Sevenths of the "normal Chords" D7 E7 F#7 G7 A7 B7 and C#7 In the Song is used G B7 C Cm So, clear is G and C as Tonic and Subdominant and B7 as Dominant of the E minor. Unclear is Cm, but often used as a way to lead back to the Tonic G. But it sounds strange in this song... Hope this helps;) Bassman. -
HI:) Finally caught the Controller Problem in the PRV. Sometimes it happens that I can't edit visible controllers. In the video you can see that the CCs on the left are editable but this one at the right not! This happens I think on every working session I have, but I can't say when and why, it's not reproducable! All notes are in the same clip, nothing is muted, but I know I before moved the clip 200 ticks to the left with the CCs moving along. The only possibility is to delete it and insert a new one for this session. If I close the project and reopen it it works again! Same with Transform Tool ( I mentioned this earlier and you got a project of this problem) , sometimes it works, sometimes not. Thanks for eventually helping;) Bassman. P.S. Video from Transform Tool 1. It changes CCs even if I have not selected anything 2. I change the middle edit point and the selection goes away 3. Some other points doesn't unselectsome do unselect the data.


