


-
Posts
8,638 -
Joined
-
Last visited
-
Days Won
30
Everything posted by Starship Krupa
-

Freeware Instruments Thread
Starship Krupa replied to Starship Krupa's topic in Instruments & Effects
What would concern me more is that the company would go casters-up and take the servers off-line. Since it looks like what happens is that you send it data and then it sends it back in a form that you then import into your project (where it becomes part of the project), it seems that all that would happen if the servers went offline is that you wouldn't be able to get your data converted any more. My guess is that their business model is to allow certain features for free and then charge a subscription for access to premium ones, or they'll limit the number of processing sessions per month or whatever. It became much less interesting once I figured out that your computer sends them the data, then their servers process it and send it back. And yes, the URGENT!! in the video title gives it the fragrance of Astroturf. -
I, too, picked up that freebie. Was it Beat Magazine? Whatever, I wish that I could find more use for it. It does exactly what it says: it's a 909 and not much else. If I could load samples into it as I can do with Audio Realism ADM CM, and if it could switch between sounds (808, 707, 606, CR) but it can't, it's....a 909. I guess if it could do all that it would have the exact same feature set as the full ADM, but that's out of my range at $95.? BTW, if you're into this kind of slavishly-imitated Roland beatbox, check out the Computer Music version of ADM. It can do everything the full version can except that it comes with a 606 kit and can't switch to other Roland sounds. You can make a kit for those out of samples.
-
this program is NOT User Friendly.
Starship Krupa replied to thatoneXman's topic in Cakewalk by BandLab
I'll watch out for them next time I watch 24 Hours of LeMans! (bucket list: camp at LeMans) -
He didn't say that he stopped and grumbled. ?
-
Favorite Freeware FX Thread
Starship Krupa replied to Starship Krupa's topic in Instruments & Effects
It's not tied to any particular iLok account until you put in the activation code, so if your um, housemate got another activation code and um, gave it to you, and you used it to activate on your iLok account, the iLok'd license would be yours. It would still be in the cloud for the laptop, but at least it wouldn't make you kill the session on the other computer every time you wanted to use it. -
Question About CPU load among DAWS
Starship Krupa replied to Stephen Rybacki's topic in Cakewalk by BandLab
Stephen, Your system should run any of those DAW's just fine, so I'd go with the one you like best. If I were you, I'd check to see if that Ivy Bridge motherboard of yours can take an i7. My main DAW is an Ivy Bridge with an i7 3770 in it. These older CPU's can be had for very little, and the more cores the better for DAW use. I even pulled the i5 from my ancient laptop and put an i7 in it, and it runs Cakewalk pretty well with 8G of RAM (maxed out). The fan runs more and battery life went to heck, but Cakewalk likes having twice the cores to play with. Both of my systems do have discrete GPU's. I'd also get a cheap second hand nVidia card to put in there. Either or both of those upgrades will be easy on the wallet and give you a perceptible increase in smoothness. The internal HD4000 graphics could barely keep up with displaying Console View or Piano Roll on a second monitor. Nothing bad happened, it would just take longer for it to page the images in and out of memory. You could see it putting up a grey box and then filling it in with the various screen elements. Sidenote: we call solid state storage devices "hard drives" because they are physically hard, as opposed to flexible, which was the most widespread non-volatile mass storage technology before drives where the medium was hard metal disks. Flexible plastic disks with rust on them gave way to hard disks with rust on them, which gave way to hard slabs of melted sand. Why a mechanical box with a whirling plastic disk in it would be called a "drive" is the big mystery to me. I get the "floppy" vs. "hard" thing. But "drive?" What is it driving? Container, tank, cache, box, locker, these are all terms for storing things. Now we're stuck with a plastic-encased bit of silicon being called a "drive." It goes back at least as far as paper tape. -
So....you decided to try letting it expire and see what happened. You knew ahead of time that use of the program requires an activation that expires unless you refresh it, and you let it expire, and were totally surprised that there were negative consequences. As far as there being no warning that saving is disabled once activation expires, that information is all over the forum that you've used to complain about it. If you start the program in non-activated mode, this is prominently indicated on the Tools Module, which is the most used Control Bar module other than the Transport. The current version of the software does start warning the user as the re-validation date approaches. Of course, you have to run the program to get the advance warning, you can't just install it, wait 7 months, then start it up and have it work without first connecting and re-activating. Cakewalk is licensed under a free subscription, like Tape Op and other trade publications. You don't have to pay any money for it, but you do have to re-verify every so often. With Tape Op, it's a year. With Cakewalk, it's 6 months. It's not "free software," where you don't need to give any consideration at all in order to use it, you have to create an account with BandLab and at least every 6 months connect your system to the internet and log in to BandLab's site with a browser that's compatible with it. If that is beyond what someone is willing or able to do, they should choose another program. I have declined "free" software when I've decided that there are too many constraints or hoops to jump through. Not because I was "scared," but because there are many available options and everything has a cost:benefit ratio. Accept one of Waves' freebie licenses, you will be required to create an account with a valid email address, through which you will be bombarded to the end of days with offers to purchase more of their products, license extensions, subscriptions, etc. It's all in the game.
-
documentation Young Lady's Illustrated Primer to Theming Cakewalk
Starship Krupa replied to Colin Nicholls's topic in UI Themes
Unless they become part of the YLIP. -
See my sig.
-
Cakewalk stretches when I just want to slip edit
Starship Krupa replied to Starship Krupa's topic in Cakewalk by BandLab
I think I know what I did to induce this behavior. Since I'm sometimes a buttermouse, I get used to using the Shift key for constraining horizontal or vertical movement, often in conjunction with Ctrl for copying, in the Piano Roll. I probably accidentally grabbed a clip edge while I was holding Ctrl+Shift to make a constrained copy. Wouldn't want to slip with the mouse and have the clip end up on the wrong track. Because it would certainly be the first time....? I'm an advocate for editing skills consistency between different Cakewalk views, and making it as difficult as possible to generate unintended results, but some of Cakewalk's horses escaped the barn so long ago that their descendants managed to swim to offshore islands and start vast wild herds that are now genetically distinct from other horses (notice how I strrrrrrretched that metaphor?). Thanks for the helping me figure this out. I knew I could count on the mighty forum. -
this program is NOT User Friendly.
Starship Krupa replied to thatoneXman's topic in Cakewalk by BandLab
Easy: Cakewalk: hot-rodded vintage Dodge. Lots of quirks, manual shift, but on certain types of tracks (heh heh) it can blow the doors off of more recent rides when under the control of a skilled driver. Much-imitated to this day. Requires addition of third-party add-ons to be competitive. Parent company changed hands multiple times, got to the point of bankruptcy before being rescued by foreign interests. Fun for everyone, but it's especially loved by men over 35 who think that anything newer (which is just about everything) is for kids or dilettantes. Studio One: Hybrid. Modern, efficient, clean, but the version that is plug-in enabled costs substantially more. REAPER: Indy Car. Takes a long time to get good at it, but once you do, you can really fly. The more you customize it past the standard configuration the faster you can go. Some people pay to use it, others don't. Seems to go a long time between fatal crashes. Pro Tools: SUV. Annoyingly ubiquitous, overpriced, consumes more than its share of resources, people who use it seem unaware of the existence of other vehicles. Was considered cutting edge long ago, now it's the choice of responsible grown-ups with well-paying jobs who can't imagine living without it. Ableton Live!: Lowered Acura with neon lights, 12" subs, wide tiny profile tires and ground fog effect. Popularity is outstanding among teens, veteran users find it somewhat harder to see the appeal. Awesome for doing loops that kids love but old people think is just noise, although the world is starting to get the drift. Samplitude: Citroen. Made in Europe, said to be reasonably popular there, but you don't know anyone who uses it. Mixcraft: Mini Cooper. Fun, easy to operate. Will get you to your destination, but runs a greater risk of being outgrown. Cubase: 80's Volvo station wagon. Still popular among broke working musicians who originally got it for free. Not the sexiest, but retains its utility over many decades, will likely never die until all of its kind have become obsolete. Also been through multiple owners. FL Studio: Volkswagen E-UP/HondaE. Excels when used in an urban environment. Demographic skews younger; older ones are concerned that you can't get far enough with it. -
Send them the link to the documentation page scook posted. "Benefit from 96kHz processing without the hard disk and CPU strain that recording at 96kHz produces" Pretty tasty. Having said that, I never oversample past 2X, because I can't hear any difference. There can be a difference with certain types of plug-ins, such as distortion and synths that are heavy on the square waves, but whether it's audible or not is also down to individual plug-ins. The thing people should be doing if they really care about this is doing some critical listening with the track solo'd and also doing null tests, where you compare bounces of the track with and without the oversampling enabled using analysis tools. I think it's better to understand and know what's really happening with the tools than it is to just crank the oversampling up. Supposedly oversampling can also introduce issues of its own, but I don't know what they are. I know a good plug-in that cuts it output in half if Cakewalk oversamples it while running the 64-bit engine. It's important to remember that you can get ugly artifacts by slamming the input of a plug-in with the output of the track/synth or previous processor. I was getting this recently. The best tool for finding this inter-sample clipping is the freeware analyzer Bitter. If one wishes to really enter the oversampling wars, Meldaproduction plug-ins can set their internal oversampling as high as 512X, and have an option for higher quality oversampling. This is one of the "pro" features that gets added to the FreeFX Bundle plug-ins when you buy the upgrade license (wait for a 50% off everything sale): As you can see, I keep it at 2X for rendering only, and turn off the high quality oversampling. The Meldaproduction documentation is uncharacteristically very informative about oversampling: Also keep in mind that many other plug-ins also have their own internal oversampling settings, which when combined with Cakewalk's, can take the frequencies out to freakin' ultraviolet.

-
Favorite Freeware FX Thread
Starship Krupa replied to Starship Krupa's topic in Instruments & Effects
I first picked this up back in November, and the only issue I had with the Cloud Activation is that every time I switched back and forth between my tower and my laptop, I had to do a dance of closing the session on the other computer if I wanted to use the plug-in. I now have a physical iLok2 and managed to get a second license, so I put that on the dongle and let the other one float. I keep the dongle on the tower computer and it no longer complains on the notebook. If Slate only allow one per customer, maybe a housemate or partner or whoever can get a license and give you theirs. The big pain is that it can't install to the computer's PACE system, which makes things weird on the laptop, to which I am loathe to attach dongles. Maybe the freebie is also a test of how customers respond to the cloud licensing? Anyway, I'm willing to jump through a few extra hoops, because the thing does what it does better than anything else I've tried. That it has a midrange control along with the "air" is really handy. -
Air Music Tech Hybrid 2020 and select Expansion Packs
Starship Krupa replied to cclarry's topic in Deals
I love the pads and the arps. I also managed to get my head around it enough to figure out a sound I had in my head, starting from scratch which is trés unusual for me. I tend to be a preset jockey, just let me turn off the reverb so I can replace it with Phoenix Stereo and I'm happy. Hybrid follows the traditional subtractive synth model just closely enough that general synth tutorials apply to it. A scalable GUI could get an upgrade fee out of me, but they would need a programming staff to do that and I'm pretty sure they ashcanned all of them years ago. The engine is still superb, but man, it would be nice to be able to scale that GUI up. Same with Boom and Drumsynth 500. Not so much Xpand! 'cause it's a ROMpler and there's not much in the way of knob-twiddling to be done. BTW, for any AIR fans out there who never got the manuals (most of which don't come in the installers and aren't available on their website), I have managed to collect most of them, so if you want them, just ask. -
Air Music Tech Hybrid 2020 and select Expansion Packs
Starship Krupa replied to cclarry's topic in Deals
I love Hybrid, and 5 bucks is a great deal, but in case anyone's confused, "Hybrid 2020" is the exact same synth as it was years ago. In 2020, they found a problem with the installer and fixed it and started calling it "Hybrid 2020." "Now without unwanted PACE driver rollback!" -
If you already have enough "cheapo crap," you could get something that is actually quite good like Initial Audio's Slow-Mo or Reverse for $9.99.
-
Cakewalk stretches when I just want to slip edit
Starship Krupa replied to Starship Krupa's topic in Cakewalk by BandLab
There's not really anything out of the ordinary in the full screen view. Looking more closely, the clip I copied from also has the "178%" on its header. I have used stretch maybe two other times, in much different contexts, so all this is new to me. I guess this is my message that it's time to study up on stretching. -
Ah, so that was you! Thank you so much, John, all the goodies that came with it, especially the manual, were great to have. It was unusual in that unlike most CM software, you didn't have to answer a question. I guess the idea was to get people to create Cakewalk accounts. There's some sneaky stuff you can do by also downloading the full SONAR demo. Since it comes with Dimension and Rapture, although they are demo versions, the sounds may be copied off and installed in Rapture Session (which you can get with Home Studio). That Cakewalk account turned out to be very valuable once I started using CbB. Around here, it seems like everyone with a Cakewalk login also has a SPlat license anyway.
-
ProChannel Concrete Limiter Missing
Starship Krupa replied to Tay Zonday's topic in Cakewalk by BandLab
Not entirely true, unfortunately. Last time I checked, Boz only has Bark of Dog II available for download. He may be offering Bark of Dog I by request, but the Panipulator build that is now available doesn't include the PC module. I've asked him twice if he could make the Panpulator PC module available and gotten zero response both times. -
None of those things are available to users who started with CbB. I got lucky, I happened to have an old Cakewalk login from when I registered to get my free CA-2A license. I did some aggressive digging and found the free Cakewalk SONAR Home Edition that apparently was magazineware at some point. I downloaded it and got all the DXi effects before they were included with CbB, also Rapture Session and some loop libraries (from Big Fish?). and FINALLY at that point, a pdf copy of the SONAR manual. I think the Linear Phase EQ's would be nice to have, the rest, whatever. Xpand!2 probably covers everything I'd use Rapture for. The CA-2A in VST form with the full GUI would probably make some people happy. I only ever use mine as a ProChannel module.
-
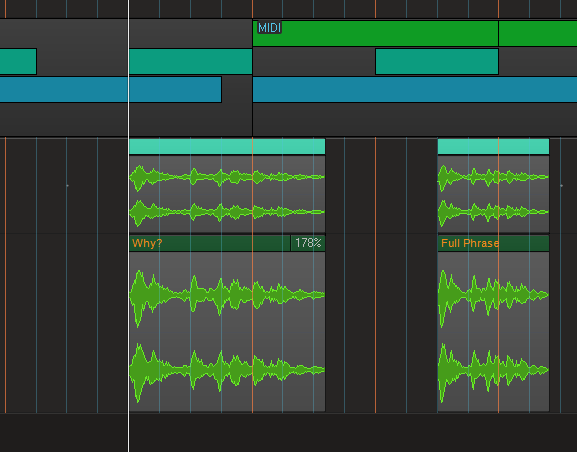
This is actually a happy accident, because as often happens when I'm doing an EDM track an unintentional result winds up sounding cool or opening up possibilities I hadn't been considering. I have one dialog phrase sample that I'm dropping in from time to time, a girl's voice saying "Why is it you wish to...." I'm chopping it up into "Why? Why? Why?" "Why is it?" "Why is it you wish?" "Why?" "Why?" etc. as you do in this genre. All was going fine, copying and pasting the clip along the timeline in multiple locations, slip editing, copying and pasting the slip-edited phrase, and so on. This is the most basic way of working with audio clips, or so I thought. Then, during my breakdown section, I decided I wanted to put in a few more "Why?s" and copied and pasted one. Then I decided I wanted more of the original phrase and dragged the right edge out to get it and this is where things went unexpectedly: The figure "178% appeared in the clip header and the phrase was slowed down with no pitch change. Sounded very smooth, that is one pimpin' algorithm there. But not what I wanted. I figured that I must have been holding down a key or clicked in the wrong area of the clip or something, so I deleted the clip and pasted it in again. Carefully grabbed the right edge, dragged it out, and....178% The cursor isn't switching to the stretch cursor when I do this, so I don't know what could be making this happen. As it turns out, the phrase actually sounds better time-stretched because the girl is talking kinda fast (and that algorithm is really frickin' smooth), so I want to explore this more, BUT I don't want to be doing it by accident, I want to be in control of it. What did I do wrong (right)? How did slip editing, something I've done hundreds of times in Cakewalk, suddenly start time stretching? I will toddle off to bed as it's 5AM and the track is sounding good, so this seems like a good time to stop, go beddy, and wait for answers from the forum. Behold yon clip with the sigil "178%" upon its header. The one to the right of it is the full phrase, non time -stretched, so you can see the stretching that went on. It's like....the first clip is about....178% the length of the other one. Coincidence? I think not.
-
documentation Young Lady's Illustrated Primer to Theming Cakewalk
Starship Krupa replied to Colin Nicholls's topic in UI Themes
Turns out that Browser/Media Tab (no corner) and Media Tab (narrow no corner) are actually used. They are for when the Browser is docked at left and not responsible for creating a nice chamfer on the upper left corner of the pane. When docked at left, he tab is buried next to the float, dock options, and collapse buttons: Why is it that purple-y themes are so good for noticing this stuff? I wonder if we could have gotten Prince to try Cakewalk by showing him a purplecentric theme. I suspect that EVA 01 is the only one that is intended for actual use.
-
As I've mentioned before, Craig, I bought my first Craig Anderton book in 1982 and it literally started my career in electronics (first project: Tube Sound Fuzz, which I still have around somewhere). Which eventually led to me having my own stompbox company 20 years later when the boutique boom started (I still have parts purchased at Mike Quinn's!). I have a lot to thank you for. I'll start recommending your book more to newbies. There are so many things in there that aren't covered in the Ref. Guide. I hear ya about the marketing frustration. I would love to be able to buy official Cakewalk t-shirts and stickers (for my laptop lid of course). Which are, of course, great advertising in and of themselves. Even just setting up a Zazzle store would be great. Takes less than an hour and you kick back and collect the earnings. I suppose it's the price we pay for the awesome developer-driven path Cakewalk is now on. Bandlab having hired the cream of the engineering staff but none of the marketing staff. ? It seems like all Bandlab do to promote Cakewalk is give the bakers rein to keep making it a better program, which is AWESOME for people who are already hip to it, but not so great for getting the word out. Such a mystery why they don't do any of the things you mention which seem simple. Publishing music magazines and not advertising your own products in them seems so odd. Noel himself maintains the KVR page. Just having someone on an intern level to do a newsletter or whatever.
-
It's a pity this person seems to have disappeared after one single teaser post back in April (this was their only message on the entire forum). They even influenced the round buttons for Yellow Submarine and EVA 01. I wouldn't hold out much hope of ever seeing this one released to the public. If you want the round buttons, you'll find them on EVA 01 or Yellow Submarine. They're also of course swipeable, just like any theme element.?


