


-
Posts
8,601 -
Joined
-
Last visited
-
Days Won
30
Everything posted by Starship Krupa
-

Sooo.... What did everyone get? (Not A Deal, Full Kontakt Not Required)
Starship Krupa replied to husker's topic in Deals
Regarding @Carl Ewing's visual comparison of channel strips, I really like the most recent iteration of Eventide's UltraChannel. There are knobs, buttons, and sliders, and they look enough like those things for their functions to be clear. However, there's no imitation 3-D stuff, no drop shadows or reflections. I think it fits between the bx and the Softube. I don't like the Softube, I don't really want to learn a new control paradigm, knobs and sliders are fine. I just prefer the flat look over the 3-D. No offense intended to those who prefer them (even I love my T-RackS processors), but those screws and 3-D controls feel like 70's simulated woodgrain to me these days.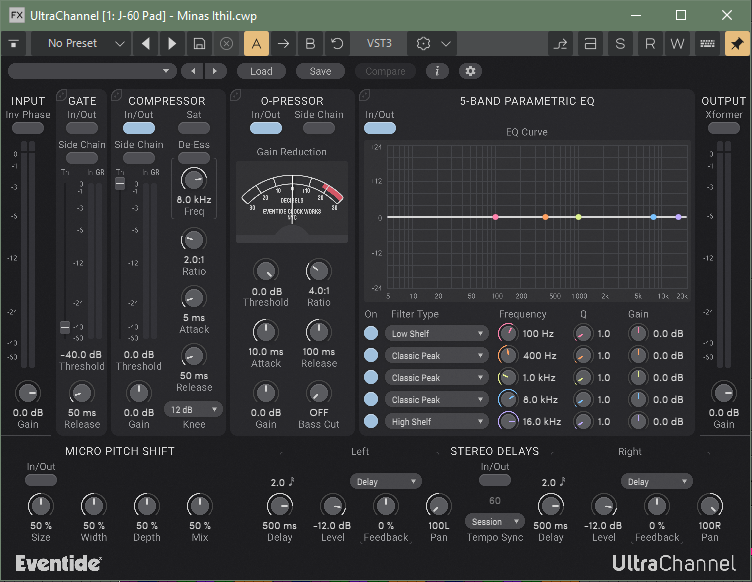
-
You'll find Modules Manager in C:\Program Files\IK Multimedia\T-RackS 6. Run it and you'll likely be delighted to see what it does. Background/tl/dr: I had read the blurb about T-RackS 6 before I Bumble Hundled it that mentioned that they had added the ability to only install the modules you own (or wish to install). The spamming of unowned modules is a longtime complaint about T-RackS. By default, they dump every module in the line into your VST3 folder, which causes them to show up in your hosts' plug-in lists with no indication as to whether you own licenses for them or not. So two types of clutter, both hard drive and visual. In the past I solved this by creating a "bullpen" folder where I would move unowned modules until such time as I acquired licenses for them. I expected this ability to be part of the installer or built into IK Product Manager, but it's not. Weeks later I was doing some cleaning work on my C drive and poked around in IK Multimedia's programs folder. That's when I discovered Modules Manager. Modules Manager allows you to see what licenses you own and choose to only install those modules. IK seem to be still into the idea that you (or they) want to dump the unlicensed modules onto your system, and some of the design of this tool reflects that. So you need to be careful when using it. When you first run it, select "Show All" in the left column. Then you can look over on the right and see the ones you own and the ones that are only available as trials. Toggle the button as appropriate for each one. Then click "Apply Changes" down at the bottom. This will remove unwanted modules. What to watch out for is that the next time you run it you may get a message about how your installation doesn't match your preferences. Do NOT click yes to this dialog. If you do, it will reinstall all of the modules you previously excluded. It's a useful tool, you just have to keep an eye on it.
- 5 replies
-
- 13
-

-

-

-
Wow, $129 for a refurbished 4i4 is a great price. I like refurbished gear. It often means that it was either an open box return or a warranty return due to whatever factory defect (defects happen) that has been recertified (and repaired if necessary). So what? Well, whereas final QA on the manufacturing line is performed by people who just connect it to the test rig and push a button. Go or no go. And these days, often/usually done in China. Returns are usually processed by higher level technicians who know how to make repairs and adjustments. And depending on the company and the individual unit, it might be done in the US office. So such units can end up being very well gone over.
- 1 reply
-
- 1
-
-
Here's a tip for anyone using MeldaProduction plug-ins: when you go into Settings/Style and select a style, there's a selection of color presets, and you can download color presets from the Online Preset Exchange. I've uploaded a couple for my favorite style, Argon. Mostly I turn the background darkest black and use aquamarine text with burnt orange highlights. I highly recommend fiddling with Styles and colors with MeldaProduction's plug-ins. I agree with those who say that the stock style and colors are....plain? Fugly? Whatever, their basic UI is purely functional, designed for high visibility over sexiness, and I find that it increases my enjoyment of using them if I can give them a color makeover. I like the darker styles like Argon, Titanium, and Uranium Dark. I'd love to dig deeper into Styles and even Devices, but it's pretty complicated and has the traditional MeldaProduction minimal documentation.
-
Sooo.... What did everyone get? (Not A Deal, Full Kontakt Not Required)
Starship Krupa replied to husker's topic in Deals
I'll claim here that there's a difference between "easy-to-use" and "easy-to-learn." There's also a difference between (what used to be called "shrink wrap") software like Sonar or Vegas where there are a zillion features, some of which may be touched by the user only once over a matter of weeks or months, or even never, and software designed for a more specific task like data entry or point of sale. In the second type of software, the user is expected to be given intensive hands-on training and then probably at least at first, operate it with an experienced user close at hand, ready to answer any questions and give useful advice. In the former type, the user will have nowhere to turn to except documentation and Reddit /YouTube/forum (if the program has a large enough user base to have a useful Reddit/YouTube/forum community). With these two types of software, there's a big difference in the importance of how easy features are to figure out. In the case of DAW or NLE software, the user could go long enough between using a certain feature that they don't remember how to access and use it the first few times they need it. In the case of DAW software, it's important for the export/render features to be easy to figure out because of how infrequently a user may actually get a project to the point where it's suitable for rendering.😒 Deciding which features, options and operations should be the more "front-facing" vs. buried behind menus is important. Case in point: MeldaProduction's MDynamics vs. MCompressor, MModernCompressor and MLimiterX. MDynamics is the flagship and wins hands down in the "will it do what I want it to do" category, but I have used it on exactly zero projects despite having access to every MeldaProduction processor (and instrument). On the other hand, I use MCompressor and MLimiterX all the time, and even use MModernCompressor (MeldaProduction's Edsel) occasionally. Why, when MDynamics will do any dynamics processing task you'd ever want to do? Its feature set eclipses the other three. The answer is that MCompressor and MLimiterX are easy to learn and easy to use, and MModernCompressor has one important feature front-facing (this would be the ability to select different types of detection algorithm, including "psychoacoustic," which is buried 3 configuration screens deep in MDynamics). It saves me time and loss of flow to be able to set up the less capable processors so quickly and easily vs. the more complex and capable one. Of course, if my task were to do nothing but set up dynamics all day long, and I had to choose only one of them, MDynamics would win hands down because once you get good at it, you can do everything with it that the other three do, and probably just as quickly if it were the only choice. Despite having to negotiate multiple menus to do the same thing, I could get good at it to the point where it wouldn't matter. Much of MeldaProduction's product line has been revolutionized by the addition of "devices" that present subsets of the products' features in a variety of simplified formats with more skeuomorphic UI's. You can still ignore those and use the products in their "under the hood" mode, but I am sure that the devices have helped sell a lot of plug-ins and have helped a lot of existing users make more use of them. So software isn't always just software, design philosophies and objectives can vary depending on the intended audience and function of the program. -
VEGAS Pro 22 and SOUND FORGE Pro 17 Humble Bundle $45+
Starship Krupa replied to MusicMan's topic in Deals
Grumble grumble, while Vegas 22 would be an upgrade, I already have that version of Sound Forge Pro. Pondering whether a single digit upgrade of Vegas is worth $45. Any Vegas users help me out as to whether it's worth it? I've never clicked with Movie Studio or Music Maker. -
I, too am a "splitter," despite having begun using the program when CbB came out. One thing that I do regularly that I'd find more difficult to do with a Simple Instrument track is drive multiple synths with a single MIDI track. Although, frustratingly, Sonar has no native way of doing this, it can be done with the help of certain MIDI plug-ins that themselves include MIDI out. Part of my song creation process is to experiment on the fly with different sounds, especially drum sounds. Having the MIDI data separate from the drum machine allows me to quickly switch back and forth between two different drum machines. When I was first learning CbB, separate MIDI/Synth tracks just seemed more versatile, so I got used to using them. I agree that part of the Sonar culture still seems to involve hanging on to old workflows so as not to disturb the set in their ways grumpy old man contingent. I've learned to emphasize the word "option" whenever I make a FR like this one, because there will inevitably be someone totally opposed to whatever change and don't want to be forced to adopt it.
-
Sooo.... What did everyone get? (Not A Deal, Full Kontakt Not Required)
Starship Krupa replied to husker's topic in Deals
Okay, I need to set something straight here, as I got a fact wrong about a line of virtual instruments that I really like. Chromaphone is NOT the only A|A|S synth that lets the user mark favorite patches. There is a valid reason that I got it wrong, which is that the synths' UI's differ and it can be difficult to find whatever they are calling the preset manager. I've been using them more in the past few days, and poking at them more. As I discovered, 3 of them actually allow the user to set favorites among the zillions of presets. That amounts to less than half the line if you count Player, which a lot of people use. Details, in order of modernity: Chromaphone 3 has the most contemporary UI and has the ability to mark favorites. Ultra Analog VA-3's editing panels still party like it's 2015, but the front-facing UI looks similar to Chromaphone 3, complete with a similar browser that allows marking favorites. Lounge Lizard EP-5 has most elements of the newer look, including being able to mark favorites, but it varies from the above in that you click on a button labeled "Library" in order to open the view that the others call "Browser." There aren't as many editing options with this one anyway, Multiphonics CV-33 has elements of the new UI but as far as I can tell, only has a list of patches, not the full-featured browser that the above 3 have, missing the very important (to me) ability to mark favorites. String Studio VS-3 has the old "Session" style UI, but it does have a browser that allows you some of the category sorting that the other newer browsers do, but no favorites and the browser is hard to find, the button for it is just an unmarked down arrow next to the previous/next patch buttons. Strum GS-2 looks and functions like Strum Session, except it can also load soundpacks. No favorites here either. It's the one most in need of a UI refresh. Overall it looks like they got the Chromaphone 3 UI just like they wanted it, then transplanted elements of it down the rest of the line never making it down to Strum GS. -
Mic Parts has interesting ideas for mic upgrades, and an interesting business model (people love to customize and upgrade our stuff) but they really undermine their credibility with the $99 IEC cable. Kinda makes me wonder if their prices on other things are inflated. The idea of "Compared to stock AC power cords or even premium cables at similar or higher prices, NRG-X cables have always delivered enhanced bass definition, improved transient articulation, greater soundstage scale, and more of the precious spatial cues that bring recorded music to life." Some of this is due to "Direction-Controlled Long-Grain Copper (LGC) in a Semi-Solid Concentric Topology." Are they implying that they somehow found a way to make a copper wire conductor directional? This would be an odd thing to have in an IEC cable, because IEC cables carry alternating current....
-
To answer the question in the topic title, the "MIDI+Keyboard" icon was retired from service with the introduction of Cakewalk Sonar. The MIDI jack icon is used for MIDI tracks. The keyboard icon is used for Synth (VI) tracks. There is no longer a special icon for Simple Instrument tracks (which are tracks that include both the VI and the MIDI tracks displayed as one unit), which leaves the "Keyboard" icon to do double duty on both Synth and Simple Instrument tracks. Long form blather: While I do agree that it would be handy to be able to tell at a glance when a track is a synth track vs. instrument track, not being able to tell is better than having it be backwards. And the way it was was backward: the "Keyboard" icon was displayed on Simple Instrument tracks while an icon that consisted of the "MIDI" and "Keyboard" icons overlaying each other was displayed on Synth tracks. There was a lot of lobbying, especially from the theme creator community, to swap them so that the icon that was essentially one with Synth and MIDI stuck together would appear on the tracks that were essentially Synth and MIDI stuck together. This lobbying was not acted upon, and the "MIDI+Keyboard" icon was quietly dropped. Those of us who cared kept our mouths shut because anything was better than having it be backward. Most users probably use either Simple Instrument tracks or separate Synth and MIDI tracks in their projects, but not both at the same time, so being able to tell them apart is not a big deal. The "MIDI+Keyboard" icon is pretty ideal for indicating a Simple Instrument tracks. I have no idea how or why they got mixed up originally, but looking at it drove me nuts. One of the first things I did with creating themes was to swap those icons around. This could theoretically have led to confusion with the images in the documentation but I didn't care.
-
34" Samsung Ultrawide Issue with Cakewalk Plugin UIs
Starship Krupa replied to sjoens's topic in Feedback Loop
Does toggling the plug-in's DPI awareness change anything? -
Sooo.... What did everyone get? (Not A Deal, Full Kontakt Not Required)
Starship Krupa replied to husker's topic in Deals
What did you think of the Addictive Drums 2 facelift of a couple years ago? Going from that faux brushed aluminum 3-D fantasy spaceship control panel paradigm to the current crisp, flat look. I neglected AD2 for a long time because the UI made me feel like if I turned away and then looked back it would be 1992 and I'd be running GeoWorks on a 386. I made a new skin for Session Drummer 3 so that I didn't have to look at that faux metal panel complete with drop shadows and two little vents (or speaker grills) up at top left and right. Putting vents in the panel of something that's not even supposed to resemble an actual real world object is weird. It's worse than rack screws on FX plug-in panels. No wonder so much recent music has been so boring. The people who designed our music software UI's once dreamed of sending us to the stars. No wonder that the music made now sounds two dimensional like the current UI fashion.😁 Seriously, I reeeeeallly don't like the embossed metallic plastic 3-D look for software UI's in 2025. Maybe it was the hot thing 20 years ago but we now seem to have less need for our computer programs to look like physical objects. I used to tease Acoustica about the "woodgrain" side panels on Mixcraft's mixer. Maybe I'll live long enough to feel nostalgia for that sort of thing. Or....do you mean the Spartan, plain, homely as hell look, like the DXi plug-ins that still ship with Vegas Pro and Sound Forge? The ones that make the Sonitus fx suite look fancy? The ReaPlugs look. I think AirWindows must be the masters of that, where the plug-ins don't even have UI's, rather it's supplied by the DAW presenting the user with a generic page of labeled sliders. Do most DAW's even still let you run plug-ins using the "generic" UI? It might be fun to try a few modern plug-ins with the generic UI turned on just to see how they look. Especially something weird like Motion: Fractal or whatever. -
Would you call this an "impulse" purchase? Or is there a more convoluted reason to want it?
-
Sooo.... What did everyone get? (Not A Deal, Full Kontakt Not Required)
Starship Krupa replied to husker's topic in Deals
Given what I said about Roku and Netflix and the TV manufacturers being in cahoots? Yes, let's update the app riiiiight before the holiday shopping season. It will break it on multiple streaming TV's, which means either sales of new streaming TV's, for which we get license fees, or sales of new Roku boxes, for which we get license fees. -
Sooo.... What did everyone get? (Not A Deal, Full Kontakt Not Required)
Starship Krupa replied to husker's topic in Deals
Saverio gives the user the choice of using the omnibus installer or not. So depending on your comfort level with installers, how many licenses you own, you get to choose what method you think works best. Would that they all operated that way. Are his UI's "bland?" I guess they are compared to IK Multimedia T-RackS. They're flat, but have color. -
Nobody else finds this a PITA? I guess the workaround is to start the tracks as Simple Instrument tracks and then split them, but that's another annoying step.
-
Feature request related to midi recording
Starship Krupa replied to Sammy D's topic in Feedback Loop
A video seems to be worth 1000 forum posts when it comes to getting the devs' attention. Seriously, if you want something fixed, make a YouTube video and make sure the developers see it. This has worked for XELOhh and Creative Sauce to various degrees. In regard to this topic, one long-requested fix regarding MIDI is that clip healing work the same way that it does for audio. That is, swiping across with the Smart/Comp tool automatically heals split MIDI clips without having to Bounce to Clip(s). The documentation says that it's supposed to work; I've been told that it used to work but was broken somewhere around SONAR X2. -
Different membership options/tiers.
Starship Krupa replied to Theodore Kloba's topic in Feedback Loop
The offer might be common, but the requirement (as in subscription ONLY) is not. There are only two DAW's currently on the market that are subscription-only and Sonar is one of them. The other is Adobe Audition. My computer system has many programs installed, and Sonar is the only one that is subscription-only. Not that there aren't multiple companies that would prefer to be selling their product solely via subscription. I mention this because I believe that it's not valuable to express resignation about software subscriptions being "typical" or "the way things are going" or whatever when that isn't the case. It's indeed becoming more the case with software that is mostly used in business and office desktop environments (for sound reasons) but not with consumer/hobbyist software. Witness what happens when companies try to make it subscription-only. The user base rebels and competitors thrive. Fortunately, with Sonar, the nag screen is pretty much the only pain. None of the other omitted features except for Workspaces and the fancier dithering options was even included until a couple of years into Cakewalk by BandLab's existence. The fancier stretch options, updated export dialog, and multiple Arranger Tracks are all CbB innovations. The Core FX are still there in their original Sonitus DXi forms. SONAR never had an Arranger Track much less multiple ones. -
Eeeeeyeah, no, it's not necessary to export your tracks as .WAV files and then mix them down in Audacity. There's nothing wrong with SONAR X1's summing engine. Where things CAN (and did for me until I figured it out) go wrong with exporting from SONAR/CbB/Sonar is when you decide where you want to take the export from. I never use the "entire mix" not after some early experiences with "entire mix" not sounding quite right. Entire Mix is just another term for "render whatever's coming off your hardware outs." So if you happen to have your hardware outs turned down as a volume control for your monitoring system, or if you are using multiple hardware outs, such as speakers and headphones at the same time, you will get unexpected results. A much better way is to take the export from your Master bus, or better still, create a dedicated Export bus. That way, as long as everything you want to render is coming into that bus, everything you want to render will get rendered. This is reminding me that I wanted to request better clarification of the Entire Mix term in the Sonar documentation. The OP may not be running into Entire Mix issues, but if playback from SONAR/CbB/Sonar and render sound different, the program isn't being used correctly. Entire Mix is the most likely culprit, but there can be others, and they need to figure out which one(s) it is. With free to use fully functional newer versions of the DAW having been available for the past 8 years, it's quite easy to test this. Grab the latest Cakewalk Sonar, run it in Free Tier mode, load up your X1 project(s) and export to your heart's content. I suspect that there will be no difference, as it's so likely a matter of configuring the export options. You may even find that you prefer modern Cakewalk Sonar Free Tier, there is nothing that X1 will do that it cannot and much more that it can. Going back is always an option. To the extent that it may have been "corrected," CbB and the current Sonar Premium Tier have a revamped export dialog that may result in better choices being made, but those choices can also be made in the X1 export dialog to the same effect.
-
Please add back some minor color choices, not a whole theme editor!
Starship Krupa replied to Dave C's topic in Feedback Loop
Please elaborate on this. I haven't noticed any difference in coloring track headers. Me, I at LEAST want access to all of the color choices that are different in the various existing Sonar factory color schemes. The factory schemes are proof that these colors can be changed, so there's no reason not to allow users to change them as well as developers. -
Rebelle 8 Pro [BF deal ended, but may pop up again for holidays]
Starship Krupa replied to mettelus's topic in Deals
I picked up Rebelle in their last Humble Bundle deal and it's great fun. It does amazing things in regard to simulating physical media. The canvases and paint blending are like nothing I've seen. Also seems more stable than Painter. Both Rebelle and Painter successfully duplicate the same vast chasm that advertising for physical materials has between the quality of what I'm able to create and the examples of pictures created by other people using the same tools. -
Sooo.... What did everyone get? (Not A Deal, Full Kontakt Not Required)
Starship Krupa replied to husker's topic in Deals
You must have a lot of HorNet plug-ins.😁 Easily the developer from whom I have the most plug-ins I never use, but I keep buying them because they're inexpensive and Saverio is such a likeable guy. No ding on the quality of his merchandise, either, the issue is usually that I have those needs covered elsewhere. They're like the $5 CD I buy off the garage band at the local nightclub. -
Sooo.... What did everyone get? (Not A Deal, Full Kontakt Not Required)
Starship Krupa replied to husker's topic in Deals
Netflix must have a deal with Roku to change their player app requirements often enough to sell new Roku boxes. The Apple business model. Last I checked, those were still around $30 and let you set up a great deal more apps/channels besides Netflix. Woulda been $100 less than replacing your TV. I have experience with this because I never buy TV's (not new ones anyway). I get them on Freecycle or Craig's List, and in the last 10 years or so, used TV's all seem to come with Obsolete Streaming Apps. This is a drag for people who bought streaming TV's because they save on not needing a streaming device, but is a boon for people who get their streaming elsewhere. Apps eventually do become unable to run on older Roku models, but they seem to be better at updating the OS than TV manufacturers, so the $30 Roku can be expected to last 10 years before it starts throwing messages saying that this or that app is no longer compatible. And if your sole video entertainment is Netflix and you have a device that can run their apps, you would do well to check out Kanopy and Hoopla. They're streaming services that you can access with a library card. Kanopy in particular has some great stuff on it, including various selections from the Criterion Collection. Lots of foreign cinema (Kurosawa, Bergman, French New Wave) , and documentaries about music and other cultural topics. Hoopla has (among many other things) a selection of British TV shows if you (like me) like those. Hoopla also has digital media other than video, such as a DEEP collection of music albums and electronic publications, readable and listenable via smartphone and tablet. There are also LOTS of free streaming services like PlutoTV and The Roku Channel. An old favorite of mine from when I got my first Roku box is Pub D Hub, which streams a century of public domain movies, TV, and vintage advertisements. Also educational films. -
Sooo.... What did everyone get? (Not A Deal, Full Kontakt Not Required)
Starship Krupa replied to husker's topic in Deals
Those hussies at A|A|S tempted me with an offer to fill out my collection of their synths for $99. This got me Multiphonics CV-3, Lounge Lizard EP-5, String Studio VS-3, and Strum GS-2. That was too much for me to resist. My favorite maker of soft synths and now I have everything they make save for a handful of soundpacks. After messing with them for a week or so....I have mixed feelings. Especially about Multiphonics. I'm not much into the patch cord-y visual metaphor but I also can't really think of a better way to go about that sort of thing. The biggest complaint I have is that the default preset melts the CPU on any computer in my house. Oddly, most of the other presets play fine and nothing in any of the soundpacks does. Is it their way of filtering out buyers whose systems aren't up to running it? In the past with hoggy A|A|S patches I could reduce the number of voices and they'd settle down. I haven't had that problem since I partsed up my most recent computer, with its 10 physical cores, etc. So far, no matter what I throw at this "outdated" system, it's handled it without breaking a sweat. My problem with Multiphonics is that there's no obvious way I can find to reduce the number of voices. There's also no way I could find to turn off reverb except for patching around it. None of the FX modules has a simple bypass button on it, in order to switch a module out I have to go through the hassle of re-routing cables. Yeah, verisimilitude, but how far do they need to go with that? The unexpected delight with Multiphonics is the standalone FX plug-in. This lets you easily process other audio using a collection of Multiphonics' effects modules. They're patched together in the same fashion as the synth, with virtual patch cables. And just the stock patches sound GREAT. I guess maybe the sound generation part of Multiphonics is too simple compared to the sonic delights of their other modeling synths. They're modeling deliberately limited analog hardware modules, so no surprise that I find that the sound isn't what I've come to expect from A|A|S. Lounge Lizard is Lounge Lizard, now it has a "reed" mode, the better to model Wurlitzer type pianos with. I seem to prefer my EP's modeled rather than sampled, and Lounge Lizard is the best I've heard. String Studio sounds great, but it still has the older look to the UI. I imagine that someday I will be paying for a version that looks like Chromaphone. Strum GS-2 retains the older look. It's still my favorite fake guitar. I love all of those cool articulations like hammer ons and string scrapes and harmonics. While I love love love the way that A|A|S' products sound, I have a BIG complaint, and it's about something that's especially a pain given how many of their products I have. Chromaphone is the only one that lets you mark a preset as "favorite." With 5 synths and 2 FX, the same sound engine in all of them (proven by how Player can run any patch from any product), this makes it needlessly difficult to recall what sounds I thought were niiiiiice when I was browsing through the thousands of them I have access to. They obviously know that people want the feature, they put it in Chromaphone. The second complaint is that the UI's on their synths are so dissimilar, and needlessly so. I'm not talking about the panels for designing sounds so much as I am the way that presets are browsed, settings discovered, and so forth. I don't think it's that I'm spoiled by MeldaProduction's one-UI-fits-all approach. Each synth UI looks like it could have been designed at a different company. I don't need the products to look as similar as MeldaProduction, but from a single manufacturer I would like them to at least be a little similar. But the preset browsers on each of them are different from each other. Settings are found in different places and look different once you figure out how to open them. Still, I think the purchase was well worth it. I probably paid at least $75 each for Chromaphone and Ultra Analog, so a hundy to get the other 4 is great. Best sounding virtual instruments in the business, IMO. -
Shift will constrain either vertical or horizontal movement, depending on which axis the user drags on first. Is it possible that due to mouse sensitivity or whatever that the clips are being knocked a bit to the left or right before being dragged downward?
