


-
Posts
4,842 -
Joined
-
Last visited
-
Days Won
5
Everything posted by David Baay
-
Bouncing with Source = Tracks generates a separate bounce for each selected track. In that scenario you will get the first track bounced to the track you created (and presumably selected as the Destination), and the second track bounced either to the next existing audio track below that one or to a new track created by Sonar. In order to merge two or more tracks you need to bounce with Source = Buses and select a bus that they're both/all outputting through.
-
Running the transport should reset any delay compensation to 0 if all plugins are disabled, but try enabling the PDC [override] button in the mix module. This will eliminate PDC on the track you're input monitoring so long as there isn't a PDC-inducing plugin active on that track or in its path to the hardware out. If you still have latency, it's probably not due to plugin delay.
-

Odd distortion recording multiple tracks.
David Baay replied to Troy Winemiller's topic in Cakewalk Sonar
A stereo track will effectively have the two channels panned hard left and right. Recording them to individual mono tracks will have them both center-panned. Depending on the degree of correlation betwene the two channels, the mono setup is going to produce up to a 6dB increase in level at the Master bus, potentially clipping the output, unless you pan the mono tracks hard left and right to match what a stereo track does. This is a possibility, but I recall that issue being addressed some years ago, and can't repro the problem now. -
Weird Meter Behavior - or is it normal?
David Baay replied to Salvatore Sorice's topic in Cakewalk Sonar
Inspector is showing Peak only, and Console is showing Peak + RMS. Incidentally, thanks for alerting me to the release of Pianoteq 9, I was just on their site a week ago to check and miseed it by a few days. @msmcleod I can repro the OP's screenshot showing that the lowest meter segment in one channel of the Console meter in Peak + RMS mode sometimes stays lit indefinitely after playback is stopped. I used Pianoteq 9, like the OP, and have not confimed with other VSTs or pure Audio tracks. -
way to find clips that need the "bounce to clip" function?
David Baay replied to LNovik@aol.com's question in Q&A
The warning will also be triggered by clips that have Audiosnap enabled but haven't actually been stretched. But the 'Select All Audiosnap/Slipstretched' option ignores unstretched clips. In that case, the only way to know if a clip is in that state is to select one at a time and check the Audiosnap section of Clip Properties or the status of the Enable button in the Audiosnap Palette. I would agree with Mark that the better option is to just save as CWZ or Zip the folder in Windows Explorer to preserve all the non-destructive stretching until you're fully ready to commit all the edits. -
Yes, and Delete Hole notoriously will not work in an empty area of the project; there has to be some clip selected. It was the shortcomings of Delete Hole plus issues with the 'Move Over to Make Room' option for drag and drop that drove to the implementation of Ripple Editing.
-
Okay, but then you get to answer all the threads on the forum like: "I accidentally recorded a bad/duplicate MIDI take into an existing clip and it's too late to undo; how do I fix this, and why isn't there a big red flashing light warning me my takes will be merged?" 😉
-
I think what the OP is encountering is that those buttons are not available in the small version of the transport module. Keyboard shortcuts are the answer; I almost never touch the transport controls. I would guess that's a limitation of the MP3 file architecture.
-
I think "first export" basically means "if there isn't already a preview file". So if you delete all preview files, it will automatically create one on the next export. And it's been previously determined that bouncing any track in a project that doesn't yet have a preview will also generate one. My projects often have two preview files, one with a shorter name than the other; I'm not sure what that's about. If a project folder contains multiple versions of a project there may be additional project-specific preview files. Both the implementation and the documentation could use some refinement.
-
I believe the documentation I linked clarifies that an initial preview file is created on the first export regardless of whether the box is checked or not.
-
Unless you're using the same interface as the OP, you should start your own thread. As posted earlier, this experience is not typical. It may well be an interoperability issue with your interface driver or some plugin, but that doesnt mean Sonar alone is at fault. In particular, it's not uncommon for a plugin-specific issue to be exposed in one DAW and not another, and DAW developers often have to make special accomodations for improperly/atypically coded plugins. Also it's well-known that the way Sonar initializes drivers at startup is not compatible with virtual ASIO driver aggregators like ASIO4ALL and Steinberg's Generic Low Latency ASIO Driver.
-
These files are created and used by the Project Preview function: https://legacy.cakewalk.com/Documentation?product=CakewalkSonar&language=3&help=NewFeatures.14.html I do think the Bakers should add some options to manage when these are created/updated and how long they are.
-
No, I checked; disabling zero controllers did not help. And the MIDI was my own - only note messages.
-
Sort of a valid point though the vast majority of pop MIDI files will be 4/4 and have a fixed tempo, and that's pretty much the only thing that doesn't come in when importing - not a "lot" of data. If it's important to get the tempo map and time signature's, use the manual process. In the grand scheme of how long it takes to complete a project, those few setup steps are completely inconsequential and they are all basic operations that every user needs to get comfortable with.
-
I count 7 or 8 clicks/keystrokes, depending on how your synth insert settings are defaulted: - Insert > Soft Synth (2 clicks) - Select GM synth (1 click) - OK (select First Synth Audio Ouput if not the default - 1 or 2 clicks) - Swipe-select all MIDI tracks (1 click) - Ctrl+click the Output widget and select the synth (1 click and 1 keystroke) If you create a project template with the synth and tracks already in place, you can just drop the .MID file in the first track and you're done.
-
I can confirm this happens with TAL Bassline, and it was brought up with another free VSTi recently. These synths somehow get reset to default parameters on re-load while the preset name continues to show the previously selected patch but with a dirty flag (asterisk). I don't have CbB on this machine, but it doesn't happen in Platinum (the dirty flag gets set, but the preset parameters are persisted on reloading). I've reported it to the Bakers.
-
Confused about pitch bend values vs. RPN (Pitch Bend Sens)
David Baay replied to Dave G's topic in Cakewalk by BandLab
This is actaully the first thing I ever posted about to the old forum c. 2006. I wasn't getting any pitch bend response from TTS-1 because the range had somehow been reset or defaulted to zero. -
The Bakers actually modified this bahavior quite a while ago (primarily motivated by your request IIRC) so that when loop recording, the last take is automatically extended to the end of the loop region so no split is necessary. As noted, this behavior is optional for punch recording as well. The OP got splits because he was just doing separate takes in Comp mode, stopping the transposrt in between, without looping or punching. Automatic splits at clip boundaries are a primary feature of Comp Recording; if you don't want them, you need to use a different mode or use the "auto extend" feature of looping or punching to avoid them. You can call it a workaround, but this is how the record modes and options are designed to work.
-
I have never had a properly configured track fail to record except in the circumstance that Bass Guitar mentioned that Punch is inadvertently enabled somewhere else in the project.
-
2025, windows 11, latest Cakewalk, and this still remains
David Baay replied to Sergio Miranda's topic in Feedback Loop
Okay, yes, I misunderstood the quesiton is about non-Maximized project windows. Basically, Sonar does not allow floating project windows outside the main application window as it does lower-level views, and that's just how non-floating windows are displayed. Right offhand I can't think of any other apps I have that allow having multiple projects/documents open and not maximized so I can't say that what Sonar does is atypical. -
2025, windows 11, latest Cakewalk, and this still remains
David Baay replied to Sergio Miranda's topic in Feedback Loop
-
Use Sound on Sound record mode instead if Comp recording and either manually mute previous takes as you go or enable Auto Punch with Mute Previous Takes and set a punch range wider than where you're recording.
-
2025, windows 11, latest Cakewalk, and this still remains
David Baay replied to Sergio Miranda's topic in Feedback Loop
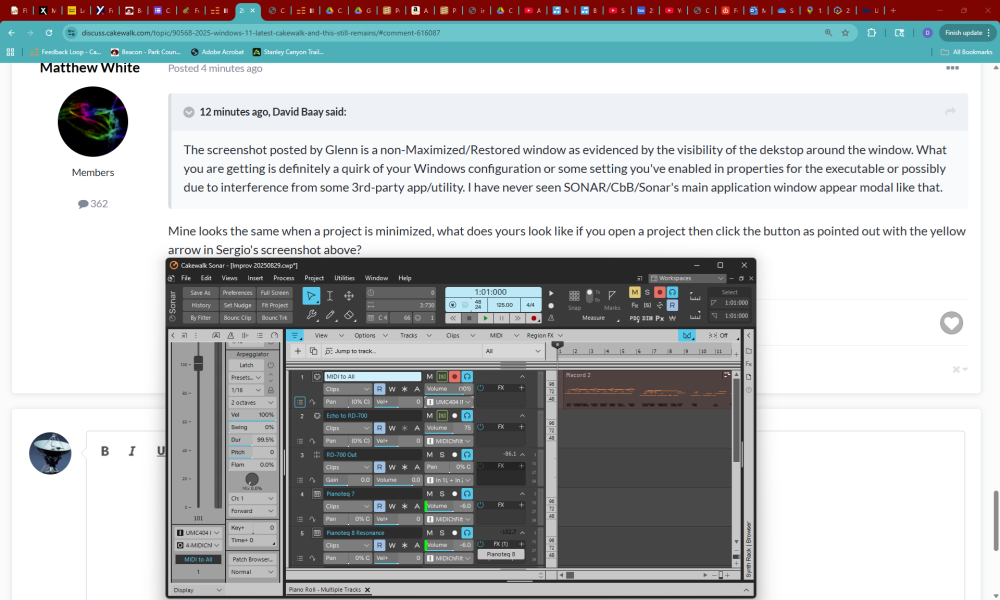
The screenshot posted by Glenn is a non-Maximized/Restored window as evidenced by the visibility of the dekstop around the window. What you are getting is definitely a quirk of your Windows configuration or some setting you've enabled in properties for the executable or possibly due to interference from some 3rd-party app/utility. I have never seen SONAR/CbB/Sonar's main application window appear modal like that. -
Try disabling the 64-bit Double Precision Engine and/or Playback Overampling if enabled for Kontakt.
-
That setting is for WDM drivers. It's grayed out when driver mode is ASIO. A project-specific issue is likely plugin-related, but if increasing the ASIO buffer size is not helping, you may have some other issue. When you say "dropouts", is the transport actually stopping with a dropout code, or you're just hearing the audo drop out? An unlicensed/expired plugin on the Master bus could cause this but it would be more consistent. Next time it happens, try clicking the Audio-MIDI Reset button in the tranport while holding Ctrl to re-initialize the driver.


