reginaldStjohn
-
Posts
1,417 -
Joined
-
Last visited
Everything posted by reginaldStjohn
-

Tempo track like any automation line
reginaldStjohn replied to Timo Finkbeiner's topic in Feedback Loop
+1, and has been requested in different forms several times. -
Check that you Lens are set to none and that you are not using a locked screen set. Or, vice versa, save a lens with your desired layout and recall it if things move.
-
EZDRUMMER sound - poor recording quality in cakewalk?
reginaldStjohn replied to Jon Watt's topic in Cakewalk by BandLab
The best way to get a virtual instrument to audio is to freeze the track, (the little star in the instrument track). This will bounce all the midi to audio and you can unfreeze it at any time to go back to the midi. If the audio sounds bad that would have to be related to your soundcard settings, project bit depth etc. Some specs on what audio interface and project sample rate and bit depth would be useful. -
Got it. I needed wanted it for a current project.
-
-
Kontakt output channels confusion
reginaldStjohn replied to Bassfaceus's topic in Cakewalk by BandLab
I setup the outputs manually. I don't use the templates unless it matches what I am doing. Here is a quick link I found on setting up multiple outputs with Kontak https://spitfireaudio.zendesk.com/hc/en-us/articles/360000340533-How-to-set-up-multiple-outputs-in-Kontakt -
How do you have the effect inserted? A picture of your screen might help. Usually you just insert the plugin in the FX bin of the audio track. Waves Tune should not be using re-wire.
-
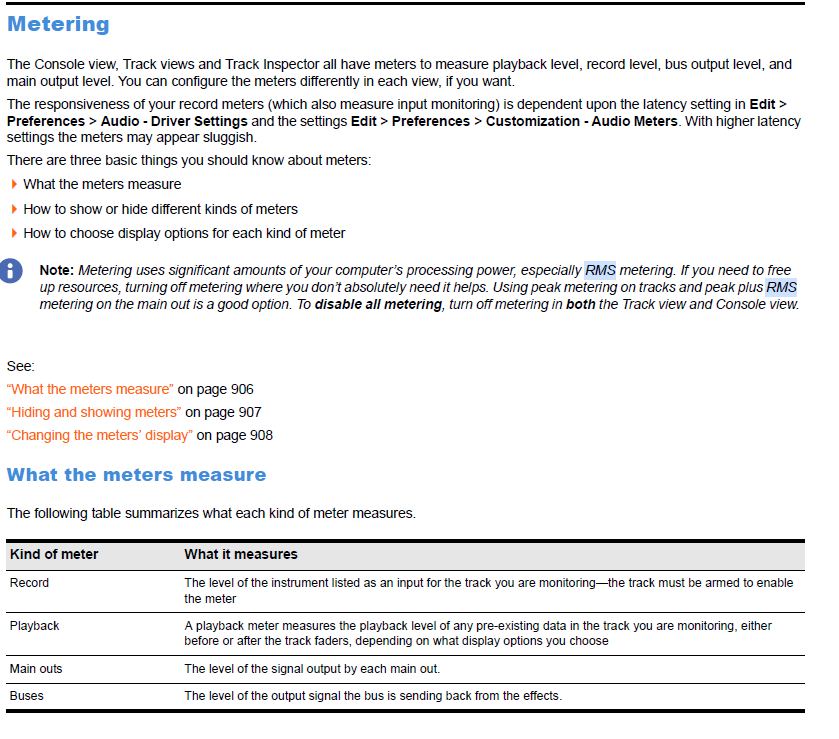
Besides using your ears you can also use the meters in Cakewalk to determine the tracks levels. The meters can be changed to show RMS, Peak, or both. If you want more metering options there are all sorts of meter plugins, free and paid, that can give you average loudness and K system levels as well.
-
help me understand the envelope automation readout
reginaldStjohn replied to micv's topic in Cakewalk by BandLab
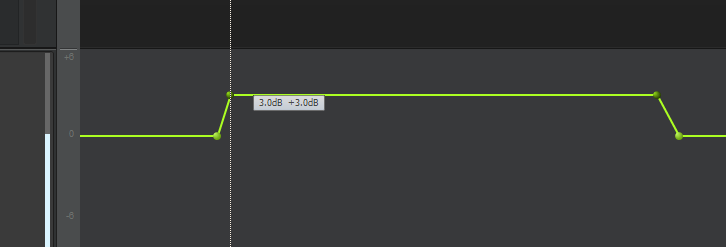
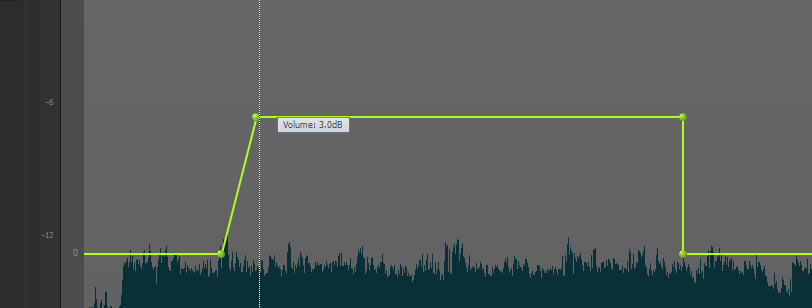
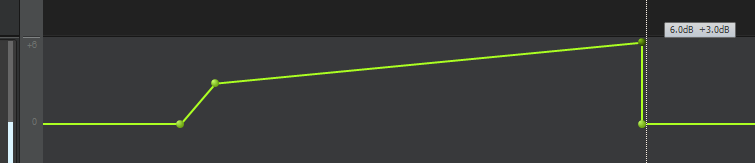
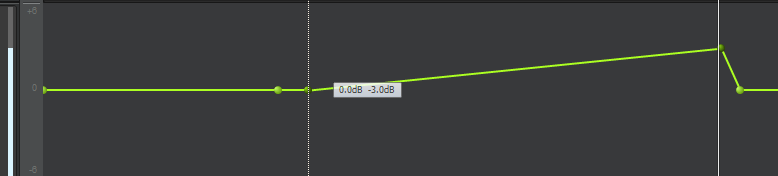
So I tried to reproduce your issue and was unable to do it. Maybe yours is more complicated an so it is not as repeatable. Here is what I see. I made an envelope lane for volume in a track and made sure the value was 0.0dB Then I created 4 nodes and raised the inner nodes up to +3db. 1st number tells me what value I am on the the second the offset from the previous possition. I also closed the automation lane and just looked at the values in the track view. They seemed to be the same I moved one of the nodes to 6db. Then I moved bot the 3dB and 6dB nodes together so the 3dB one was back at 0dB. So, at least in this case everything seems to be working. If you are seeing something different maybe get a hold of cakewalk support and send them your project so they can look at it.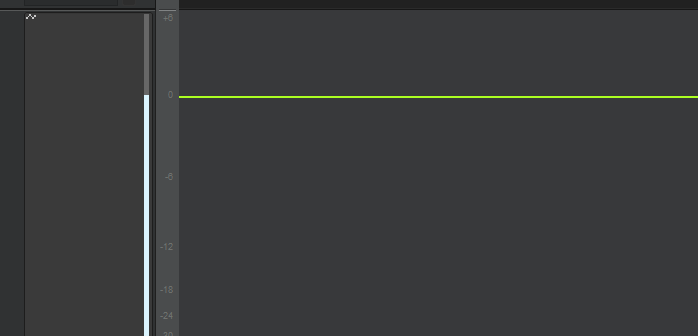
-
One of the weakest parts of Cakewalk that I use.
-
A corrupt project file is all I can think of. Try with a new project and importing all your audio/midi files. A pain but might solve your issue?
-
I can't say as I know why that would be happening. Do you have any VST or VSTi's in the project? It might be helpful to narrow it down to if a VST is the thing looking for a file or Cakewalk. Save your project to a new location. Delete all VST and VSTi one at a time and see if one of them is causing it.
-
New laptop, Behringer XENYX USB, no worky! Helllllllp!
reginaldStjohn replied to Barry Seymour's question in Q&A
Are any of the drivers you mentioned ones provided by Behringer? The best chance you have is to use the Asio driver provided by the manufacturer. -
help me understand the envelope automation readout
reginaldStjohn replied to micv's topic in Cakewalk by BandLab
My experience is that the two numbers shown are supposed to be represent the current value and the difference from the previous value. If you have multiple selected then I don't know what the current value would show but I would think the other number should be the changed amount. Maybe post a screen shot or two to show what you are seeing. -
Armed track is including audio from previously recorded tracks
reginaldStjohn replied to John Saunders's question in Q&A
Maybe someone with a Focusrite interface and chime in here since I don't have one. Somewhere, probably in the Focusrite control software, there must be a connection that is feeding the output that you have chosen back into the inputs. -
Armed track is including audio from previously recorded tracks
reginaldStjohn replied to John Saunders's question in Q&A
We need more information about your setup. Are you using the built in sound card? If you are they often have a setting "what you hear" recording option that will route the stereo output back to its input. Make sure that is not enabled. Try using a different input (left instead of right). -
I use Modo bass and have not had that problem. Could be a corrupt project. Try a new project and copy over the midi to the new project with Modo bass loaded and see if it happens in the new project.
-
From my understanding that is expected behavior for take lanes. There are cross fades between take lanes because that is intent of the take lanes, to comp different takes of a performance together. If you move one take to another lane then you are saying that they are the same take and they shouldn't need a crossfade. I don't think the intent of the take lanes is to move other takes to the same lane and try to edit them together. That seems more of a job for a track.
-
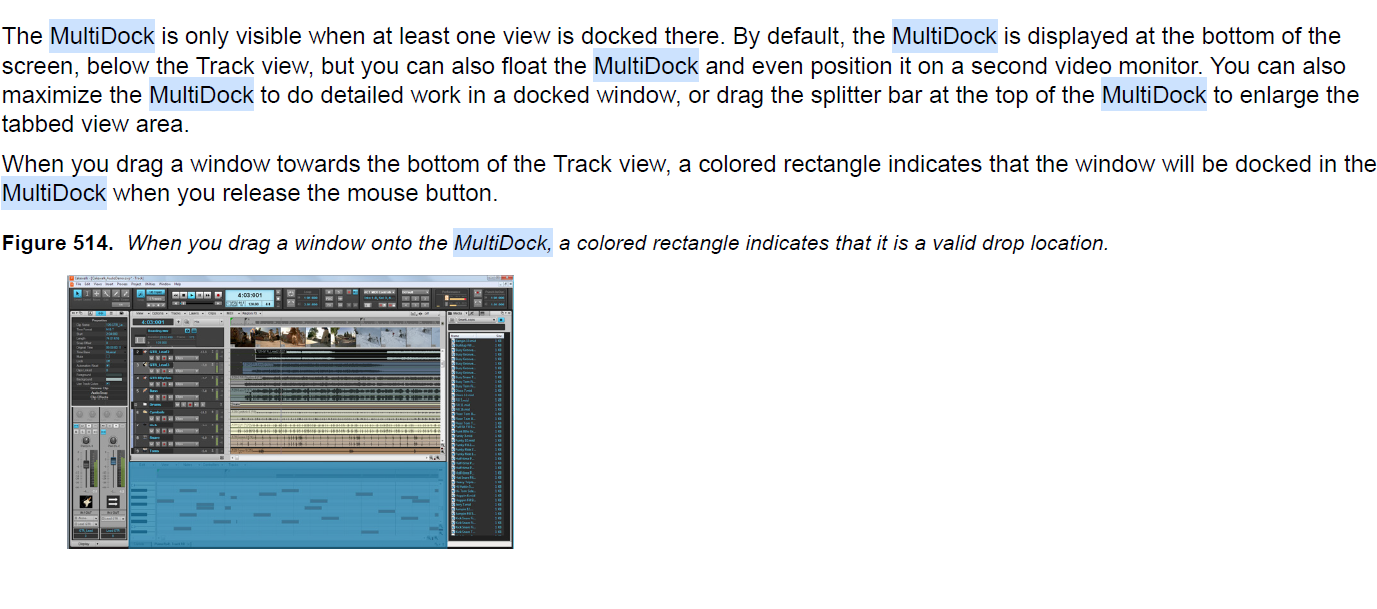
A quick look at the Reference manual gave me this information. Seems the multidock can only be at the bottom or floating.

-
Check to make sure you don't have a punch in region defined.
-
Midi doesn't contain any sound information only note information so that a synthesizer can produce sound. You need to insert an instrument, like Cakewalk's TTS or Studio Instruments (Bass, Drums or Strings). Then route the output to the inserted synth. You show the built in Microsoft synth but I don't know if that will really work inside of cakewalk. Look for a tutorial or better yet look into the Reference guide for how to use midi and instruments.
-
"Meter Peak" and almost no volume in recorded midi track
reginaldStjohn replied to Michal's topic in Cakewalk by BandLab
I don't know what you mean by "Meter Peak". On a simple instrument track, one that combines a midi track with an audio track, there are two meters you can look at. If you open the inspector ('i') then there are two tabs at the bottom of that window. If you select the Audio one then the meter will show the output level of the audio. If you click on the midi tab then it will show the Velocity of the Midi note in the meter. There is a setting to "zero controllers" on stop. With some instruments this can turn the volume down. Try unchecking that option or add a volume node in an automation lane. -
Lo hace con otras programas or solomente con Cakewalk? si es solamente con Cakewalk busque en las preferencias y cambia el tipo de driver (WASAPI, ASIO etc.)
-
It might be at the bottom of the screen and minimized. Try moving your mouse to the bottom and see if it turns in to a double arrow. If it does drag it up. Otherwise, try hitting 'd' key
-
Dropouts when opening plug-in windows
reginaldStjohn replied to Skelm's topic in Cakewalk by BandLab
If doing something in Cakewalk, like opening a VST GUI, is causing the problem then you will need to run Cakewalk while running latencymon to see what pops up.