msmcleod
-
Posts
7,209 -
Joined
-
Last visited
-
Days Won
39
Everything posted by msmcleod
-
If you've installed anything recently, your redists could have been messed up. You can install the latest redists by following the instructions here: If this doesn't work, try launching Cakewalk with SHIFT held down. This should reset your configuration. Next think to try is uninstalling/re-installing Cakewalk. You can use the web installer for re-installation: If it's still not starting, it could be your Cakewalk registry settings are corrupt. In this case: - Uninstall Cakewalk - In RegEdit delete the following key: Computer\HKEY_CURRENT_USER\SOFTWARE\Cakewalk Music Software\Cakewalk\Core Note: Do NOT delete the "Computer\HKEY_CURRENT_USER\SOFTWARE\Cakewalk Music Software\Cakewalk\Cakewalk VST X64" key - this will save you having to re-scan your plugins. - Re-install Cakewalk using the web installer above.
-

the horror of going back to Windows from a Mac mini
msmcleod replied to Marc Harris's topic in Cakewalk by BandLab
The only way to aggregate ASIO devices from different manufacturers that I've found is to use ASIO Link. ASIOLink works in a similar way to ASIO4ALL, but instead of only using WDM, it also allows passthru to an ASIO device. It also remembers your configuration. You set up ASIOLink to connect to your devices, then use the ASIOLInk ASIO driver within Cakewalk instead of your regular ASIO driver. You can do it in two ways: 1. Run a single instance of ASIOLink using ASIO for your main driver, and WDM for the others. 2. Run several instances of ASIOLink using ASIO on each device, connected together via the network using your local network address (127.0.0.1). Once it's set up it works really well, but it's a total PITA to configure in the first place. Even with decades of experience in audio / network experience it took me ages to get my head around it... and no, I don't remember how I did it, so don't ask me ? ! In the end it was too much hassle for me, so I just bought an RME Digiface USB instead. Feel free to check it out tho: -
Bandlab site down - no updating an my reg runs out in 2 days
msmcleod replied to Alan Tubbs's topic in Cakewalk by BandLab
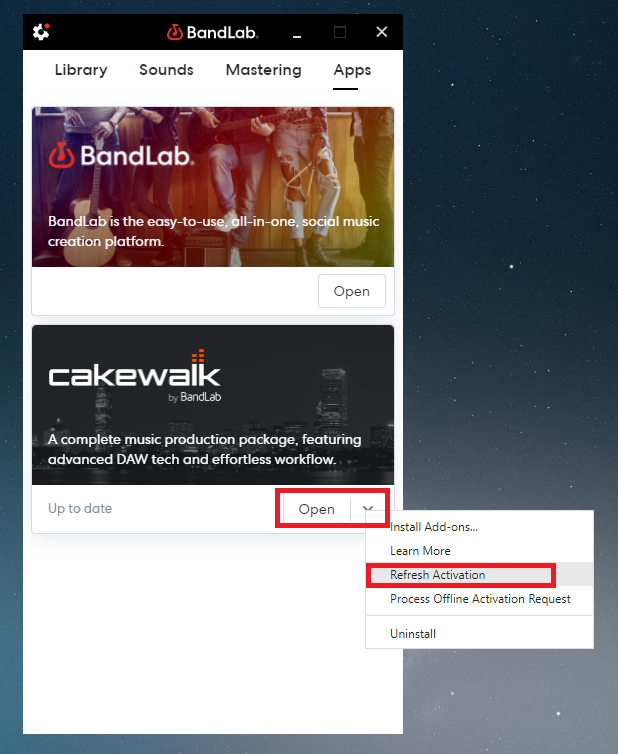
@Alan Tubbs - on Windows 7 you can always download and install the latest version of BandLab assistant, got to the Apps tab, then select Refresh Activation from the Cakewalk Open menu: If you're still getting issues, then it's likely your Windows 7 security settings are out of date. You can solve this by going here: https://support.microsoft.com/en-us/topic/update-to-enable-tls-1-1-and-tls-1-2-as-default-secure-protocols-in-winhttp-in-windows-c4bd73d2-31d7-761e-0178-11268bb10392 Search for the "Easy fix" link on that page and install it. You may find that after applying this, activation may start to work from within Cakewalk itself.
-
Adusting faders on group with Icon Qcon Pro G2
msmcleod replied to Anders Madsen's topic in Cakewalk by BandLab
Quick grouping doesn't work with control surfaces, only when using the UI. You'll need to use standard grouping for this: -
Maybe Windows has blocked the DLL ? You can unblock it by: 1. Go to C:\Program Files\Cakewalk\Shared Surfaces in Windows Explorer 2. Right click on MackieControl-MMcL-1.dll and select Properties from the context menu 3. Check the unblock checkbox, click Apply, then click OK. 4. Do the same for MackieControl-MMcL-2.dll and MackieControl-MMcL-3.dll.
-
How To Setup A Peavey Studiomix In Cakewalk By Bandlab?
msmcleod replied to albert williams's question in Q&A
First ensure that the StudioMix is connected to its own dedicated MIDI interface - you can't daisy chain it with other controllers/keyboards. Ensure the MIDI out of the StudioMix is connected to the MIDI input of the interface, and the MIDI input of the StudioMix is connected to the MIDI output of the interface. Press P to bring up preferences Go to MIDI->Devices and ensure the MIDI ports StudioMix is connected to are checked Go to MIDI->Control Surfaces and click the yellow add button in the top right On the Controller/Surface Settings dialog, pick "StudioMix" from the Controller/Surface dropdown (you should see it directly under VS700 ) and set the Input / Output ports to the StudioMix's MIDI ports. Click OK on the Controller/Surfaces dialog Click OK to close preferences -
For question 1: It's unclear whether you mean showing multiple tracks ( i.e. one per track ), multiple staffs for a single track, or you mean a single track but set to wrap around. To pick multiple tracks, select "Pick Tracks" from the staff view "Tracks" menu. To set the number of staffs, select "Layout" on the staff view "Edit" menu, and pick "Treble/Bass" for both the treble & bass staffs (e.g. for piano ) If you meant for the single track to wrap around, Cakewalk doesn't support this for editing / playback. It does however support this when printing. You can use the print preview to get a static view of how it will look when printed.
-
This is correct if you want to quantise to a whole bar in 3/4. If however you actually want whole beats, then set it to 1/4.
-
That looks like the locked view icon, but how it got on the main project window I've no idea. Are you using a custom theme? Perhaps the theme is out of date or corrupt? [Edit] - as the OP has pointed out, it's actually the PRV in the screen shot, which is set to be a locked view.
-
It was changed due to a bug in Windows menus limiting the number of menu items, meaning that not all scanned plugins would be available on the menu (it would only show around 1200 and ignore the rest). It not only affected the menus, it also affected the browser.
-
This is an interesting idea. It did come up in initial discussions, but a decision was never made as there are complications such as how to sensibly represent sub-folders, and also how this would affect control surfaces. This is exactly what Track Manager is for, and don't forget you've now also got track manager presets within the project, so you can recall previous views from the dropdown rather than having to use screensets.
-
There is a quicker way, if I'm correctly understanding what you're trying to do... 1. Select your tracks 2. Hold down CTRL, and on one of the tracks and select "New Aux Track" from the output dropdown. A new patch point is automatically created when you create an aux track in this way, so there's no need to create a separate one (unless I'm missing something in your routing requirements here) Holding down CTRL with a selection will set the output for all of the tracks using quick grouping, e.g.:
-
The "HoRNeT Tape" tape emulator sounds fantastic, and is a bargain at the sale price of €10... just be careful about your gain staging though.
-
AFAIK there isn't any code within CbB that would be directly trying to unzip that file. The only thing (at a guess), it could be the CbB media browser tab, which is essentially a re-skinned Windows Explorer component. [Edit] - confirmed, it's the MediaBrowser control which is basically Windows Explorer. I can only repro if my project file is on the desktop, and the zip file you provided is also on the desktop, and I open the project by double clicking on it. Normally this wouldn't be an issue, but Windows is having issues opening that zip file (i.e. double clicking it outside of Cakewalk causes Windows Explorer to hang too). As this is Windows Explorer that is hanging, I don't think there's not much we can do about it. The answer is not to open a Cakewalk project file from a directory which has corrupt zip files in it.
-
Why Arturia say it's up to Cakewalk is beyond me too. They know that each DAW has a different button layout, and the button layouts for the various DAW's should have been provided to them from Mackie. They've obviously gone to the trouble of supporting layouts for the other DAW's on the list, so not including Cakewalk/SONAR on that list must have been a conscious decision on their part. I wish it was as easy as getting Cakewalk's Mackie Control to just pretend it was using the Cubase or Logic layout, but the issue here is that because these emulated devices don't have the full button compliment, they are actually sending more than one button press in a lot of cases, and assuming a particular state within the DAW. So the only solution really, is for them to support the Cakewalk/SONAR button layout. Another option may be to use Azslow3's AZController and manually map each button as required. This may work, but it does depend on whether the controller is then requiring the DAW to be in a particular state, in which case it could get complicated very quickly. I had exactly this issue with the Presonus FaderPort when trying to get it to support the Synth Rack. It kind of works, but internally, the FaderPort is making assumptions as to the state of Cakewalk, and you end up having to go through various modes to get it back to where the FaderPort's state & Cakewalk's state match.
-
Duplicating Selected Envelopes Independent from the Clips
msmcleod replied to murat k.'s topic in Feedback Loop
Ah right, I see - sorry, I mis-read, you want to duplicate the envelopes without the clips. Currently there are only two duplicate commands: "Duplicate Selected Clip(s)", and "Duplicate Section" (from an arranger section context menu). -
To save a track template with a folder hierarchy, you need to select the folder (which selects all of its sub-folders & tracks), then right click on one of the tracks and save as a template. The complete folder hierarchy will be saved in the template. As far as Cakewalk support for hardware that supports the Mackie protocol, this is totally down to the hardware vendors. Cakewalk supports Mackie MCU by standard, with beta support for HUI. When Mackie brought out the MCU protocol, they contacted all the major DAW manufacturers at the time (Cakewalk included) and asked them to provide a button layout. Mackie then supplied overlays for all of the DAW's with their surfaces. Cakewalk / SONAR was one of the first DAW's to support all of the Mackie MCU surfaces (i.e. MCU, XT & C4). When hardware vendors provide Mackie emulation, it's up to them which DAW's they support and provide a button layout for each DAW in MCU mode. Many of them do support Cakewalk/SONAR, e.g. Mackie ( MCU ) , Behringer ( BCF2000, XTouch) , Presonus ( FaderPort) , KORG (nanoKONTROL), Samson (Graphite 49) to name a few. When using a device that does not specifically have support for Cakewalk/SONAR, you can usually get transport and faders working by checking the "Disable Handshake" option in Cakewalk's Mackie Control Surface panel. Other buttons such as loop may not work as they will be mapped to different buttons depending on which DAW you selected on that device.
-
Using the smart tool, select from the bottom, drag from the top:
-
Duplicating Selected Envelopes Independent from the Clips
msmcleod replied to murat k.'s topic in Feedback Loop
It does work if you've got "Select Track Envelopes with Clips" checked under Track Options, or have it enabled in the select module: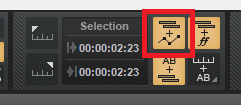
-
Normally you'd use one or the other - i.e. you'd either copy your normal clips as linked clips, or you'd just use a groove clip and stretch it out.
-
Tempo maps are created by generating transients of the audio file you dragged, and calculating the tempo from them. Because you now have the transients, it's seen as AudioSnap data.
-
I guess you've been lucky with your room. I've used ARC 2.0 since it came out, and for me it's made a massive difference. Mixes done before I got ARC had no bass whatsoever, and hyped frequencies in the upper mids. ARC has sorted all of that out for me. @Doug Steinschneider - the only thing I can recommend is to try it. It is completely dependent on your room/speakers, and everyone will get different results. One thing having ARC has done, is enable me to experiment with different placements of my speakers so I can get closer to a flat response. You may also want to check out Sonarworks - again whether ARC or Sonarworks works better will depend on your room/speakers.
-
I guess I was lucky - I've used a Shure SM58 for vocals for more than 20 years. I've tried various condenser mics, but none sound as good with my vocals as the SM58. I suspect an SM7B would sound better, but with software upgrades and the constant need to buy bigger SSD's, I've never managed to get around to committing the funds for one. One thing I would say.. the Rode NT1 & NT1A both sound fantastic. The NT1 is very flat, and the NT1A hypes the top end, but both are great depending on what or who you're recording.
-
Disc image backup choices?
msmcleod replied to The Dispossessed Orangutan's topic in Computer Systems
Oh, almost forgot... I did some tutorial videos a while back on using Clonezilla, as it can be a bit quirky for first time users. It's using an older version, but the options are basically the same: Backup: Restore: -
Stretched audio doesn't bounce down
msmcleod replied to Moving Air Productions's topic in Cakewalk by BandLab
This was a bug, which has been addressed for the next release. You can get the early access of this release (which has this fix) here: