


-
Posts
3,363 -
Joined
-
Last visited
-
Days Won
8
Posts posted by Will.
-
-
35 minutes ago, Nigel Mackay said:
Re-install Cakewalk maybe? Fairly painless operation.
No, it's not a bug or related to such.
I believe what's in discussion, is that it scrolls aggressively, when using the scrollbar.
By holding CTRL this action can be controlled. What it can't do is center the notes/information in the PRV.
-
1 hour ago, Kevin Perry said:
The nomenclature isn't explicit but the UI wouldn't be that dissimilar since the controls required would be essentially the same.
Just a question:
Wouldn't it lessen the work on the send engines rendering it more stable? I've seen some threads here on dropout on that region of the UI. Personally I had never had problems in that department.
Hence to why is said: Not dedicated.
I could be wrong.
-
18 minutes ago, Kevin Perry said:
Sends do indeed do exactly what you want.
Though this is 100% true, it's not a dedicated fixed routing method. There were times when I also wished multiple channel outputs was a thing in CbB to split a channel. Like the @Keni said in his reply -- it's not a big deal for it. Still would have been nice to have that option too.
-
On 3/8/2021 at 12:14 PM, swhuarza said:
I want my autotune to sound good and I want to use the autotune pro. I want to buy the subscription to that but can it be used in cakewalk? Does cakewalk supports autotune pro?
Yes, cakewalk support Autotune pro. It opens up intergrated like melodyne.
To use any pitch correction plugin, you need to know your notes on a keyboard and the singers voice - being able to identify a note instantly, but you can play by ear too. You also need to understand the singers/rappers voice to identifying certain information that are done intentionally. This is the same when running an instrument through it. Other than this, using it is pretty much a no brainer.
-
14 minutes ago, Soundwise said:
My favorite headphones for ... basically anything, including mixing. I also have Sennheiser HD650, and use them occasionally, but 712s have more definition and better scene. With plugins like Sonarworks (or Toneboosters' Morphit) and ARStudio 3 one can easily make great sounding mixes.
Yes, you can't go wrong with the 712's. The information in detail it project into the ears, are just crazy.
-
 1
1
-
-
5 hours ago, RBH said:
I was mixing some drum tracks ( acoustic tracks ) I'm working with "other peoples tracking " I had a pretty high blead from the snare into the hat mic. I thought I would try an experiment which comprised taking a copy of the snare track and inverting it and mixing back into the hat track to " hopefully " cancel out the snare bleed. Zip nada - craptastic results. I did make sure to sample align the snare hits. But It really didn't work! - Do you think it should?
Have you tried moving the hat mic a bit closer, and spacing the snare drum further away from the hat? Miking and drum placement is extremely important.
You will always get bleeding and live recording - whether on stage or in studio. The trick is also to EQ out the snare as much as you can. This shouldn't be a problem once your mic placing are in that sweetspot. Having a bit of the hat bleeding into the snare or Visa-Versa / for me: that's always tasty ? if I may say so.
-
Personally, I wouldn't mix with headphones. If I do (which is very rare) I only use them when I had tame some harshness in the vocal to make sure it's not overly compressed with a multiband. You need a really good pair of sensitive headphones for this. Also, when a percussion burried deep in isolation.
Otherwise: I don't mix with headphones and there's nothing wrong with mixing on headphones - it's a preference thing.
There's big hit songs out here that was solely mixed on headphones / and users should not be discouraged to use them or to train their ears with.
There's some really good decent pair of headphone that is cheaper than most entry level Studio Reference Monitors.
These brands include:
AKG K52
ROLAND - H5
SAMSON SR850
SENNHEISER HD 200
Just to name a few . . . I actually own all 4.
I personally LOVE the AKG 712 pro Studio Reference Monitor Headphones. It's a bit more pricier though.
I only have these 5 pairs. ?
-
21 hours ago, Nigel Mackay said:
I suspect you are imagining things.
LOL! No he is not. ?
@Stewart Cormack I finally had a listen to the sample and there's definitely too much going on the upper high mid region. There's also a lot of ringing cutting through. When this is compressed it starts to spread over the frequency area it occupies. There's a touch of reverb too much on it. Combine this with fast attack and release and a bit of heavy compression - it becomes messy.
-
1
-
-
Help me if I'm wrong with this.
The last update has brought many satisfactions to my production. Most importantly witb the new interleave on Instrument tracks, bringing me to using less effects on it when creating depth and space turning a specific instrument to mono that does not have a Mono/Stereo knob on it.
REQUEST:
So now, my next request is similar to it, on inserting sample, recording and for visual purpose.
Is it possible to add an option for dedicated Mono and Stereo tracks in a future update too in conjunction with the track we have now? This isolates the instrument and tracks further for you. This is especially true when boucing the track to audio.
EXAMPLE for REQUEST: When I switch the interleave to Mono, I always take a stereo plugin effect to further isolate the mono track, by narrowing the mono field more it on both Audio and Instrument.
So if i'm correct, a dedicated track in it's fixed state (Mono or Stereo) will have a greater effect to this both ways.
As said above, correct me if I am wrong. (I did do some research on this too.) I might not have correctly understood, what I have read.
Thanks.
-
On 3/4/2021 at 10:23 PM, Stewart Cormack said:
For whatever reason, when I export my song from cakewalk the audio sounds terrible. Not sure what the point was in me spending hours mixing and mastering just for it to sound completely different when I export it. Cakewalk seems to have a mind of it's own half the time ahaha, can anyone solve my problem? Just want to finish my song and finally get it released, but I can't because this is delaying the whole process. Frustrating would be an understatement...
I'm gona say this again. When things sounds "clustered" and messy - that means there no sense of balance in your track and compression on the master track is too heavy - but most importantly probably NO HEADROOM. Forget about the Media Players for now. No seriously! throw that out of the discussion.
Another mistake new users do in the console, because everyone wants to jump straight to it - is to crank the "Console Emulator Module" way up. The TRIM knob there is to trim the increase in dial effect. So if you set the drive to 2db or 3db, you have to turn the Trim knob to the left side and match the drive volume in (-) negative value.
With this comes compression and limiting mistakes. So now do yourself a favour quick, by doing another test. Turn down all the gain/volume to their default position of 0 = Unity, on your compressors. SET your limiters ceiling to -0.3db and the threshold down on 0db.
Watch your meter peaks on the limiter and console strips! and on your MASTER Track.
This is hardly mixing tips I'm giving / and only for testing what's in discussion here. If your meters are barely reaching that -0.3db reading, export the track and have a listen. Give feedback on this.
I will reply back.
-
6 hours ago, Mark Morgon-Shaw said:
Actually I've been using CW about 25 years and there's loads of stuff I've never used. Staff View - Video - Screensets - Markers - Mix Recall - Ripple Editing - Audiosnap - ReWire - Matrix View - Workspaces - Scale Snap....there's probably others !
You're kidding me, right? ?
Only things I don't use is:
Matrix, The now New Arranger (I just can't see the point in them.) I'm using markers less now too. Used Rewire with Sonar LE for Melodyne 2. Other than that, I use everything else.
-
13 minutes ago, Stewart Cormack said:
@Promidi @Hatstand @Will_Kaydo I always export it as a WAV file, and I'm fairly new to this so the technical terms might not be entirely correct, but when exported it sounds much heavier and clustered. The midi piano at the beginning sounds as though someone's banging a drum in time with every chord. Plus the entire mix in general sounds much messier and you can't hear the instrumentals as clearly. I'm listening through studio headphones on the default windows media player so maybe that does have something to do with it but I can't be sure. Any thoughts on what I can do to fix it so it sounds the same as it does in cakewalk?
Oh!
Understandable seeing that you said you're fairly new to this thing. It's a whole new world this, yes. Though once you have the basic knowledge of things under your belt, things will fall into place for you.
Learn about, compression as a whole / but, focus more on the Attack and Release aspect of the self-taught videos. Wish you all the best.
Good luck on future achievements.
-
1 hour ago, Osman Hemidov said:
By the way, for developers, a great example of what many users would like
")
I will gladly pay that every month for all those feature that has been requested many times before right here on the site, where all you got was negative feedback.
Are you kidding me? In place Bounce to Audio? It's been requested how many times?
So, worth it.
-
11 hours ago, Stewart Cormack said:
For whatever reason, when I export my song from cakewalk the audio sounds terrible. Not sure what the point was in me spending hours mixing and mastering just for it to sound completely different when I export it. Cakewalk seems to have a mind of it's own half the time ahaha, can anyone solve my problem? Just want to finish my song and finally get it released, but I can't because this is delaying the whole process. Frustrating would be an understatement...
Different in how?
If you're playing it through a player / or any device with custom presets, it will sound different.
Like @Promidi said: More details are needed to why you say it sounds different.
-
So here's a member that has done a pretty awesome job creating a feature add-on-fix app, called "Cakefolk for Cakewalk" that I have been running and testing for over 2hours on my laptop creating a test project (of a nursery rhyme?) for the test.
So far . . . Some great features that, I had seen in the feedback section, here on the site, he managed to solve.
Example:
• The dreadfull accidental renaming of things in the Browser.
• Resizing of tracks.
• Bounce Instrument tracks to Audio in place. Great! (This was something I had personally requested to Cakewalk, over a year ago, but the negativity that came with this. Also, it was constantly called "freeze, Huge difference.")
This is the kind of stuff you want in your DAW! Easy workflow.
I do have a few respectfull issues with it, but thats my own personal selfish reasons. Like the icon and name of it.
Otherwise: AWESOME JOB HERE!
-
Step recording and Step sequencer are two different things in Cakewalk and in general.
-
On 2/25/2021 at 9:49 AM, Jimmy Haggard said:
I've noticed a few differences in the way a mix sounds in Cakewalk compared to what it sounds like when it is bounced down to an MP3. All tracks are going to busses, and all busses go to the master bus. The output to the MP3 is the Master Bus.
Differences:1> Bass instrument is louder in the MP3
2> reverb is more pronounced in the MP3
Actions to fix:
I have to go back to Cakewalk and lower the Bass bus a little lower in Cakewalk than what I want in order for it to be correct in the MP3.
I have to lower the wet mix of reverb in Cakewalk in order for it to be correct in the MP3
Question here is: What's the EQ setting of your playback device?
If it sound right in your DAW / or any DAW of choice - it will sound right on the out side too.
-
On 2/21/2021 at 7:58 PM, Tristan Thompson said:
Screen Grabs from New Laptop:
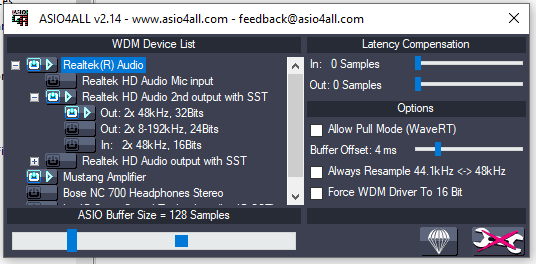
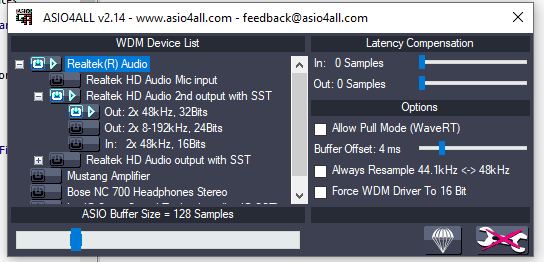
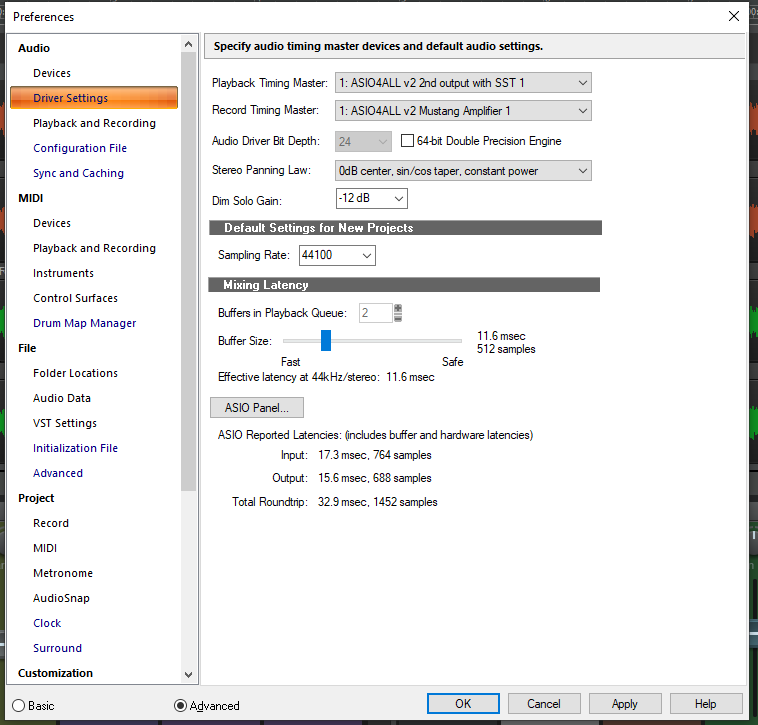
Yeah, this is definitely not right. Your Buffer Size in Asio4All and in Cakewalk needs to be sync'd.
-
8 hours ago, musikman1 said:
Ok, I just tried again and for some reason last time I selected 1202fx instead of 1204fx, my bad. I'm not sure if this is the one I need, or if I even need it, I'll have to check my driver version first. Driver update can be a pain for me, can't seem to ever just be a simple process. The Behringer downloads page re-routes me to this page.... https://www.asio4all.org/
Yes, unfortunately most Behringer Devices works best with this drivers.
but, try to hook your Audio Interface to it too.
Back when I had my Behringer, I recorded all my electric and acoustic guitars only through the mixer and vocals through interface. Every felt as if you could taste a sound ? Well, it gave me that.
Watch here: How to connect your interface to a mixer.
-
On 2/23/2021 at 1:49 AM, musikman1 said:
I was having trouble finding those for some reason. Behringer's website is kinda confusing to me, you?
Navigations were easy on their website for me. All you need to do is type in what you want.
-
1 hour ago, Kevin Perry said:
What exactly do you mean by this? Real examples please.
Exactly what it says.
-
6 hours ago, Starship Krupa said:
Ugh, that's another can of worms, Mouse Wheel Zoom is so broken. It's supposed to allow the user to zoom vertically, too.
See the thing is, cakewalk is not up to standard with windows 10 in return hindering it unstable. Cakewalks memory on functionalities are still left with Windows 2000 / XP.
Microsoft introduced a whole new world to applications with Vista and most software adapted to this, but we can't blame the current company for this.
PLEASE! I'm not stepping on toes here! ✌
-
8 hours ago, Colin Nicholls said:
@Will_Kaydo, it seems fine to me. But I'm using Ctrl-ScrollWheel.
OK stupid question but how do you horizontal scroll without using Ctrl?
Hi colin.
I'm all too familiar with this / and that is still too aggressive.
Scrolling is the most basic function in any application. It shouldn't be a command key step to begin with, and yet: still not up to standard. How many times has your DAW crash while using that?
Cakewalk has way too many "Commands step" to do a simple task. Way more than the platform it runs on for basic functionality, thereby hindering in unstable. Every where in windows scrolling is done in seconds with a one click function / not with increment steps.
I appreciate that you're trying to help, I mean it, and im familiar with all the keyboard shortcuts Cakewalk has.
My request is still valid though. Smoother controlled scrolling is needed +1000!
-
1 hour ago, Colin Nicholls said:
Ctrl-Scroll on the mouse wheel moves the window, not smoothly, no, but in small enough increments.
And Bingo! There's your problem.
Zoom in to a note on a midi clip, then scroll without pressing the Ctrl button.
That increment step scroll needs to be smooth too.

How to set the speed of horizontaly wheel-scrolling? (on PRV)
in Q&A
Posted · Edited by Will_Kaydo
Yeah, my bad.
It's actually the same here.
Apologies.