


msmcleod
-
Posts
6,958 -
Joined
-
Last visited
-
Days Won
36
Everything posted by msmcleod
-
hmm - 1000 parameters is a lot. I don't think the CS API was ever designed for querying such a large amount of parameters. If that had been envisaged, it would probably have had a call to return all the common parameters in a single struct as the result of a single call.
-

Alesis Nitro Mesh doesn't trigger. Is showing
msmcleod replied to fdadf DFaf's topic in Cakewalk by BandLab
If you're getting nothing plugging your headset into the nitro mesh module itself, then it's probably a faulty module. -
I stopped using my K1 as a controller because of the All Notes Off thing... I used MIDI-OX to filter them out for a while, but I got fed up with patching it up every time I booted up. Pity really, as it was the only decent priced keyboard with channel aftertouch. I use an EMU X-Board now when I need aftertouch. If I was still using the K1, nowadays I'd probably spend £15 / $20 on an arduino + MIDI shield and have it do the filtering for me.
-
If you want to keep cost down, the Shure SM58 sounds very similar to the SM7 / SM7b, albeit lacking some of the detail in the high end. You could maybe compensate by using EQ, or a better solution might be to mix it with a condenser mic.
-
That's good to hear I don't think finding the change should take too long - assuming that you're not querying too many parameters, and the COM overhead isn't too high (it shouldn't be as by that point, you've already got the interface, and it's not inter-process). Cakewalk already knows the state, and all you're doing is a parameter look up on that state. There's no messages involved, just function calls and a big switch statement. This was something I was going to suggest in my previous post. I built a couple of hardware projects that both eventually "failed" due to me relying on some sensible balance between the frequency of refresh rates, and what the hardware could realistically handle. In my case, my displays were i2C based and the i2C bus couldn't cope with the throughput of updates (I was also multiplexing on the i2C bus, which added further complications with higher rates). However, a lower refresh rate meant parameter changes weren't smooth enough. It's a pity, as it worked fine with a small number of knobs/displays, but just didn't scale up. In the end, I gave up and bought a Mackie C4 My suggestion for the OP however would be interpolation of the values in hardware. If continuous values are needed, it might need a phase-locked-loop based on a lower refresh rate - this could be implemented in software within the hardware's microcontroller.
-
Checkout my answer here:
-
You might find these useful: Setting up ACT for plugins: https://youtu.be/UK24ySULnf0 Setting up ACT for surfaces: https://youtu.be/ObsW0t5FnzM
-
GPU's are not general purpose devices, unlike CPU's. They're very good at specific operations - none of which are particularly useful for audio processing. They can be used for machine learning / bit-coin mining, but audio/DSP.... not so much (if at all).
-
I started getting this a month or so ago, mainly in Chromium based browsers. The issue is to do with how the browser deals with mixed content (i.e. by default, it now blocks mixed content). The workaround is to enable mixed content for discuss.cakewalk.com: https://www.howtogeek.com/443032/what-is-mixed-content-and-why-is-chrome-blocking-it/
-
I have to agree with @scook here - try to avoid 32 bit plugins if you can. In saying that, if you must use 32 bit plugins, consider using JBridge as it has a few configuration options to get around the fact they were all written to use a much older OS. FWIW I've had no issues with the DSK plugins in the past when they were configured to use the JBridge wrapper. As it stands, the only 32 bit plugins that I've got configured to use BitBridge are the legacy Cakewalk ones - all others are using JBridge.
-
AFAIK, AZController uses Cakewalk to send it's MIDI messages, as it'll be using the control surface API. So whilst the calls to refresh can be increased, the frequency of how quickly MIDI messages can be sent out from AZController can't as long as it's doing it via Cakewalk. What I think is required is for AZController to call midiOutShortMsg and midiOutLongMsg directly. This would require @azslow3 to make some modifications to AZController. You'd also need to ensure that the MIDI out device was NOT enabled in Cakewalk so ensure that AZController had full control over it. In other words, in Cakewalk, you'd configure your MIDI In device only, but the MIDI Out device would have to be set within AZController itself. It's also worth noting that a refresh frequency of 10ms had an adverse affect on Cakewalk's performance. I experienced a fair amount of dropouts unless all other applications were closed - just having a browser open would cause dropouts in Cakewalk. I suspect this would be improved if AZController had full control over sending MIDI messages, but given that all control surface functions are performed in the main thread, I'm not sure this would be a significant improvement unless perhaps AZController used a separate thread for sending MIDI messages. Any calls to Cakewalk must continue to be done in the main thread though, and doing this every 10ms will adversely affect performance.
-
I use the MidiSport 8x8 (the old blue & yellow one), and I don't have issues with it causing CbB to crash not close properly.
-
I've got an MCU + XT + C4 in my studio, but in my spare room I use the Korg nanoKONTROL Studio which doesn't have motorised faders. For the most part, I don't find the lack of motorised faders much of an issue. Sure, it's a pain setting them up to initial values, but: I try to keep the fader at zero as much as possible, using offset mode to get it to the right place. It's primary function for me is to record bus volume automation by riding the bus faders during mixdown. I find it very useful to be able to control 8 buses at once. For tweaking tracks, it's equally useful, but I use it less for that.
-
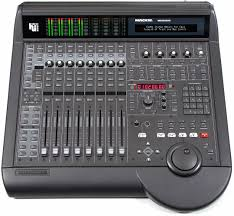
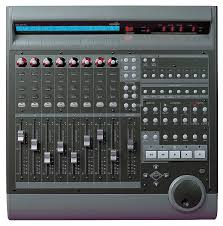
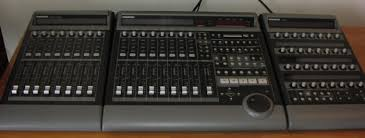
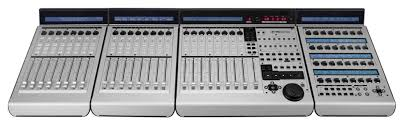
Definitely MCU - why? HUI is dead, and MCU replaced it... and as far as Cakewalk is concerned, MCU is supported whereas HUI is only very partially supported. HUI was originally conceived by DigiDesign & Mackie for ProTools ( before AVID took over ), and came up with HUI: A few years later, Mackie did a similar thing with eMagic for Logic and came up with this: Presumably realising they couldn't keep coming up with completely new surfaces for each DAW, Mackie discontinued the HUI, and turned the eMagic Logic Control into the Mackie Control Universal ( same hardware, different ROM ). The Mackie Control Universal works in three modes: HUI ( for ProTools ) Logic MCU ( for everything else ) They also brought out some extenders to add to the MCU ( which speak the same MCU language: The XT (an extra 8 faders), and the C4 ( lots of knobs for controlling plugins) : These were given a new look in the MCU Pro series, but apart from some minor differences (e.g. USB interface & better faders), functionally they're exactly the same: The MCU Pro and the MCU Pro Extender are still available. Unfortunately the C4 Pro isn't - except on eBay - a pity really, because the C4 rocks.
-
Any chance for deep hardware integration?
msmcleod replied to Batwaffel's topic in Cakewalk by BandLab
FWIW, there's a pretty good relationship between most DAW manufacturers. PreSonus have been great with regards to Cakewalk - the FaderPort range have Cakewalk/SONAR modes, however this does piggy back on the existing MackieControl support. Steinberg & Cakewalk also have a good relationship. With the AVID product though, it gets tricky. Writing a custom surface DLL from scratch takes a fair amount of time & investment. The question AVID will be asking is, "How many more $30K surfaces would we sell if we did support Cakewalk?" For Cakewalk it would be, "How many more users would we get if we supported this $30K surface?" The answer to both is most likely, "...not enough to justify the investment." The solution might be for the OP to pay a developer to write a custom Control Surface DLL (or configure AZ Controller if this is feasible). However, from experience I can confidently say the majority of time developing a Control Surface DLL is spent in testing... and a developer will need access to one of those $30K control surfaces (and the physical space to set it up somewhere!). -
It's the stereo mix of all the drum parts, as opposed to the individual outs of each kit part.
-
@norfolkmastering - I had a look at the refresh interval issue. It looks like some of the UI optimisations have had the effect of capping the refresh rate at 25ms. Although the timer controlling the refresh is in its own thread, the refresh and any MIDI messages that are requested to be sent out by the control surface are synchronised to the main thread. I did manage to find a way around this to support a refresh of 10ms, however its worth noting that any MIDI messages sent back out via Cakewalk will still be capped at 25ms. The only way around this would be for your control surface DLL to deal with the MIDI messages outside of Cakewalk - either that, or not use MIDI at all for controlling the analog side.
-
I sounds like Spire is generating MIDI events which are being picked up by the subsequent recording. You've two options: 1. Disable MIDI output on Spire by going to the drop down menu at the top of the synth's dialog; or 2. On the track you're recording on, make sure your MIDI input is only set to your controller keyboard instead of "All Inputs".
-
Automation shift with project tempo change
msmcleod replied to Mo Jonez's topic in Cakewalk by BandLab
If you've got audio clips with automation, and you're changing tempo without stretching those clips to match the tempo, then you need to make sure your automation timebase is set at Absolute. e.g.: -
Yeah, I think I'll raise one. Thanks for checking it out though - it's good to know I'm not the only one with the issue.
-
An analyzer may give you an indication as to where frequencies are dominant (or not), but that's really only any use when you know what you're looking for (i.e. you can hear something bad, but not sure where it might be). It can also be useful if two instruments aren't fitting well together, as you can identify where their common frequencies are. But in all honesty, visual tools can lead you down a rabbit hole where you're cutting/boosting frequencies for no good reason at all, and in the end it just sounds awful. My best advice is... use your ears, not your eyes!
-
Two jumped out at me right away. PAD Man at the corner LED Birdland
-
I upgraded and almost immediately reverted back to 2.9.8 as a few of the presets are totally messed up.
-
Cakewalk attempts to recover from dropouts during playback, depending on the DropoutMSec setting in your configuration file. This isn't the case for recording where dropouts aren't tolerated because you don't want glitches in your recording. Plugin UI's should really be designed to be as lightweight as possible (CPU wise) rather than be focused on maximum eye-candy.
-
https://www.cakewalk.com/Documentation?product=Cakewalk&language=3&help=AudioPerformance.24.html


