


msmcleod
-
Posts
6,909 -
Joined
-
Last visited
-
Days Won
35
Everything posted by msmcleod
-
 FWIW - if you use Articulation Maps, Articulation MIDI events are always sent prior to any notes / CC events on the track.
 -
Playlists display wonky in Sonar compared to Bandlab Cakewalk
msmcleod replied to tdehan's topic in Cakewalk Sonar
Just to confirm, are you running the ARM version of Sonar, or the Intel (x64) version? -
Playlists display wonky in Sonar compared to Bandlab Cakewalk
msmcleod replied to tdehan's topic in Cakewalk Sonar
Can you let us know: - The resolution / scaling of your screen(s) in Windows - Your display scaling within Sonar -
@Tommy Byrnes - what is your display scaling set to within Windows? If you're using a custom scaling (i.e. not the standard 125% / 150% / 175% / 200%), it's known to be problematic - in fact, Windows warns you it might cause problems if you try to set a custom display scale other than the standard ones. Another thing worth trying is running dxdiag.exe - this is a built-in Windows diagnostic tool that will check the integrity of your DirectX configuration.
-
The issues for both the Play List View and the Color Preferences page have been fixed for the next update.
-
Old projects created in SONAR professional using TH3 from overloud
msmcleod replied to warrickhale's topic in Cakewalk Sonar
TH-U is a separate installer in the Cakewalk Product Center -
FWIW - I'm running a i7-3770 @ 3.4GHz... I've now got 32GB ram, but was running on 16GB for years. I'm typically use an ASIO buffer size of 64 on my Focusrite interface ( I can use 128 on my RME, as its round-trip latency is better). 8GB will work up to a point, but performance will drop considerably once Windows decides to swap memory to/from disk. To avoid this happening, try to make sure Sonar is the only application running (a web browser with lots of tabs open is a killer!); avoid multiple VSTi's that use larger sample libraries (things like TTS-1, the SI Instruments, AIR XPand! 2, Synthmaster - even Omnisphere are probably ok, Kontakt probably isn't). Also stick to 1080P for your diplay resolution, as 4K will use 4 x the memory for graphics rendering. FWIW, I've run Sonar on an Intel J4125 @ 2.0Ghz with 8GB RAM, recording 16 simultaneous audio tracks whilst playing back 32 audio tracks without issue. No VST's were involved however, as it was just a tracking session. If you do start to see performance drop and upgrading your machine is not an option, consider upgrading your RAM to 16GB while they're still available - it's relatively cheap nowadays. Other techniques such as freezing tracks when they're "complete" can help considerably too. For tracks using sample library based VSTi's, make a copy of the frozen track (so the copy is a pure audio track) and archive the original synth track / disable the synth in the synth rack. It's worth mentioning that Sonar will not run on Windows 7, as it relies on Windows API's that are only available in Windows 10 and above.
-
Are you using any clip gain envelopes - also what is your screen resolution / scaling?
-
@John T - I'd advise unchecking "Show Waveform Outlines" within the Track View's View->Display menu. @Jorge Tata Arias - AFAIK, GPU acceleration only affects the PRV for the time being. It shouldn't affect Track View audio waveform display performance.
-
Joking aside... have you priced up the cost of a compatible Data MiniDiscs for that? A pack of 3 is around the same cost as the discounted Sonar subscription, if not more. I have a Yamaha MT8X and the cost of decent type II cassettes is just as crazy - around $20 - $25 for a new/old stock Maxell XL-IIS 60 or 90. The surprising thing is that when you account for inflation, they're actually more or less comparable to what they cost back in the day.
-
SONAR/CbB/Sonar have always been both forward and backwards compatible. If you try to open a newer project in an older version of Sonar/CbB, it'll just ignore the new stuff. Some newer features aren't compatible in older versions, such as the new Audio Snap transient detection algorithms introduced in CbB (if you try to open in SONAR Platinum). In cases like this, the transients will be thrown away and you'll need to re-detect them using the older algorithm. You'll get a warning dialog when opening the project if this is the case.
-
It has definitely been discussed, but nothing scheduled yet. Part of the reason for delaying is Microsoft's impending release of MIDI 2.0 support.
-
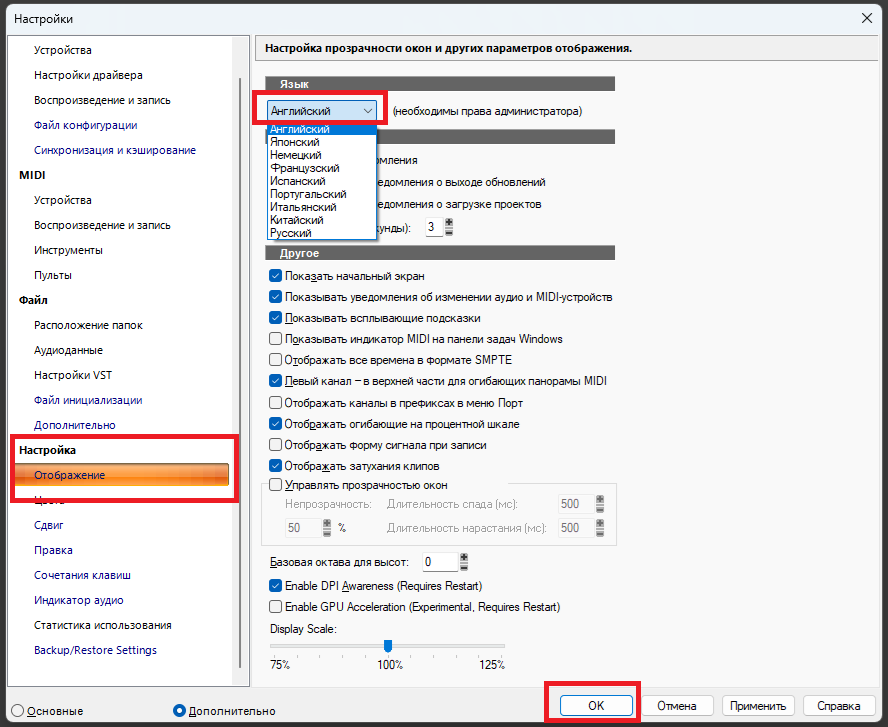
Press "P" for preferences, select the following (English is always the top option on the language dropdown), click OK, then restart Sonar:
-
What you say is only true for "Track Manager" in the View menu. The old Track Manager is not a view - it's a dialog - so we show the crown in this menu only. There was previously no Track Manager entry in the View menu. The following will show the old Track Manager dialog: Pressing "H" when the Track View (TV) or Console View (CV) is in focus. Selecting "Track Manager" from the TV or CV Track Manager button context menu. Selecting "Track Manager" from the TV "Tracks" menu. Selecting "Track Manager" from the CV "Strips" menu I've updated the original post to make this clearer.
-
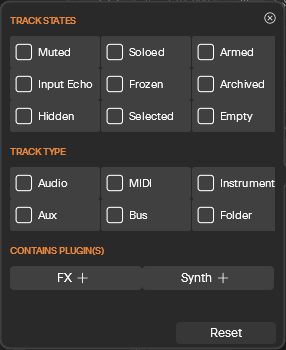
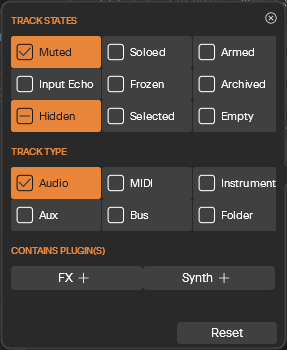
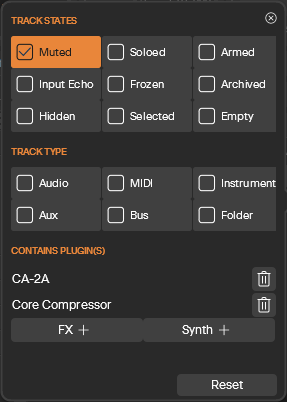
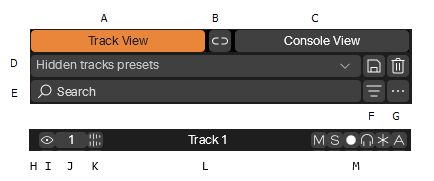
Track Manager Within Sonar Premium, the old Track Manager dialog has now been replaced by a new Track Manager panel which can be docked along with the Browser/Synth Rack, or reside on the desktop as a floating window. It is no longer modal. To view the new Track Manager, either press the "H" shortcut key, or select "Track Manager" from the main View menu. The Free edition of Sonar will continue to show the old Track Manager dialog when using the "H" shortcut key, the Track View button context menu, or "Track Manager" from the Tracks View "Tracks" / Console View "Strips" menus. The Track Manager not only allows you to show/hide tracks, but also allows you to select tracks, change the MSR, echo, frozen and archive states, as well as rename / move / delete tracks. Swipe behaviour is supported for quickly changing the states for multiple tracks and buses. A : When highlighted, you're seeing the tracks/buses in the Track View B : Enables/Disables "Synchronize Track and Console views" setting C : When highlighted, you're seeing the tracks/buses in the Console View D : Hidden Track Presets - works the same as it did within the old Track Manager E : Filter track/buses list by name or number F : Additional filter options by Track State / Track Type / Plugins. When highlighted, a filter is being applied. G : Menu for Sort options / Delete Tracks H: Shows the current Track Color. Clicking this will show the Track Color picker. I : Show/Hide Track - when enabled, the track is hidden. Click or swipe to apply to multiple tracks*** J : Track Number / Selection status. Click or swipe to apply to multiple tracks. K : Track Type Icon - clicking will jump to this track. Dragging will move the track / highlighted tracks* Double click to open synth UI ( Instrument tracks), or open editor (Audio/MIDI tracks). L : Track Name - clicking / swiping will highlight the track rows** Double click to rename track. M : Track State buttons - Mute/Solo/Arm/Input Echo/Freeze/Archived - click or swipe to set for multiple tracks * Drag to move tracks will only work when ordered by Track Number and no filter is applied. ** Row highlighting is separate from track selection. Unlike the Track View, grouping operations (including Delete Tracks) are always performed on the highlighted tracks within the Track Manager. *** ALT + Clicking the hide button will hide all tracks within the Track View and/or Console view other than the ones in the current search results. When you ALT click the hide button of a track, only the tracks are affected; when you ALT click the hide button of a bus, only the buses are affected. This way you can match your filtered track results in the Track View/Console View without hiding your buses and vice-versa. [2025.07] ALT + Clicking the hide button of a Folder Track will unhide the Folder and all its content tracks. Filter Flyout: The Filter options allow you to show only the tracks of the state / type you're looking for. Each checkbox has three states, e.g. for the mute button: Off: - don't care if it's muted or not On: - only list tracks that are muted Tri: - only list tracks that are NOT muted The states/types are "ANDed" together, so the following means only show audio tracks that are muted and not hidden: The Contains Plugin(s) section allows you to further filter tracks/buses, so the only the tracks that contain any of the specified plugin FX or Synths are shown. For example, the following will only show muted tracks that have CA2A or Core Compressor within them: The Reset button will clear all of the checkboxes, so that the track list is no longer filtered.


- 1 reply
-
- 6
-

-

-
Is There a Way to Run Multiple Instances of Cakewalk?
msmcleod replied to david40's topic in Cakewalk by BandLab
Depending on the options you've checked within the Backup/Restore Settings page, the config profile file can contain a compressed copy of: Various Sonar settings contained in the registry (it does not include your plugin inventory or anything related to your user account) Cakewalk.ini (general Sonar settings) TTSSeq.ini (MIDI settings) Aud.ini (Audio device settings) ctrlsurface.dat / ctrlsurface_UWP.dat (Control surface settings & control surface user presets) INSTRMAP.ini / Master.ins (instrument mappings) userArrangerSectionTypes.json (user arranger section types) When applying a config profile, the existing files above are replaced with those in the config profile. Obviously it can only replace what was stored within the file when you created it. If you do this via the short-cut/command-line method, these files are replaced before Sonar properly starts up. If you do it while Sonar is already running, it replaces them then re-applies all the settings from the new files. Either of these methods should take no more than a few seconds - normally around 3-5 seconds, but certainly less than 10. I suspect the difference in time is due to Windows reacting to your hardware being connected/re-connected rather than anything the config profiles are doing - especially since, as you say, subsequent loading of the same profile is much quicker. Windows knows what hardware was connected the last time it was switched on, so if anything has changed, it has to deal with that. The only other thing that could affect things would be an anti-virus/anti-malware program, but if it these were the culprit I'd expect it to be slow every time. -
Is There a Way to Run Multiple Instances of Cakewalk?
msmcleod replied to david40's topic in Cakewalk by BandLab
This is the correct link without the https... it relates to the new Sonar only: http://legacy.cakewalk.com/Documentation?product=CakewalkSonar&language=3&help=Introduction.34.html -
Sonar Premium and Sonar Free are the same program. Premium features are unlocked when you log in, and stay in as long as you're logged in. Note although you need to be connected to the internet to actually log in, you do not need to stay connected to the internet to remain logged in. If you remain disconnected from the internet, your log-in session will eventually expire, but AFAIK it lasts around a month. If connected to the internet, your log-in session will automatically refresh.
-
If your subscription ends, functionality will revert to the free version of Sonar, currently this means: Plugin oversampling will be disabled. Anything set to Elastiqué Pro will be rendered using Elastiqué Efficient. Dithering will fallback to using Triangular if it was previously set to POWR. If you had more than one arranger track, you will still be able to access them all, but you will only be able to view one at a time, and you can't delete, rename or add any new ones. This doesn't affect your existing arrangements, or your ability to create new ones using any of the sections from the existing arranger tracks. Jump to Track will become unavailable You will only be able to preview BandLab sounds from the BandLab Loop library - any that were already used in your project, will still be available. Track Manager will revert to showing the old "Show/Hide Tracks" dialog. The hidden tracks presets are 100% compatible between the old and new Track Manager. As long as you don't attempt to edit any of the oversampling/stretching/dithering settings, your existing settings should return to their previous settings if/when you renew your subscription.
-
Does free version of Sonar disables itself like CWBL?
msmcleod replied to Misha's topic in Cakewalk Sonar
^^^ essentially, this. -
You should only get the message if you try to access a setting that is only available in the premium version... and this should be clearly indicated by the crown icon. If you're seeing it when doing other things, please provide us with the exact steps that led to the message appearing. Before releasing, we did see an issue when selecting an export preset (in this case the preset was set to use POWR dithering). We fixed this one, but it's possible there could be other loopholes. Please let us know all the detail if this is the case.
-
The search will filter the tracks list in the Track Manager (the filter button offers more options). It doesn't affect the main track view. The idea is that you can use the search/filter options to identify tracks you wish to perform a number of operations on. You can then select them (to perform a quick group operation from the TV), or mute/solo/archive/arm/hide etc directly from the Track Manager. If you want to hide the tracks, use the search/filter options to identify the tracks you want to hide, then swipe down the hide icon to hide them. You can then save this as a preset for that project.
-
The presets are "Hidden Tracks" presets - as they were in the old Track Manager. They are not search presets.
-
As far as I can tell PDC is taken into account, which is what it should do. I added a bunch of look-ahead plugins, and used the MIDI Sync display in MIDI-OX to show the time. Even with a 1.5 second delay due to PDC, the MIDI sync was showing the M:B:T time exactly in sync to what I was hearing. It doesn't matter what each individual track's PDC is as Sonar will automatically add a further delay to each track to ensure that each track is played in time with each other. In other words, each track is delayed as much as it needs to be to match the track with the largest plugin delay.