
-
Posts
203 -
Joined
-
Last visited
Everything posted by Helios.G
-
Hey SteveC, Tried it out, and it worked sort of, but because of the default behavior of the built in themes, every new track has to go through the process individually. Sometimes I work on projects with high track counts, so that's a big no no for me. I'm going to keep using Cbb, but for the first time in all these years, if they cut me off, I might have to find a new daw. That's a real bummer for me
-
This looks great steve, thanks a million! I'm gonna give it a try and report back later, awesome! THank you
-
How'd you do that?!! Like what was the process? This would be so much easier on my eyes, especially the first one.
-
Hey Jonesey, unfortunately no. The issue is how my vision works. I don't know what exactly is the cause, but viewing these basically monochromatic UI's hurts my eyes and usually end up in migraine. It's a real problem for me.
-
Get the note vst, you can change whatever you want and use it any daw you want.
-
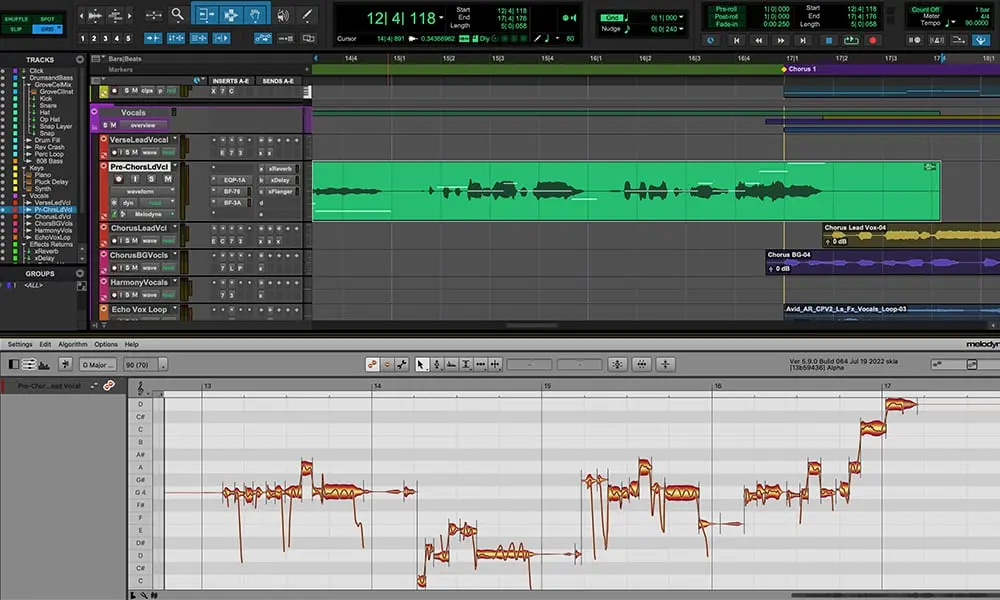
I get what you're saying, but to me it's not about just preference, I get migraines looking at these dark UI's and brightly centered blobs. Every software I have installed that is like this, the moment I check and see there is no way to customize, it gets deleted.
-
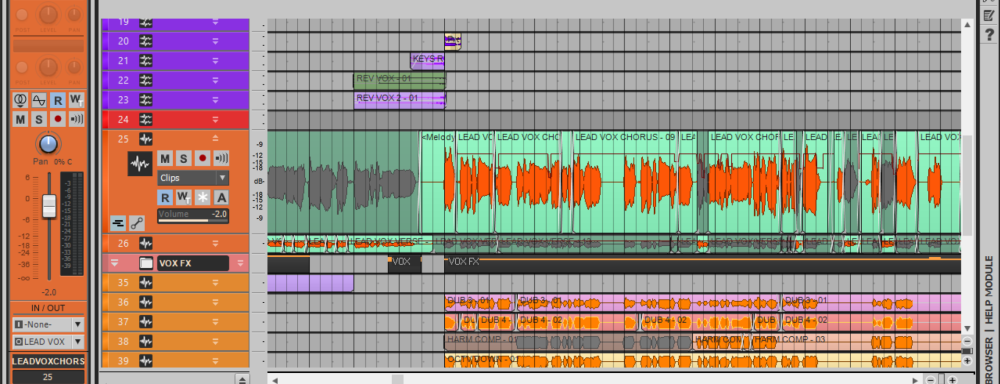
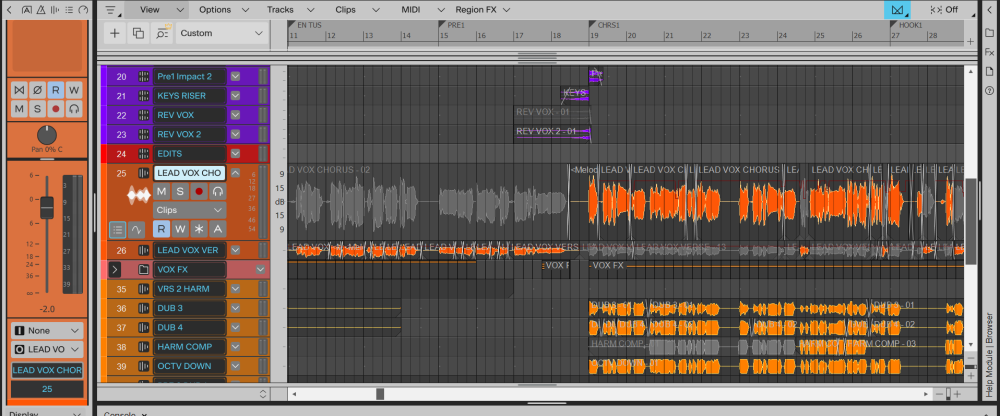
Hey guys, I don't know if this is the best spot for this, but here it goes. I've been using Sonar/Cakewalk going on almost 20 years or so. I love cakewalk and have held on through all the different ownership, cause I know it well. I have been hesitant to jump into new sonar, one, because I'm not a fan of subs, but two, and more importantly for me, the lack of ability to edit the color palette on the GUI. I have visual issues, and I need contrast to be able to edit and spice comfortably for hours when making music. For a while now sonars color palette had been and issue for me, since the gibson days, but there was always a way to change it. In the new sonar, that is not the case. With the new offer for cakewalk users I decided to download it again, and again, I couldn't look at it for longer than a few minutes at a time without getting a migraine. Is there no workaround for this? I can't see myself paying for something that doesn't take this type of stuff into account for it's users. I've included a few pics to show what I mean. The first is cakewalk, the second is new sonar. Same exact project. Cakewalk is much easier to edit the color palette and make it easy on my eyes. Other daws have this as well, I'll add pics of that too.


-
Where can I read this on Cbb?
-
Hey guys, I don't know if this is the best spot for this, but here it goes. I've been using Sonar/Cakewalk going on almost 20 years or so. I love cakewalk and have held on through all the different ownership, cause I know it well. I have been hesitant to jump into new sonar, one, because I'm not a fan of subs, but two, and more importantly for me, the lack of ability to edit the color palette on the GUI. I have visual issues, and I need contrast to be able to edit and spice comfortably for hours when making music. For a while now sonars color palette had been and issue for me, since the gibson days, but there was always a way to change it. In the new sonar, that is not the case. With the new offer for cakewalk users I decided to download it again, and again, I couldn't look at it for longer than a few minutes at a time without getting a migraine. Is there no workaround for this? I can't see myself paying for something that doesn't take this type of stuff into account for it's users. I've included a few pics to show what I mean. The first is cakewalk, the second is new sonar. Same exact project. Cakewalk is much easier to edit the color palette and make it easy on my eyes. Other daws have this as well, I'll add pics of that too.


-

Free version of Cakewalk Sonar now available
Helios.G replied to John Vere's topic in Cakewalk by BandLab
Ok, we pay the 49, what happens after the year is up? -
I don't think so, I've had to refresh my activation several times since december, which required me to log online. Either way, it's probably nothing.
-
I saw that too, and was a bit confused at first when I realized it was sonar and not cbb. Thanks Jonesey
-
Hey guys, did anyone else get an update for cakewalk yesterday? I've been looking through the forums and I don't see any mention of anything. My laptop didn't get it for some reason, but my desktop did, but what's more odd is that the "what's new" page didn't go anywhere like it usually does, it just opened a blank page. I'm just wondering if I'm the only one? Thanks! Edit: the new version says 2024.12(build 125)
-
Or copy control D until you have as many as you need.
-
Can you edit the categories in the text file too?
-
So I figured out what's happening, I just don't know what to do about it yet. I made another ins file with the john melas software, and clicked it open with a text editor, everything was there, but what I realized is that a ton of mx patches where sent to the GM section. That's why some things seem to be missing, and some categories look off, lots of patches are stuffed there for some reason. Problem is, I don't know how to relocate them in the melas software. If I knew how to do that, I could do it and share the new ins file for anyone facing the same issue here.
-
Hey Greg, by any chance did you use the demo version of the John Melas software? I read in some motif forum that if you don't buy the full version of the whole bundle, it has restrictions in place. That might be what we're seeing here. If true, that sucks, cause I'm not paying 95 for these tools.
-
I don't know, it's driving me nuts. My main issue is that because of these random differences, picking a sound sometimes reverts randomly. When I check the ins, it's always around those sounds that don't line up with the original data list. check for yourself, here's the Yamaha data list for the mx series. https://usa.yamaha.com/files/download/other_assets/0/892970/mx49mx61mx88_en_dl_c0.pdfc
-
Hey 57Gregy, long time I haven't bothered you on this, so I hope you don't mind. I'm working on a project and was using my mx yesterday, when I noticed that the ins file doesn't have everything listed in correct order. I thought I'd take things into my own hands, and downloaded the john melas software, and ran that, but the same thing kept happening. My issue is, when you download the data list directly from yamaha, and compare it to the keyboards menu, they line up exactly, but when you compare it to the ins file, there are things that don't line up. Is there something I'm doing wrong? I just want the basic voicings in the order and categories they appear on the keyboard on the ins file. Am I missing something? Thanks man
-
it's not free, but start here, and you'll learn everything you need to know, good luck... https://www.groove3.com/products/SONAR-Explained
-
How much can a decent mastering engineer polish the overall mix?
Helios.G replied to T Boog's topic in Cakewalk by BandLab
You've gotten a lot of great advice here already, but I'd like to add this one thing. Many novice producers/artists/musicians don't actually know what a good mix sounds like. Most people are accustomed to what the final product of a major label release sounds like, and they compare their mixes to that. Don't do that. Beyond the fact that you're comparing a finalized project to your still unfinished one, there are usually tons of people who work on these songs, with lots of knowledge on arranging, sound choice, recording in optimal conditions, probably with top notch gear and more importantly with years of know how in implementing all of these advantages. Your first/early projects will sound bad, that is part of this process. You're going to go through some growing pains, but if you do lots of songs, and stick to it, eventually, you'll start getting better, and hearing things you didn't before. Before you know it, you'll start to understand what people mean by the gear doesn't matter, only your ears do, cause fundamentally it's true. Once you get your ears to a level of proficiency where you can hear what a song needs and what may be extra fluff that it doesn't, you'll be golden. Then you'll start to make production, mixing, heck even gear acquisition decisions, based on what is actually important and not what you think makes you sound "professional". Good luck man. -
How to True Stereo Pan NOT just balancing
Helios.G replied to Roland-Music's topic in Cakewalk by BandLab
Or just have it's way of working built in, I'd love that. But I'm not complaining too much, at least it exists 😂 -
How to True Stereo Pan NOT just balancing
Helios.G replied to Roland-Music's topic in Cakewalk by BandLab
I know this comment is old, but just wanted to thank you for sharing this plug here. One of my biggest bugaboos with cakewalk has always been getting a mix to have space and width and translating both in cans and on monitors/speakers. This plugin is amazing, I honestly can't go back to the way I used to mix. Thanks again! -
Glitch on playback, from a quack to John Henry's hammer
Helios.G replied to badt1mes's topic in Cakewalk by BandLab
Why don't you just delete the offending sections and fill it in with copy paste from a section without the problem? -
Can't save projects access denied
Helios.G replied to onlyinitforthemoney's topic in Cakewalk by BandLab
How old is your ssd/hdd? Could be that, but would need more info.