


Andres Medina
-
Posts
723 -
Joined
-
Last visited
Everything posted by Andres Medina
-
 Running smoothly here - Thanks you all.
 -
Cakewalk for video projection.
Andres Medina replied to Sergio Miranda's topic in Cakewalk by BandLab
Glad it somehow worked! -
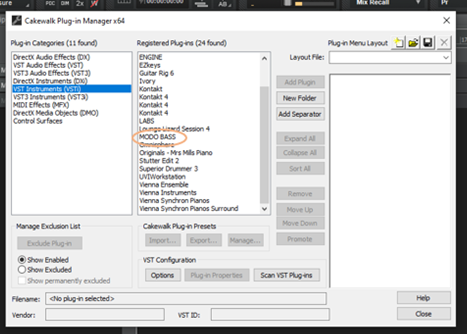
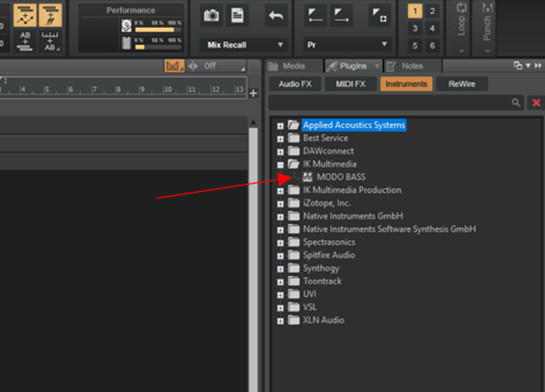
If properly installed and recognized by the plugin manager, it should appear like this in the plugin manager (see pic 1) Also, you can try this: go to Insert/Soft Synth/Plugin Layouts/Sort by Manufacturer - It should display your soft synths accordingly, so look under Ik Multimedia folder. (see pic 2) Hope it helps -
-
Where is the MP3 export bitrate?
Andres Medina replied to Keith Marriott's topic in Cakewalk by BandLab
Yes, it is available only after you choose the mp3 format, not before that. -
For me the old way was very simple: I agree that with just two or three clicks you were done... fast and simple. But limited, when you are working with a increased number of tasks related to a bigger project (exporting stems, alternative mixes, adding information to each file, batch exporting several tracks with different specifications, etc.) So, after investing a couple of hours in the learning process of the new features, I managed to configure my workflow in a way that is incredible fast, as I don't have to bother even naming the exported files. It takes the names from wathever source you want, and that's it. And if you need simple export functions, just create a preset that meets all of your requirements, and use that preset all the time. Couldn't be simpler then. But it takes time to learn and customize to your needs the export features, after you properly understand the logic of the system. Would I get back to the old way? no.
-
Cakewalk for video projection.
Andres Medina replied to Sergio Miranda's topic in Cakewalk by BandLab
There is no way to do what you want. However, this could work to a certain extent: Create a shortcut for full view for video size. Open video window Hit spacebar to play video+audio Click on the video window Apply the shortcut (you'll get the full screen video running) It will not be what you need, I know, but it's closer. --- or invert the thought process: embed the audio in your video using a video editor, or even CW export video features - , and use a video player with that capability instead?- 15 replies
-
- 2
-

-

-
- video
- synchronization
- (and 1 more)
-
If you want to delete the whole blank space for all the tracks in your project, use the Ripple Edit command (see pic, right up corner). Engage it and when you press delete, EVERYTHING in the selected area is gone. Remember to disengage it later!

-
How can I save track sizes and position?
Andres Medina replied to gmp's topic in Cakewalk by BandLab
Great - CW is REALLY flexible. -
How can I save track sizes and position?
Andres Medina replied to gmp's topic in Cakewalk by BandLab
"If so, what happens if you set the height for each track the way you want and then choose "Lock Height" for each track?" - Yes, each track is saved with the specified height. Not sure what happens if saving the workspace retains the locked heights, not tried it. -
How can I save track sizes and position?
Andres Medina replied to gmp's topic in Cakewalk by BandLab
There is a way, actually: right click on the selected track, and mark "Lock Height". The horizontal size is locked now. But you have to this in a track by track basis, doesn't work on multiple selction. See pic.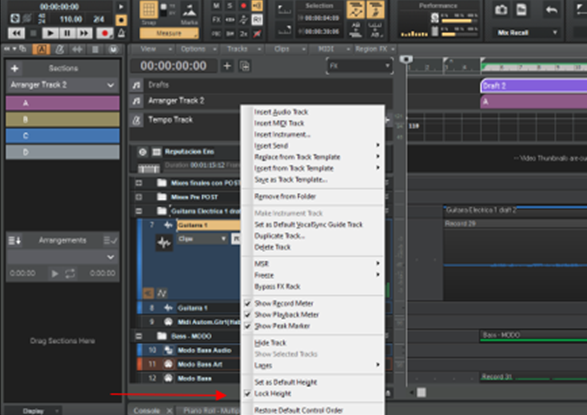
-
Copy/Paste Special not working?
Andres Medina replied to Andres Medina's topic in Cakewalk by BandLab
Good idea. Thanks! I'll do. -
Hi - I've tried several times to copy (Copy/special+Paste Special) tempo, arranger tracks and markers from one project to another. I do check all the appropriate boxes in the related dialogs, but have no luck: only midi and markers data are copied, but the tempo and the arranger tracks do not transfer... Maybe I'm doing something wrong? Thanks -
-
Having multiple plugin windows open at once
Andres Medina replied to Myriad Rocker's topic in Cakewalk by BandLab
You can Pin the window of any plugin, so it stays always open. See image -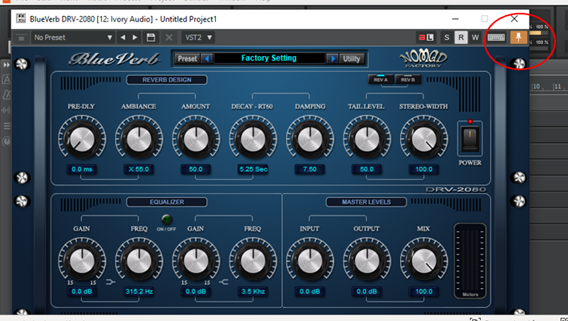
-
Copy Track Settings To Existing Track
Andres Medina replied to John David Ross's topic in Cakewalk by BandLab
My suggestion would be to duplicate the audio track without the events, and then just drag the audio from the 2nd vocal track to the original. (see image) Other way to do it: Insert your plugins in a BUS, and route your vocal tracks to that bus.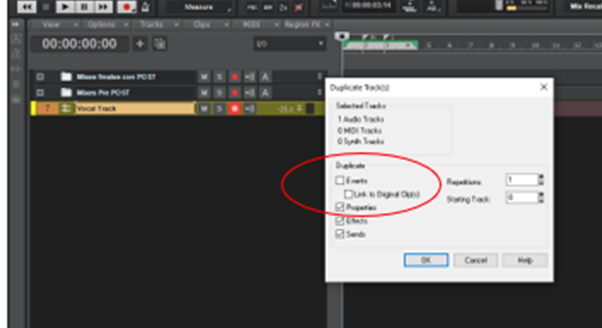
-
Converting Arranger Section into Markers?
Andres Medina replied to Andres Medina's topic in Cakewalk by BandLab
Thanks a lot msmcleod! Saved me a lot of wasted time doing it manually. You really know CW upside down - -
Hi! I wonder if there is a way to convert existing arranger section into markers, automatically?
-
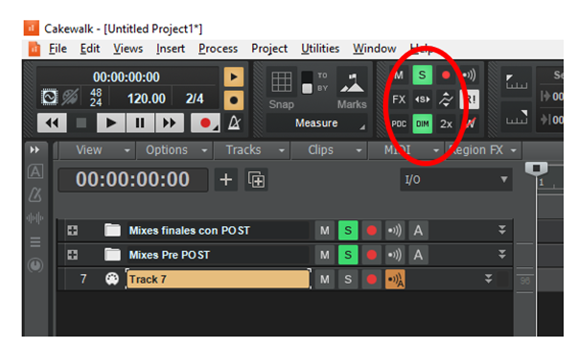
.. also, make sure that "Dim solo Mode" is not accidentally engaged: it makes the other tracks slightly audible too, by a configurable percentage.
-
mmm... even in Spanish is a incomprehensible phrase.
-
Chasquidos al Reproducir la Mezcla
Andres Medina replied to Project LE's topic in Cakewalk by BandLab
Hola. No sé si ha estudiado un poco el programa antes de usarlo. Es importante, porque no es un app simple sino un programa profesional de producción musical. La ayuda del programa es muy muy buena y tiene tutoriales para todo lo básico. El ruido que menciona puede deberse a múltiples causas. Lo principal es que revise la configuración del audio de Cakewalk, para que esté usando el driver correcto. (Preferences/Audio/Devices). Seleccione solamente el driver ASIO que instaló recientemente. Revise también la configuración del driver, en (menú en inglés:) Preferences / Driver Settings / ASIO panel - y asigne un buffer size adecuado a la velocidad de su equipo. Puede probar desde 526 hacia abajo. Mientras menor el valor, menos latencia, pero más exigente con su sistema, lo cual puede producir chasquidos. Un valor de 256 es usualmente apropiado. Ver imagen -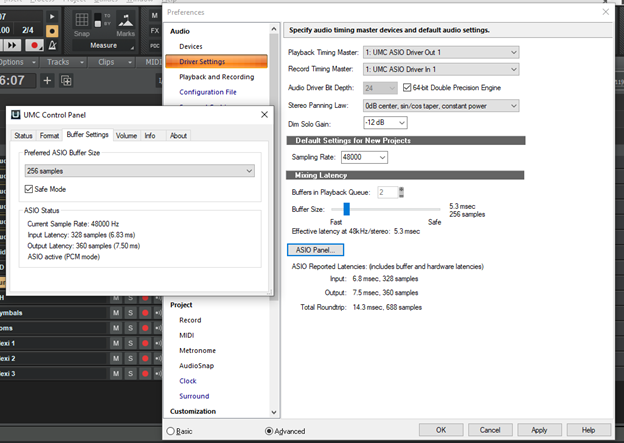
-
Problem drawing in CC64 in PRV (SOLVED)
Andres Medina replied to Billy86's topic in Cakewalk by BandLab
An easy way to write the pedal line is by setting your drawing tool to "line". Just click once in the desired place. Also, remember that some piano VST's use half pedalling, so you can actually draw your pedal line at different positions, not just 0 or 127. -
Chasquidos al Reproducir la Mezcla
Andres Medina replied to Project LE's topic in Cakewalk by BandLab
El Driver que estás usando no es el mejor. Es genérico y de mala calidad. Instala el driver que viene con tu interface. -
Problem drawing in CC64 in PRV (SOLVED)
Andres Medina replied to Billy86's topic in Cakewalk by BandLab
Not 100% sure, but I think that the moment you release the mouse when drawing, you are actually writing a value - which is not zero -, and it persist in the lane. If you want cc 64 off you have to specify that value on your writing by drawing at 0. The other thing I see is that you may have engaged the Snap button - may be Snap to Measure?, and that's why when you release the mouse, tha value goes to the very end of that measure. -
Locking Arranger Sections to SMPTE
Andres Medina replied to Andres Medina's topic in Cakewalk by BandLab
jeje - my mistake: Thanks msmcleod ! -
I struggled with this too, but once I understood it and studied it a bit, I'll would not go back to the tempo view. But there is a learning curve involved.
-
Locking Arranger Sections to SMPTE
Andres Medina replied to Andres Medina's topic in Cakewalk by BandLab

