

-
Posts
476 -
Joined
-
Last visited
Posts posted by winkpain
-
-
5 minutes ago, Glenn Stanton said:
letting the gain level work on inbound audio regardless of source... (which is likely what the majority of folks would expect).
Absolutely!
-
On 6/13/2021 at 5:40 PM, Glenn Stanton said:
yes, the track input gain is only used to control the recorded clip and the live input would have be controlled on the HW IO
On 6/13/2021 at 5:40 PM, Glenn Stanton said:what is a bummer is that the patch point and soft synth bypass the input gain
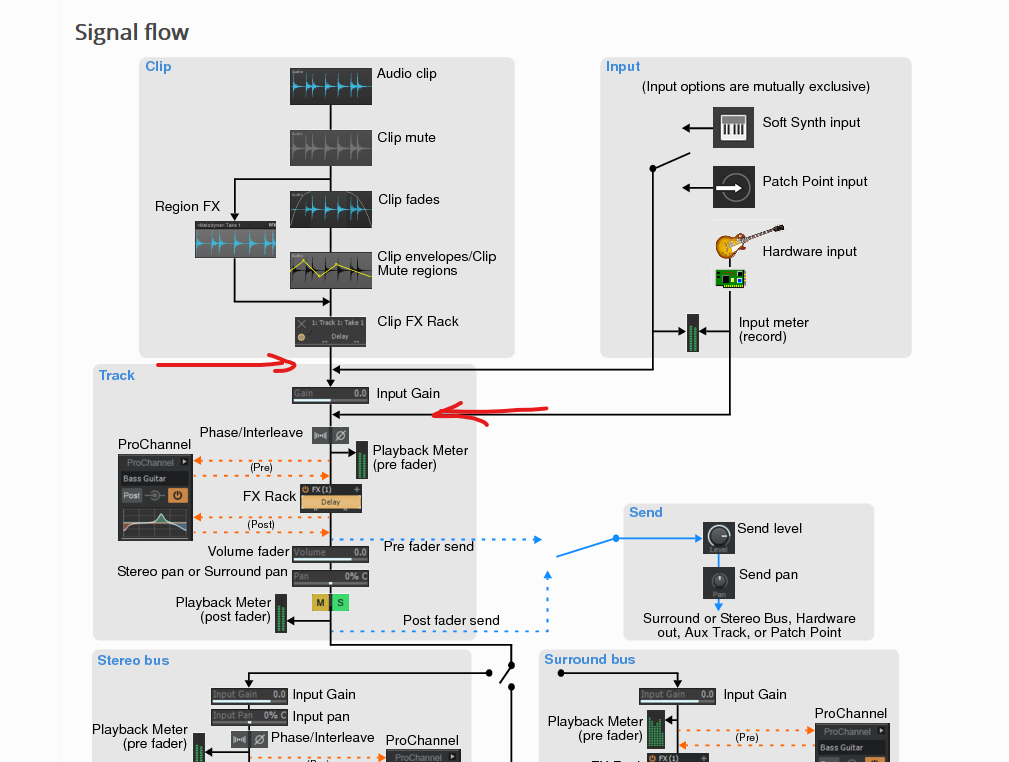
SO... I am still scratching my head on how to really understand the signal flow indicated in the above chart, specifically where it seems to indicate that the Soft Synth and Patch Point signals indeed come before the Input Gain control as marked with my upper red arrow. In my (perhaps just wishful thinking) desire for what is shown in this chart to be true and that using a Patch Point would allow actual input gain control over a live signal (that is otherwise at a fixed level) before being recorded, I have been trying things and have noticed very odd (to my understanding) behavior...
- As a test, I first tried playing a soft synth live while record enabling its associated audio track only and varying the Input Gain from -18 to +18db throughout the recording process. The audio I heard while recording changed with these gain variations, and the waveform that displayed while recording clearly showed the gain variations as well. Immediately upon stopping recording, however, the waveform reverted to a consistent unity gain display and the playback did likewise.
- I then tried patching this same Soft Synth's audio track to a Patch Point, record enabling this track only and repeated the procedure varying the Input Gain on the original audio track (of the synth), and this resulted in a gain varied clip being recorded on the Patch Point track. (This, of course, can be achieved with varying the track fader of the original synth audio track as well or a combo of Input Gain and track fader. - Varying the Patch Point's Input Gain during recording made no difference, as in #1)
- Then, changing nothing but the input source of the original audio track to a hardware input and leaving that track patched to the Patch Point set to record, I recorded audio while varying the Input Gain control of the original audio track exactly as in test #2. Unlike in test #2 however, this had no effect on the recorded clip. (Varying the track fader did vary the recorded level as desired.)
What, then is the difference between # 2 and # 3? In my mind they should have had the same result. There is obviously something nuanced in the signal flow going on in the variations between these examples that is not being explained, certainly not in the signal flow chart above. I understand and see that a hardware input is indeed bypassing the Input Gain and this is indicated in the chart where I have the lower red arrow. But the Soft Synth/Patch Point signal line shows then arriving above/before the Input Gain. And why does a Patch Point behave differently to the Input Gain of its source track if it's receiving audio from a synth as opposed to audio from hardware ? In both cases, the Patch Point is just receiving audio from an audio track. How does the Patch Point track "know" that there is a difference between the original sources of the audio??
-
I am impressed by the level of patience and restraint witnessed in this post (and others of similar nature) in regard to responding to the OP's stated "issue" . Obviously the discussion has evolved into having some valuable points being made, something that, unfortunately, cannot be said of the opening post.
Kudos to your wiser, calmer heads!
-
So, this is actually possible! I JUST found out by accidentally seeing it mentioned in a random post that by dragging multiple audio files from the browser while holding CTRL+SHIFT and placing into the project they are aligned end-to-end on a single track.
This is apparently a long held secret by others who have not chimed in here. ?
-
 1
1
-
-
On 4/29/2021 at 2:51 PM, Colin Nicholls said:
Import the files sequentially into one track
This is actually possible, I JUST found out by accidentally seeing it mentioned in a random post, by dragging multiple audio files from the browser while holding CTRL+SHIFT and placing into the project!
Who knew? Well, apparently several folks, but no one mentioned it here.
The Arranger naming idea is cool but not available yet as far as I can tell.
-
 2
2
-
-
On 7/10/2021 at 3:04 AM, sjoens said:
Like Starship both these methods give me the default image. I can only get a custom image doing it Glenn's way.
So W E I R D !!
-
12 hours ago, sjoens said:
As Daniel mentioned in the video, there are more "magic" words to discover.
Daniel's list (from Kurre):
Rock / triggers the sunburst les paul guitar
Mixing, Basic / trigger the speaker image
Piano, Keys / trigger the grand piano image
Mastering / triggers the gold album image
Drums / trigger the drum set image
Orchestration, Bass / trigger the violin,viola and cello image (orchestra)
Synth / triggers the synthesizer imageWhat I found in addition with defaults:
Guitar Amps, Metal = Amps
Electronic, Dance, Techno, Trance = synthesizer
Guitar, Pop, Jazz, Blues = les paul
Acoustic, Song = acoustic guitar (<< John Vere)
Rap, HipHop = boombox
Vocals, Singer = microphoneIf 2 trigger words are used, alphabetical order takes precedence for which image is used.
It also seems if part of a word contains a trigger word, like songwriter, it will display that image.
Extra points to anyone who finds triggers for the 4 and 16 track icons, if there are any.For me, using "Basic" gets me nothing (the default .cwt file image) but using "Mixing" works for the speaker image. I can also not get the "Empty Project" image of the blank staff paper to come up with anything so far, nor the 4 and 16 trk mixing consoles.
I've also noticed ('tho I think it has been pointed out here somewhere) that simply changing any of the template file names in the template folder within Windows Explorer to any of these magic words is enough to get the associated Start Screen icon to be chosen/changed. You can even keep CW open, but close and re-open the Start Screen to see the change.
As for custom templates with custom images....
Strange, @sjoens, that you can't get "my way" to work, but perhaps there is something in the following. I have noticed this peculiarity (this whole thing is peculiar, really!):
In the Save As dialog, IF I type the name of my template file first and then choose Type/Template and Go to folder/Template files after and then save, the file is nevertheless saved in the Projects folder as a template! It, of course, then doesn't show up in the Start Screen templates.
IF however I choose the Type/Template and Go to folder/Template files before typing the file name and then save, the file saves in the Templates folder as desired and shows up with its chosen image/icon on the Start Screen templates window.
This second method has been my habitual default, and so I didn't notice the difference until today by accident.
How's that for idle hands!?
-
It's obvious that some of us are here because we are between projects and are fueling curiosity with boredom. ?
What do they say: Idle hands are the Mothers of Invention ??
...No, that's not it. But yeah, boredom fuels curiosity.
-
On 7/3/2021 at 1:22 PM, Glenn Stanton said:
@winkpain @Syphus so, in re-reviewing this, you save the template source file (with image, copyrights, etc) as "normal" in the "project template folder". this is a .cwp file in the template folder at this point. then rename the file as .cwt. now the template file has the image in the header section of the file (which is what needs to be read from the start screen display) as well as embedded in the file notes.
I mentioned this in the other post, but I don't find it necessary to do this to get my desired image as icon.
-
I haven't found it necessary to save as a normal project file first. Not sure what that step is for.
I simply add my desired image in the Browser/Notes, Save As a Template in the Template Files folder with my chosen name typed into the File Name, and it appears in the Start Screen templates with my chosen image as the icon. Works every time.
The weird part is if I want to save a template that uses one of the default image icons, I must use one of the "magic words" in its name (i.e. Guitar, Mastering, Vocals, etc.), AND include the extension in the File Name section of the Save As window (still with Type being template and Template Files as the go to folder). In other words to get the default guitar icon to appear on the Start Screen, I save my template as "My Guitar.cwt" as the file name. If I do not include the ".cwt" typed into the file name, a screenshot is used as the icon (or an image I've placed in the Notes section)
-
1
-
-
Yup. I understand all of that. The template saving protocol within CW is actually very particular when it comes to these images. Following the links that @Syphus referred to opened up a whole can of worms on that for me. I think I got it now.
It absolutely matters how you save a Template file, how you rename it, whether or not you include the ".cwt" in your naming in the Save As window, and what "trigger" words you use in order to access those default images. It is all quite fascinatingly complex as threading through those links and the accompanying video in one of them will show! It's something that was written into the CW code a while ago when Start Screen was introduced, I guess.
I think I got a handle on it now, but Wow, strange indeed!
-
26 minutes ago, Glenn Stanton said:
when you are editing the template, there is a browser section for adding notes, etc and includes adding an image.

Thanks, Glenn! Yes, I knew that. That is how I've been attaching images to projects currently. But I actually wanted to use one of those default images (that got removed from a template somehow) and figured they must be stored somewhere. Haven't been able to find them yet....
-
Where (which Cakewalk folder) are the images stored that appear on the Start Screen for project templates?
-
On 6/15/2021 at 12:04 AM, Kawika said:
Winkpain, I'm in a similar related boat. I have an Impulse 49. Are you able to assign CC# to any of the features (e.g., tremolo) of your soft synths?
thanks,
Kawika
Yes, I have been able to assign CC's to controls. It is necessary to switch the mode on the Impulse to MIDI with the Plugin/Mixer/MIDI buttons next to either the faders or the rotators, 'tho. Otherwise, I am now using a control surface plugin (AZController) and then a custom Impulse preset with that. These are for working with the Impulse in "DAW Mode"
-
20 minutes ago, Glenn Stanton said:
what is a bummer is that the patch point and soft synth bypass the input gain as it would seem useful that controlling the gain from a patch point (summing possible there) or soft synth (generally 1:1 on outputs to inputs) to prevent the input of a track from overloading, whereas it seems that you would have to manipulate the tracks outputting to the patch point (or at the soft synth) to achieve a usable level on the track using it as an input.
Yes, it is in this way that I wished to use it (Input Gain control) with a Patch Point, as a summing gain for controlling recording level in certain instances. What is odd is that, in the Signal Flow diagram, it shows patch points and soft synths as flowing into the Input Gain as opposed to hardware inputs falling after it. But again, where does the tape/track lie in that chart when it's in record mode? My upper red arrow, right? (but with the hardware input flowing through it as well)
-
Where exactly in the signal flow should we consider a live audio source (from hardware input, soft synth, or patch point in the image) to be "printed to tape", so to speak, onto it's track? Would it be at the point of the upper red arrow in the image below , or the lower one?
It seems to be the upper one. This always causes a bit of confusion for me, as the "Input Gain" that falls between those two points doesn't effect what gets live recorded, either from a hardware input or soft synth (being recorded live) or patch point. Or should we rather think of live input during recording as falling outside of this flow, going directly from the audio card (in the case of hardware input) to the tape (or track in CbB) ? The confusion for me is "Input Gain" makes me think gain on an input (live input) like a pre-amp , but it's really gain on the "input" from tape (track) which, to me, is more of an "output".
Clarifications?

-
17 hours ago, User 905133 said:
(1) These manuals? (2) Is the automap guide applicable?
I have plain old MIDI interfaces with multiple ports and they show up as numbered ports. Is it possible that the ports are for user configuration and not specially dedicated to certain functions? If so, perhaps the automap utility is just a tool for helping users to set up the flexible MIDI ports?
Thanks. Yes, that is the manual I have, and it really does not go into any detail about virtual ports and their specific purposes. I do not use Automap as it has been discontinued and never really worked anyway. The new firmware instigated the HUI protocol, and I believe it was after updating that that I first saw the "MIDIIN 3" added to the ports which started getting me curious. I just figured it would be nice to know exactly what these ports are for. They obviously are necessary, but I'm just flying with them blind.
-
1
-
-
1 hour ago, msmcleod said:
This was the page I saw it on:
https://www.manualslib.com/manual/1908369/Novation-Impulse-49.html?page=8#manual
Right. I see that, but that's for setting up in Cubase of course. Cakewalk doesn't get a mention in the manual. And in Cakewalk they are simply listed as MIDIIN2, etc. and the manual doesn't go on to say what specifically they are for, why 3 and then 2, etc.. Perhaps it is obvious to many, but this is a realm where my knowledge is a bit more basic.
I'll just leave everything as is.
-
39 minutes ago, msmcleod said:
Just had a quick look at the manual.
It mentions the other MIDI ports in the Control Surface setup. It looks like the Impulse only supports HUI, which might work with the Mackie Control if the protocol is set to HUI (beta).
If you're not going to use it as a control surface, I'd just have the first MIDI IN 1 / MIDI OUT 1 ports enabled.I'm definitely using it as a control surface in addition to the note input. And it's working that way now, so I'll just leave it be. Was just wanting to know more.
Did you happen to notice what page/chapter those virtual ports are discussed? The HUI functioning is something that was just added in a firmware update that I just did the other day, so just got the updated manual were it discusses that a bit, but I don't see where it discusses the virtual ports or the difference between #2 and #3, for example.
-
40 minutes ago, msmcleod said:
When keyboard controllers have more than one MIDI port, usually the first MIDI port is used for the actual keyboard, the sustain pedal, and the modulation / pitch bend wheels.
Any additional MIDI ports are normally used for faders, transport control, or any additional controllers your keyboard may have.
The idea being, that you can assign MIDI IN 2 / MIDI OUT 2 to a control surface (e.g. Mackie Control if it has Mackie emulation, or Cakewalk ACT ), but still use MIDI IN 1 for recording normal performances.
A third pair of MIDI ports might be used for changing the settings of your keyboard (i.e. assigning control surface mode, or assigning CC values to faders etc). You should check the user manual for more info.Unfortunately, I cannot find any information in the Impulse manual about how these virtual ports are purposed. Regarding MIDI ports, it only speaks of the physical USB or DIN MIDI ports. Virtual ports are not mentioned at all.
In general 'tho, is there ever a reason to call on these ports (in a setting) by name other than having them checked "on" in Preferences/MIDI devices? This latter is all I do and if I do not, the controller functions do not work, but as I say, within the controller plugin's Preferences window (as well as anywhere else where I want to connect the keyboard/controller), I only ever have the first of the three ports chosen. Is this always the appropriate protocol?
-
I realize that I have never understood exactly what the "MIDIIN 2" and "MIDIOUT 2" (with varying numbers and the name of my keyboard in parentheses after them). They are "virtual MIDI ports", I know, but exactly when and which ones do I use and for what, or do I?
In my case at the moment and for example, for the available MIDI ports associated with my Novation Impulse keyboard I have (in Preferences/MIDI devices):
In ports - Impulse, MIDIIN 2 (Impulse), MIDIIN 3 (Impulse)
Out ports - Impulse, MIDIOUT 2 (Impulse)
I have them checked "on" in Preferences/MIDI Devices, but nowhere else do I have them selected. Not in any tracks' MIDI ports settings, nor in the Preferences/Control surfaces ports settings (Here I have just "Impulse" for in and out ports in the AZController plugin that I use for this keyboard ). I know I have to have them checked "on" in Preferences/MIDI Devices for the faders, knobs, transport, etc. of my keyboard to work, but I've never really understood the which, when, and wherefore of it all. Why, for example are there 3 in ports but only two out ports? What exactly do the different numbered ones do? If there is more than one numbered virtual port (as is my case with the "Ins" ), which is which and how do I know? When, if ever, should I be choosing one of these numbered MIDI ports by name in a setting?
Lot's of questions, but they are all kind of the same one. I am not suffering anything not working with any of it (at the moment!), but I would love to know more in order to understand more better ?
-
3 hours ago, David Baay said:
You can set beats in any order, and go back to set more as needed to get as tight as you want; enable the playback metronome to hear how it's going.
For some reason, I would always have problems when going backwards to fill in a new beat before one already set. Now, when testing it doesn't seem that way. Good to know.
-
Using SetMeasure/Beat at Now is the most straightforward way.
Focus on the track with the obvious on-beat transients, go (with cursor and with Snap off) to first audio beat where you know what beat you want it to be (bar 2, beat 1 for example), choose SetMeasure/Beat at Now for that beat setting (bar 2, beat 1). Do that for the next bar, beat 1, and the next and next - if the tempo strays that much at every bar, or do it every 8 bars or whatever. (You must do it in an orderly and consecutive fashion, tho - you can't go backwards after setting a beat at Now and re-set a previous beat, in other words.) This is my "brute force" method.
But from what I remember, the Mike's (CreativeSauce) tempo mapping video shows it pretty spot on without any stretching of audio. I actually had some posts on my working out of this issue which combines the CreativeSauce advice with the Melodyne drag-and-drop technique which you can read here - scroll down to near the bottom, a Jan 7 post by me that begins with "Ah hah!" for a description of what I do.
In addition, I have great luck with Melodyne stand-alone which has the precise method you desire of dragging the measure/beat lines to match the actual played audio beats, if needed, but Melodyne does an excellent job of mapping tempo just by itself, I find. From there you can then export the tempo map and open in a blank CW project. But the above methods (brute force and combo) are the quickest in my experience within CW.
-
1
-
-
.... I just sent in a Support request on this as well.
-
1
-
Batch change MIDI channel on select multiple notes
in Q&A
Posted
I can't recall... How is this done?
Say I want to force associate channel 10 to a selection of multiple notes in a clip (or the entire clip itself) that have been recorded or written on channel 1 (or any other channel) in order to then save that clip as a groove clip that will default to playing thru that channel (ch. 10) whenever I bring it in to a track with no MIDI channel chosen ("none") or be previewed from the browser on the preferred channel ?
Or, to put it more simplier, how do I batch edit multiple MIDI notes' channel??
I thought that I could do a multiple note selection and then right-click that selection for note properties, then change the channel and have that apply to all selected notes. This is not what happens, tho. Only the note under the cursor is affected with this right-click.
Again, this is for "burning in" the MIDI channel to the notes themselves to be saved with the clip.