


JnTuneTech
-
Posts
330 -
Joined
-
Last visited
Everything posted by JnTuneTech
-

MIDI Keyboard no longer plays VST's in existing projects
JnTuneTech replied to Robert Carter's question in Q&A
Typically, MIDI input assignments in Cakewalk, in fact device assignments in general, change when devices are unplugged and/or added, and even when drivers are updated, and that is mostly a function of how PCs deal with various device driver loading, before it even gets to Cakewalk. Although it can be tough, my approach has always been to make sure you start the PC with all desired devices plugged in and available, or at least made available in the same sequence in the OS before starting Cakewalk. -However, in my experience, sometimes even that cannot guarantee updates or other non-Cakewalk related events will not change the device startup - listing order. As per @57Gregy mentions - you may save yourself some hassle by not leaving inputs assigned all the time in saved projects - I follow that same rule. In regards to fixing the changed inputs in bulk: When I want to switch, or assign multiple MIDI inputs to the same device, I use track view and inspector view together, and ctrl-select all MIDI tracks I want to (re)assign, -starting in track view by holding down ctrl starting with the first track, and then at the final selection, -without letting go of the ctrl key-, selecting the MIDI output device I want in the inspector. -There are also other similar procedures. As a note - once in a while if I notice a major change in MIDI input assignments, -before saving the project again-, I have had luck simply restarting the PC with all devices connected in proper order, and re-opening the project, or sometimes even disabling the MIDI devices in Cakewalk preferences, closing the app, then restarting & re-enabling... but I know all of that can be a pain. -And - the results could sometimes even be worse, so be careful! -Still - if you have that many projects that could be affected, those methods may be worth a try in a pinch. -
It seems like you may be confusing 2 MIDI note entry methods. Rests are a musical notation, and in Cakewalk represented in Staff View. They do not have a MIDI entry in PRV. But yes, you could technically then create "gaps" in PRV entries to the same effect, programmatically. -Neither of which may be performing as you expect though. As to your experiences with notes entered on the PRV (or anywhere) seeming to sound longer than the time you put them in on the grid - I would look into whether the instrument you are sequencing plays the notes based on the timing (and velocity, etc.) that you send from the track, or perhaps in fact only uses note on messages, etc., effectively so that notes hold (or not) for their own timing and what have you. -There are also other considerations to be included in that category, such as whether you also have a hold (pedal) command already in effect, etc., so do check that too. For reference - yes, creating a "gap" in the PRV note entries would most typically then create a rest in the Staff View, but again, if your instrument does not play notes with absolute note-on - off responses, that "gap" would not necessarily be honored on playback.
-
I don't have that particular VSTi, but I do have another that exhibits the same way, but only in the VST3 version. -Even some VST2 synths will not respond to patch changes, without consulting the settings required in their documentation. Some VST2 synths require enabling MIDI patch changes manually, and some VST3 versions have other suggested workarounds for MIDI patch changes. -It all depends on the particular plugin. -On mine, the patch saving routine is even particular, as I get the same default to patch 1 in a default bank... but instructions in the synth manual helped with that. -Still a pain though!
-
Introducing Cakewalk Next and our new brand identity
JnTuneTech replied to Jesse Jost's topic in News & Announcements
Buying, owning, many, many "things" in our modern world has changed, - a lot for some of us old enough (yes, I know, grumpy gramps talking...) - and that affects everyone, in different ways, to be sure. I've learned so far that I can only make as good a choice as I am capable of, and if possible, try and help to make it work out. When Gibson dumped on us with Sonar, we all had to deal with that. Now, somehow we are still here with a progression of Cakewalk software, and I for one plan to try and continue to make the best of it. -Of course - open forums encourage all opinions and expressions, but I have to wonder sometimes if people realize the logical loops created by complaining without offering any positive solutions. -Ah well, perhaps it all helps in the end. I just hope the devs can sort through all this hubub and continue to keep this Cakewalk thing going, and getting usable feedback from members here. It has previously been a mostly positive experience from my vantage point, so far. Yes - software, and related product "ownership" has changed a lot in the past 30 years & counting. But creators and companies that stay alive generally keep working because we support them with our dollars - with varying shades of the effects of the balance of power (wealth), of course. -I'm just happy Cakewalk wasn't dumped - again. On the grumpy side: I too wish I could use an iPhone 3 with the current Apple software and a phone provider of my choice. -Instead now of having a phone that could plug into any jack, in almost any major country, I have to pay again (or subscribe) to get an entirely new one, or eventually they cease to work for the primary purpose I bought it for. Adobe still owns all my and my client's PDF software rights, and could shut them off at any time. Avid MC used to be the solid, reliable, backwards-compatible media editing & storage option. -See the previously mentioned company about that now. (Isn't there already a book out there called "Future Shock"? - I really should read it) Salespeople can never be trusted to tell us the truth. -Oh, wait, -are you working sales for that new startup now... Oops, sorry about that. I can open my client's original Apple Mac Word .doc file on almost any device and still figure it out. The original licensed Word for Mac will not work on any modern computer normally. -And this could go on & on... We all wish everything could stay the same, unless of course we don't like it. -Pick your battles, when you can, I am told. -Seems wise to me. -Well, at least until AI starts turning off the heated seats and driving me where I don't want to go, anyway. I wonder, -will AI let us unsubscribe even? Be happy when you have a choice. I think Cakewalk here seems to be continuing in that general direction, and that works for me. Today. -
Introducing Cakewalk Next and our new brand identity
JnTuneTech replied to Jesse Jost's topic in News & Announcements
I will second that sentiment here. While I am very thankful Sonar got revived and even re-released as a free licensing model (p.s. that term is important), I had been wondering for some time now, just how long that would last. -This recent development decision may fix that, for me -certainly for a while anyway. Because of course, no product, free or otherwise, is absolutely guaranteed to succeed. Amazing in some ways we even got here with our old purchases from the previous companies somewhat intact. I plan to be positive, and work forward with what options suit my needs. And, so far it looks like familiar names & programming are still promised to be behind it. As to all the licensing options, I see so many people get frustrated, and take it personally. Not just with this product, mind you, but many times now, in a multitude of contexts, over the years I have been both a musician and a computer & networking consultant, as- well as a personal computer user. I will say, it took me many years to understand the methods by which computer software has changed what us consumers think of as product ownership. And sometimes it still bothers me even so. Regardless, I've learned that in reality, unless I am an IP owner or developer/owner of a software product, I have never owned any software put out by a major company. I have owned the hardware that may (or may not) properly run it, but that is it. I learned, eventually, that the majority of the software that runs on computers has a licensing model, and all major IP owners & developers have been using nearly the same terms since computers gained mass-market sales potential in the 1980s, and some even earlier. Most software is licensed, -not sold. Cakewalk, and most all the software that runs on and with it, as well as the OS it needs to run at all, is given, or sold, on a licensing model basis. Since most of us can never live through reading all the reams of legalspeak and manage to follow references to often distantly posted terms and such, that we now routinely agree to, when starting up a new computer, or installing software, it may slip our minds. But make no mistake - software is not like the hardware it runs on or say, a toaster or a pair of shoes for instance, -perchance in our world maybe a nicely crafted guitar even. -With software, all that is sold, or given access to for free, -depending on the licensing terms-, is whatever rights are stated in the TOS for us to use it. -Not own it. I know I never have. I don't own any software products or IP. So, when it comes to paying for it, or complaining about what happens with it when true ownership, stewardship, and development decisions change, I just try to keep that in mind. And, depending on how much I trust that process, and whether I must depend on that process to accomplish goals I want to achieve, is how I decide whether I want to pay for one version of a software tool, or multiple versions, in lump sum or in payments, is how I go with licensing these days. -At least when there is a choice. Again, I think the planned options revealed so far, in this latest continuation of the Cakewalk saga, seem promising, and I hope to continue growing with it, and the people who enjoy developing and using it. -
Even Windows Media Player can be configured to rip CD tracks to .wav format files, -as long as you still have a system with connectivity to a disc drive anyway. Then do yourself a favor, and convert the 44.1 16-bit files that creates to the standard you are using in Cakewalk projects, before you import them to tracks. -One free great option is https://www.voxengo.com/product/r8brain/ - I have used that for years. -Use the high quality setting for reference files. Of course Cakewalk itself will upsample CD content quite well by itself, just check the import options when you bring in the tracks to set the level you want.
-
Wow, and thanks for replying. -I do a lot of work with multis and back them up too, just for that type of thing, in fact. I will now be sure to look out though, and maybe I will test some of my stuff (with backups in place) with the reset function, to try and dig deeper and to see what the deal is. -I would say - good to know, -but since we haven't solved anything for you, for now again just thanks for the detailed info!
-
I have the very same model SKB, I use it in that very same orientation (though not next to a fireplace), and it's been working great that way for over 10 years. Nothing wrong with that. -As others have mentioned, you may have to re-orient yourself to work with it sometimes, and just watch out for neck strain! -I'm sure the gal in the picture a few posts above also knows about that problem. ?
-
Although I completely agree about a lot of the bloat & what pianos to keep, I at least found that having the version with the contents on SSD (installers only, mind you, not direct library access - what a shame) allows me to use Native Access to fairly quickly re-load an entire library. So, I tend to try a library out, and if I don't use it or need to free up some space, I delete it until I decide to use it again. -Better than downloading - or those boxes of discs! -Still, yeah, I am not seeing much in the newer "instruments" they seem to be heading towards in those Komplete packages of late. Too many acid-y loops and whatever for me. But, I am getting old, so what do I know?
-
I hope that it will not be too hard to update, but some equipment just needs to be working properly for it to do the job right. And, nowadays, most of the newer MIDI-capable devices that will work for what you want are not necessarily so expensive. I highly recommend you check out some further information on latency and other issues when using Cakewalk - there are some great tutorials from some of the other members of the forum here. One to check is https://discuss.cakewalk.com/index.php?/topic/56885-cactus-music-tutorials/ - There should be some great info in one or more of the YouTube playlist chapters he links to there, so check that out for sure. That subject is a bit tougher, and I would highly recommend making sure the basic MIDI connections work for you first before even trying to create those mappings, but yes, basically you can find or modify mappings (for older hardware mainly) to help select MIDI patches with names instead of numbers, and clearer - custom naming for the MIDI CC controls you can automate from Cakewalk to your MIDI device, but it's not necessary, -numbers work fine too right out of the box! And again, best to get the MIDI connections working properly before any of that.
-
Microtonal pitch correction on mixed down stereo audio Wav file?
JnTuneTech replied to TH's topic in Cakewalk by BandLab
The instructions are to not turn on looping at all, and he's very clear about that. You don't want to make a loop clip at all. -As I say, I have used it many times, and it's rather easy, once you get past the idea of using a loop clip tool for only changing pitch & speed. -Oh, and the advice about slip-editing the clip in advance, or trimming later to make sure the new clip length gets captured for your export is a bit I had to play around with as well, when doing big changes in the pitch & speed on longer clips. -
I have used Cakewalk to control PODxt, Eleven Rack, and many other external devices successfully over the years, and the only tough part for me was setting up patch & control mapping (I used Instrument Definitions for that eventually) to make it easier to use. -The only time I can remember having issues with similarities to what you describe, is when I had a very poor MIDI output device & driver setup. -Bad MIDI I/O setup will definitely cause timing issues - check your latency, but garbled commands would likely point to bad MIDI communications between Cakewalk and your devices in general. You might try using a different MIDI output device, and see if that clears things up.
-
Unless there is a problem with file permissions, locks by other processes (AV, auto-backup, what have you), -in the location that you saved the backup file to, which then got cleared when you renamed it, I can't think of what would cause that. Very interesting!
-
In case it helps, that sounds like you may have selected to save as MIDI type 0, instead of type 1, in the Cakewalk save as dialog. -Type 0 saves all MIDI in one track, with only MIDI channel data per event as a differentiator between all the data you had originally created. Type 1 will save each MIDI tracks' data referenced by its original channel assignment, as a track, as you had originally organized them in Cakewalk - normally. Though if there is corruption, maybe that is also not working right - hard to say from here.
-
To add to @Promidi 's suggestion regarding pre-setting the MIDI controls: While I mostly like that approach too, I have recently begun to deviate from that with Kontakt instruments in Cakewalk, because of the unpredictability of mix results when I change the project tracking to another Kontakt instrument and/or version, especially when I have opened old projects that had referenced a different version of Kontakt I no longer have installed, and in the upgrade process (opening a hopefully saved .nki), the volume settings in particular seem to mismatch. In my recent projects, I have taken to using no MIDI track volume (cc7) in Cakewalk, -which seems to only happen if I use the default track volume of 101 (or do a reset to that), and let the volume settings saved in the .nki determine the starting point. -On a case by-case basis anyway, as of course if later, I want to program using CC7, I make a note of that, and carry on as usual. -So far, most of my instrument volumes seem to stay put more often that way, when switching things around and back again, to open on other systems, etc. -Maybe that's just me though. @Jim Stamper - Did you mention what volume control in Kontakt is affected for you? Does the volume slider in the instrument GUI, or the Kontakt instrument header, show the change to zero as well? Or is it more like a mute button function reaction? -If you, for instance re-load the .nki of your instrument, does the volume return to normal that way? How are you dealing with the aftermath? What control do you use to bring the volume back up again, and does it stick? -Also, I would highly recommend not saving a mix right after hitting the Cakewalk reset function - though I know that can be problematic on its own...
-
Microtonal pitch correction on mixed down stereo audio Wav file?
JnTuneTech replied to TH's topic in Cakewalk by BandLab
I know I keep referencing this link, but again - if you don't mind also changing the tempo of a performance, Cakewalk can natively adjust audio pitch in cents & semitones, in a way that mirrors the varispeed tape technique in the analog world. -P.S. I have only used it on 3-4 minutes of audio at a time, but never had an issue so far, even though the tool is mostly designed to adjust loop clips & such. And the numbered directions start somewhat assuming you are using the tool (Loop Constuction) stated in the preamble after having selected the loaded audio clip... https://craiganderton.org/how-to-do-true-tape-type-varispeed-in-cakewalk-sonar/ -
My own top tools/techniques in Cakewalk change for almost every project, as it depends on the workflow needed for the particular project. But I guess when starting projects in general, using custom project templates, & stored custom ProChannel presets for fx and instruments would be in my general top 2.
-
@John Vere I think you are missing points on this one, and perhaps audio is more your specialty. -MIDI, as the OP here is experiencing, can have many options and levels of programming and usage. Just pointing (no pun intended!) a MIDI track to an input, is not even close to being the only thing you have to do for all of the options to work as expected. @Jack Barton - You mentioned having tried the MIDI file with several other VST instruments, with varying results. You may want to think of it the other way around, and test your VST instruments for the capabilities you seem to be missing, as compared to playing them with say TTS-1 - first. -Take a MIDI keyboard, and route it to your MIDI VSTi of choice, then play a few notes, and then see if the pitch wheel/lever does what you expect, and what the mod wheel/lever does - in that particular synth. -You may be surprised. Then, you may have to dive into the synth properties - settings, or possibly even the documentation, to find out why and how to change things if needed. This may be overkill for the original topic, but if you are interested in using older MIDI files in your Cakewalk projects, read on. If not, that's understood, but do be aware that Cakewalk itself is heavily designed around MIDI functionality & the related logic. -And FWIW - MIDI 2.0 will not change these issues, only add more options & streamline some functionality. It is more of an evolution, as opposed to a change up or even an update & fix release of some kind. -Far from that. -But, I digress! MIDI files you download casually, especially ones created during the emergence of General MIDI (GM) standardization approaches that were undertaken by major players in early MIDI, such as Roland, -who provided the programming for the TTS-1 synth currently supplied with Cakewalk, can and variously will include many, many other MIDI messages than just notes and channel information. -What each synth, -whether real or virtual matters not-, will do with that "extra" MIDI information is up to the designer(s) of the synth itself. -If you are dealing with those downloaded files, it can be important to understand that. -Did you know that a multi-timbral synth, such as TTS-1, or the Sound Canvas series synths it is based on, can be programmed and played with a properly created MIDI stream, that in effect performs an entire mix? Not just notes, but multiple, individual instruments with their own track assignments, FX send & receive settings both per track and globally in the mix, as well as patch changes. I could go on and on, but by the time we discussed system exclusive MIDI options, hardly anyone here would likely want to deal with it, understandably. But, again, Cakewalk here was actually designed to work with and actually create this type of MIDI - so if you are aware of it, you are in luck if you have to deal with it. And currently it is free. - I simply find it amazing that much under the hood is here, and often simply ignored. -Until there is a problem. So: Someone opens an old MIDI file, TTS-1 just pops up and lets you play it, and well, probably some of it sounds a bit "cheesy". -Fair enough. The next step often tried, it to take one of the instrument tracks, and re-assign it to a different synth - right? You have cultivated a few "modern" synths that could do a better job, -no problem. But, all of a sudden now your new synth won't play the track in nearly the same way as TTS-1 did, or maybe won't even play at all. To keep it simple, there are 2 main approaches I recommend, to loading & re-using older MIDI files that you don't exactly know the content of: One - If you don't care about anything other than the notes in the performance, -at the most basic level-, I tend to use the event viewer to strip all MIDI except notes from the track. -Several major exceptions apply-, such as piano parts that contain hold pedal events, or any of the many performance-linked events we all forget about once we hear the file play back without, such as pitch bends, expression, even patch changes when they are crucial to the performance. -That first approach is usually the fastest, and in many cases I already plan to recreate the additional performance events myself, and in fact in most cases, I have to re-work a lot of just the basic note events themselves anyway. Sometimes, MIDI files only consist of maybe 3 or 4 tracks of Piano 1, each playing a very rough melodic representation of the major instruments, and the decisions there are very simple. -But sometimes not. Actually, the "good" ones are usually much more complex. Two - If I feel that the MIDI file contains a lot of helpful content that I like, and don't want to re-create, I will analyze it first - then decide what to keep, and surgically remove the rest. Cakewalk is great for this, but it is often time consuming. But, as mentioned earlier, some performance elements can be very importantly tied to the note events, because as we know, making music is not just about the notes all by themselves. Knowing how that works with MIDI can be very important. -Some other quick notes about GM formatted MIDI files: Most of the older, full-featured MIDI files, were intended originally for playback with a specific multi-timbral synth (or series), -in fact some of them even contain notes on blank tracks in the file, that can contain synth info, along with other such text information. -More importantly, they can often contain "blocks" of MIDI setup commands at the beginning, and sometimes later in the file, in each track. Some of that MIDI will be harmless, but sometimes various synths (both hardware and virtual) will react unpredictably (until you know the synth capabilities anyway) to those commands. One such example is the "reset all controllers" command, which Cakewalk itself has an important option for, in fact. -You need to know how that all works within your project goals & choices. Even if you re-assign the Cakewalk MIDI track output filter & fx settings in the Inspector, for instance - Later inline MIDI will "Overwrite" those initial settings - just like a change in an envelope will change the initial value, etc. (That is why I often suggest the conversion to MIDI envelopes above). -'Doesn't matter what track you drag the data to, if you drag it all you may get all the embedded MIDI commands as well, and many will still change your new track settings. Especially important are embedded MIDI volume and expression events, as many "modern" virtual synths respond to that. -You think you set the volume level at the beginning of the track, for instance, but somewhere in the playback - it re-mixes itself... You get the picture. Especially important to find out in advance - if your virtual synth(s) actually respond to MIDI events other than notes, the way you expect. -Just because it plays fine in TTS-1, doesn't mean your newly downloaded super-synth-sampler AI plugin will respond to the pitch bends, or mod wheel events, the way you expect. -Or even at all. Each synth has to have matching MIDI input for its settings & capabilities, -they are not all just "plug & play". (Though in the future, MIDI 2.0 will address some of that...) -There is often a lot more to loading MIDI files & swapping tracks & channels, than what you might expect. -But Cakewalk is actually built for this stuff, so get in there and dig around, until you find how it works the way you want it to. -At the very least, it can be a fun adventure!
-
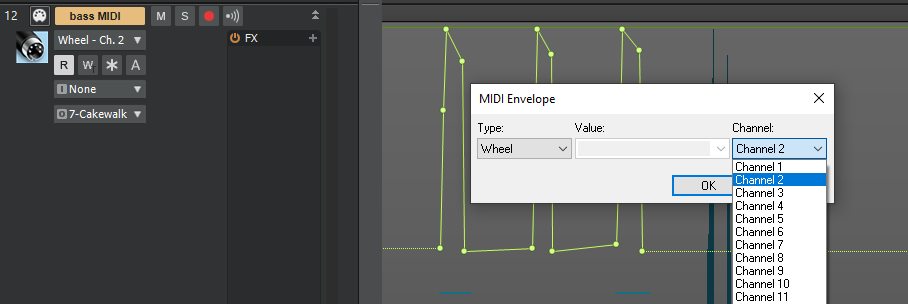
-Interestingly enough, I have found that using "Convert MIDI to Envelopes" - from within the MIDI track controllers view in PRV, for instance, really helps - by converting & later modifying those wheel events (from old "back in the 00's" MIDI files for me too!) in what I find to be an easier fashion. -Now, it takes more time than the "bulk" convert method you originally asked for, but since envelopes seem to be a commonly used method for automation & editing, you may find it easier to work with in the longer run than editing inline MIDI CC message flows. -It's another choice that can work for changing those wheel events you mention, if you really need to. To explain - here is a screenshot with some examples present to hopefully help with the concept: In the screenshot, I have taken a bass MIDI passage with some pitch wheel bends, and converted some to MIDI envelopes. -You can see the last wheel bend of the series, which was not converted, in the view behind the selection box pop-up, for comparison. -By converting the wheel events to envelopes, I now have the facility to edit and/or add events with the mouse easily. -On top of that, if I right-click the envelope, I can choose to assign the envelope to another channel (as in the example above), or in fact to many other MIDI control choices, as well as copy, etc. So, if you want to selectively re-assign the inline MIDI CC events, using this method you could change the selected CC channel info, on all or part of a MIDI track, if that is something you really need in order to get the results you want. -I simply find using this method for editing pitch wheel events just much better in CbB workflow generally, once you understand how wheel events work (they are different than standard CC values), and have them converted from say, initial pitch wheel manual entry, or of course those passages you want to save from existing downloaded old files. -Again though, you may find other ways to get your synths responding properly to the existing CCs you think they should, first! -There are always choices, hopefully these will help you, as they have me.
-
As with any VSTi situation, MIDI handling will vary in actuality. Though a majority of them will simply accept any channel data, and in theory changing the track filter to redirect the mapping should work, I too find that sometimes it doesn't quite cover everything. For instance, some Kontakt instruments have internal layers of control settings regarding MIDI control mapping. You might look into that. I have had to use MIDI - Omni for input on some organ synths, for using the default multiple keyboard layers & controls. And in Rapture Pro, for instance, each program can often have the pedal input set to only accept pedal MIDI on channel 1, all while the rest of the program will accept any channel. -So, it can get confusing. -It really is on a case-by-case basis. I would suggest using either the above-mentioned method of Process> Find/Change on the tracks that need that (it can take a learning curve, but it works), or using MIDI FX to change the CCs/Channels in the stream dynamically, which can be done without changing the original data. Again, only for problem situations.
-
Not to be a bummer, but that is not the question of the original post. To be clear, and to repeat what @msmcleod answered, the internal polyphony of a given external keyboard has nothing to do with the polyphony of a VSTi in Cakewalk. They are indeed independent. -When you use an external keyboard to control a software instrument in a DAW, you are only using the keyboard MIDI output of the hardware device, not its internal synth software, in most cases. As to MIDI 2.0, it won't be likely to matter for this question. Not only does properly formed & connected MIDI 1.0 data work quite well with typical polyphonic keyboard connectivity, and has for years, it is so trivial to modern processing & chipsets to manage, that only poorly designed systems, or ones with other problems present, will encounter such limitations when performing with the keyboards mentioned above. And yes, MIDI 2.0 is a wonderful step up, which I am certainly looking forward to. However, it is highly unlikely any of the keyboards mentioned above, or most any we own now in fact, will be by able to upgrade to the newer hardware interface requirements in order to use it, let alone also implement the software changes that the manufacturers would also then have to somehow add to legacy devices & provide us with. I doubt the OP here will need that info to start properly using polyphony in a VSTi in Cakewalk right now. Regardless of bandwidth limitations, a properly connected MIDI keyboard will easily be able to take advantage of polyphony in most common situations with a polyphonic capable virtual instrument. Independently of the keyboard's own internal instrument implementation.
-
General MIDI Assignment of Instrument to TTS-1?
JnTuneTech replied to dalemccl's topic in Cakewalk by BandLab
Glad that you find it useful, as many of us do. -As to other places, I still find trying things out in the DAW itself is one of the most productive things I can do to learn, and heck it's free, nothing blocking that. Then, if there are any other specific questions that come to mind, don't hesitate to start a topic here! -
@Billy86 -Are all the notes happening off the beat, or just the one note value you have in the square? -If it's just the one note, what instrument is it mapped to?
-
Any way to move tracks without dragging them?
JnTuneTech replied to sean72's topic in Cakewalk by BandLab
Yes! And I recently learned from coming here, that you can put text notes in both Track Inspector and Take Lanes, which I really plan to start applying to multi-take projects. So, between folder names, and track information, I can remember why I (did it (!) and) put take number 36 in that folder... ? -
It sounds like a workflow issue to me. -Kinda like getting mad because the fridge door keeps trying to close on me when I'm grabbing a beverage from the back shelf... If you don't want to use the Start Screen, -just close it. Then drag & drop to your heart's content!

