


JnTuneTech
-
Posts
330 -
Joined
-
Last visited
Everything posted by JnTuneTech
-

Any way to move tracks without dragging them?
JnTuneTech replied to sean72's topic in Cakewalk by BandLab
You might post just that in the Feedback section here. -In the meantime, one workaround I use when track counts exceed my view in Cakewalk, is to make track folders in logical groups. That way, when I want to move a track without dragging, I just right click and select to move it to a sort folder. -I don't know if that helps, or even if it works reliably with so many tracks, but it's something you might try, if you haven't already. -
Recording V-Drum MIDI - Question about the MIDI Notes
JnTuneTech replied to Joel Pixton's topic in Cakewalk by BandLab
@Joel Pixton - I can only speak from my personal experiences, but I do also know it is always a matter preference, and highly dependent on your choice of drum samples - kits, etc. For me, there is no easy answer, it always depends on the sound I want to hear, compared to how it plays back at a certain velocity. -And sometimes I will revisit a MIDI track after adding other parts, and try another pass at adjusting velocities, to be quite honest. -I am glad though that MIDI makes it so easy to do that after the fact, or at least it's more flexible than having to make multiple takes of an audio recording. -Usually, anyway! I haven't used Addictive Drums as much as some other software, but recently I began fiddling with some tracks that I thought might work well with some of the default kits. They seem fairly forgiving on the velocity curves in their samples, maybe not as much dynamic range as some others, -which has its uses. As in your example with the supplied MIDI clips, the range of velocity can be fairly wide from lows to highs, and in Addictive's default kits it doesn't sound too abrupt. -That of course is just the defaults, as all that stuff can be modified, but that usually is just too much for me to want to deal with at that level, unless some MIDI file or input has some glaring problems I can't quickly fix any other way. I still find playing the samples, -"hits"-, on a keyboard - or a touch pad set (I have 8 pads on one of my MIDI keyboards) to be very helpful in quickly getting a feel for what the sounds - velocity levels, etc., are going to play like, especially for auditioning in a mix, and especially when tweaking settings in a custom kit. -Trying to do that with a full set of pads, sitting on a drum stool is rather difficult! Otherwise, MIDI velocities in PRV - mostly help me to see any glaring errors, and sometimes point to whether a particular track is going to have enough human dynamics (or not, depending on your goal) and help decide if it needs editing. -Especially if I think a note or two seems to be missing, or way out of place. Velocity tails can even alert me to small glitches I might have missed in note view. -But generally, you have to play it all with the specific sample set you want to try, and evaluate how it all works together, to judge what velocity levels are "right" - it all depends. I have only used supplied MIDI "grooves" when I really am bored - but that's just me. I noticed long ago that for me, they are definitely tailored to the specific sampler & kit for which they are targeted, the velocities & mapping often only work best with a certain kit, and for a very specific feel. -But, that is what they are supposed to be. if you build a project using them it will probably work great, but mixing them with real input can be confusing. -I do like to see some of the extreme examples of mapping in the samples that get presented, as sometimes that's a good guide to re-program your live input to get a more realistic feel - since you can really only map pads to 1 or 2 initial samples. Things like hi-hats, toms, even the snare, can have so many variations available in a sample set. -It can get real time consuming though, between mapping and adjusting velocities... be careful not to let it take away all the fun of just playing! -
OP-X Won't transfer from laptop to desktop
JnTuneTech replied to Tim Cappello's topic in Instruments & Effects
Have you tried opening an empty project, and loading the OP-X instrument, and then making sure it runs and lets you enter the serial on the new setup? As mentioned above, not enough information here yet. -What did you do to "transfer" the OP-X instrument? The different plugins all have different methods of licensing setup, sometimes that needs to be done before opening a project that already has the plugin running. -Just guessing, as that may be your issue with any Sonic Projects VSTi. -
FWIW - There are many variations in quality & balance even in the sources you get your reference tracks from, so it can be difficult, even incorrect, to use some of them to master, especially using tools like Tonal Balance, etc. In many cases, you may be much better off using material created locally, as mentioned above, that you already like the results of. -Just using commercially available tracks, from say a CD, are great for getting arrangements and mixing cues from, but not always tonal balance. In my workflow, for many years, I have used a lot of commercially available song material as reference, and the quality & usefulness of them varies widely. Also, having worked in and around record stores (remember those?) for many years, I have literally heard dozens of versions of the same, always "remastered" material. -Right. Typically, as per much of the conversation here, I will either rip a CD track, or if I can lately, source a BD audio or download version I want as reference material. Then I use an old free audio converter to re-sample the track to my project profile. -This is simply a personal preference, as Cakewalk does a great job of resampling on its own, when I have used it that way, to be clear. Then, I will import the track into my project and point the output of that track to my primary audio output. -I also make sure the track has no FX or sends, etc., in case those might have snuck in from using a template of some kind. It's disappointing how many versions and quality levels of material you will get, from say one artist's works, in available commercial audio. -And then there's the alternate "popular" source - online video renditions, most not even official, much less professional transfers, that get in the way... -In any case, be careful of what you use for a reference, and how you use it. Trying to analyze tonal balance from mud will produce mud, so try and trust your ears first. And/or find a real, good-sounding mix or track you managed to create on your own, and reference it, as mentioned earlier. -Personally, I love using commercial tracks as a general example, and primarily to get closer to the arrangement and mixing balances, -if that is the goal. -But not really for exacting tonal matches. -Of course, your mileage may vary!
-
Recording V-Drum MIDI - Question about the MIDI Notes
JnTuneTech replied to Joel Pixton's topic in Cakewalk by BandLab
@Joel Pixton - Also, continuing in my ramblings about things you will encounter using DAW & VSTi drum recording/editing: Now that you've cleared up the long note issue, it is also worth mentioning that some MIDI input will need adjusting, if you get further into playing instruments like Addictive Drums. -And though you can just use an on-screen keyboard, or even the preview you get by clicking on a note on PRV, I find it useful to have a keyboard when mapping out your virtual kits. In virtual kits, there are some instruments that do need more than just a quick pad hit. Then there are some instruments that have to be used to link with another, and not just for layering. -The Roland modules and pads probably have some presets for some of that, but you will need to do it differently in VSTi instruments most of the time. In the VSTi, many samples - kit pieces - are made for variations, that may not even be useful on the pads, but will be in editing. Things like built-in snare rolls, flams, and often melodic percussive instruments need more than just a "hit" - they need to have the note value long enough to trigger them fully - and for the duration you want - and you can test that by using a click in the PRV or using a keyboard - hold down the note and test the results. -They don't always say which ones need that in the maps & documentation. And then there are things older pad kits may not have triggers for - but can be essential. Cymbal mutes are one of those for me. I always have to search the VSTi mapping for the note number they use to mute each of the cymbals, because every sampler, and kit has different mappings. -Anyway, good that you are getting it all to work, sounds like a good project! Keep at it! -
Recording V-Drum MIDI - Question about the MIDI Notes
JnTuneTech replied to Joel Pixton's topic in Cakewalk by BandLab
Before you delete any of your work (-if it's not too late already) - you can fix all the already entered long notes without taking too much time. -First though, make a backup - save as, copy, what have you... Look for - or add - the "Event Inspector" module to the toolbar in Cakewalk. Then select one of the tracks that has the too long notes, and make sure that all the notes are then selected (highlighted) in the PRV view - or at least any that you want to fix. -Click to bring down the Events (Event Inspector) module from the toolbar. -Click once on the section that is labeled "Duration". -In my example, 30 was selected automatically, but yours will probably say some other number. Clear that and type in 30 - as in the following screen shot: -Hit enter on your keyboard. Doing that will change all the selected notes on the track to a duration of 30. -In my drum editing, I use that, or sometimes 15, as a typical note duration for drum sample triggering. -Anyway, then you should have a much better chance at being able to edit & copy things you've already entered - FYI.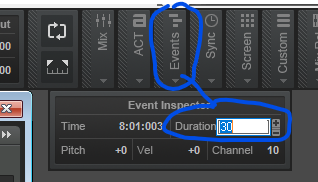
-
Recording V-Drum MIDI - Question about the MIDI Notes
JnTuneTech replied to Joel Pixton's topic in Cakewalk by BandLab
In the back of my mind something says you might want to try connecting just one module, and one pad connected to that, to see if the MIDI notes from just one of them get recorded properly. -Also, I can't tell, but did all of the notes have the same long timing? Or is it just certain pads? -
I know this just adds to your woes... but the zero controllers setting - which I understand the reason for including as a CbB default for the casual user - is really tough to allow across the board, -especially if you are using MIDI in your testing. Not only does that command work differently than expected on synths & such that won't use the original MIDI standard it comes from, but I realized a while back that CbB sends it out across all my active MIDI ports - not just the one I may be concentrating on at the moment. It can cause really unexpected results on a project with a lot of MIDI implementation. -Not great for testing, let alone some complex projects. Hopefully, you are at least testing with a MIDI file you created, so that you know it is clean of anything other than basic data, because without understanding the layering of MIDI commands (like volume in @John Vere's post), and how each DAW handles them, that will really always be a wildcard. I would highly suggest testing with only audio files themselves, not MIDI & VSTi combos. -FWIW.
-
Recording V-Drum MIDI - Question about the MIDI Notes
JnTuneTech replied to Joel Pixton's topic in Cakewalk by BandLab
In event view, normally you will only see note messages that by nature don't have an "off" - just duration, along with of course the note number and velocity. -Looking at event view may not clarify what is causing the long duration - but that again is probably in the drum module settings - gate time. -And yes, make a test with your system - make sure you can record normally with a keyboard - notes should only be the duration for which you hold the keys down, etc., or something else is wrong here. FWIW - Going forwards you will get used to the note durations and proper uses for them in percussion samplers. As the quoted material states, some events may actually need a long trigger, although most percussive samples do not. For instance, if you choose to use a snare roll or flam sample in Addictive, they are actually loop-able samples - and will require triggering for the length of time you want them to last. Generally though, the pads should only trigger a short note length for most uses - certainly not much more than the length of the initial hit - reverberation and such is taken care of with other parts of the sampler playback in most cases. -
Recording V-Drum MIDI - Question about the MIDI Notes
JnTuneTech replied to Joel Pixton's topic in Cakewalk by BandLab
To add to the good info above: Longer - earlier MIDI notes overlapping into a "Now Time" start point will get triggered by default project settings that are included in the Project - MIDI - Other Options preferences, such as MIDI event chase... But my question is - where did those long notes come from? Usually, a drum pad never puts out such long note on messages, in fact most of the time I have to modify pad inputs to make them visible lengths, -when I use normal note view. -Did you purposely stretch them, or somehow record them that way? -I would fix that 1st. -
My first guess, as I have never tried it, would be that the CbB Master setup with no output routing would probably not provide the NDI plugin (or anything else in the chain) the proper signal, and the only thing coming through might be straight from the live input monitoring... It's not designed to work that way. -Software mixing is different in some ways than hardware mixing (even though it's almost moot nowadays with many mixers being mostly software controlled.., but I digress) But maybe you've got that straight now. Input echo is what passes hardware audio -live audibly- into a software DAW. -Anyway, it sounds like you may be getting things figured out, and that's awesome. You have 6 mics and still not much room in the mix? I used to do a lot of video of open mic sessions I did a few years ago, and with only 3 or 4 mics, I never had that problem, but maybe you need to add a mic specifically for ambience. With that board... but I guess that does add more complications. Not sure what to say, but you will figure it out better hands on anyway. -Have you recorded streams already, and they are too dry? -Also, I had a few extra minutes on YouTube searching earlier, and just searching X-32 + Streaming Live got several links titled specifically from people doing just that. -If I knew more about that type of board & fx options, etc., plus how it works with Cakewalk, maybe I could make some better suggestions, but hopefully what we have gone over so far helps. -Keep at it, there is almost always a way!
-
Rapture Expansions - yes, it has been a long time since I did those! -Now, I can only go from rusty memories, but I think you have to make sure they installed to the current Cakewalk Content folders, if not, search some of the common locations on your C:\ drive for the set of folders that installer creates, and move them there (along with the existing "factory" Rapture library material). Seems like I had to do that a few times. If they are already there (look for the folder dates that match your recent install), maybe you just need to refresh the Rapture patch browser (sorry, I forget the keyboard shortcut for that - maybe in help?). -Again, it's been so long, but yes, I think there are some steps needed, and I hope this helps!
-
Again - what tells you that audio is not coming out of the Cakewalk Master Outs? -In your screen shot (thanks for that) - your Master shows "--None--" as output routing. -If there isn't an output assigned, how could you hear anything? -Is the correct output available to Cakewalk? Maybe revisit your audio settings in Preferences. Please, revisit your connections and routing. Cakewalk is as much a mixer as you make it to be. Things do have to be routed per whatever your hardware & drivers, and settings are, on your end, it's not automatic. Calm down and don't let it mess with your head. -I will agree with @John Vere though, -for live streaming, you may be making things too hard. And that mixer should be plenty capable, I would think as well, -maybe try posting in the Music Tribes - Behringer forums. I wish I could help more, but again I am not familiar with the Behringer mixer & interfaces. -But Cakewalk works great as a DAW, and mixes quite well, for tracking & recording purposes, and we would certainly see a lot more complaints here if it didn't route audio to a master out. Take a deep breath, think things through, you will figure it out.
-
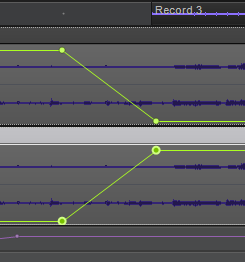
AFAIK - Automation Snapshots are only set per automatable control, not for the entire plugin module. -If you are only needing to change the entire EQ module settings once, or a few times, during a project timeline, I can suggest an alternate methodology: Duplicate the track you wish to have the multiple changes occur on. Change the EQ on the copy to your second group of settings. Automate a linear crossfade on the two duplicate tracks at the point(s) you want to swap over. -This has worked for me, and in fact can be used in many more ways than just EQ. Steps - for simple swapping to multiple EQ (and any other mix choices) major versions, on 1 audio track during a mix playback: 1) Start with perhaps your initial mix of a track. In Track View, right-click the track & select "Duplicate track...". 2) From the choices that pop up, select (check) all of the options. (This assumes you do not want to duplicate/separately edit audio content later) 3) Select the 2ond copy of the track. Change the EQ parameters (or any of the mix) to the 2ond variation you want to be able to switch to. 4) Find the time in the project you want the switch to occur. Create a Volume envelope on each of the two tracks. (assumes you do not already have any) 5) For a gradual change between mix settings, create 2 nodes on each track, at exactly the same timing, spaced apart as desired. 6) Pull the 1st Volume automation shelf on the 2ond copy down to -inf. Then pull the 3rd Volume automation shelf on the 1st copy down to -inf. This will create a linear crossfade, and allow you to adjust the timings as needed. -So, not only can you switch to a different set of EQ parameters, but many other options are available as well. And, you only need two envelopes for the basic switch, instead of many envelopes for each parameter. -It does increase your plugin load & track count, but again, less automation is needed overall, and you do not need to duplicate the audio. -If this wasn't what you were needing to achieve, -carry on! And of course, there are other techniques as well. But I hope you find this one helpful, as I have.
-
"Monster cables - you gadda get dose Monster cables..." ?
-
Just curious - is the sine wave testing you mention done from the file input to a track, and then comparing the output of an exported file result analysis? -I would be interested in seeing a setup using a virtual audio driver as DAW input, and then a virtual audio driver output capture as well, used between different DAWs. Of course, that would only analyze the various results on an identical signal set passing through the programming, it would not necessarily compare subjective quality. I say that, because for years I was concerned about the coloration and degradation of audio in a recording & eventual playback & delivery sense. And when digital became commonly available, I was hoping it would address some of that. But, so far, it seems to have imposed only a different set of conditions on the process. -Audio still has so many differing effects on each individual alone, that finding what "sounds best", or even "the same" is really up to each individual in each situation. Yes, electrically, and physically, we can measure accuracy of a signal which we think we understand is part of what makes up "good" sound and try to use that which technically works best. But does it really? I still find things like analog emulation to be such a surprise to me in audio processing, -that we would decide to re-color the audio processing back to known analog standards that were once considered to be electrically unavoidable loss & degradation (i.e. tape sims, etc.) workarounds... It just shows me, that no matter the technique, getting "good" audio is still as variable as ever. We just keep coming up with (hopefully) better tools to manage it all, -seems to me. -So far, I like my results in Cakewalk, -bad vocal days or not.
-
Yes, as @kperry responded, if you are using realtime monitoring of a live audio input in Cakewalk, then input monitoring would need to be enabled to pass it through. -Think of the routing - a track in CbB can have several things routed to it as input. -If you are using an audio device input, rather than (or in addition to) existing recorded track data or other routed input, that input must be brought in live from the audio driver, similar to a preamp being switched on. -Without that, the track only sends whatever else is already present (-already routed in) on to the output of the track. Since I am not familiar with the X-32 and the X-Live card you mention, I can only guess without a lot more hands-on investigation. However, I can say that if you are using the USB input of the mixer or card into Cakewalk, you should be getting fader & other processing in CbB from an audio input with Input Monitoring on, albeit with some latency, to show up at the master out of Cakewalk - if you have it routed that way, and again, active. So, my question is - where are you monitoring the output of Cakewalk from? Again, I cannot see your hardware & software settings. Also, does the audio interface provide a method of loopback routings? If so, you might be able to use the audio interface entirely for both Cakewalk and the OBS inputs, as I have seen in other such live-streaming setups. -One other possibility, is that the NDI FX plugin may need to feed from a bus, rather than the master out, I don't know the routing that actually feeds the NDI plugin - maybe that only reflects the external mixer output? Does the audio device driver setup have a mix-routing app? -I apologize if my guessing is way off, but hopefully some of this helps.
-
[SOLVED] Quick retuning of an old 432 hz recording?
JnTuneTech replied to Andres Medina's question in Q&A
-Just remember, that technique will speed up the tempo too. -And, FWIW, it took me a bit to figure out - select the audio clip first, then open Loop Construction (view - tool(?). (- I did it from the Views selection in the file menu, as I hadn't seen that one since I don't usually work on loops much, but that is just me!) -Also, maybe try it on a short section of audio first, I'm not sure how long of a recording you are talking about here. -
[SOLVED] Quick retuning of an old 432 hz recording?
JnTuneTech replied to Andres Medina's question in Q&A
Are you OK with changing the time factor as well as pitch? -Disclaimer - I'm terrible with math elements, so I don't know if the tool I am thinking of has the right range settings, but I would look into the method described by Craig Anderton, on changing the entire pitch & timing of an audio file, just like we used to do with varispeed on a tape machine: Craig Anderton - How To Do True Tape-Type Varispeed In Cakewalk-Sonar I have used this technique, and though I use it most to do full semitone adjustments, it does offer up to +-49 cents adjustment, and in fact I just used it to nudge tuning on a sample, and if I knew the proper math... I'm sure someone here will laugh & help out, but anyway, adjust the audio file up to the cent level you need, and I would think that would do it. (Yes, just an example, not the right value!)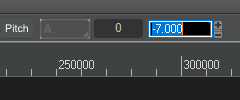
-
Ah, and I have actually learned to appreciate the help module, as in that screen shot. Back in the day, it took me a long time to understand the modified keyboard command options for copy, cut, & paste available in Cakewalk. -Of course, I'm not the sharpest tool in the shed, but having used "common" keyboard shortcuts for so long, I guess it didn't occur to me that there might be variations... Anyway, learning how Cakewalk offers the "special" options there, and what it does going forward in a session, took me a while to get a handle on. Nowadays, I almost always do a ctrl-alt-c when I start editing MIDI, so I can set my preferred options, -and just to remind myself of what options exist (as in the GUI list having the 3 little dots comment) behind the operation (rather than just basic copy - cut - paste).
-
Can anyone help me work out this sidechain technique?
JnTuneTech replied to kevmsmith81's topic in Cakewalk by BandLab
Whichever compressor you use, watch the mix - send settings, as it sounds from your original post that you may just be throwing too much from the sends at the sidechains in each bus. Overdoing input levels on the compressors (or most anything) will just make things difficult to manage. -
Can anyone help me work out this sidechain technique?
JnTuneTech replied to kevmsmith81's topic in Cakewalk by BandLab
I did a quick test with Sonitus Compressor, on my system, and I could not see what effect the sidechain input has, exactly, in the Sonitus processing. I also looked at the inline help for that compressor, and it mentions nothing of sidechain input at all. I switched to a more full-featured compressor plugin, and not only does that give me a full readout of the sidechain input and its effect on the compression settings, but it also allows me to choose band-filtering on the sidechain signal, etc... It does the type of processing described in that "trick" video easily, which to me is basically a refined take on vocal FX ducking, really. -A very useful technique, to be sure. You may need to try the experiment with a different compressor plugin, to really be sure it is working. -
Plugins linked to the wrong file folder, no way to change it
JnTuneTech replied to Kat Craig's topic in Cakewalk by BandLab
All the correct path information matters. Your reply doesn't quite match the screenshots I see, however. Are all the screenshots from the same settings? Two pictures mention items on d:\ - but in 2 different folders. And the VST Scan Paths picture clearly has f:\steinberg ... in the list. The plugin load error could be unrelated to the scan location (even though that also looks mis-matched above) - maybe you missed setting that one up right (VacuumPro). Otherwise, again in the plugin manager screenshot, your Velvet plugin is listed as located on the d:\ drive. -Did you also change drives and/or assignments on the new system? -
Not sure if it will help: Recently, -but before this month's Waves licensing debacle... I had some issues with the Waves Central installer and my Cakewalk plugin listings. Waves Central has its own settings section, some of it applies to cleaning up older versions, etc. -In my case, since I am not always (and forgot to change when trying the cleanup) logged on to the PC as a local admin, Waves had an issue trying to clean some registry settings they put in for older versions, so I have some "ghost" entries in my VST3 list in Cakewalk that I need to fix now. I've been ignoring it. As I say, for me, that issue was related to using the installer without local admin permissions, which is something only a few VST installers seem to have much problem with, and is usually not hard to avoid (I simply forgot to do things right for the way I set up my system). -But I will say that otherwise Waves hasn't littered my system with things I didn't want, and they do ask where I want things. -Usually, setting up VSTs with associated libraries, and ones that won't give setup choices, are the toughest to clean up after, or reconfigure after install. -Some of the vendors make little effort to mention in advance that you can change install preferences before downloading, and installing, from their licensing interface, that also gets irritating. -Once in a while, I may dig into the temp folder after a lousy install, and see if the installer left an identifiable log file, and go from there. But rarely does that happen when they don't follow standards anyway!
-
Hmm... To be, or not to be, a wave editor... "I'd like to have an argument please." ... "I see. Do you want to have the full argument, or were you thinking of taking a course?"


