


msmcleod
-
Posts
7,191 -
Joined
-
Last visited
-
Days Won
39
Everything posted by msmcleod
-

How to turn existing midi tracks to virtual instruments?
msmcleod replied to Don Schneider's topic in Cakewalk by BandLab
Yes, you can do that. Just insert a new synth, and change the output of the MIDI track to that synth. -
How to turn existing midi tracks to virtual instruments?
msmcleod replied to Don Schneider's topic in Cakewalk by BandLab
Yes, you can do that however: 1. It requires knowledge of how MIDI tracks / soft synths are routed, and 2. Most new users just want the track to be an single instrument track, rather than separate MIDI / synth tracks. Having separate MIDI / synth tracks makes for a more complex project ( up to double the track count ), and can cause confusion for new users. For example, the gut instinct for adjusting the volume of, say a piano track, is to go to the track with all the piano MIDI data on it and changing the volume slider... except by doing this you're not changing the piano's synth's output volume, you're changing the MIDI volume ( CC #7) of that channel. Instead you have to go to the synth audio track to change the volume. And then there's which track to use for FX, or MIDI vs VST automation. So you have to be constantly aware of what you're adjusting and how things are routed. Simple Instrument / Per Output Instrument tracks take the complexity out of that. You've still got complete control via the Track Inspector Midi/Audio tabs, but by default it's easy to work with. The only limitation with using instrument tracks is the case where you've got several per-output instrument tracks fed to a single synth instance, and you need automation on the VST parameters. In this case, you're limited to putting the VST parameter automation on the first track. However, this can be usually worked around by mapping CC's to the parameters within the VST itself, then adding MIDI automation in each individual track. Alternatively, you can create an additional MIDI track solely for adding VST automation. -
Yes - the shelf tool alters existing envelopes. If there's no node to the right of it, there's no envelope to modify at that point.
-
How to turn existing midi tracks to virtual instruments?
msmcleod replied to Don Schneider's topic in Cakewalk by BandLab
@Torbjörn Lundberg - there are a lot of different ways to do this, as detailed in this thread - but I admit the explanations are a bit daunting for new users. For new users, I'd recommend doing the following: 1. Create a new Kontakt instrument track for the track you want to change, then move that track so it's underneath the old MIDI track. 2. Select everything in the old MIDI track by clicking on the track number, then hold down SHIFT and drag the MIDI clip selection to your new Kontakt track (holding down SHIFT stops the MIDI clips moving left/right in time when you're dragging). 3. Delete the old MIDI track. I appreciate there'll be a bunch of users who think "Why, when you could just do X,Y, Z.....", but this method is simple and easy to understand for new users. There are definitely more efficient ways of doing this, especially if you're going to be changing all of your tracks to share a single Kontakt instance, but this should at least get you up and running. -
Transfuser 2 by Air Music won't work in Cake? - Solved
msmcleod replied to LoopJunkie's topic in Instruments & Effects
The first time I did an install of any of the AIR stuff after Windows 10 21H1 came out, it put my machine into a BSOD loop on boot. Luckily I had a backup image from the day before, so I could restore it. IIRC what I did was... immediately after the AIR install ( and refusing any option to restart the machine ), I re-installed the latest VC++ redists, and also re-installed the latest iLok License Manager / drivers. This cured it. -
moving a bunch of tracks to a new folder shuffles order
msmcleod replied to John Bradley's topic in Feedback Loop
@John Bradley - Thanks for the report. It may be in some instances the tracks are being moved in track creation order, rather than their original index order. We'll look into it. -
Duplicate Track Folder and all the tracks it contains?
msmcleod replied to sadicus's topic in Cakewalk by BandLab
Another way is to save it as a track template, and import it. -
Do you have Ripple Edit enabled?
-
oh, interesting... they must have different CLSID's, or maybe installed in the Win32 subsystem.
-
32 bit DX plugins cannot run within a 64 bit DAW, and vice versa... and AFAIK you can't have a 32 bit DX plugin "installed" or more accurately, registered at the same time as the 64 bit one. So although you can have both on your hard disk, only one of them will be available as only one DX plugin can exist in the Windows registry with the same CLSID. You can however quite happily have 32 bit & 64 bit VST's installed at the same time, as long as they live in different locations on your hard disk. For the DX plugins, you could probably come up with a batch script that could swap between the 32 bit & 64 bit DX plugins before you ran SONAR or CbB, but you'd need to know exactly which plugins you'd need. For example, assuming you've installed SONAR 32 bit to "C:\Program Files (x86)", you could run the following to register the 32 bit version of TTS-1, and use it in SONAR 32 bit: regsvr32 "C:\Program Files (x86)\Cakewalk\Shared DXi\TTS-1\TTS-1.dll" Then run the following to register the 64 bit version before you run CbB: regsvr32 "C:\Program Files\Cakewalk\Shared DXi\TTS-1\TTS-1.dll" However, you'd need to: 1. Do this for each and every DX plugin, and 2. Know exactly what dependencies they need, in case you need to regsvr32 those as well. It's not for the faint hearted. There are three other solutions: 1. Run SONAR 32 bit on a different PC 2. Set your PC to be a dual 64 bit/32 bit boot and swap between them as needed ( FWIW, this is what I do ) 3. Run SONAR 32 bit in a virtual machine running a 32 bit OS... although with this solution, you'll be able to load/edit projects, but the VM might be too slow to record or playback larger projects.
-
It's also worth mentioning that Midi Export is now selection sensitive, so it'll only export what is selected. As mentioned above, the fool-proof way is to Save As -> Standard MIDI File.
-
Updating plugins makes them non-functional in older projects
msmcleod replied to Bobo Fret's topic in Cakewalk by BandLab
Look forward to that one. @Craig Anderton BTW - I've been collecting your "Musicians Guide to Recording" series, but a few of them seem to be unavailable, particularly "How to Record and Mix Electric Bass" and "Desktop Mastering". Are these still in the pipeline? -
Personally, I would avoid USB mics on Windows, the reasons being: 1. You can't use ASIO, as most USB mic's don't come with an output and Windows only allows one ASIO driver to be open at once. 2. You're stuck with the preamp built in to the mic, which may or may not be a good one... but it's never gonna be a Neve 1073. 3. You can't plug it into anything else but a computer. Additionally, if you're using it with other audio devices, there's no way of syncing the word clocks. So even using WASAPI Shared to record from multiple audio devices, they're all going to be misaligned and you'll have to deal with any phase issues by aligning the audio yourself afterwards. An XLR mic gives you way more options, and will be still be useable for decades - way past the point the drivers for your USB mic no longer work on your PC's OS. So unless you're ONLY doing pod-casts / voiceover work, I'd stay clear of them.
-
I managed to get one of those for a stupidly cheap price from Amazon a few years ago. It's surprisingly good as a guitar MIDI controller, although it does require its own playing technique. I've used it for recording finger style parts with the Ample Guitar M Lite.
-
When a Meloydne Region FX is active, Melodyne takes ownership of the clip which is why split is disabled. You need to render the Region FX first to relinquish control from Melodyne.
-
CC's 121 to 127 are Channel Mode messages: 121 - Reset All Controllers 122 - Local Control On/Off 123 - All Notes Off 124 - Omni Mode Off 125 - Omni Mode On 126 - Mono Mode On (Poly Mode Off) 127 - Poly Mode On (Mono Mode Off) For synths that support it, sending CC 126 with a non zero value turns that channel into a mono synth, which is handy for keyboard solos.
-
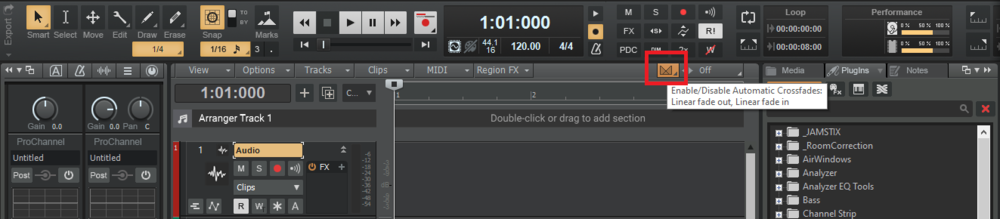
Enable auto-crossfade before you start recording:
-
Realtime guitar to MIDI is always going to be a challenge, especially on lower notes. It needs enough of a complete waveform (or more likely enough several complete waveforms) to correctly detect the pitch, but by that time there's an audible latency. You can get used to it over time and learn to anticipate the notes with a lot of practice, but I suspect that time is better spent getting more proficient at learning the part on keyboard, or even entering melodies via PRV or staff view.
-
Strictly speaking only CC up to 97 are true CC's. CC's 98/99 are 14 bit NRPN's and should be sent as a pair - same with 100/101 ( 14 bit RPN's). As far as I can tell, they are chased as long as they do come as a pair. 102 - 120 are undefined, but 102 to 119 are chased 121 onwards are reserved for Channel Mode Messages and are not currently chased. It doesn't look like aftertouch messages are chased. I'm not sure why, although I suspect this was due to historical performance reasons.
-
No, dirty is common computer science term for a file or structure with unsaved or uncommitted changes. https://softwareengineering.stackexchange.com/questions/410262/whats-the-origin-of-the-term-dirty-in-regards-to-unsaved-progress
-
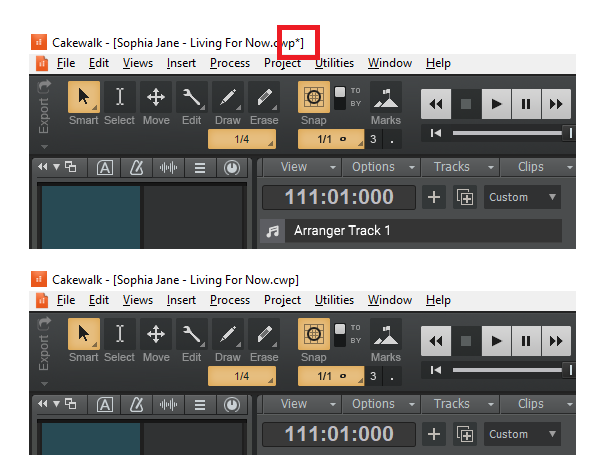
If the main project is modified, but not saved since the modifications - i.e. there's an asterisk (*) after the project name in Cakewalk's title bar:
-
I've tried using the GK2A (and also a GK3) with my GI-10, and also the MIDIGuitar plugin - both return mixed results from my experience. I've had much better results just recording the guitar, then dragging the audio to a MIDI track, which uses Melodyne's pitch-to-MIDI conversion. You'll need either Melodyne Editor or Studio to do polyphonic conversion though. Whichever method you use, you should expect to have to edit the results in the PRV afterwards.
-
On my Asus P8B75V motherboard, my 1st gen Scarlett 18i20 works far better using the USB 3.0 ports than on the USB 2.0 ports, but I suspect his is more to do with what other devices are using the same IRQ as the USB 2.0 port, rather than a USB 2.0 / USB 3.0 thing. Looking at the IRQ assignment in Windows Device Manager, it looks like all USB 2.0 ports are going through the same IRQ (23) - so my trackball, keyboard, USB wifi adapter & USB midi devices will all be serviced by the same IRQ. The USB 3.0 port however, has it's own dedicated IRQ.
-
Ok, so you're using the on-board audio interface on your motherboard. WASAPI should work fine with that - if it doesn't, make you've got the most up-to-date audio drivers installed for your motherboard.
-
whatever your sound is coming out of (i.e. what your headphones or speakers are plugged into)


