msmcleod
-
Posts
7,119 -
Joined
-
Last visited
-
Days Won
39
Everything posted by msmcleod
-
 Use the vertical zoom buttons on the right - specifically the '-' one:
-
Yeah, we noticed this one shortly after the 04 release. We've fixed it for the next release. [EDIT - To clarify, it's a display issue - the clip gain envelopes will sound correctly.
-
Offer an Effective 'Duplicate but Transpose' Option
msmcleod replied to Todd Groemling's topic in Feedback Loop
Why not? This articulation will do exactly what the OP is requesting - i..e. play the original note plus an additional note an octave higher: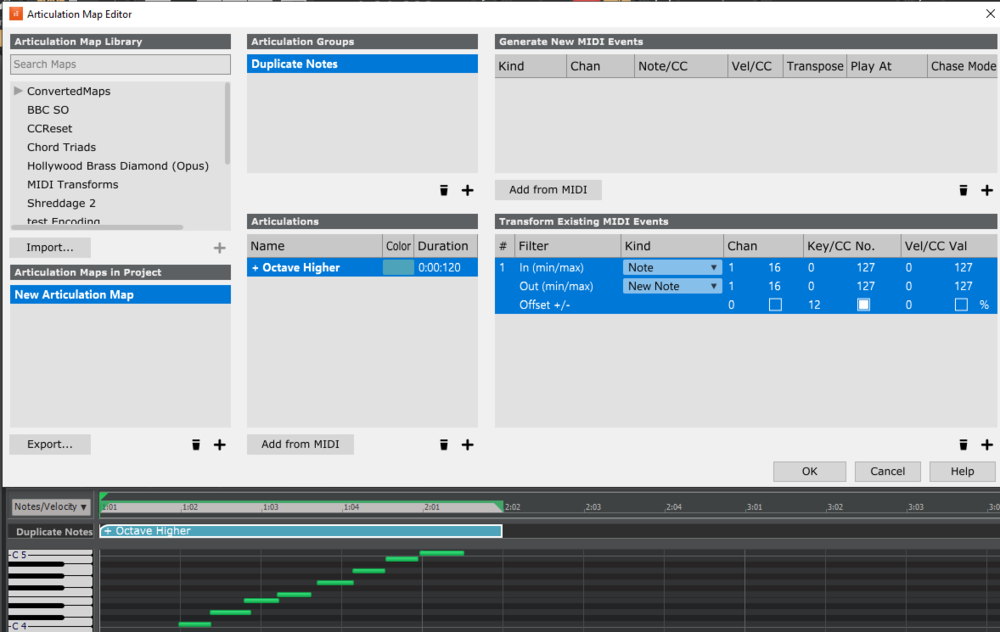
- 7 replies
-
- 3
-

-

-
- staff view
- better workflow
- (and 3 more)
-
Splitting Clips whilst using Clip Automation Mode/View
msmcleod replied to Mark Morgon-Shaw's topic in Feedback Loop
The "s" shortcut relies on a selection (because it can work over several tracks), so it will still work, as long as the clip is selected. There's two ways to do this: 1. If you've got show clip headers enabled, you can click on the clip header to select it and remain in clip automation mode. 2. Clicking the track number will select all of the clips, again remaining in clip automation mode. e.g... (all I'm doing here is using the left mouse button & pressing "s" to split) : There does seem to be a small bug where the edit filter reverts back to clips on splitting the right most clip, but apart from that it seems to be working. -
AZController uses the Cakewalk Control Surface API : https://github.com/Cakewalk/Cakewalk-Control-Surface-SDK
-
Best thing to do then, is to either: 1. Backup your system drive before you start; or 2. Buy a brand new SSD for your Windows 10 system drive and either remove & keep the old one safe, or do as I did and have a dual boot system. That way you can easily switch between the two if you have any issues.
-
There may also be issues with automation created in newer CbB builds ( I think automation changed around Nov 2019 IIRC ). I'm looking at going between by mobile recording rig running SONAR Platinum (32 bit) & CbB at the moment. It seems to work fine as long as there's no automation, and no DX plugins. Even arranger sections aren't an issue, as I can save them as an arranger template in CbB, do what I need in SONAR, then import the template back into CbB later on.
-
FWIW my DAW rig is now 8 years old, and still working fine with Windows 10 21H1. It's a 3rd gen Intel i3770 (3.4Hgz, 16Gb RAM). Granted, I don't got OTT with plugins (usually < 5 synths & < 50 effects), but considering I normally run at a buffer of 64 with my Focusrite Scarlett / RME DigiFace USB, I think it holds up pretty well. If your machine was built by Jim, is likely to be much more powerful than mine.
-
@Terry Kelley ... @Bristol_Jonesey is correct: 1. Press CTRL + A to select all tracks 2. While holding down CTRL, change one of the track filters to "Clips" - this will change them all, because you've quick-grouped them by selecting them and you're holding down CTRL.
-
How do I get classic General MIDI synth sounds?
msmcleod replied to Dave G's topic in Instruments & Effects
I'm pretty sure the first bank of TTS-1 sounds are exactly the same as the old 24 note poly Roland GM synths at the time, but it sounds like you're talking about Microsoft's internal GM synth? As far as I know, there's not been any changes to the Microsoft GM sounds either. To use them though, you'll need to ensure you're running in WASAPI mode for Audio, and set your MIDI output to "Microsoft GS Wavetable Synth". If you were using a 3rd party sound card at the time, it could be that you had the Yamaha XG sound set, which does sound different. You can download an XG VSTi synth here: https://veg.by/en/projects/syxg50/ It's 32 bit, but it should work with BitBridge. I personally use JBridge, but can't recall any issues with BitBridge when I last used it. -
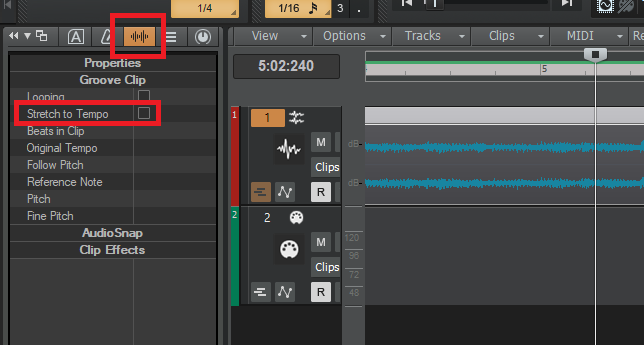
Changing tempo will not normally stretch audio clips, unless "Stretch to Tempo" is checked within the clip properties: AFAIK this is only ever checked automatically for groove clips, although you can set it manually.
- 3 replies
-
- 4
-
-
- time stretch
- time stretching
- (and 2 more)
-
MIDI and AUDIO clips transparent in Cakewalk
msmcleod replied to Mr. KubikoV's topic in Cakewalk by BandLab
Can you elaborate on your reasons for why you'd want them transparent? I'm not aware of anything behind the clips that you'd want to see... the only thing is grid lines, but you can choose to show them in front of the waveform, which would have a similar effect. Alternatively, you can turn off the clip contents completely if you want and just show a coloured block. -
Many users (including myself) change snap settings constantly throughout the lifetime of a project depending on the operation. I find the notion of a fixed snap setting for duration of a project strange, never mind it being global for all projects. If I'd set a snap setting for a particular task in a project, I'd expect it to be the same when I reloaded the project. If I loaded a different project, I'd expect to be as I left it as it was in that project. But in any case, this is exactly the type of thing project templates are used for.
-
The last time I fired up my Amiga to transfer some stuff from Music-X was fun in a nostalgic kind of way, but I can't see myself firing up Cakewalk Pro Audio 5 on a win 3.11 machine and enjoying the experience! Major studios will keep old machines with old operating systems and DAWs on them, just in case a client comes back a decade later wanting to remix their old songs. But for the rest of us it's mainly lack of hardware driver support that forces people to use older operating systems and the older DAWs that still work on them. A few of my older projects rely on the EQ/Dynamics settings on my DS2416, which is why I have a Windows 7 32 bit boot on my studio PC with SPLAT on it. Back in those days, I never used plugins as I could do pretty much everything I needed on 2 x DS2416's. SONAR was basically being used as a MIDI sequencer, tape recorder and automation controller for my DSPMIx software. I did go back and upgrade my projects at one point, replacing the MIDI tracks with SIT tracks using samples of the original hardware synth patches, but audio tracks were left as is.
-
The help PDF and online help are usually updated on every release, although not always for early access. The only thing that isn't done every release is the localization, and especially localized help. We have to book translators well in advance, and their schedule does not always match our release dates.
-
Once you've set it once, save it as a Project Template and use that template as a starting point for every project.
-
Yeah, I think you're right here - must be an issue limited to the installers. I upgraded all my machines to Windows 10 21H1 over the weekend. I've just tried and all of my AIR MT VSTi's work fine. I tried a handful of AIR MT effects too, and they're all ok too. FWIW I tried a new machine build a while back and had similar issues with Windows 10 2004 / 20H2. The trick was to immediately install the latest iLok software after installing the AIR plugins. IIRC this would remove tpkd.sys for you.
-
I use SPLAT on a Win7 32 bit laptop with my Yamaha 01X / i88x / ADA8000 as a portable 24 track recorder. I've got WIn10 64 + CbB on the laptop too, but I can't get the drivers to work properly in WIn10 64 bit on the laptop. Pity, cos it works fine on my desktop in Win10 64 bit, but after trying out 5 different Firewire laptop ExpressCards, I've given up and I'm sticking with SPLAT.
-
Insert Committed Arrangement at Now Time & The Most Requested Features
msmcleod replied to murat k.'s topic in Feedback Loop
Thanks for clarifying - so it's more like "Insert Committed Arrangement at Now Time". This makes sense. I'll discuss this with the team. -
Insert Committed Arrangement at Now Time & The Most Requested Features
msmcleod replied to murat k.'s topic in Feedback Loop
We've recently added a "Create Arrangement from Selection" option to the Arrangements context menu. It just missed the 2021.04 release, but will be available in the next release. With this you can select a subset of arrangement sections and create a new / temporary arrangement from the selection. This will allow you what you're asking. It's also useful if want to loop a subset of arrangement sections. -
I'm not convinced changing the arranger font size is the best solution for this. I too used to use the sections for at least the first line of the lyrics as a reminder, but nowadays I use Melda Productions' MNotepad which comes with their free fx bundle: 1. Put Melda Productions' MNotepad into your Master effects bin (or the metronome fx bin if you feel this is more appropriate) 2. Hide the Keyboard within MNotepad 3. Copy your lyrics from wherever you have them (e.g. Notepad) to the clipboard (CTRL + C) 4. Click the Edit button on MNotepad and paste in your lyrics (CTRL + V) 5. Press the Close button on MNotepad's Edit dialog 6. Change the font to a large one, e.g. Large 3 7. Dock MNotepad in the MultiDock, and resize the multidock if required 8. Create a new automation lane on Master, assigning it to MNotepad's "Scroll" parameter 9. Using the Arranger Inspector for navigation, add automation nodes at the various lyric sections 10. Change all the envelopes to "Jump" shapes 11. Using the Arranger Inspector for navigation, click on each section and move the automation node so it shows the correct lyric at the beginning of each section TIP: You can put this specific layout in its own screenset, so it doesn't restrict you resizing the multidock in other screensets for other operations.
-
Sorry about that - looks like my inbox was full! I've cleared it out now... can you try again? Thanks.
-
Thanks for that - could you PM me the link too, just in case I get a chance to look at it over the weekend.
-
Take a look a Melda's MDrumEnhancer. Rather than totally replacing the drums with samples, it "enhances" them with samples. A hardware alternative would be to get hold of an old Alesis D4 or DM5 module. The 12 trigger inputs are extremely configurable, to the point that you could use your existing drum mics as triggers ( with full velocity sensitivity), and mix the Alesis drum samples in with the live signal. They usually go for around $150 on eBay.