msmcleod
-
Posts
7,119 -
Joined
-
Last visited
-
Days Won
39
Everything posted by msmcleod
-
One thing I would add about choosing an interface, is think about what you might need in the next 2-3 years. I'm not saying spend a fortune on a 32 in / 32 output interface, but think about scenarios where: You might want to record more than just one or two channels Will you always be using VST effects, or will you be reamping via a real amp in the future, or might want to use external effects processing? So for example, something like the Scarlett 2i2 is a great interface, but you've only got 2 ins and 2 outs... and the 2 outs will invariably be connected to your monitors. The Scarlett 4i4 gives you 4 inputs and 4 outputs for an extra 30% - 40% of the cost. In general, you can't use more than one interface at once ( due to technical restrictions with ASIO / wordclock sync issues ), so if you do have to upgrade your interface your old interface will be redundant. One exception to this rule is interfaces that have an ADAT input. If you buy an ADAT converter, this will give an ADAT equipped interface an extra 8 inputs. The Scarlett 18i20 / 18i8 both have ADAT inputs. They're not cheap interfaces, but in saying that the Behringer UMC1820 essentially has the same feature set as the Scarlett 18i20 - i.e. 18 inputs (8 analog, 2 SPDIF, 8 via ADAT), 20 outputs (10 analog, 2 SPDIF, 8 via ADAT) - but is the same price as the Scarlett 4i4... although it's arguable that the Scarlett preamps are superior. Anyhow, all I'm saying is you might want to consider getting something slightly more than what you need now to save money in the future.
-

Copy and paste articulation track
msmcleod replied to Sidney Earl Goodroe's topic in Cakewalk by BandLab
I can't find anything specific to articulation copy/cut/paste/delete, but I suspect the this behaviour was taken as a given, as there are several references to articulation selection - i.e. anything else within a track/clip can be selected, and then copied/cut/delete/pasted. The articulation events themselves essentially live inside their own MIDI clip on each track, so they're treated exactly the same as MIDI events in that respect. The only differences being: There is only one articulation clip per track You can only see Articulation events in the Events View and PRV Articulation Lanes (i.e. they're invisible on the clips pane ) During playback, articulation events are always processed before any MIDI events on a track -
That should be plenty fast enough for low latency operation.
-
Copy and paste articulation track
msmcleod replied to Sidney Earl Goodroe's topic in Cakewalk by BandLab
Just select the articulations and use CTRL + C / CTRL + V: -
If you're just dealing with key switches, creating articulation maps should be trivial using the MIDI learn function. You just engage MIDI learn, press the key, name your articulation and repeat for each key switch. This is especially true if all the key switches are mutually exclusive (i.e. each key switch overrides all of the others). I appreciate that the base octave can be confusing as there's no standard here. Personally, I just ignore this and either look at the MIDI note number itself, or more often just go up and down the keyboard until I find the right octave and use MIDI learn from there. Where things start to get more complex is where you've got groups of key switches that aren't mutually exclusive. In this case you need to put all the key switches that override each other in their own group. Most VSTi's / Kontakt libraries are pretty good at colour coding these on a keyboard display to make these groupings more obvious, so you just create your groups to match what you see on the plugin/library. Not grouping articulations properly is the #1 reason why people think that chase doesn't work, and end up changing their articulations to "Full Chase". For the most part, you can ignore the transforms section unless: You're using a library that doesn't support key switches, in which case you can fake them by using a MIDI channel transform and organise your sounds to match the MIDI channels ( e.g. legato strings on Ch 1, pizzicato strings on Ch 2) You're using a transposing instrument (e.g. clarinet, saxophone etc) and you want the staff view to show what the musician is playing vs the actual pitch being heard, in which case you use a Key +/- transform. The VSTi uses velocity switching (e.g. Shreddage uses the lower velocity range for palm mute, the upper range for clean, and 127 for pitch squeal), in which case you can use a Vel +/- transform to force your performance to clamp to the velocity ranges you want.
-
Ok, decided to give it a go... can't say I'm overly impressed to be honest. I turned off all the extra effects, set the widening to zero, and set all the EQ bands to zero gain, so all I was hearing was the guitar modelling. There seems to be some weird hollow resonance going on. The only model that sounds half-decent to my ears is the Gibson, but even that suffers from this strange effect. The mic choices are strange too. How the SM57 can sound better than the Audix condenser baffles me. The beyer (another dynamic mic) weirdly seems to have the best sound. Anyhow, I set it to the Martin using the condenser at 50% Neck, 50% hole, and compared it to my Martin body IR's ( via Audio Assault's IR loader ). The difference was night and day. The IR's sound so much better. Now I'm not saying you can't get any half decent sounds out of this plugin... you can... but you need to use all the extra effects to cover up whatever is happening in the modelling. I think I'm gonna stick to the IR's.... https://www.3sigmaaudio.com/acoustic-impulses/
-
I've used guitar body impulse responses in the past, and they do make a difference to acoustics with piezo pickups - but they're a bit of a hassle to set up. This plugin would be a lot less hassle than manually using IR's. If anyone gets a chance to try this plugin out, please post your findings here.
-
You need an audio interface with an "instrument" input. The Focusrite Scarlett 2i2 is probably the most popular interface. The newer 3rd gen interfaces are reasonably priced but you you can get some good deals on a used 2nd gen. Slightly cheaper is the Presonus AudioBox, or if you're on a budget something like the Behringer UMC202HD will do fine. All of these interfaces are bus-powered from your USB port and should work fine with a guitar. I actually use a 1st gen 2i2 with my laptop for recording guitar when I'm not in my studio. Before you get anything however, check that they have native ASIO drivers available for download - you don't want to use ASIO4ALL if you can avoid it.
-
No, this is something completely different. Cakewalk will tell the interface to play a buffer of audio at a particular sample time, and the audio device plays it. It's like telling two people to fire a starting gun at exactly 10pm, but if one person's watch is 0.5 sec out, they'll fire at different times. They both think they're firing at exactly 10pm, but their watches are different. Even if their watches were synchronised 8 hours earlier, there's still going to be inaccuracies in the quartz crystal or the gearing that will cause them to drift. Probably not a huge issue for a watch when you're dealing with seconds, but it is an issue for an audio device needing to be accurate to 1/48000th of a second.
-
Most audio interfaces have an internal clock, and this is where they derive their timing from. If your interface has an ADAT input or an SPDIF input, it will normally have the option to slave it's clock to those inputs instead, which override the internal clock. Both ADAT and SPDIF have a clock signal which is continuously sent along with the audio - it's there regardless of whether there is audio playing through it or not. BNC is a dedicated clock input / output - but the theory is the same. So if you connect the SPDIF output of device A to the SPDIF input of device B, then tell device B to slave to SPDIF, they'll both be using device A's clock. The best analogy I can think of is, say you've got two guitarists playing the same part. They've both got an Alesis SR-16 drum machine set to 120BPM as their metronome, and they're wearing headphones so they can't hear each other. They both press play at the same time and start recording. Because the drum machines are going to be very slightly out (or one started very slightly later than the other), the timing will drift. This is what playing/recording on two separate devices is like if they're not sync'd. Now say, they get only one person to press play on both machines at the same time (or they've wired up a single footswitch to both devices) . It's more likely that they'll start at the same time, but the two drum machines are never gonna be exactly 120BPM... they'll start to drift. One might be closer to 120.001 BPM, and the other 119.999BPM. By the end of the song, they've drifted apart. This is what it's like using a shared ASIO driver without wordclock sync. So realising this isn't working, they decide to share a single drum machine and both play to that. Now they're both in sync for the whole song, because they're both using the same "clock".
-
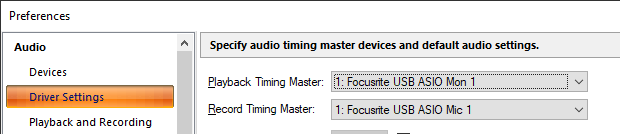
ASIO doesn't guarantee two interfaces are in sync with each other. If I bought another RME device and didn't sync the wordclocks, they'd still go out of sync even though they share the same driver. They need to be physically linked to the same wordclock, via BNC, ADAT, SPDIF or MADI etc. WASAPI and WDM are no different. I used to use WDM to record from several interfaces at once, and this was fine as the wordclocks were physically sync'd via ADAT. This very true - especially if you're recording live instruments. And what you suggest is the perfect way of checking how out of sync your interfaces are. I think by default it does, but you can obviously change it. You should set it to whichever interface is acting as the master for wordclock:
-
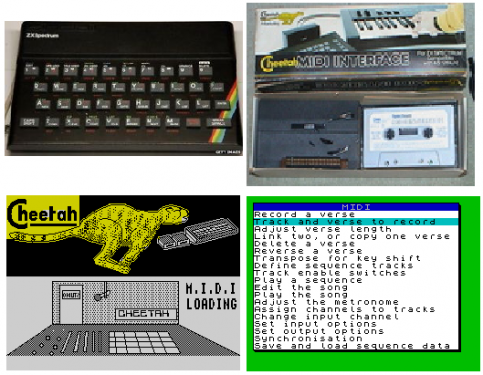
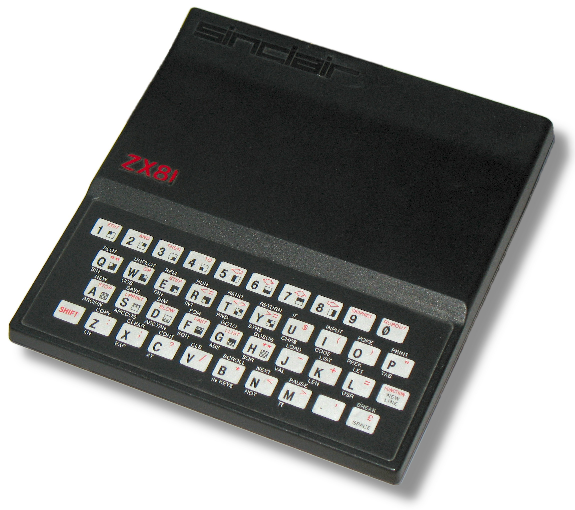
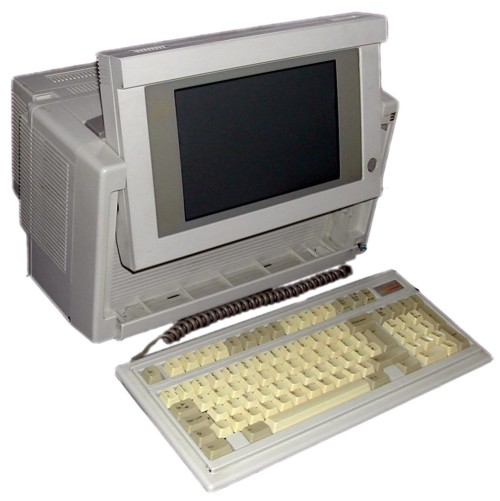
I started programming on this, first in BASIC then in Z80 assembler: My first sequencer was this... And I first used Cakewalk on one of these (a 20MHz Compaq Portable 386), with a Voyetra MPU401 clone. Nice machine with an amber plasma display, a whopping 2MB (or was it 6MB? ) of RAM and a 20MB hard disk. At around 20lbs it was hardly portable though. Did a lot of Turbo Pascal / Turbo C programming on this thing. ... but as this was my dad's PC, I moved to Music-X on the Amiga for around 6-7 years or so, before moving on to Cakewalk Pro Audio 7 on a P166 with 64MB RAM and a Yamaha DS2416 card.
-
There's a few here you could check out: https://plugins4free.com/search?term=chord
-
Actually it matters more for playback than recording. Recording isn't an issue, as you can adjust the recording by nudging the waveform to align it. Playback is more of an issue. If the wordclocks aren't in sync, the devices won't be playing at exactly the same time for the same sample time. This can cause phase issues or a chorus/flange effect if the wordclocks drift significantly. More subtle wordclock drifting will mess with your stereo imaging, making your mix seem "wider" in places or even lop sided. You might get away with it if you carefully choose which instruments go to which output - i.e. make sure stereo pairs, or doubled parts always go to the same device. But you can't rely on it. To avoid any of these issues, I'd seriously recommend getting a multiple out audio interface. You can get them pretty cheap nowadays off eBay, or even refurbished from the manufacturer (Focusrite quite often sells refurbished or older generation interfaces off cheap).
-
This is an important point, that azslow3 touched upon in an earlier post. Even if you're able to record from multiple devices (either through ASIO if the drivers support it, or through WASAPI), the device's wordclock's still need to be synchronised to be sample accurate. It'll still work if they're not, but they won't be sample accurate and you may find recordings from one device drifts slightly compared to another. This is true for both recording and playback. If you're recording from multiple devices and outputting to a single device, this is less of a problem as you can always manually adjust the recording within Cakewalk.... but outputting to more than one device really does need to be sample accurate, else you'll get all sorts of random phase issues. One device needs to be the wordclock master, and all other devices are then wordclock slaves. The master can be one of your interfaces, or it can be a dedicated wordclock generator. Then the wordclock needs to be sent to all the devices. There are three common ways of doing this (there are more, such as MADI, AES, mLAN etc.., but these are the 3 most common): 1. Via a BNC wordclock connector - one of the devices will need a BNC wordclock out, and the others will need a BNC wordclock in. BNC "T" connectors can be used to daisy chain the signal to multiple slave devices. A 50ohm terminator is usually required after the last connection (unless your device has one built-in). 2. Via ADAT - any device with an ADAT input can use the incoming ADAT connection as it's wordclock source from either the master, or any of the slaves sending an ADAT signal. It doesn't need to be sending audio - it just needs to be connected and sync'd. 3. Via SPDIF - any device with an SPDIF input can use the incoming SPDIF connection as it's wordclock source from either the master, or any of the slaves sending an SPDIF signal. Again, it doesn't need to be sending audio - it just needs to be connected and sync'd. If you're already using ADAT, then consider using that as your wordclock sync by setting your slave device's wordclock to ADAT. If not, consider connecting the SPDIF out of your master interface to the SPDIF input of your slave (and tell the slave it's syncing to SPDIF). It's a quick and easy way to get them synchronised. Also, although it's not recommended, you can mix and match how you distribute the wordclock , as long as there's only one master. At one point I was using my Focusrite Scarlett 18i20 as a wordclock master, with a Fostex VC-8's & ADA8000 slaved via BNC, my TC Helicon VoicePrism sync'd via SPDIF, and an mLAN network slaved via the ADA8000's ADAT out to one i88x, where another i88x and 01X were then sync'd to the first i88x via mLAN. So four different wordclock distribution methods over 7 devices, but only one (the 18i20) was the master.
-
I had both the Roland U8 and it's successor the Edirol UR80.... IIRC, the U8 worked fine in Windows 98 and XP, but didn't work as well in Win 7 32 bit. I had better luck with the UR80 with Win 7 32 bit, as the drivers were newer, but it was still a bit hit & miss.
-
AAF (Advanced Authoring Format file)
msmcleod replied to Michael Heavner's topic in Production Techniques
I guess the point is, if the OP's customers are specifically asking for AAF files, then it might be worth the investment... especially if its something he could charge extra for. Interestingly, the main reason why the enhanced version of AAF is so much more expensive than the standard version, is down to the amount of effort in providing OMF, AAF and ProTools support (and presumably keeping it working). The developer alludes to this in one of the links I posted. But I agree, individual track exports/stems & MIDI file export are far more useful, and they'll work with everything. -
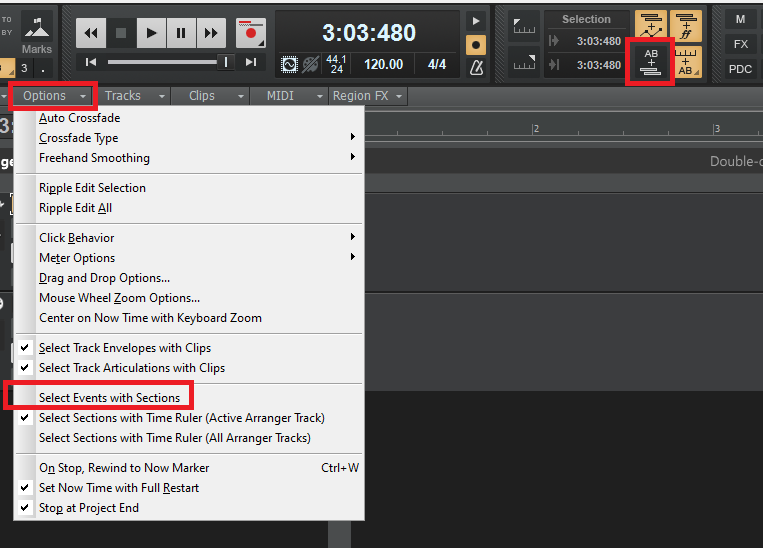
You can also uncheck "Select Events With Sections", or use the button in the select module:
-
How to tame vocal "I" and "E" sounds?
msmcleod replied to user390096's topic in Instruments & Effects
An EQ or de-esser should do the trick. You just need to scan through to find the right frequency. You can also use a dynamic eq, so it only ducks the frequency when it gets particularly bad, rather than all the time. -
AAF (Advanced Authoring Format file)
msmcleod replied to Michael Heavner's topic in Production Techniques
Cakewalk only supports OMF export, which is the format that preceded AAF. AAF is ridiculously complex and over-engineered, and unfortunately offers little over OMF for audio projects (it was primarily developed for video). What's more, every DAW that does support AAF has implemented it differently, so there's no guarantee that an AAF file from one DAW will even import properly in another. There's currently only 2 ways to get AAF files from a Cakewalk project: 1. Export it as OMF from Cakewalk, then either import that into another DAW that supports both OMF/AAF and export as AAF from that DAW. 2. Export it as OMF from Cakewalk, then use AATranslator to convert it to AAF. Note that you need to purchase the enhanced version to support OMF/AAF. FYI - this has been discussed before... this was my reply: -
While this request isn't necessarily off the cards, due to the way folders were originally implemented, it's in no way trivial. However, in the meantime, for large projects you could consider using Track Manager presets. They are per-project presets allowing you to hide groups of tracks, so you only see the ones you're focusing on at any point in time. You can also combine them with Screensets, with each Screenset using a different preset (i.e. Screenset 1 = all, Screenset 2 = strings, Screenset 3 = brass etc. ), so you can quickly switch between them.
-
Saving a template will always remove the events. Anything else would simply be a normal project. However, you can achieve what you're suggesting by doing the following: 1. Create your template project as you would normally, and add your events and articulations. 2. Save it as a regular cakewalk project (i.e. cwp file) 3. Copy the .cwp file to your project templates directory 4. Rename the file so it's extension is .cwt instead of .cwp
-
Start Screen Not Working Since Update **solved**
msmcleod replied to dubdisciple's topic in Feedback Loop
@dubdisciple You could try renaming Offline.html in %APPDATA%\Cakewalk\Cakewalk Core\ to Offline.html.bak It should get recreated from scratch when you re-open CbB. You should try to work out why this has happened though... do you have OneDrive enabled? I could have re-synced from an older machine maybe ? Check your OneDrive configuration, and consider excluding this directory... or at least make sure everything is synced and up-to-date. -
Audio tempo/time sig plugin for Sonar?
msmcleod replied to pax-eterna's topic in Cakewalk by BandLab
The time display in Cakewalk is tempo based, whereas audio data is absolute time based - that's why you see the audio stretch when you slow down the tempo, and shrink when you speed it up. To get the audio to automatically stretch with the tempo, switch on "Stretch to Tempo" for the selected audio clips in the clip inspector. Important - make sure you set the Original Tempo to the existing tempo value BEFORE you change the overall tempo in your project. You can do it afterwards, but you'll need to make sure you remember the exact tempo you had it at when your recorded your audio.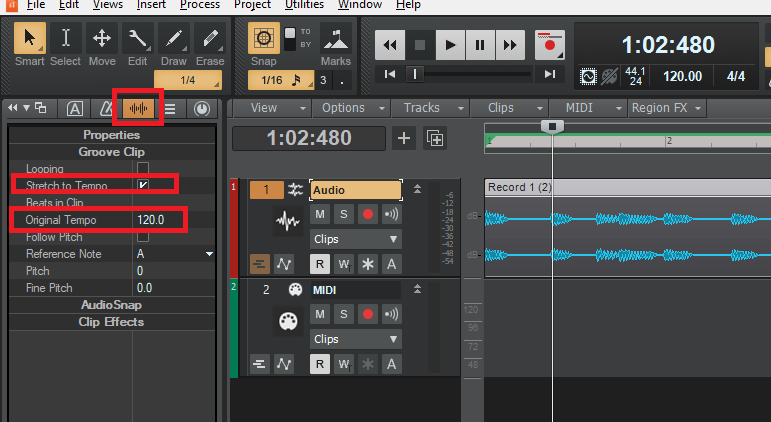
-
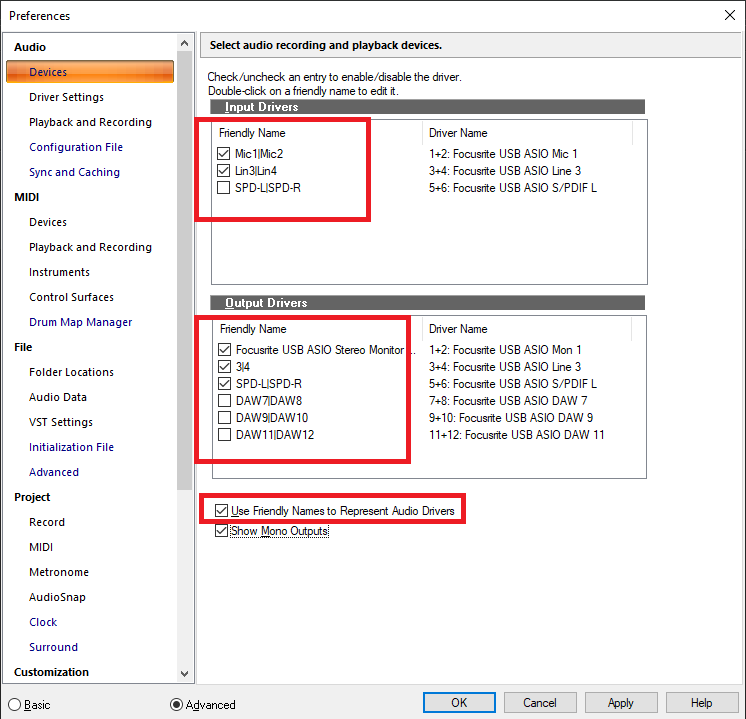
As far as I can see the Zoom LiveTrack L-20 doesn't work as a control surface. It provides audio over USB, but no MIDI. You can rename the audio ports in Preferences, by enabling Friendly Names and editing the name in the areas shown below: The Inputs and Outputs are shown as stereo pairs - to name each "side" of the pair, use the | character to separate the odd and even channel names (SHIFT + backslash).