


msmcleod
-
Posts
7,120 -
Joined
-
Last visited
-
Days Won
39
Everything posted by msmcleod
-
Apparently you can bypass the TPM 2.0 requirement by replacing Windows 11's appraiserres.dll with the one from Windows 10.... see: https://winaero.com/how-to-install-windows-11-without-tpm-2-0/ ... and scroll down to the "Modify the ISO image without using UltraISO" section I'm not sure if this will be enough though... apparently if you're using an Intel chip you also need a 8th gen or greater.
-
Looks like my DAW PC is in the same boat... better start saving up for a new DAW PC!
-
A workaround was put in a few releases ago. If you've imported the Triton .ins files into Cakewalk, clicking on the patch browser will allow you to choose them:
-
If your instrument tracks are simple instrument tracks, you'll need to split them to get access to the underlying audio track. You can then set the audio track's input to the synth's audio output.
-

CWbBL CD Burner Utility lacking basic functions
msmcleod replied to musikman1's topic in Feedback Loop
This is the one I tend to use too. -
This sounds like a driver issue. I'd recommend re-installing the A & H drivers. If you're connecting through Firewire, you may want to re-install your Firewire drivers too.
-
Personally, I'd discourage using the volume control in Windows or the changing the audio interface's output. Yes, you can do this, but there's been loads of posts in the past with users complaining that their exported mixes come out at a different volume than the volume heard within Cakewalk.... and controlling the master volume in this manner is usually the cause of this. By keeping your audio interface volume at unity gain, and using a master bus to control the master level you'll avoid this confusion.
-
Cakewalk Hangs when using PG-8X Soft Synth
msmcleod replied to spiffo's topic in Cakewalk by BandLab
@spiffo - I managed to get it to hang eventually, after seeing some other issues. First the parameter values on the PG-8X got stuck on "NONE" then it eventually hung when trying to change one of the parameters. Certainly in my case (and by the looks of your dump file output) this is 100% inside the plugin. I would recommend contacting the plugin developer. -
As of the 2021.06 release: "Instrument" will only refer to instrument tracks (i.e. linked audio & midi tracks such as Simple Instrument or Per-Output Instrument tracks ); "MIDI" will refer to any MIDI track hardware or software; "Audio" will refer to any audio track.
- 12 replies
-
- 6
-

-

-
- console view
- requests
- (and 2 more)
-
FWIW, running Windows 21H1 here without issues. @cclarry - definitely sounds like a compatibility issue with your graphics driver. I'm running with my on-board graphics card, but Intel released an updated graphics driver shortly before the Windows 2004 release (which was surprising given it's for an old 3rd gen i7). But I guess the updates were needed to support the newer Windows versions.
-
20H2 was a tricky one on my DAW machine too - the KORG USB driver and an old Native Instruments virtual CD Image driver were stopping it from upgrading, but once I removed them it was fine. I'm now on 21H1 on all my Win 10 machines with no issues.
-
The original server for this PDF has gone unfortunately.... luckily I've still got it on my server: https://msmcleod.co.uk/cakewalk/Cakewalk%20Application%20Language%20Programming%20Guide.pdf
-
Add ability to filter directly on the Event View - Minor
msmcleod replied to Terry Kelley's topic in Feedback Loop
You could bind a key just for the Event View, e.g.: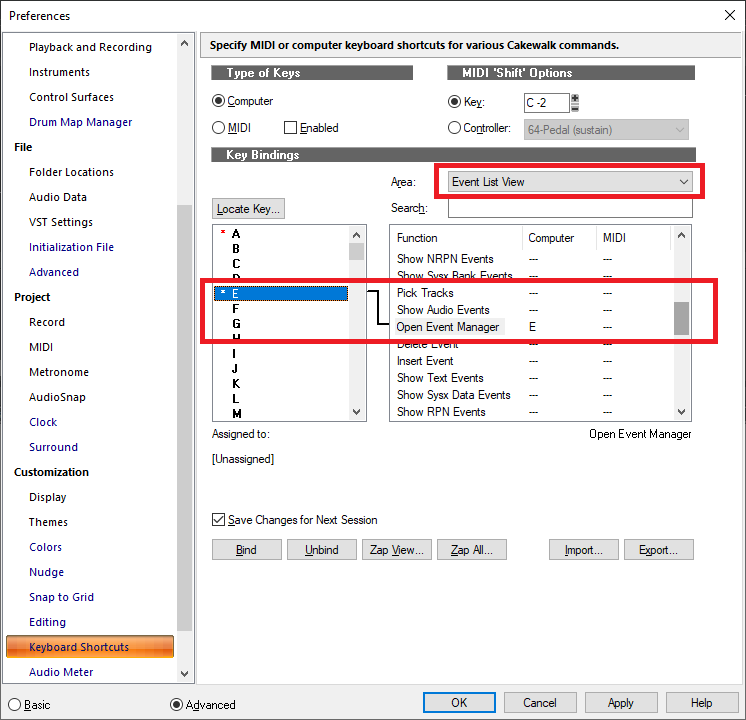
-
Connection Roland FP-30 to Cakewalk on Laptop via Bluetooth
msmcleod replied to Neil Hart's topic in Cakewalk by BandLab
Bluetooth MIDI is supported in the UWP MIDI driver mode. Several devices use it (e.g. Korg microKEY series, Korg nanoKONTROL Studio). Latency definitely isn't an issue, as the MIDI baud rate is extremely slow compared to Bluetooth's baud rate. The main reasons I don't use it myself, are: 1. I've got older MIDI hardware that only work in MME mode. 2. I don't like having to constantly replace batteries for remote devices (especially when they don't move on my desk in any case). -
As long as they don't completely change the driver model making half my hardware obsolete... that would be VERY annoying.
-
Export Multiple File Formats Simultaneously
msmcleod replied to Mark Morgon-Shaw's topic in Feedback Loop
We're actually working on something like this at the moment. It won't be in the 2021.06 release, but hopefully the one after that. -
Clicks and Pops -- The Final Frontier
msmcleod replied to jonathan boose's topic in Cakewalk by BandLab
Also check that a recent Windows update hasn't set your power plan back to "Balanced" or "Battery Saver" - make sure you're running at "High Performance" -
We've made some improvements to this for the next release.
-
It's probably going wrong because there's no events on track 2 within the selection (i.e. the selection is in a blank space between two clips). A lot of the older commands rely on event selection before considering other things like envelopes. To be honest, you're better off turning on Ripple Edit All (or Ripple Edit Selection) and pressing the Del key.
-
Yes it's explained here for zooming: http://www.cakewalk.com/Documentation?product=Cakewalk&language=3&help=Arranging.22.html#1838690 I can't find anything specific in the docs for scrolling - normally the mouse wheel alters the control it's currently hovering over, but if it's over a clip or a blank space in the clips view: Mouse Wheel = vertical scroll bar. CTRL + Mouse Wheel = horizontal scroll bar.
-
All the standard keyboard shortcuts are listed here: https://www.cakewalk.com/Documentation?product=Cakewalk&language=3&help=KeyboardShortcuts.html#1306571 The closest thing to scrolling horizontally is CTRL + Page Up / CTRL + Page Down, but this also moves the Now time.
-
In the track view, CTRL + LEFT/RIGHT will zoom horizontally, CTRL + UP/DOWN will zoom vertically. All the zoom controls are detailed in this chapter: https://www.cakewalk.com/Documentation?product=Cakewalk&language=4&help=Arranging.22.html (scroll about half way down the page)
-
bug report MIDI input routing bug and virtual synths
msmcleod replied to Ronny.G's topic in Cakewalk by BandLab
@Ronny.G - We've fixed the issue with templates that you reported in your first post. This will be available in the next release. Your latest issue sounds like it could be different, but it could also be related to the original bug... did you load any track templates in this project? The original bug means that the MIDI ports are in a strange state after importing the template. This might explain why you cant change the ports after importing. For the moment, I'd advise against loading/saving synth templates with routing until the next release. Routing from hardware MIDI ports should be fine, but if the template contains MIDI routing from synths within the template, that's where the issue arises, and it pretty much messes up all the ports. Like I said though, it's been fixed for the next release. -
Whilst this is true, it basically boils down to this: 1. Take a note of the measure the clip ended on before you change tempo 2. After changing tempo, you want to stretch it so it ends it on exactly the same measure as it did before. This is why I recommend slip editing to end exactly on a measure boundary before doing the stretch. As a general rule, the bigger the change in length, the worse the quality is going to be. There are different stretch algorithms that do a better/worse job depending on the type of material you're stretching. Also there's an offline / online method - where online is what you'll hear doing what is showed in my video, and offline is what is used when using bounce to clip(s) and exporting. By default, the online algorithms are quick but average in quality. It's designed to make editing quick. The default offline algorithms are slower, but much better quality. There's nothing to stop you changing them to be the same however (i.e. make both online/offline the slower, high quality versions). You can change the methods in preferences:

-
For non-groove clips, this is what I'd do:
