Colin Nicholls
-
Posts
1,777 -
Joined
-
Last visited
-
Days Won
2
Everything posted by Colin Nicholls
-
Ouch. What option do you have under the Track View menu, Options > Select Events with Sections ? I do not have this option selected.
-
 Couldn't this requirement be satisfied by an additional arranger track? E.G: I get that ideally you'd like some intelligent tools in Cakewalk attached to it, that could use the current key sig to, I dunno, offer modulations or transpositions or whatever...
-
How would you like Cakewalk to determine the current key?
-
@Steve Harder, just to be super-pedantic, the file format is JSON, not XML.
-
How to have view occupying the same Tracks View window?
Colin Nicholls replied to micv's topic in Cakewalk by BandLab
@micv, there's a way of locking a screenset so that you don't accidentally change your previously saved layout, which is easy to do otherwise. -
How to have view occupying the same Tracks View window?
Colin Nicholls replied to micv's topic in Cakewalk by BandLab
Here's what I did to achieve the workflow I understand you to be asking for. I start off in ScreenSet 1. Open the Console View Dock the Console View in the multidock (if it isn't already there) Press D to hide/minimize the multidock. Now select ScreenSet 2 At this point, your screen arrangement will be saved in ScreenSet 1. Press D to show the Multidock Grab the splitter bar and drag it all the way up to the top of the screen. In my environment, this does NOT cover the Control Bar. Now select ScreenSet 1 At this point, your arrangement return to what you previously saved, and the "full-screen console" should be saved in ScreenSet 2. Flip between the two arrangements by selecting ScreenSets 1 and 2 (without making changes to the arrangement) Again, I don't use Screen Sets routinely so I could be missing something, but this should let you play around and see if it works for you. -
How to have view occupying the same Tracks View window?
Colin Nicholls replied to micv's topic in Cakewalk by BandLab
Screensets is probably the feature you want to leverage for this use case. To be clear, I mean, you can pull the separator bar of the multidock all the way up, covering the track view entirely, and save as a screenset 2. Then flip back between screenset 1 and 2, using the number keys to change sets. Caveat: I don't use screensets myself. But I recommend reading the section of the manual linked to above, then trying out some experiments, and then report back here with your findings. -
Is it just me or does this version of Cakewalk faster?
Colin Nicholls replied to Craig Reeves's topic in Cakewalk by BandLab
I suspect you're seeing the benefits of the optimizations included in 2020.11 -
Arghh, my bad for not reading your post thoroughly. Sorry for the duff answer. I'll let it stand so that future generations can assess my work. Yeah, I don't know of any way to map Console view changes to a keystroke.
-
It's definitely map-able to a key-press in the Preferences>Keyboard Bindings, and until now I could have sworn it was mapped to "M" but I think I was imagining things. It's SHIFT-B, as per The Manual
-
Cakewalk Articulations and Key numbers
Colin Nicholls replied to Jimbo 88's topic in Cakewalk by BandLab
@Jimbo 88, have you actually encountered a problem with importing and miss-aligned articulation keys? -
Cakewalk Articulations and Key numbers
Colin Nicholls replied to Jimbo 88's topic in Cakewalk by BandLab
Articulation maps should be using MIDI note numbers. Note 60 will always be "middle C" at 262Hz. Cakewalk seems to respect the "Base Octave for pitches" preference setting in the Articulation Map editor. I typically use a Base Octave set to -2, and it looks good to me: If I set Base Octave = 0, then the Editor respects this and shows "C3 [36]" against the Note/CC instead of "C1". I haven't imported any articulation maps from third parties so I can't see whether other products only refer to Note Names and don't assign artics to Note Numbers. But if they are designed correctly they totally should be using MIDI note numbers, not note names. (LATER: I was curious and checked the JSON .artmap format used by Cakewalk, and, yes, parameter B2 is definitely storing the MIDI Note Number. Of course.)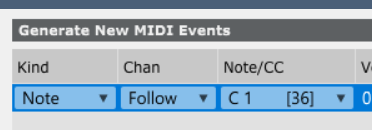
-
CreativeSauce Cakewalk articulation maps vid
Colin Nicholls replied to Steve Harder's topic in Cakewalk by BandLab
It's "capo". You had it right the first time. -
CreativeSauce Cakewalk articulation maps vid
Colin Nicholls replied to Steve Harder's topic in Cakewalk by BandLab
Dude, if you've watched all of the video and you still have this question, then there are other issues you need to resolve. -
Browser bookmarks are quite useful. Help > User Forums is about as easy and obvious as you could wish for. Welcome to the forum.
-
@tparker24, you're not wrong. I noticed this a while back, and put in on the list for addressing. And then.... I forgot. I normally use "Maximize Waveform Height"so it dropped off my radar. Sorry about that. Thanks for reminding me. I've updated the top post with details, and refreshed the ZIP.
-
This is going to sound crazy, but since a couple of updates ago (say, since 2020.09) I have encountered situations where open VST windows suddenly can't be dragged into a new position. I think I've most noticed this with Voxengo SPAN (VST2). I can close the window, then re-open it again, after which it is fine and re-positionable. I'm just curious if other folks have noticed this.
-
Is there a new, updated sample project?
Colin Nicholls replied to hockeyjx's topic in Cakewalk by BandLab
The Start Screen has a section called "Demo Projects" and by looking at the dates against each of the four it seems these are updated regularly with each CbB update: Chernobyl Studios - Withered Moment.cwb 11/03/2020 20:35 Geoff Manchester - Virtue.cwb 11/03/2020 15:39 Sophia Jane - Living For Now.cwb 12/29/2019 17:12 True Sound Studios - Happy Go Lucky.cwb 11/27/2010 20:56 I think I installed 2020.10 EA#3 yesterday which explains those dates on the first two... -
See if this topic helps you out.
-
A plastic bust of Dr Zoidberg.
-
I declare @sjoens the winner of this thread. We can go home, boys and girls.
-
Hmmm. Do you think something like this would be better than a rotary knob?
-
What, you're not willing to edit each knob impression individually?
-
I do remember; but FLAT WHITE wasn't directly in response to your request. However I did think you might enjoy it. I'm glad to hear that is the case.
-
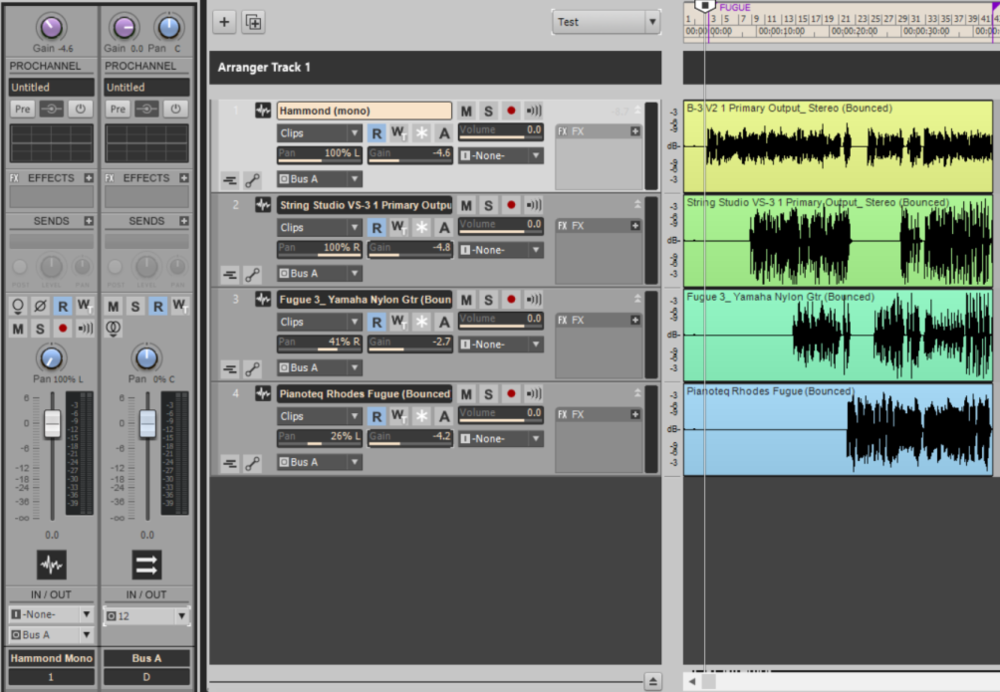
@brandon Okay if you take a stereo bus and pan it all the way to the LEFT side, then yeah, everything you've sent to that bus will be sent to the LEFT channel. That's how it works. >> However I still cant get the individual tracks to pan separately from each other. Try the following simple test: Create three mono audio tracks Route them to Stereo Bus A Route Bus A to your outputs (Hardware out 1 & 2 or whatever your LEFT and RIGHT output channels are called) Put a unique mono sound on each track (say, high voice; mid voice; low voice) Pan track 1 LEFT, 3 RIGHT, and leave 2 centered. Press PLAY. What do you hear? It should be a nice stereo field. If it is not, then something is wrong with your configuration. Here's my test. I used four tracks because I had them handy in a fugue I've written, bounced to MONO and directed to a new stereo bus A: Now hard-pan that Bus A to the LEFT. You should be able to hear all three (or four) tracks coming out of the left channel. Try panning to the RIGHT. Same. If you don't, then there is something wrong with your config.