msmcleod
-
Posts
6,958 -
Joined
-
Last visited
-
Days Won
36
Everything posted by msmcleod
-
TTS-1 has 4 stereo outputs. By default, all the parts are routed to the first stereo pair. You need to go into the SYSTEM area of TTS-1 to re-assign which parts go to which stereo pair. However even then, they're still stereo pairs. In order for you to use it in mono, you'll have to pan part1 within TTS-1 hard left, and pan part 2 within TTS-1 hard right. Once you've done that, your first track will appear on the first mono track, and the second on the second mono track. You can then use the audio pan on each track to pan those instruments.
-
If you're using any VSTi which has its own "sequencer" type behaviour, or anything that generates its own content based on the timeline, you should freeze the tracks using those VSTi's (or bounce them to an audio track) before committing your arrangement.
-

Can Cakewalk work with onboard Realtec audio?
msmcleod replied to gmp's topic in Cakewalk by BandLab
The issue with recording using an on-board Realtek device isn't the Realtek chip itself, it's the other circuitry on the motherboard surrounding it. If not designed with recording in mind, it can leave it susceptible to interference from other parts of the motherboard. I've had had interference from USB/serial devices (e.g. moving the mouse) and also the power supply when using a laptop. Motherboards with separate line/mic inputs tend to perform better with the line input, but to my ears its still lacking on some motherboards. -
Cubase Expression Map list for importing into Cakewalk.
msmcleod replied to Steve Harder's topic in Cakewalk by BandLab
The import is definitely not changing the notes, it's the difference in base octave setting that is causing it to display differently, but the note is the same: -
Cubase Expression Map list for importing into Cakewalk.
msmcleod replied to Steve Harder's topic in Cakewalk by BandLab
Can you attach an example expression map, so I can take a look? -
Cubase Expression Map list for importing into Cakewalk.
msmcleod replied to Steve Harder's topic in Cakewalk by BandLab
Cakewalk doesn't have the chromatic setting - but for a case like this, I find it quicker to use the "Add from MIDI" button and just play the keys in: -
Latest MMcL MackieControl.dll available with HUI Support
msmcleod replied to msmcleod's topic in Cakewalk by BandLab
Sorry, can't help much here as a don't have a DM24. The MackieControl.dll HUI mode was developed using the HUI mode of the Mackie MCU & the HUI mode of TouchDAW - both which are emulations themselves, so it's quite possible there's some incompatibilities with other hardware that is also emulating a HUI in a slightly different way. -
We're working really hard to get to the bottom of this issue, but we're having problems reproducing the problem. We think it's related to monitor setup and DPI settings, so if you are seeing this issue, please let us know: What version/build of Cakewalk you're running (you can find this out on the About screen) What version of Windows you're using How many monitors you have connected to your system How those monitors are arranged (e.g. main monitor on the left, 2nd monitor on the right), and which one is your main monitor What the resolution and DPI settings are for each monitor (e.g. 1920 x 1080, DPI 100%) What graphics adapter you're using. For example, my system is as follows: Cakewalk 2020.10 (Build 075) Windows 10 1909 Monitor 1 (main monitor, left) 1920 x 1080 DPI 100% Monitor 2 (right) 1920 x 1080 DPI 100% Intel Graphics 4000 If you're having this renaming issue, please send your version of this information to @Ben Staton and @Jonathan Sasor so they can look into it further.
-
Cubase Expression Map list for importing into Cakewalk.
msmcleod replied to Steve Harder's topic in Cakewalk by BandLab
This is exactly why the Articulation Map Editor shows the actual MIDI note number is shown in square brackets after the C0, C#0, D0 etc.. Every piece of software has a different definition as to what C0 actually is. -
Cubase Expression Map list for importing into Cakewalk.
msmcleod replied to Steve Harder's topic in Cakewalk by BandLab
It definitely does not do this. The MIDI note is a number between 0 and 127. This is translated exactly from the Cubase expression map to the CbB Articulation Map. The fact that something shows as C2 in Cubase and C0 in Cakewalk means nothing. This is simply down to how you've set your base octave in preferences: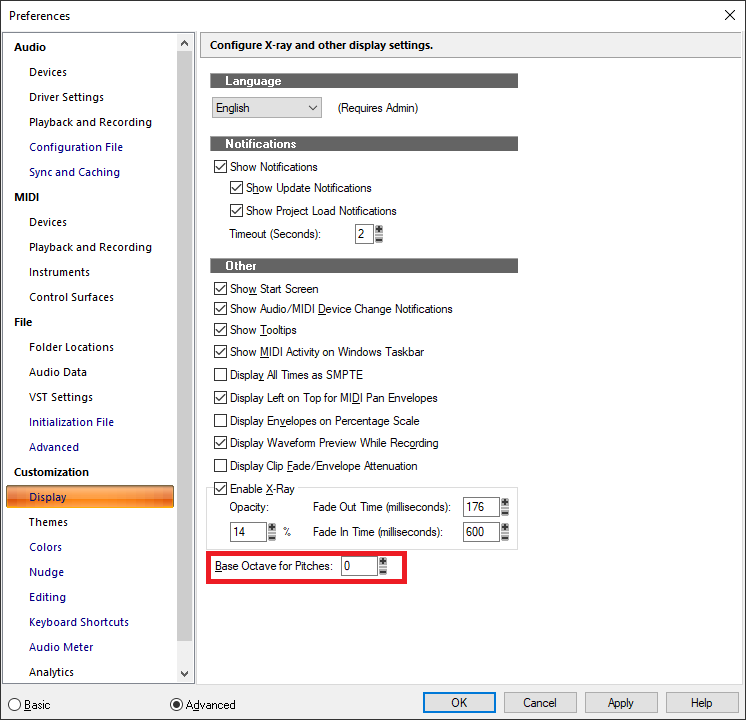
-
Whitesea Studio did an interesting video comparing one of those cheap mic's with a U47 - AFAIK the NW-8000 / BM-800 are basically the same mic rebadged by 1000 different companies: He also did a follow up, using EQ to try to match them:
-
All of the NI Stuff has always been relatively slow in loading for me - there's a tonne of samples involved that need loading. But all of it runs rock solid. You might be able to tweak how much is loaded from within Kontakt itself, but I'm just using the defaults.
-
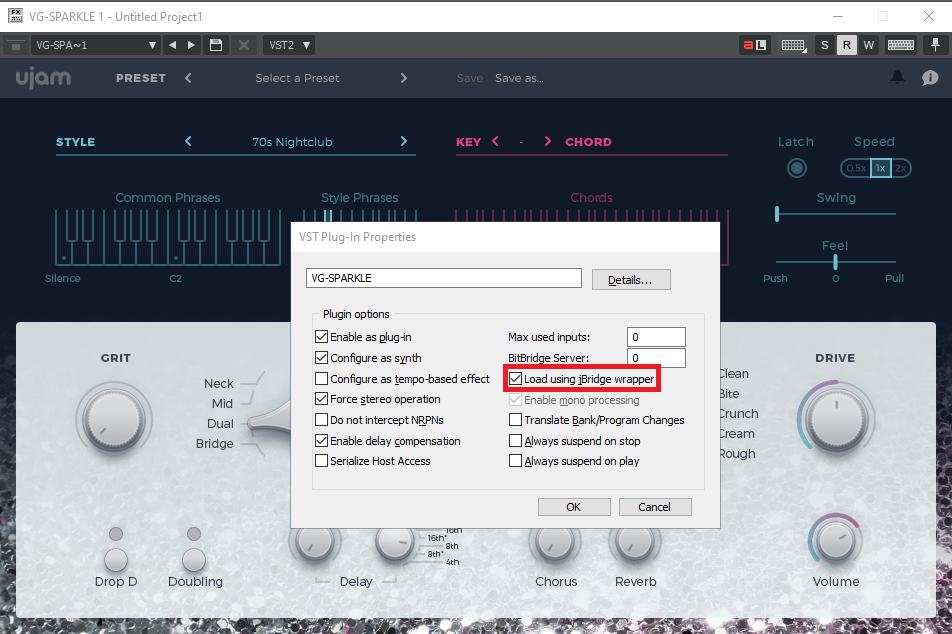
No, jBridge is a 3rd party product: https://jstuff.wordpress.com/jbridge/ Although JBridge is primarily for bridging 32 bit plugins to 64 bit hosts, it also supports: 64 bit plugin -> 32 bit host 64 bit plugin -> 64 bit host (which is what I'm doing with Sparkle) 32 bit plugin -> 32 bit host (which gets around the memory limit per process)
-
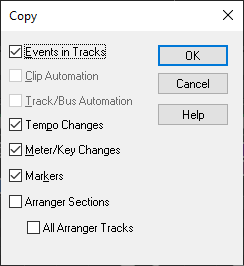
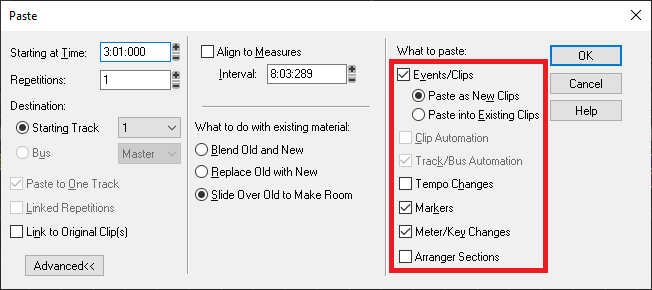
Selection in ruler on clip range - how to change behavior?
msmcleod replied to LarsF's topic in Cakewalk by BandLab
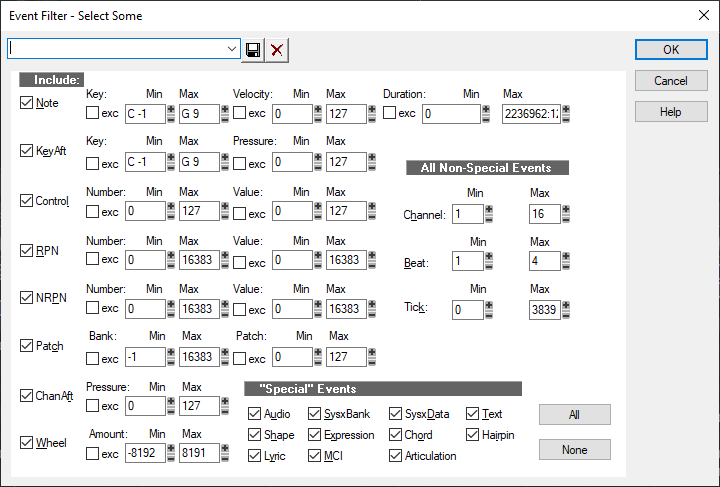
The most common options are defined in the Track View Options menu: As far as Markers, Tempos and Meter/Key go, these are automatically selected with the time range... however by default, the drag/drop operations and cut/copy/delete/paste operations won't take these into account (unless you're ripple editing). The cut special / copy special / delete special / paste special operations allow you to check/uncheck which of these you want to include / exclude, e.g. for "Copy Special" / Paste Special: In addition, you can also further filter out your selection by using the Edit->Select->By Filter dialog: The cool thing about the Event Filter dialog, is that you can save your own presets.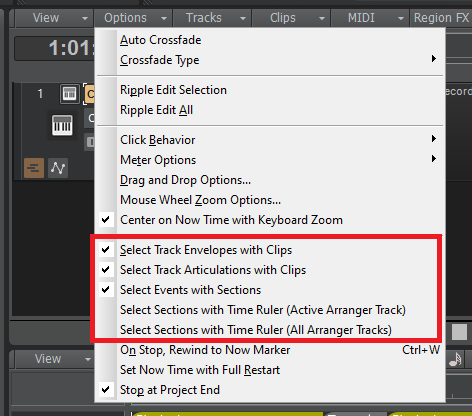
-
I got this too - using the "Load using jBridge wrapper" totally fixed it for me. I get perfect playback at a buffer size as low as 32: Of course, this is assuming you have JBridge installed...
-
I bought VG Iron, VG Amber & VG Sparkle as a bundle when they first came out. I added VG Silk & VG Carbon later. They're all really good, but I probably use VG Sparkle & VG Carbon the least. VG Sparkle is pretty much a chord riffer, which it does very well... but for me to find use for it, I'd like to see everything from VG Silk incorporated into it (i.e. the bass notes & arpeggiated notes), but with the VG Sparkle sounds. I'd like to see the same in VG Amber too. Until they do that, for me, NI Electric Sunburst is my go to for that type of sound. VG Amber / NI Strummed Acoustic are pretty much on par IMO, and I'll quite often use both in the same project doubled up.
-
Cubase Expression Map list for importing into Cakewalk.
msmcleod replied to Steve Harder's topic in Cakewalk by BandLab
Yeah, I noticed that... we'll be releasing a fix for that shortly. -
Cubase Expression Map list for importing into Cakewalk.
msmcleod replied to Steve Harder's topic in Cakewalk by BandLab
@Maestro - can you post (or PM) a small project that demonstrates this so we can get to the bottom of it? -
@John Roynon - is this still happening for you in the EA release? Some work was done to remedy this in that release.
-
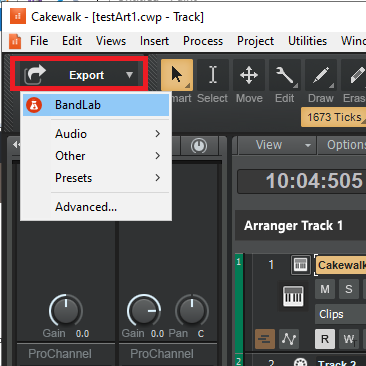
You first need to export your Cakewalk project to BandLab using the Export Module, then log in to BandLab via your browser to access the project that has been uploaded: Once you're logged in, click on your project, e.g.: Next, select the menu on the right to master your track:


-
This is no longer available with CbB, as BandLab offer their own free mastering service. Re-installing SONAR Artist through the Cakewalk Control Center should make this available again. I can't recall whether a custom install will allow you to only install the LANDR export utility, but it might be worth giving it a try. Normally we recommend installing SONAR first (to get all the included 3rd party software), then Cakewalk by BandLab afterwards as it updates some shared components, but in theory, the SONAR Artist installer should leave any newer shared components alone.
-
Understanding Cubase expression maps
msmcleod replied to Steve Harder's topic in Cakewalk by BandLab
FWIW, CbB articulation maps are for the most part like Direction expression maps. The attribute type expression maps is closely linked with MPE (MIDI polyphonic expression), as it relates to adding specific control information on a per-note basis. When we come to implement MIDI 2.0 & MPE within CbB, we'll look at implementing a similar feature for per-note articulations at that point. There is actually a way to emulate per note articulations using the transforms and the input filters, but it's messy as you have to create a separate articulation for each note, and you end up with a separate articulation lane for every articulation/note combination. -
Cubase Expression Map list for importing into Cakewalk.
msmcleod replied to Steve Harder's topic in Cakewalk by BandLab
There's a couple of collections of Cubase expression maps in github: https://github.com/r-koubou/ArticulationMappingFiles https://github.com/mvy/symseries-exprmap -
I managed to upgrade to 20H2 using the media creation tool, and selecting the "Keep my files" option... which deletes all your program files (and all your stuff in ProgramData), but keeps your "personal" files intact. Copies of your program files / program data are in the windows.old directory, so it's easy to copy stuff over (e.g. VST's that don't have an installer) if need be. I got about 1/2 way through re-installing programs before a reboot refused to boot again. I've gone through this procedure TWICE this week (so wasted around 30 hours). The second time around I was running sfc /scannow before every reboot, just to make sure no installation had screwed anything up. The last time it failed was just after installing Antares AVOX 4. I seriously doubt that would have caused the issue, but it was rebooting fine up until that point. So now I'm back to square one having restored my 1909 image yet again. I'm gonna re-enable system restore the next time I try this, in the hope I'll be able to rollback the state if this happens again, but I'm very close to losing all confidence in these Microsoft upgrades.
-
When you say time code, do you mean the time code display within CbB itself ? The "Pause" key (next to scroll lock) puts CbB into low CPU usage mode by reducing the UI refresh rate. Pressing pause again will take it out of that mode.