


msmcleod
-
Posts
6,931 -
Joined
-
Last visited
-
Days Won
36
Everything posted by msmcleod
-
With per-output tracks, you definitely can.
-
Yeah, we've found it really hard to reproduce this bug. As soon as we can get a reliable repro, we should be able to get to the root cause. It's just a theory, but I've a sneaking suspicion that it may be related to this (which we've now fixed): In other words, clips that were affected by this bug in the past might suffer from the gain/normalize issue... but any other clip is fine.
-
Yes is does, but then so did old HP calculators. The syntax of Forth is very different to Lisp . In Lisp the expressions use RPN, but Forth is completely stack based so everything is RPN including all the statements. I used Forth for a bit in the early to mid 80's. It was near impossible to do anything of any size, and every change affected the whole program as it would change the push/pop balance. You could write modules, but everything had to be done bottom -up. With the exception of a few neat graphics routines, Forth made assembly language programming look like bliss.
-
I think you mean Lisp, which CAL is loosely based on.... although some time using Forth is useful for making you feel relieved when you go back to writing CAL.
-
They should then get them to reimplement what they've done in C++, then they'd have a better idea of what goes into programming a DAW ?
-
Zip it up and either PM it to @Jonathan Sasor , or send him a link to download it (e.g. from some cloud account like GoogleDrive or One Drive). He'll log it so that any of the devs can take a look. It might be worth saving it as a bundle file so the audio tracks are left intact - we need to see what is different about that guitar track which is causing the issue.
-
We'd need to take a look at your project file to work out exactly why this is happening, but in the meantime, does freezing that track fix the export?
-
Is the guitar a standard audio track, or is it a VSTi ?
-
Not all drums loops are created equally. If the clip is actually a groove clip, it will have had all the beats identified and saved within the file. This allows the loop to be stretched intelligently, giving regard to where the actual beats are. Many loops however, are just standard WAV files which simply reference the tempo they were recorded at in the filename. For these to work properly, they need to either be converted to groove clips (by using the Loop Construction view - which involves a combination of automatic transient detection, and you going through filling in the missing bits), or you simply treating it as a standard audio clip and using copy/paste or duplicate clip rather than trying to use it as a groove clip. Of course, even with a standard WAV file you can still use regular time-stretching to fit the loop to any tempo, but it's a bit more of a manual process and results are not as good as with groove clips. I suspect the loop in question is either not a groove clip, or has the tempo set wrongly within the file.
-

Question about FX plugins for each (Midi) track!
msmcleod replied to Emanuel Vella's topic in Instruments & Effects
Ok, my bad... there is an extra step you need to do in Battery itself. You need to tell Battery which outputs each pad goes to. So right click on each pad and set the output accordingly, e.g: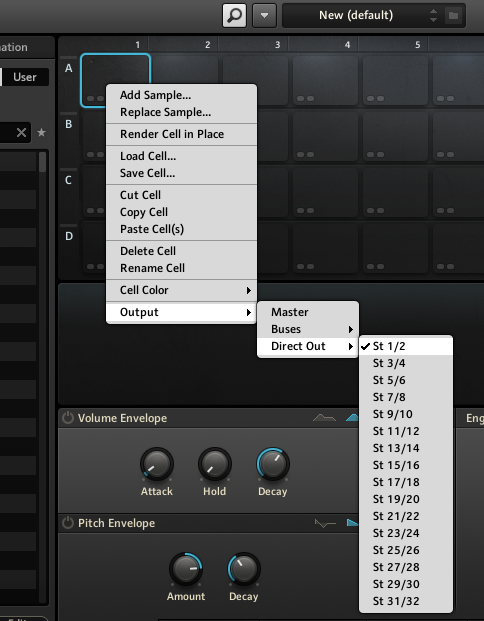
-
The manual alludes to it having an ASIO driver, so first make sure you've got that installed and you've set CbB to use ASIO mode within Preferences->Audio->Driver Settings, and all the outputs are enabled within Preferences->Audio->Devices. Next, make sure you've got surround set up within CbB within Preferences->Project->Surround. First set the Surround Format to 7.1, assign each of the outputs 1 thru 8 to the relevant outputs on your Strix device, then save it as a preset. Checkout the "Surround Mixing" part of the Cakewalk Reference Guide (page 985). The reference guide can be downloaded via the "Cakewalk By BandLab" menu at the top of this site.
-
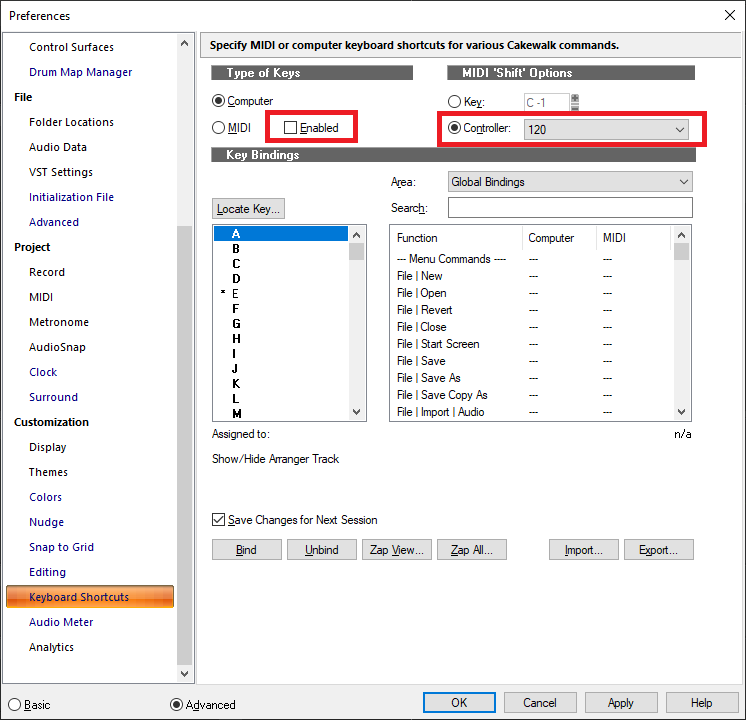
You may have CC-64 (sustain pedal) set as a SHIFT key within Preferences->Keyboard Shortcuts. Make sure Controller is set to something other than 64, and the Enabled checkbox is unchecked, e.g.:
-
Question about FX plugins for each (Midi) track!
msmcleod replied to Emanuel Vella's topic in Instruments & Effects
Whenever I need to do this sort of thing, I use per-output instrument tracks. Battery can have up to 16 audio outputs (one per MIDI channel). Using per-output tracks, you can have 16 instrument tracks all fed to a single instance of Battery: There's only two real downsides with Per Output tracks: 1. All your individual effects or MIDI automation are obviously done on each individual track, but automation of the actual Battery synth parameters has to be done on the first track. 2. If you decide you want to swap the synth for only one of the tracks, it's a bit more complex as they're all sharing the same synth. There's various ways to do this, but by far the easiest way is to clone the individual track, do a swap synth on the duplicate track, then delete the original. A third downside (which doesn't apply to Battery), is that some synths that don't natively support multiple cores can hog one core for all the tracks, but like I said, this isn't the case for Battery (or Kontakt for that matter either). -
There are several ways to extract tempo: 1. Drag the clip to the time line - this uses Melodyne (even if you've got an expired trial version) to extract a tempo map 2. Use the audio snap palette to identify the transients of your clip and extract a tempo map from there 3. Use the "Set Measure/Beat at Now" at various points in your project to tell it where the measures/beats start. The tempo will be modified to match where you tell it measures/beats start. 4. Use the "Fit to Improvisation" command - For this you need first record a MIDI track, where you "tap" notes to the tempo (i.e. tap along to the audio clip). Select the newly recorded MIDI clip , then select "Fit to Improvisation" from the menu to extract a tempo map from what you've played.
-
It looks like the restriction is still in place in CbB, but the program no longer crashes - it just closes the staff view and won't let you open it again while that time signature exists in your meter map. The message is a bit misleading - it has actually reached its limit in this case. The staff view can only cope with bars that are less than 128 1/32 notes in length (i.e. the limit is 127 1/32 notes, which is what I'm seeing in the code ). The Staff View code is very old, so the limitation is probably due to the size of the variable it's using to store what notes are where within a bar. So bars of 128 1/32 notes or more are too long. As far as a patch for SONAR 2.2 is concerned, SONAR 2.2 was the patch for SONAR 2.0. It was released over 18 years ago, and is no longer supported.
-
Native Instruments Midi Controllers & Cakewalk
msmcleod replied to Nobletonmusic's topic in Cakewalk by BandLab
This sounds like you've got a MIDI feedback loop somewhere. One of your VSTi's is probably echoing the MIDI it's receiving back out, and another is picking it up, causing MIDI feedback. Go through each of your synths, and make sure the "Enable Midi Output" is unchecked, e.g.: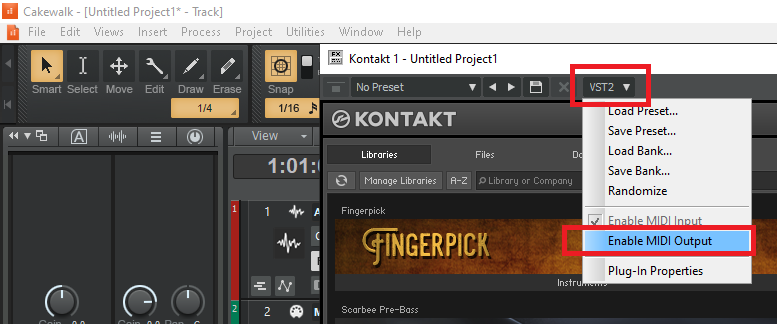
-
Save CWP as MIDI Format 1 cause the effects setting set to default value
msmcleod replied to Tuan Hoang's question in Q&A
@Tuan Hoang - open up TTSSEQ.INI in notepad ( you should find it in %APPDATA%\Cakewalk\Cakewalk Core\ ) and add the following to the [Options] section: LegacyAutomation=1 As an example, here's my TTSSEQ.INI after the change [Options] PumpDataMsec=200 LegacyAutomation=1 [MIDI Input Devices] 0=microKEY2 1=nanoKONTROL Studio 2=Focusrite USB MIDI MaxInPort=2 [MIDI Output Devices] 0=nanoKONTROL Studio 1=Focusrite USB MIDI MaxOutPort=1 [MIDI Echo Devices] MaxEchoPort=-1 -
This came up in a discussion with the beta testers, but I thought I'd share it here.... You have a reference track and you want to switch between your mix and the reference track with a single click: 1. Engage Exclusive Solo Mode 2. Select all, then deselect your reference track 3. Use CTRL + left click on the solo button to toggle between your mix & and the reference track:
-
@jono grant / @razor7music - if either of you have a small project (preferably with only stock CbB VST's) that can reproduce the multiclip gain issue, please zip it up and send it to @Jonathan Sasor. We did think this issue had gone away due to fixes in related code (our existing repro's don't exhibit the issue anymore), but obviously not. So a solid repro would be a great help.
-
Turn off Velocity Sensivity - MIDI Controller
msmcleod replied to lucas98cp's topic in Cakewalk by BandLab
The velocity MFX plugin will do this. -
This better demonstrates why you might need to "Apply Trimming" before you do any operations on the Process->Apply Effect menu. I'm using Normalize as an example, but it also applies to Clip Gain, Remove DC Offset etc.. This might not always be desired though: If you're likely to slip edit the hidden areas back in, you're going to want to have had the hidden areas processed too. In which case Apply Trimming isn't what you want, as the hidden parts will be a completely different level.
-
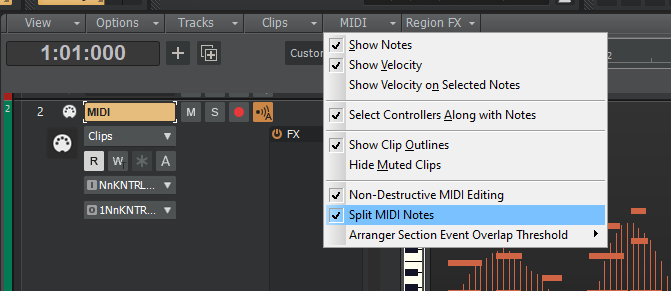
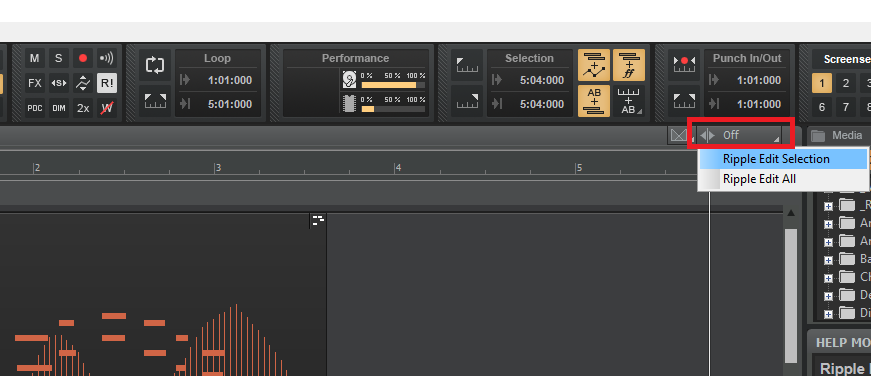
You may also want to consider playing with the "Split MIDI Notes" setting if you're not getting the results you expect: When this is off, any note that intersects the selection will be deleted - regardless of its start & end time. When this is on, the note will be split at the selection boundaries, and only the parts that are covered by the selection will be deleted. Also, if you want to "close the gap" after deleting, switch on Ripple Editing: Deleting with "Ripple Edit Selection" on will close the gap on just the parts you deleted. "Ripple Edit All" will close the gap on the whole project.
-
You could always export using Broadcast waves - this embeds the actual start time in the waveform, so when they're imported into the other DAW they should retain their start time.
-
Has anyone tried using a virtual machine for their DAW?
msmcleod replied to craigb's topic in Computer Systems
That's surprising, as AFAIK they both use exactly the same audio device drivers. The DS2416 has an additional ymix2416.dll which allows applications to control the mixer functions on the card, but the actual audio interface IC on both devices is the same. So I guess there must be some other hardware differences that were causing this. The main issue with motherboards and the DS2416 wasn't the chipset so much as the voltages on the PCI slot. A lot of motherboards stopped offering both 5V and 3.3v, and the DS2416 requires the 5V supply. Also when Intel moved from the Ivy Bridge ( true 16 bit PCI ) to Haswell (emulated 16 bit PCI) the cards no longer worked. I'm just grateful I managed to get nearly 20 years of use out of them, before being forced to go to 64 bit. I hardly touched plugins up until that point! -
This used to annoy me when I first moved from SONAR 8.5 to X1... I was always wondering where half the controls were. I'm so used to using the track inspector nowadays (which shows all of the controls), I just go with the default layout in the Track View. It does depend on your workflow though. I use a control surface, so it doesn't bother me that I can't access those controls within the Track View. For those that don't have a control surface, and want to quickly adjust volume/pan though... I can definitely see that having the volume/pan widgets there makes sense.


