Leaderboard


Popular Content
Showing content with the highest reputation on 09/27/2021 in all areas
-
Don’t know what I love most about this IK Group Buy, the actual group buy or Zolton’s graphics.11 points
-
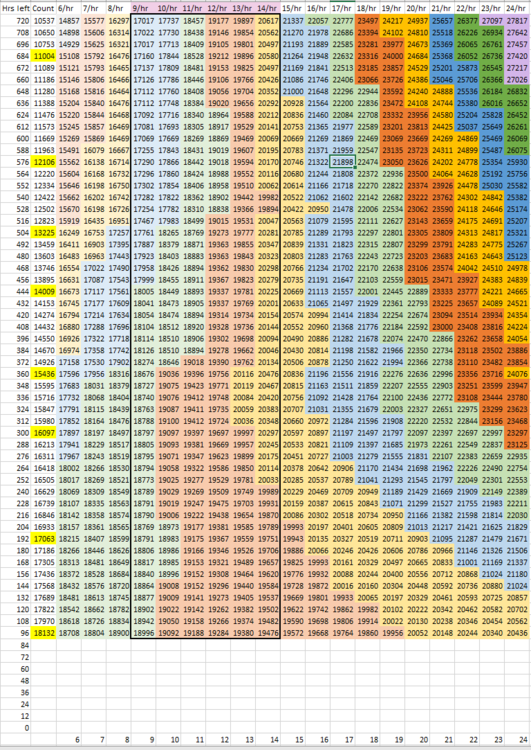
In case anyone's interested in a more "holistic" view of where we're at in the plod toward 20k, here's a picture of the absolute nerdiest way I've looked at the September data: It's sort of a poor man's probability map. The rows represent 12-hour intervals from midnight on 9/1 to midnight today, and the columns are rates -- from 6/hour to 24/hour. The grid itself shows the projected total, given the count at each time point (e.g., 10537 at the top, or 18132 at the bottom), if the signups average each rate for the rest of the way. Each color represents values within intervals of 1000 -- the light green is 18k, medium red is 19k, medium yellow is 20k, etc. I've put a little box around the range where the September count has been -- from around 9/hour to 14/hour. If that rate doesn't change, there's a good chance the count will hit 19k (i.e., most of the values in the bottom row are colored red for 19k), but not 20k. Right now, reaching 20k would take an average of at least 20/hour. If the rate falls back to 9/hour or less, the count is in danger of falling short of 19k. Anything outside those possibilities is currently literally off the map -- or outside the 6/hr - 24/hr range shown here, anyway. It's interesting (to me, at least) that a 14/hour average -- the last column within the box -- would have been enough to reach 20k until just a few days ago. The rate hasn't changed so much since then (other than not being "bumped" for a while), but those yellow 20k squares have been veering off to the right of the chart of late. It'll be pretty cool if they get dragged back in the eight time windows left.
 10 points
 -
Usually the things you can choose are in bundles or similar. Any single purchases that you currently have are not going to be able to be chosen because more people would choose them by mistake than would knowingly get another license. At this time you'd need to transfer your existing item in order to be able to choose it. That would require opening boxes and if items are backordered that could get messy. However we've been receiving MEMS microphones and shipping out orders and will continue to so this shouldn't be an issue for long.4 points
-
Maybe others also in the area of Chord Progression / generative circles https://mixedinkey.com/captain-plugins/captain-chords/ https://www.pluginboutique.com/products/6439-Scaler-2 https://audiomodern.com/shop/plugins/chordjam/ Just a shout out to anyone who has any or all of these and thoughts. I have noticed that SCALER2, while very comprehensive, would be geared more toward learning theory and/or people who approach things from a more music theory perspective while CHORDJAM is more generative random and probably better for non music theory musos. Captain chords seems to be in between Of course ANY COUPONS for above appreciated by all As for SCALER 2 at Pluginboutique use "PBAttack" as coupon at checkout .. knocks near 20% off the price. Coupled with virtual cash i have it down to €39 https://www.pluginboutique.com/products/6439-Scaler-23 points
-
Had a little surprise livestream earlier taking a look at Spitfire Audio Originals Media Toolkit. There is a lot to like in this collection as well as supporting a deserving organization. Check out the replay here:3 points
-
Actually, that’s less than $20 each. Pretty good deal for 26 Kontakt Player libraries of the highest quality.3 points
-
I have Scaler 2 and Chordjam. Scaler 2 contains a LOT of material with LOTS of different ways to use it. So, if you are looking for something you can play with for many years (and keep finding new stuff in it!), then go with Scaler 2. Chordjam is a fun, learn it in one day, kind of program. And describing it as a generative happy accident finder is an apt description. Want a free, "happy accident" chord progression finder? Try this: https://chordi.co/3 points
-
confirmed working. i am in a second time in the GB. darn IKM and their deals. --- So this plugin almost blew my ear drum. I gotta post a support ticket. I was using it on a bass track and playing around with the mic positioning in the cab section.. and when i moved the mic way to the bottom of the cab.. it turned into +200db squealing digital noise. Now I learnt why some engineers on GS always use a limiter on the master channel when working. ?3 points
-
Can I call my lifeline?3 points
-
Last day bump...3 points
-
Wayyy back in the early thread (I found some posts Aug 10) there were comments about making sure you don't sell a plug that was used to qualify for the GB, so just make sure you hang on to THOSE. Apparently if you transfer it/them, the "attached" GB's evaporate.3 points
-
or use the simplified export options in the Export module3 points
-
For me the old way was very simple: I agree that with just two or three clicks you were done... fast and simple. But limited, when you are working with a increased number of tasks related to a bigger project (exporting stems, alternative mixes, adding information to each file, batch exporting several tracks with different specifications, etc.) So, after investing a couple of hours in the learning process of the new features, I managed to configure my workflow in a way that is incredible fast, as I don't have to bother even naming the exported files. It takes the names from wathever source you want, and that's it. And if you need simple export functions, just create a preset that meets all of your requirements, and use that preset all the time. Couldn't be simpler then. But it takes time to learn and customize to your needs the export features, after you properly understand the logic of the system. Would I get back to the old way? no.3 points
-
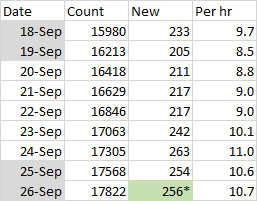
It's not quite that dire, if I'm tracking correctly. We've got about 100 1/2 hours until 11:59PM on the 30th -- four full days, and four-plus hours tonight. That means just a shade over 19/hour to reach the mark. We haven't been very close to that rate (for a full day or more) since mid-September, but things are trending upward a bit, which is encouraging for the weekend: The last number gets an asterisk because it's 256 so far -- there are still the remaining four hours to top that off. The "Per hr" number in the table above is for each day separately, though the cumulative rate since the "race to 20k" was announced (around 10.6/hour) is close to the high water mark so far. Using just the latter data (from the afternoon of 9/21 until now), the total would currently project to around 19,150, if nothing changes. The count has been over 20 at least three hours today, but it'll need to get there and stay there for most of the week to hit the 20k mark. (Edited to correct that we did hit 19+/hour for a full day in September -- actually, twice. Just not since the 15th.)
 3 points
 -
These links should help. http://forum.cakewalk.com/64bit-Audio-engine-vs-double-precision-engine-and-a-dithering-question-Noel-please-m3804976.aspx https://www.cakewalk.com/Press/Release/1047/White-Paper-Benifits-of-x64-for-Audio-Workstations Essentially the 64 bit engine uses double precision floating point numbers from end to end assuming that plugins support it. The main advantage of 64 bit computing is that its very tolerant of errors that build up over thousands or millions of computations and has a massive dynamic range. You can literally do multiple mixing gainstages that clip > 0dB or go to very low levels and then scale back up with no audible errors creeping in. In fact the original white paper had a test project that did something like that. Not only is it advantageous for mixing, it is actually more efficient for modern CPUs to process. As far as the export settings go, its simply a way to control whether you want the export to use the 64 bit engine processing or not. I.e you can have it disabled in preferences and enabled in the export or vice versa, (If its disabled in export it will NOT use 64 bit processing even if it’s ON in preferences) The delivery file format is independent of the engine precision. You can choose to export to 16, 24, 32 or 64 bits. Obviously 64 bits will retain the full resolution and integer formats will be dithered down. There are still advantages to mixing in 64 bit even if rendering to 16 bit because the conversion happens at the last stage. Whether you will hear a difference with 64 bit really depends on the processing in the project. In simpler projects without a ton of buses and processing its unlikely that it would be audible.3 points
-
Hardware manufacturers are responsible for writing their drivers. The RealTek ASIO driver has never worked well. Starting with CbB 2021.09 bad drivers are flagged by the program. Instead of ASIO, try the WASAPI driver modes in preferences when using the internal PC sound chip.2 points
-
This on Twitter a short while ago - Hang on to your wallets.2 points
-
Well, I am an "in the moment" type of personality. I had just installed the library and was so excited to share it but was conflicted on whether to do it early before we went out to lunch and the grocery or after we came back, needless to say it was before ;^) So right into the livestream we had some friends come over who were helping us with some yard maintenance to paint the lawn furniture, that is when my wife comes in to get the keys to move the car for them to get into the driveway. I also was taking a different approach moving from the last presets (percussion, etc.) to what I thought were the library highlights, the guitars and Piano. So, a lot of things going on ? Also, if anyone has ever done a livestream, you know how many things are moving at the same time, and just the fact that you are putting yourself out there can be a little unsettling at times. I am so very fortunate to have such wonderful and generous support from all of you that it makes that aspect less stressful. I am so grateful to be able to have the opportunity to share and to help when I can. All of that being said, its all good. See you at 3:00 ? All the best!2 points
-
The thing is with Scaler, it gives you the theory stuff, but you can also just select things. There are different ways to approach Scaler from a composition perspective, while theory details are present, you don't need to know any of that stuff to use it. You can start off with pre-made "song" style chord selections and change keys of them at the touch of a button as well as swap out chords you want to sound different. Scaler can provide logical choices or you can force it to break the mold, but you don't really need to know theory to do any of it. Scaler is also user friendly in the fact under a scale it will give you a sense of the "mood" of that scale (happy, sad, joyful, thoughtful, etc) you select the scale and it provides the chords of that scale for you, which you can further modify. To me that is the epitomoe of non-theory but gets to the heart of music, the feeling. Without using Chordjam, I'm not sure, but I know the randomness could have "problems' if it isn't following theory in the backend as happy accidents rarely occur outside the realm of fitting an accepted music theory formula of some kind. This is why I think Scaler 2 is so useful, it can feel random but the general selections can feel like happy accidents as you can get pleasing results. My suggestion is get Scaler and then look at Chordjam later if you think you need both. Scaler 2 is pretty intuitive once you watch a couple videos of how to select, bind keys, etc.2 points
-
I missed my opportunity for a charter membership in Procrastinators Unanimous. But I remain an Eternal Optimist! t2 points
-
Being pedantic about this (and having to do it for work a lot), always use yyyy-mm-dd if you can so it sorts alphabetically.2 points
-
Nothing special. Let’s hope we get some surprise vouchers.2 points
-
Performance is mentioned primarily to explain that using double precision doesn’t mean you will get half the CPU performance because there are secondary optimizations in modern processors. The main benefit is the higher precision. Compare these two formats: 32 bit float https://en.m.wikipedia.org/wiki/Single-precision_floating-point_format Sign bit: 1 bit Exponent width: 8 bits Significand precision: 24 bits (23 explicitly stored) And 64 bit: https://en.m.wikipedia.org/wiki/Double-precision_floating-point_format Sign bit: 1 bit Exponent: 11 bits Significand precision: 53 bits (52 explicitly stored) In practical terms, the second has much more than 24 bit resolution so you could literally go through a huge number of gainstages, bounces or mixes and the noise floor would be inaudible. With modern CPU’s why not use the best resolution.2 points
-
I would suggest to have a look in this brilliant tutorial: ("Export" starts at 07:15) Have you tried to use filename tags to get unique filenames? Please note the difference between the two buttons at the bottom. The "Export" button directly exports and there's no need to create tasks... In my opinion the new export is a huge timesaver. OK, there's a learning curve. But that will be a good investment. Have fun ?2 points
-
Got this. really liking it2 points
-
Well I was working on a song with EZ Bass and MODO Bass. After working a good bit to get the bass sounding like I wanted it to inside EZB, I tried to send the midi out of EZB to MODO and sure enough, didn't work. It was OK but not like what it sounded like in EZB. Most articulations that make a part sound good, were lost. What a shame. Toontrack really needs to get off of it and open that up. Such a shame. However, I put my Overloud MKII bass amp with EZB set to DI and no effects it it sounded good. Really good! So there is hope.2 points
-
Delete the junk, and keep your inspirational sound pallete right in from of you. At least that is the goal that I'm slowly attempting to achieve. Too many synths and sound libraries get in the way of productivity!2 points
-
There is no way to do what you want. However, this could work to a certain extent: Create a shortcut for full view for video size. Open video window Hit spacebar to play video+audio Click on the video window Apply the shortcut (you'll get the full screen video running) It will not be what you need, I know, but it's closer. --- or invert the thought process: embed the audio in your video using a video editor, or even CW export video features - , and use a video player with that capability instead?2 points
-
I did my part and entered for a second time today! Great deal getting better by the day! Surprised that one of the freebies I can now select is something I already own. If I select that, am I able to transfer the original down the road and still keep the freebie? Don't want to waste a slot if not.2 points
-
I think it matters! Isn't IKM's regular price 49.99 for the upgrade? That would only let you choose products 49.99 and below! This is apparently is the full, 99.99 version for sale at 49.99. Once you register it, IKM sees it as a 99.99 spend and lets you choose items up to that value.2 points
-
2 points
-
Fuel - Hangin Round:2 points
-
The McCoys - Hang On Sloopy:2 points
-
I think you can still get the Collective synth plus Beta Maxed sound pack for "free" with the current issue of Computer Music (Autumn 2021/CM300).2 points
-
I’m really liking the Cinekinetik collection by the way2 points
-
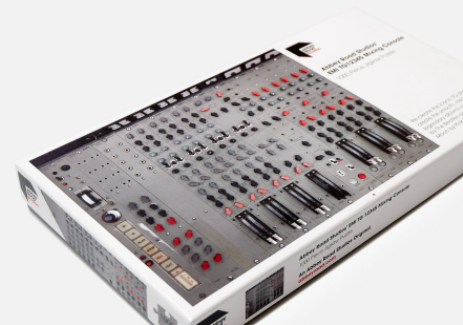
Full disclosure: I'm a proud Beatles/Abbey Road geek! Plugins? Yeah, I got 'em. Currently reading "Solid State," about The Beatles bringing the band in for a bumpy landing during the Get Back/Let it Be/Abbey Road period... I got this in my email from Abbey Road (I'm on the mailing list) and just had to share b/c I thought it was hilarious! For the true Beatles fan/Abbey Road Studio geek on your gift list! An EMI TG12345 Mixing Console Jigsaw Puzzle. Whaaat??? Yes, boys and girls, you heard that right! From Abbey Road: "The TG desk, delivered to Abbey Road in 1968, was EMI’s first solid-state (i.e. transistorised console) and superseded the vacuum tube-based REDD range of desks. The TG was the first console to include a limiter/ compressor, EQ and metering for each channel, and the smooth, clean sound of the TG can be heard on legendary albums such as Abbey Road by The Beatles and The Dark Side of the Moon by Pink Floyd. The Mk III TG12345 photographed for this puzzle, as well as a very similar Mk II version, are still available for use on recordings at Abbey Road today." Now, where did I put that vinyl cutting lathe???
 1 point
 -
@Jacques Boileau Thanks for reminding me I lost but won at the same time.1 point
-
I know it is possible, but I don't know how its done exactly. I haven't done it myself.1 point
-
Actually everything is covered very well in the documentation.1 point
-
No, just misunderstood exactly what you were asking. That is a feature request but chances are you will be able to save up and buy a second monitor before it gets implemented.1 point
-
I've at least installed the Upright.1 point
-
Hey Shane, I have a M-Audio Code 61 Keyboard Controller, but it's not made any longer.1 point
-
From what I've seen of most controllers in that price range they're all a bit like kids toys in terms of feel. They will probably all do much the same job, but it depends how you feel about build quality and the idea of stepping up in price. The big plus for the Arturia ones is the bundled Analog Lab which is probably the best of any in terms of bundled synths if you don't already have a selection. If you get it and they give you an Analog Lab V licence ask them for a licence for version IV too as it has about three times as many sounds as the latest version. (Apparently, they will do that). In my experience Arturia's support is a bit hit and miss though. I haven't seen the relatively new mk3 Novation Launchkey range, so can't comment on them, but most things Novation seem to be pretty much geared up for and aimed at Ableton users these days. Having seen most of what is on offer, I passed on all the cheaper ones and even the more expensive models are all compromised in some way in the sense one will have this,but not that, the next will have that, but not this. There doesn't seem to be one that has it all for me - maybe I'm just too picky, lol. Thanks to 2020 and all that entails I have been waiting a long time now to see the Black version of Arturia Keylab 88 in the flesh, but that is proving to be easier said than done here - local retailers have had no stock and have been claiming "new stock due in by the end of the month" since at least March, so I'm still none the wiser and as it was supposed to be a "limited edition" I'm seriously doubting that I will ever see one now. OTT for what you want, but it was the one that seemed to tick the most boxes for me.1 point
-
IK extended again
 1 point
 -
Groove is the universal language. You can't misinterpret bounce. loved it. cheers, -Tom1 point
-
I use the Oxygen Mk IV 61 key as a keyboard and controller. Yes it has the pads. and as its class compliant, no drivers needed. J1 point
-
18 reached.1 point
-
To 20,000?1 point
-
I don't really care how cold the upcoming Canadian winter will be! I have so much hot stuff to play with thanks to IK's GB!1 point
-
The issue is more than just allowing the external insert to support inputs. Its complicated by the fact that Cakewalk supports other driver modes that have stereo channels so it makes it harder to do. Its not that we don't want to do this but it requires some rework of routing to support. This is why it hasn't been tackled yet and has been lower on the priority list.1 point