Jump to content

Leaderboard

Popular Content

Showing content with the highest reputation on 09/25/2021 in all areas

  1. Here: https://wavegrove.gumroad.com/l/Vastaus
    4 points
  2. For anyone curious how the group buy signup rate is looking as we wind down the workweek, the answers are "better" and "not (yet, at least) better enough". With 150 hours remaining in September, the signup rate since the "race to 20k" announcement on the 21st has crept up to just about 10/hour. Two days ago, it was only around 8.5/hour, so that's good! On the other hand, the pace needed from the 21st to hit 20k was around 14.4/hour. Since the rate has been consistently below that so far, the rate needed now is 16.6/hour. In terms of individual signups, the current count is around 330 "behind" that 14.4/hour pace. So that's bad. If history is any guide, the weekend is likely to be a little slower -- though there's a good chance the count will hit 18k sometime before Monday. That would leave around 100 hours to gain 2000 signups. In the last 100 hours of August, the count rose by 2875 -- or nearly 400 more than we need right now, with an "extra" 50 hours to spare. So that's... inconclusive? But pretty fascinating, if you're into that kind of thing.
    4 points
  3. Fans of Dr. May and Rick Beato will like this. Brian is one of those guys you'd really enjoy chatting with at the pub.
    3 points
  4. Folks! here we have the surviving evidence of the "one and only time " IKEA sent over a customer service rep to help a customer put together a bed . They stopped doing that after he turned up MIA just like Jimmy Hoffa. Kenny
    3 points
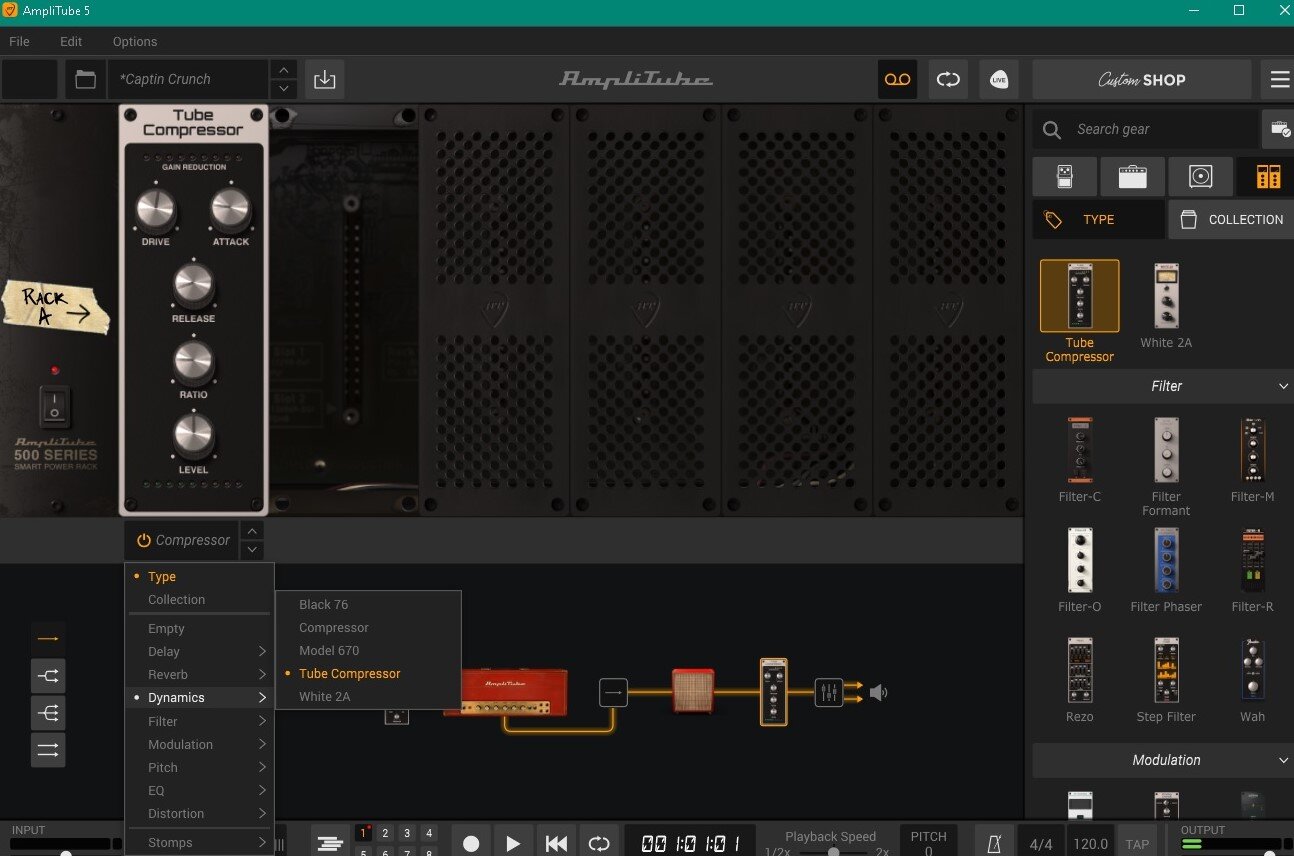
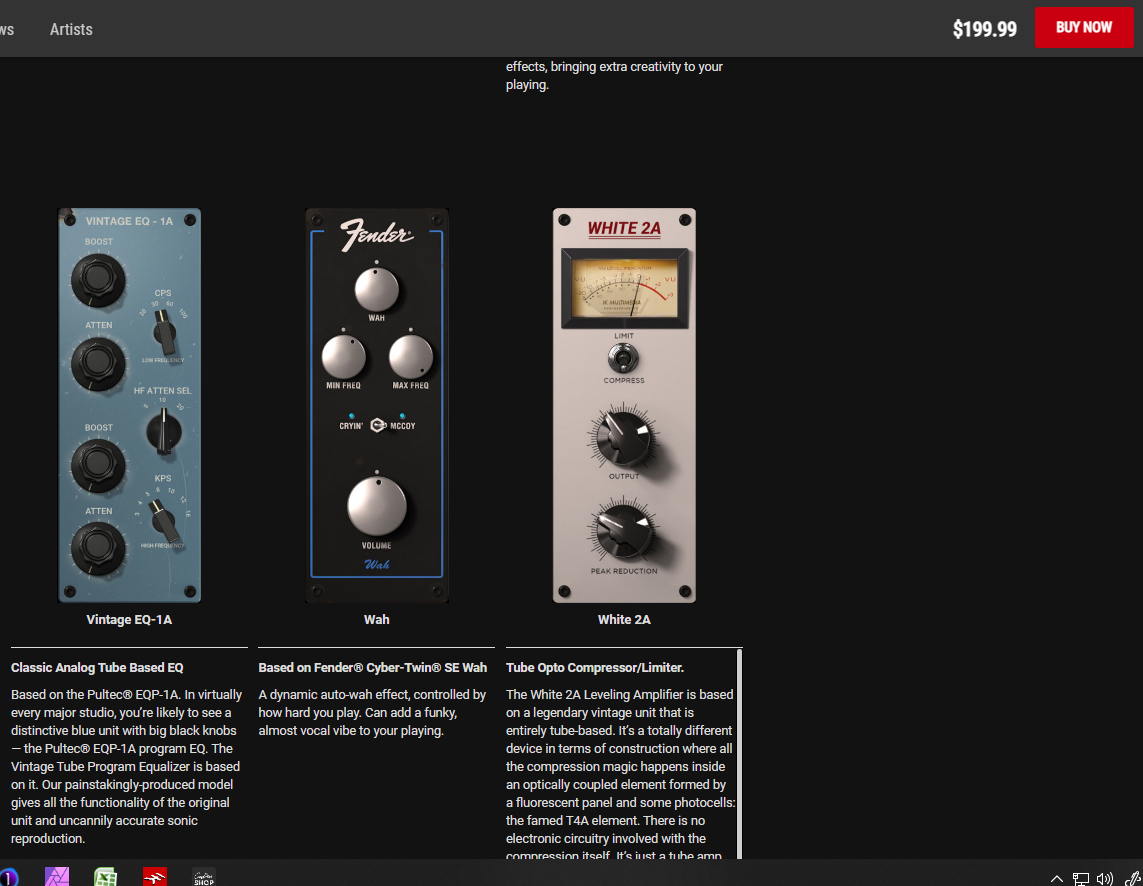
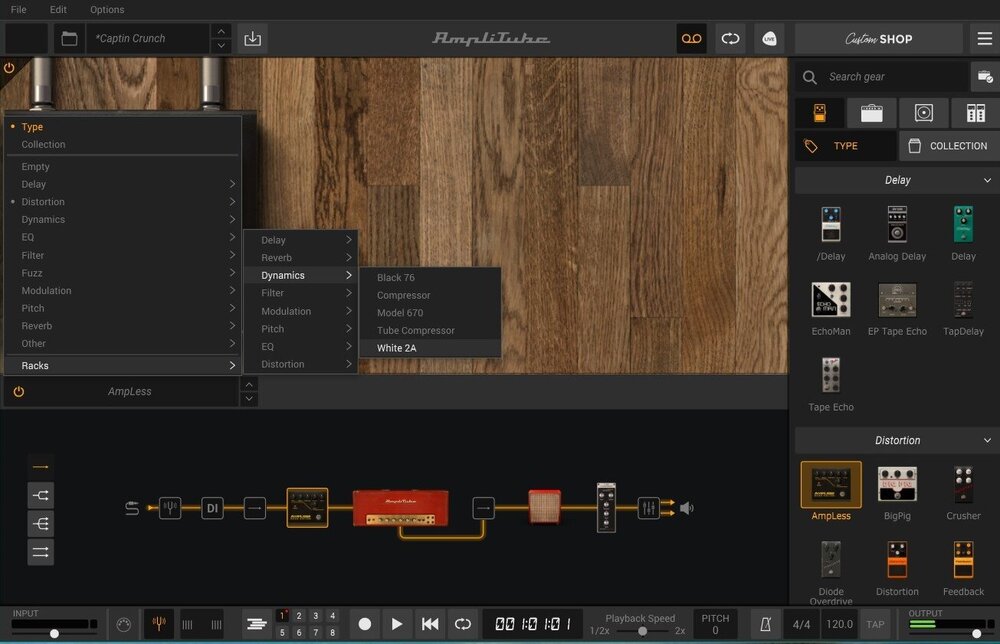
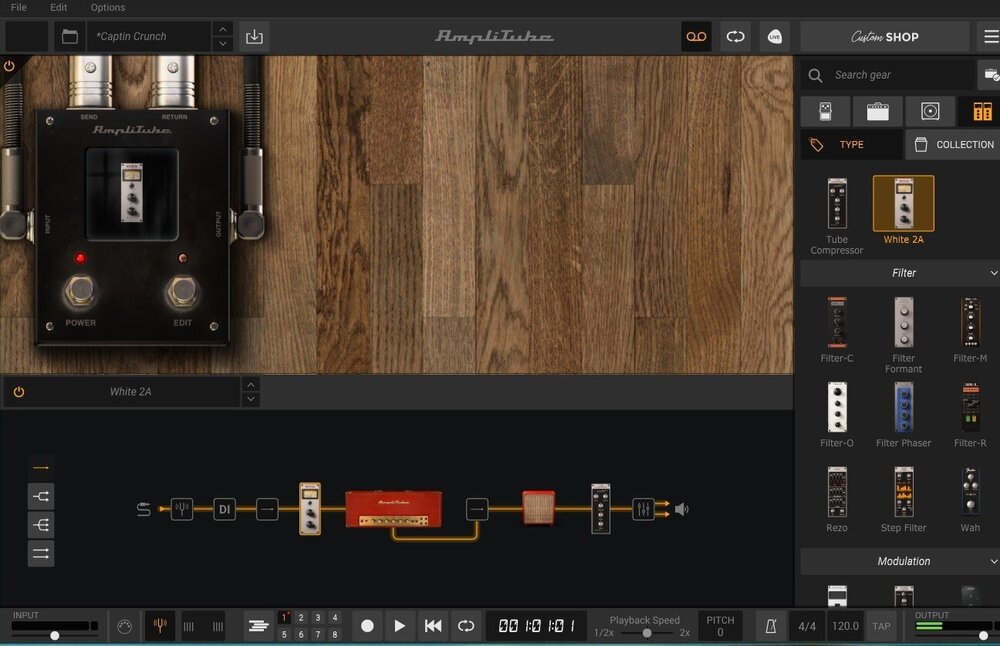
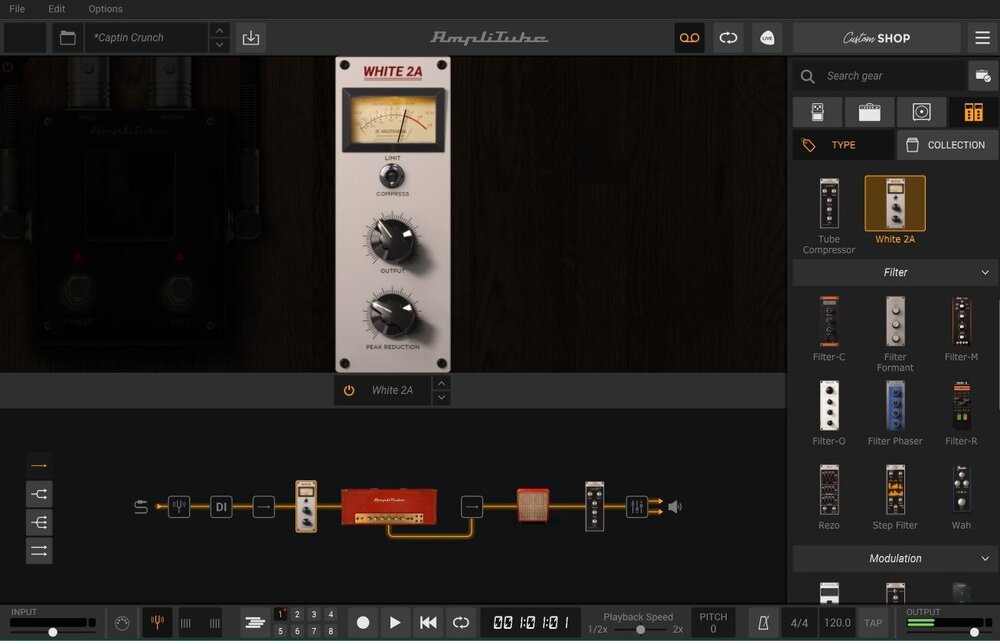
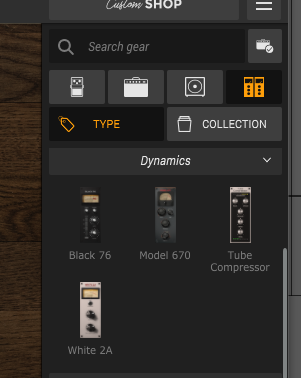
  5. if you want to use the White 2A in Amplitube as a stomp this is what you can do ....Keep in mind this is The Ampitube version of The White 2 A 😉 The first thing you need to do is to put an effect in the signal chain as a placeholder if you do not have one already . You need to do that so you will be able to access the effects Once you have done that you go to the effects section you can pull down the dialog box and place your rack effect in and it will be wrapped if you are using a rack effect as a stomp to gain the full controls of your effect you just hit edit when you are done just hit the effect in my signal chain second pic and the effect will go into what you have in my second pic . if you want to use the White 2A in Amplitube as a rack you can just use the racks dialog box ...in my pic I'm about to switch over to the White 2A from the tube compressor. hope this helps Kenny
    3 points
  6. Going over the export feature and other updates of the lastest release let me know if you have questions..😀
    2 points
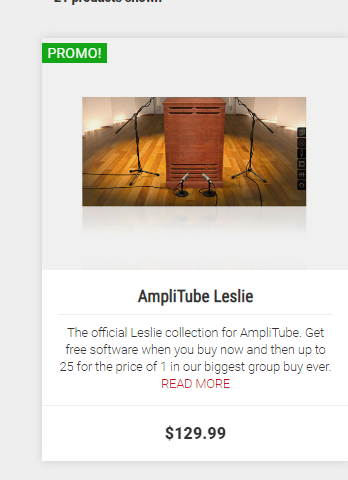
  7. AmpliTube SVX 2 $49.99 If you don't have IK product then this is a deal At RecordingSoftware.com https://recordingsoftware.com/product/ik-multimedia-ampeg-svx-download/
    2 points
  8. 2 points
  9. Of course you do as it is all about the BASS 🤣
    2 points
  10. Firstly, MODO is not a waste of money at all if you can grab it as a Group Buy freebie!!! But the answer is not a clear yes/no for a choice of either EZBass vs. MODO Bass. To oversimplify, a point that Reid made in his detailed YouTube video comparison of EZBass & UJAM, is that if you want to PLAY bass, get a UJAM bass. If you want to COMPOSE a finished bass track for your song, get EZBass. To this, I may add that what you get with MODO Bass is no samples, so no load times. Everything is synthesized in real time. And with almost endless ways to shape your bass instrument and sound. Run MODO through AmpliTube 5 with SVX2 and you have the ultimate tone machine!!! Select full D.I. "10" in MODO, and dial their their AMP mix down to "0.0". So get all three! I did! I just don't think one can replace the other... Edit: after thinking it over, it occurred to me that MODO Bass is probably more of a producer's bass, rather than a player's or composer's bass...
    2 points
  11. He should probably be more concerned with his memory loss.....2 minutes in and he's already saying things that he already said.
    2 points
  12. Sneaker Pimps - 6 Underground
    2 points
  13. In every post that S.L.I.P. ever made ?
    2 points
  14. Another of my threads prepares for deletion! 😆
    2 points
  15. If I vote yes will that sway you? Or will I be trying to steal your decision 🤔 🤣
    2 points
  16. Sometimes we treat that forum as the final authority on any library. There is no doubt a bias against KH libraries. Some of them get paid for their work and I get that. Interesting though is if a developer comes out with (insert any name) Strings they often ooh and ah. One developer pointed that out when he make a cinematic or trailer library whatever. The wheel can only be invented so many tines and it takes a while for a hobbyist to figure that out. Interesting once when Hans Zimmer Strings came out a guy made a 4 hour video on it and was expecting it to be more "Hans Zimmer" and Hans came on the forum and insulted him. Hollywood ego at best. I think that library was $700. Never mind that the guy wasn't thanked for buying it.
    2 points
  17. You wouldn't let it lie ....
    2 points
  18. yup. i use it that way as I prefer the sound of NI Kontakt basses as they sound better to me. But you lose all the fancy articulations of EXbass. What I will try is what one guy suggested. Make a DI track in EZbass and then load up a bass amp VST on it. so this me just playing around with EZbass. i loaded EZ into Cubase. Built the song progression. Then exported the DI track within EZ to a wave file. Then muted the EZ track and loaded up a new track with AT5 SVX and used that DI wave file. it sounds better than in EZ IMO.. but as always, the problem with that workflow is you are building it all up and out from the bass track. gotta keep going into EZ and exporting the DI should you need to change something.
    2 points
  19. I am a big fan of their processors, especially Dumpster Fire, which I have in the category "Enhancer" in my plug-in list. After that, Backmask is really fun, and has some features I've not seen with other reverser plug-ins, like a randomizer. MISHBY is a combination broken cassette deck emulator and grain delay. I think. The cool thing about them is that they are made to turn tracks into smoking wreckage, but they don't do it in as jaggedy a way as similarly-intended FX from Glitchmachines and Unfiltered Audio. You might have to try them to hear what I mean. And the UI's are a treat for the eyes, with happy Lovecraftian horrors. Sure, this or that plug-in may be ROLI-compatible, whatever that means, but these have tentacles and levers that plead with you not to push them further and knobs that frown if you turn them toward their less destructive range. I think I got them all for $20 each in a Pluginboutique sale, so $30 for the set is a great deal. I like them so much, and also like their marketing anti-style so much (okay, videos that don't actually include demonstrations of the sounds?? That's so wrong that it folds back around and becomes right) that I am perfectly happy with having paid double. I know that our thing here in the Deals subforum is to squeeze maximum software for minimum bucks, but I get so much enjoyment out of Dumpster Fire alone that I thought they deserved compensation. The marketing, the website, the FX, they remind me of the feeling I got after seeing Devo for the first time on Saturday Night Live, doing "Satisfaction." Like lining up your homemade dragster at the wrong end of the strip, putting it in reverse and stomping the throttle, but then turning a decent 1/4 mile time. It's also fun to gently troll discussions of snake oil-y enhancers (whoo, it boosts the level and upper mids, Fletcher and Munson would be proud) by mentioning Dumpster Fire. It sincerely really is my favorite "enhancer," although I do also like Slate Fresh Air. Sometimes I put it on a track when I'm feeling frustrated, then after demolishing it for a while, remove Dumpster Fire and get on with my project. It lets off steam. Maybe I should put a Dumpster Fire bus in my templates so that I can do this more easily. The weird thing is that I don't think that, despite my obvious fanboy attitude toward them, I've ever committed any to a final mix. They're just fun to have around. Especially when other sick-minded people visit the studio.
    2 points
  20. One of the secrets to killer guitar tone is to minimize the amount of stuff in your signal chain.
    2 points
  21. It's all good , things have gotten clearer for anyone who has an interest in this ..myself included 😉 Kenny
    2 points
  22. And to think, I once worried about losing my hearing.
    2 points
  23. White 2A does come with the $200 version of AT5 As does VEQ-1A If you bought that to get in the group buy you could also select the Amplitube version of leslie: I bought 200 gear credits for $160 then used that 200 points to get AT5 using all of them. I had JamPoints to use also which brought down the group buy in price at the $200 level to $112, YMMV.
    2 points
  24. There was a heated 😛discussion about this detail in the Early Access... so you are not alone in this request.
    2 points
  25. As an FYI, in case you didn't know, this (and at least some other Overloud plugins) connect back to their web server every session you instantiate one. They still work (albeit insert/open slowly) if you have no internet connection, but I know some people don't like this (I don't like it as my internet connection sucks!).
    2 points
  26. As our late great sadly departed friend Bayou Bill would have said - 'Brillyant!' 😄
    1 point
  27. so then i really should not be wasting my money on MODOBass if I already have EZBass. I am thinking I might go for the SVX2 upgrade for my next freebie. Today was first time I looked at SVX. it sounds pretty good in AT 5.
    1 point
  28. Yes and now with the export dialog in 2021.09, it is easy to setup an export task with fixed start and end times
    1 point
  29. I have ST4 and ST4 Max 😃 I upgraded to ST4 and IK had the sale buy the keyboard and get ST4 Max for free! So the keyboard was my Christmas gift.
    1 point
  30. Robert Palmer - Sneakin' Sally Through The Alley
    1 point
  31. Boots = shoes = sneakers Hi Heel Sneakers - Tommy Tucker (Robert Higginbotham)
    1 point
  32. I've been with my wife for 23 years so it's been a while since I've seen one of those but it looks familiar. Hmm. Can't quite place where I've seen one. 🤔
    1 point
  33. To widen our views. China - Trio contests? Japanese metal.
    1 point
  34. And some pocket meat.
    1 point
  35. How did you get him to come to your house?
    1 point
  36. Thanks guys. I already bought five of them yesterday. I shouldn't watch @Simeon Amburgey's YouTube videos... Next step: learn how to play, so everything doesn't sound like an out of tune toy piano going "plink plonk plunk".
    1 point
  37. 1 point
  38. 1 point
  39. Yes you can create two tasks and they will render the wav and mp3. Its not rendered at the same time however it will do two bounces.
    1 point
  40. The thing with ASIO4ALL, or any other "generic" ASIO, if you have it installed and then add a "real" ASIO for your interface, it will probably conflict and prevent your DAW from locating the real one. I ran into this garbage when trying a Steinberg demo. It had installed a "Generic ASIO" driver that I was not aware of. So if you have been running one of those "unnecessary" ASIO clones, you had best wipe it clean before you attempt to use the real thing. But If you run ASIO4ALL with just an on-board OEM audio chip, you shouldn't have any issues. But it might be unnecessary for that use, if you can run WASAPI under Win10. WASAPI was optimized for Win10.
    1 point
  41. @Toy there is no difference between setting bounce buffer size or manually or changing the audio latency to a higher number and redoing the bounce. Behind the scenes it has the same effect except its not changing the driver latency. If you are seeing differences its due to the plugins in your project and out of our control. You can repeat this test by changing the playback buffer size and redoing the bounce each time with the default "PlayBack Size" option selected. i.e. Do this test: Export with bounce buffer size set to 20 Export with playback buffer size set to 20 and bounce set to Follow playback Compare the two wave files. They should be identical assuming you set the buffer size the same Another thing to try: Bypass all your plugins and do the test again. If the audio aligns then the issue is caused by one of the plugins. You can use a process of elimination to find the problem.
    1 point
  42. Thanks for posting. It serves as a reminder to me. I copped this 'free' a while back. They are all trippy and mostly unpredictable. I told myself I'd cop some of their mech if I thought they were cool, and I do so I guess now is the time.
    1 point
  43. I’m waiting on Bapu’s review in the next hour or so.
    1 point
  44. ORCHESTOOL | SECTIONS completed Happy to announce the release of the last of four instruments of the ORCHESTOOLS | SECTIONS - Free Public Orchestra series. The instrument covering percussions ORCHESTOOLS | PERC is released (go to orchestools website page for download links). Spent more than a year in developing and working on this project. Next few months i will work mainly in making tutorial/instructional videos and few demonstrational ones as well. In general i am happy with the result and already instruments have been downloaded (over 2000 downloads total) and reactions, suggestions and ideas are coming in. Already there are talks/plans for ORCHESTOOL | SECTIONS 1.5 version - wich will instroduce more samples, more articulations, more presets and improved funcionalities of the engine. So, ORCHESTOOLS | STRINGS, ORCHESTOOLS | BRASS, ORCHESTOOLS | WINDS and ORCHESTOOLS | PERC are now available for you to download and play with. Hope you like them and find them useful in your work and projects. Would be great, and i would appreciate it very much, if you send results of your work, link of audios and videos. Also, I would appreciate very much your opinions, ideas, criticism about this project. For music and ❤️ (*instruments available as VST3 plugins for 64bit Windows, also as sourcefiles to build them in other OS)
    1 point
  45. [UPDATE 4-Oct-2021: Cakewalk 2021.09 Update 1 (build 27.09.0.145) now available] We're pleased to announce the 2021.09 release! This release includes enhanced audio file export, batch exporting, filename tokens, completely redesigned Export Audio and bounce dialogs, improved AudioSnap transient detection, several bug fixes and lots of other enhancements and optimizations, all in keeping with our goal of making Cakewalk as reliable and enjoyable as possible. Please note that in order to automatically keep your activation status up to date, Cakewalk will renew your activation status whenever a new version of the application is installed and run for the first time, and when you sign in to BandLab from within Cakewalk. If you have never signed in to BandLab from within Cakewalk, you will be prompted once to sign in. Thanks, The Bakers For new feature details, see New Features. Should you need to revert to the 2021.06 release, you can download the Cakewalk 2021.06 Rollback installer. Update Oct 4 2021: 2021.09 Update 1 (build 27.09.0.145) Bug fixes Stability: S-Gear 2 VST3 plug-in crashes when inserted Intermittent crash when closing Arranger section context menu Exporting audio with plug-ins on a surround bus can hang the export while flushing plug-in buffers In rare cases certain plug-ins could hang export while flushing plug-in buffers Export: MP3 Export Options dialog does not show recalled task settings MP3 Export Options dialog should default to 256 kbps Changes to Notes Browser tab are not reflected in the ID3 MP3 Export Options dialog until Cakewalk restart Export as MIDI exporting whole project if selection at time zero Windows notification sound when opening Export Audio dialog in some projects Export Audio dialog uses default project sample rate instead of actual project sample rate Large bounce buffer sizes cause flatline audio when exporting or bouncing clips with 96K or higher sample rates Export task fails with no meaningful message if drive or path is invalid Export with External encoder was not functional Warn if duplicate filenames in export task queue Expand width of file overwrite prompt when exporting multiple files and make the list scrollable Export as MIDI File should not show audio track warning message Misc.: Bounce to Track(s) dialog forces render sample rate to 44100 always Bounce to Track(s) should always use project sample rate to prevent unnecessary sample rate conversion Bounce to Clips unexpectedly uses bounce buffer size from Export Audio dialog 2021.09 Highlights New export audio features Improved AudioSnap transient detection Misc. enhancements Bug fixes New export audio features The Export Audio feature has been greatly improved and optimized to handle the most demanding rendering tasks. Highlights: An intuitive new UI with collapsible panels to make it easier to get to the most commonly used features,. Task queues for export automation. Complete control over output file names using tag based file name presets. New additional export categories available: "Tracks Through Entire Mix" for track stems, exports the audio from each chosen track as heard through the main output. This is a useful way to create track stems as heard through master effects. "Track Folders" for any non-empty track folders. "Arranger sections" allows you to export each individual arrangement section as a separate audio file. Export uses significantly less memory and runs faster by eliminating making an extra copy of the project in memory. Support for setting the export buffer size independently from the audio driver buffer size. (can speed up export times) Convenient access to select and mute or solo tracks directly from the export UI. Set export time ranges or export entire project directly from the export UI. Automatic effects tail flushing is now part of export/bounce to prevent left over effects tails from leaking into exports or being heard. New default Export Audio Files folder setting in Edit > Preferences > File - Folder Locations. Toast notification on export completion with link to the completed render. More details: Related settings are organized into collapsible panels. The size, position and expanded state of each section is remembered once you close the dialog. The task queue allows you to create multiple export tasks and run them all as a batch. A task in the export queue contains the set of export settings including the mix settings, export file name, selection, location, and the time range. The export queue is saved in the project and can be recalled and re-executed. Any prompts appear at the time of adding the task, so you can run the whole queue without any user intervention. To batch export all tasks in the task queue, click Run Tasks. To export a single job with the current export settings, click Export. Filename and location are shown as two separate fields. Filename is the name of the file you want your exported audio to be called, and location is the directory where it should be saved. When you first open the dialog, the location will be set to the default location as specified in Edit > Preferences > File - Folder Locations under Export Audio Files. The default is \Audio Exports under the current project directory, where the current project folder is indicated by the %PROJECTFOLDER% environment variable. You can change the export directory by clicking on the browse location button , and this location will be remembered for the duration of the project’s session. You can change the global export location for all projects with the Export Audio Files path in Edit > Preferences > File - Folder Locations. Filename tokens. Filenames now support substitution tags for common project and export properties. You can type tags directly into the filename edit box, or use the filename builder pop-up to add them for you. You can still type while this pop-up is showing, so you can mix literal characters with tags, or use backspace to correct any mistakes. Filename presets let you save and recall custom filename formats. The filename itself now supports both literal characters and substitution tags (“tokens”). Substitution tags replace tags within the filename with common project and export properties. Each tag is contained within curly brackets. You can type in the tags directly into the filename edit box, or use the filename builder pop-up to add them for you. It’s worth mentioning that you can still type while this pop-up is showing, so you can mix literal characters with tags, or use backspace to correct any mistakes. A preview of the first audio export filename is shown below the filename edit box. The filename builder pop-up also support filename presets, so you can easily recall a formatted filename by selecting it from the drop-down. As with all Cakewalk presets, you can save new presets, replace existing ones, or delete one’s you don’t want. Export presets can now store a default filename. In the What to Export section, Track Folders has been added as a source category. This setting exports the tracks in each of the selected track folders as heard through the entire mix, as separate files. This provides yet another convenient way to export stems without modifying the source project. In addition to arrangements, individual Arranger sections are available as an export category. This allows you to export each individual section as a separate audio file. Under Format, the Bounce Buffer Size (ms) setting is used to specify the audio buffer size that will be used during export. This value defaults to use the current playback buffer size and can be changed to a max size of 350 ms. While small buffer sizes are useful to minimize latency, they add to CPU load and can slow down export operations significantly. A larger buffer size can speed up the export process in large projects by allowing the CPU to process data more efficiently. Caution: Some plugins can be unstable or crash with large buffer sizes so use this with caution. Depending on the plugins used, we recommend using moderate sizes like 50-100 msec rather than higher sizes. Also if you are using plugin automation, large buffer sizes will not sound smooth if you are using plugins that do not support sample accurate automation. The Bounce Buffer Size settings only applies when Render in Real-time is disabled. The playback latency buffer size is used when Render in Real-time is enabled. Tracks Through Entire Mix has been added as a new source category under What to Export. It exports individual tracks including all downstream bus effects and automation. The result is the same as if you solo one track at a time during export. When exporting multiple files as MP3 or Windows Media Advanced Streaming (WMA) format, the Export Options dialog box has a new Use These Settings for All option that lets you apply the same settings to all files instead of prompting for each file. Export works on the current project selection. The What to Export panel contains a fly-out project selection editor. This allows you to modify the current track selection and the mute and solo status of each track and bus, without exiting the Export Audio dialog box. This is especially convenient if you if you want to create several tasks, each with a different selection, or if you want to export multiple stems. Simply solo the tracks that you want to include in the stem, then add as a new task. A track that is checked means it’s included in the selection. If all the tracks are unchecked, that means there is no selection, and all tracks will be available. Changing the project selection changes which source items are available. A note about selection and the Tracks export category: When the source category is Tracks, the project selection has a special meaning: Having a project selection means there is also a time selection. So if you have tracks selected in your project selection, then all the tracks chosen in your audio source will be exported at exactly the length of the selection. In other words, the length of each tracks’ audio file will be the same. If you have nothing selected in your project, then no specific export time range has been set, and the length of each tracks’ audio file will be the length of each individual track. To the right of the What to export drop-down is a search filter, which lets you search for a particular track, bus, arrangement, section, or Mix Recall preset, should you have a large number of sources to search through. Tip: To quickly select all/none in the source list, hold down CTRL+SHIFT and click any checkbox. To select all, press CTRL+A. To check/uncheck the selected sources, press SPACEBAR. The Range panel specifies the time range to be exported. The drop-down provides the following choices: Entire Project = The entire length of the project. Time Selection = A specified time selection. The Start and End edit boxes allow you to manually enter the start and end times of the export range. Clicking the button to the left of the Start label will toggle between musical and absolute time. The buttons to the right of the Start and End edit boxes will allow you to choose a time based on defined project landmarks, such as the beginning of the project, the now time, or marker locations. Set Time Selection to Loop Range = Set the time selection to the current loop region. Set Time Selection to Punch Range = Set the time selection to the current punch region. Note: The 2021.09 installer will delete the old factory export presets and replace them with new and updated presets. If you have overwritten the factory preset names, those presets will be replaced. Other custom export presets will not be affected. Batch exporting audio files using task queues Using the Export button is fine if you have a single export. But what if you want to tweak your project and export again, or you want several different types of exports? You may want a task for exporting your stems, another task for exporting individual tracks, and another for exporting your final mix as a stereo file. You can now create multiple export tasks, such as stems or different file formats, and add them to an export queue. A task in the export queue contains the set of export settings including the mix settings, filename, location, selection, and the time range. You can add as many export tasks as you like, and run all export tasks as a batch without any user intervention. The task queue is per project and is saved with the project. Adding a task to the queue To create a task, simply go through the normal process of defining your export, then instead of clicking the Export button, click the Add Task to Queue button . This adds a task with the current settings to the task queue. If you are exporting multiple files as part of a task, a list of the filenames will be shown in a confirmation prompt. Any further prompts required for additional format settings will also be shown at this time… that way, you won’t get any prompts when you actually run the task. Once you’ve confirmed any prompts, enter a name for your new task. Simply type the name of the task in, and press ENTER. Tip: The name of the task can also be used in your filename by using the {taskname} tag. Repeat the above steps for any additional tasks you need. To the right of the task name you’ll see the number of files to be exported by each task, an estimated size (if it’s a wave file), and a summary of the file format. Editing tasks in the task queue You can update tasks that you already added to a task queue. To update an existing task: Do one of the following: Double-click on the task within the task list. Click the task’s menu button , then select Recall Task Settings. The task’s settings are recalled in the Export Audio dialog box. Make any desired edits to the current export settings. Click the task’s menu button , then select Update Task with Current Settings. The task is updated with the current settings. All other tasks in the task queue remain unchanged. Renaming a task To rename a task, do one of the following: Right-click the task and select Rename. Click the task’s menu button , then select Rename. Duplicating a task To duplicate an existing task: Do one of the following: Double-click on the task within the task list. Click the task’s menu button , then select Recall Task Settings. This recalls all the task settings in the Export Audio dialog box. [Optional] Make any desired edits to the current export settings. Click Add Task to Queue. Deleting tasks To delete a single task, right-click the task and select Delete, or click the task’s menu button , then select Delete. To delete multiple tasks, select the tasks that you want to delete (Tip: press CTRL+A to select all tasks), then right-click any selected task and select Delete. The task(s) is removed from the task queue. Executing task queue export To execute all checked tasks in the queue, click the Run Tasks button. The tasks in the queue are exported one after another. The status of each task is updated as the queue is executing, and a summary is shown in the task queue header. Once a task is completed, the task is unchecked. Checking a task resets it. Clicking on the Run Tasks button resets all checked tasks before executing each task. While the queue is running, the Run Tasks button changes to a Cancel button, which allows you to cancel the execution of the task queue at any time. The checked status of a task persists when opening/closing the Export Audio dialog box, and with the project. Resetting a completed task Tasks are automatically unchecked on successful completion. To reset a task so it will execute again the next time you click Run Tasks, simply check the task. Canceling an in-progress queue export While the queue is running, the Run Tasks button changes to a Cancel button, which allows you to cancel the execution of the task queue at any time. Opening a task’s export location To open a task’s export location, click the task’s menu button , then select Open Export Location. Using export filename tags and presets You can now use “tokens” to define filenames for exported audio files. Tokens allow you to use placeholder tags that automatically extract the corresponding information (such as the project name, artist, sample rate, bit depth, current date or time, etc.) from a project and adds it to the resulting filename. For example, instead of manually typing the project name and date into the filename edit box, you can enter the following: {projectname}_{d} This will automatically use the project’s name and the current date. Each token is enclosed by curly brackets (aka braces) e.g. {d}. Adding filename tags To enter a tag, do one of the following: Open the Tags panel and click a tag. You can still type while this pop-up is showing, so you can mix literal characters with tags, or use backspace to correct any mistakes. Type in the tags directly into the filename edit box. Be sure to enclose each token by curly brackets (aka braces) e.g. {d}. Tokens are case sensitive. A preview of the first audio export filename is shown below the filename edit box. To see all tokens that can be used to specify the filename, click the Build Filename Using Tags button to open the Tags pop-up panel. To add a tag, click a tag button, or manually type the tag in the filename edit box. Below are some common tokens: Project name = {projectname} or {P} Name field in Notes Browser = {notesname} or {N} Artist field in Notes Browser = {notesartist} or {A} Sample rate = {samplerate} or {sr} Bit depth = {bitdepth} or {bd} Channel format = {channelformat} or {cf} Track name = {trackname} or {T} Track number = {tracknumber} or {t} Date = {d} Tempo = {tempo} or {b} Meter / time signature = {meter} or {m} Key = {key} or {k} Task = {taskname} or {TN} Press the Build Filename Using Tags button to display all available tokens. Most tags have a long token and a short token. For example, the project name token can be {projectname} or {P}. Each tag’s tooltip shows its full and abbreviated tokens. To always use abbreviated tokens when you click a tag, select Use Abbreviated Tokens in the filename builder pop-up panel. You can freely use either format. Tokens can be combined as in the examples below: {notesartist}_{notesname}_{d} {notesartist}_{notesname}_{samplerate}_{bitdepth}_{channelformat}_{d=Ymd} You can combine tokens and regular text, as in the following example: Client Name_{samplerate}Hz_{bitdepth}b_{channelformat}_{d=Ymd} Saving filename presets You can save your custom export filename format as a preset in the filename tag panel. To open the filename tag panel, click the Build Filename Using Tags button next to the filename edit box. To save the current filename as a preset, type a name in the Presets combobox, then press ENTER or click the Create Preset button . To delete a preset, select the preset in the Presets combobox, then click the drop-down menu and select Delete Preset. By using filename tokens to define a naming scheme and saving the filename format as a preset, you can reuse the presets in any project without having to manually type a filename. Misc. export enhancements Improved support for exporting track stems Creating per track mixdowns commonly called track stems is a common post production requirement when exporting projects to audio. There are several convenient improvements to aid with the process of exporting stems without modifying the source project: Use Tracks Through Entire Mix in the What to Export section to quickly exports the audio from each chosen track as heard through the main output. This is a useful way to create track stems as heard through master effects. Aux track and sidechain track dependencies are now automatically included when exporting individual tracks as well as when soloing such tracks. Use Track Folders in the What to Export section, to export the tracks in each of the selected track folders as heard through the entire mix, as separate files. Use the fly-out project selection editor in the What to Export panel to modify the current track selection or set the mute and solo status of each track and bus, without exiting the Export Audio dialog box. This is a convenient way to create export tasks for stems. Simply solo the tracks that you want to include in the stem, then add as a new task. Improved handling of aux tracks and sidechains when exporting or soloing tracks When exporting with source category Tracks, sidechain or aux track sends or outputs are now properly included in the export for the track containing the sidechain. The same applies to aux tracks. When soloing a track that contains a sidechain plugin, any sends from other tracks in the project are now automatically included, similarly to how it behaves with sends to aux tracks. Automatic effects tails flushing during bounce Many VST plug-ins do not properly flush their effects tails via reset state transitions. In some cases, exporting multiple clips or arrangements could result in tails unexpectedly appearing in the export/bounce. To address this, Cakewalk now automatically flushes effects tails during export/bounce operations to prevent left over effects tails from leaking into exports or being heard. By default, tails are flushed until a threshold of -70dB is reached or 20 seconds of silence is detected, whichever occurs first. The dB threshold and max duration can be changed via the following variables in Edit > Preferences > Audio - Configuration File: BounceFlushTailsMaxDurationSec=n (0 to 60; default is 20; set to 0 to disable tails flushing) Effects tails maximum flush length while bouncing (seconds). BounceFlushTailsThresholdDb=n (-120 to -40; default is -70) Effects tails flush gain threshold while bouncing (dB). On export, the audio engine will first hard flush any effects tails from all active plug-ins referenced in the project, including track/bus effects, clip effects, effects chains, ProChannel as well as instruments. Flushing tails is done both pre and post bounce/export in order to prevent unwanted tails from sounding after a bounce or appearing in exports after playing a project. Effects tails flushing is done in efficiently using parallel processing when the multi processing engine is enabled and is normally very fast. Flushing progress is shown on the toolbar during the bounce. If you wish to disable this, set BounceFlushTailsMaxDurationSec to zero. Default ‘Export Audio Files’ folder A new Export Audio Files folder path has been added to Edit > Preferences > File - Folder Locations. This path is used as the default location when you open the Export Audio dialog box. The default path is %PROJECTFOLDER%\Audio Export, which is an \Audio Exports subfolder in the current project directory. The current project folder is indicated by the %PROJECTFOLDER% environment variable. Tip: If you change the folder path in the Export Audio dialog box, you can restore the %PROJECTFOLDER%\Audio Export path by opening Edit > Preferences > File - Folder Locations and clicking OK or Apply. There is also a new content location preset in the Media Browser to jump directly to the Project Audio Export Folder. This preset always takes you to %PROJECTFOLDER%\Audio Export. Toast notification with link to open export location Upon completion of a single export job via the Export button, a toast notification appears with a link to open the export location in Windows Explorer. If the toast notification has been closed you can reopen the project audio folder again by selecting the media browser content location preset Project Audio Export Folder. Updated Bounce to Track(s) dialog box The Bounce to Tracks(s) dialog box has been redesigned similar to the Export Audio dialog box. Improved AudioSnap transient detection The transient detection algorithm has been greatly improved to more accurately detect audio transients in a variety of source material. Transients are useful when using audio snap and are also used for time stretching as well as when snapping to the transient pool. The AudioSnap transient detection method can now be specified in Edit > Preferences > Project - AudioSnap under Transient Detection. There are three methods: Magnitude Spectral (default for legacy projects) Multi-Resolution (default for new projects) Multi-Resolution is the new default transient detection method for new projects, and Spectral and Magnitude are the older legacy modes. The Multi-Resolution transient detection algorithm provides improved transient analysis that works well with most audio source material. The detection mode is stored in the project and older projects will continue to use Spectral until changed via Edit > Preferences > Project - AudioSnap. Note: The new transient analysis will not be used by default on previously saved projects. You must explicitly pick the Multi-Resolution algorithm from Edit > Preferences > Project - AudioSnap before this will take effect for that project. Once you resave the project with this change it will continue to use the new algorithm for all audio. When the detection method is changed, you will be prompted that project audio waveforms will be recomputed. After regeneration of the waveforms are complete, the new transients will be visible when switching the edit filter to Transients. The default transient threshold (available in the AudioSnap palette) is different for each transient detector mode. Note that any edited transients are retained when switching the transient detector mode. Misc. enhancements Mackie Control revspread VPot DataType On the Mackie Control surface, a VPot’s datatype defines the type of control being edited and how it should be displayed on the VPot LED halo. Currently, the Mackie Control surface supports a spread DataType for the LEDs that surround the VPots. The LEDs start in the middle for small values, then "spread" around the VPot for larger values. With certain parameter types, such as an equalizer "Q" setting, where a small Q value means a large spread, and a large Q value means a narrow spread, the VPots show the opposite in the LED spread, which is confusing. To address this, the Mackie Control surface now supports a new revspread VPot DataType that can be assigned in MackieControl.ini (C:\Program Files\Cakewalk\Shared Surfaces). With the revspread VPot DataType, high values show a narrow LED spread, and low values show a wide LED spread. This doesn't affect the actual numerical value being shown, just the way the LEDs spread around the VPot. For details, see the instructions in MackieControl.ini. Allow multiple MIDI files to be dragged into a project simultaneously You can now import multiple MIDI files into a project by dragging from Windows or the Media Browser. By default, multiple tracks are created. To import back-to-back instead, hold down CTRL+SHIFT when dragging the MIDI files into a project. ASIO driver compatibility checking Some ASIO drivers, such as Realtek ASIO, ASIO4All and Generic Low Latency ASIO Driver, are known to be incompatible with Cakewalk and can lead to instability or crashes. Cakewalk will now detect use of known incompatible ASIO drivers and warn the user to switch to a different native ASIO driver or WASAPI Shared mode for a better experience. Note: This warning doesn't prevent you from using these drivers. If you need to use them for some reason you can still select and use them. Bug fixes Stability Crash Freezing Track with synth in project Crash when bouncing with sidechain FX Crash exporting user project as OMF Crash when cloning track with synth envelopes UI Aim Assist draws incorrectly after collapsing/expanding MultiDock Arm Tracks command arms hidden audio track in Instrument tracks Aim Assist can appear unexpectedly when turned off Selection module does not automatically update display after setting display times to SMPTE Misc. Process slide not sliding some track envelopes Paste Special behaves unexpectedly when combining Paste to One Track and Paste Into Existing Clips When the Snap module set to Measure or any value below that in the list, the Snap Value drop box fails to turn snap on/off Save Copy As MIDI interferes with project cwp save Last File 1-4 key bindings are all linked unexpectedly Unable to copy/paste multiple Arranger tracks between projects Modal message boxes do not always disable the main app window Cannot copy special selection with tempos from SONAR to Cakewalk Latest release notes are here. See prior release notes. Check out all new features released to date.
    1 point
×
×
  • Create New...