


bitflipper
-
Posts
3,370 -
Joined
-
Last visited
-
Days Won
22
Everything posted by bitflipper
-
When my MOTU 828 abruptly died, it caught me off guard with no money for a replacement. I went with Focusrite, just because it was cheaper than another MOTU would have been (and way cheaper than what I really wanted, an RME). Fortunately, despite making my choice based on cost alone, I lucked out. The Focusrite has turned out to be an excellent interface. It has all the features of the Ultralite and then some (e.g. 2 headphone outs, 2 front-panel mic inputs). I still think the Ultralite is a good choice, though.
-

Transposing FXReverb (32bit) settings to another reverb...
bitflipper replied to Lisa Will's topic in Instruments & Effects
I couldn't get that .chm file to work. Comes up with section headings but no content. I don't have FXReverb on my computer anymore and don't recall what controls it had. Could you list them, or upload a screenshot? -
So can I have your copy of Albion ONE?
-
Create a symbolic link where your libraries used to be, using the mklink command. Kontakt will think they're still at the old location but Windows will actually silently redirect it to the new folder. For example, let's say you move the Kontakt 5 factory library from drive c: to drive d:. I don't remember what the default installation path is, but for purposes of this example assume the old path was c:\Kontakt\Kontakt Factory Library, and now you've moved it to d:\Kontakt\Kontakt Factory Library. Presumably, you also deleted the original folder. Open a command prompt and type the following: c: cd \ mklink /D Kontakt d:\Kontakt That's it. Now, when Kontakt looks for the old folder named "Kontakt" on drive c:, it'll find it. It will look just like the real folder and all programs will treat it as the real folder, but none of the data is actually on the c: drive.
- 1 reply
-
- 1
-

-
I think you've made a safe choice. We've never done a proper poll on what interfaces people are using, but based on years of forum discussions the Ultralight appears to be one of the most popular models in use. I was a happy MOTU user for many years, until the unit died. Be aware, though, that the company is very Mac-centric and appears to have like maybe one guy working there who's conversant in Windows drivers.
-
So I assume that when you deleted those bogus markers the video stutter went away? Never seen anything like this, and don't have a good explanation, sorry. Although I'm pretty sure the final explanation won't be "the new update is terrible". It's unlikely you accidentally hit "M" 10,000 times. More likely, the problem lies with the keyboard itself. Is it a wireless model and/or a programmable one? Do you use software that lets you define keyboard macros? Have a peek under the "M" keycap and check for lint, crumbs or dead insects that might cause it to stick. True story: I had a keyboard whose spacebar would sometimes stick - removed the keycap and found a sticky orange residue in there. It was from my grandson's juicebox. He thought he'd cleaned up the evidence, but because he'd not yet entered grade school it had not yet been explained to him how liquids work.
-
This is one of my favorite delays for vocals. That's partly because it has no tempo sync. If you're looking to fatten vocals, tempo sync is not your friend.
-
Computer keys not recognized in certain plugins.
bitflipper replied to Michal Ochedowski's topic in Cakewalk by BandLab
Unfortunately, there isn't likely to be a universal solution because the issue isn't with the plugin or with the DAW, but rather with Windows and how it decides where to route keystrokes when multiple windows are visible. -
If bad timing is all you're after, any non-drummer tapping on a keyboard can do that.
-
Back when SONAR cost $500 they could throw in lots of cool third-party stuff that they'd licensed from other developers. The effects you now get for free are limited to what CW owned outright at the time its IP was transferred to BandLab. AFAIK CW never developed their own convolution reverb, preferring to license one from a third party (Voxengo). Fortunately, there are free/cheap convolution reverbs out there, and they all do a decent job. I should also note that convolution reverbs, although once extremely popular, have since been relegated to specific applications where you want to replicate an actual acoustical space. Nowadays algorithmic reverbs are far more widely used than convolutions.
-
Amanda Peet on Keyboard and The State of Education in Ameirca
bitflipper replied to Bapu's topic in The Coffee House
"The State of Education in Ameirca" - it all went to hell when they stopped teaching phonetics. -
Not seeing such behavior here. Is it a particular project you see this happening with?
-
Velocity marking in Pianoroll.
bitflipper replied to Paw Vester Kristensen's topic in Cakewalk by BandLab
The feature already exists. scook told you how to do it. If that's too complicated, just select your low-velocity hits by dragging a selection square in the controller pane. Adjust them as a group. They won't all be the same velocity; their ratios will remain intact. Of course, if you want to adjust just the kick you'll have to first isolate those notes into another track. Fortunately that's quick and easy to do.
-
sales KONTAKT 6 50% Off Until The End Of September
bitflipper replied to Simeon Amburgey's topic in Deals
Do you mean the update doesn't include the factory library? Or that it is identical to the K5 library? As noted in the previous post, you need to keep past versions if you've used the factory library in past projects. Even if 99% of the content didn't change. The only good thing to come out of the trauma of having my old computer stolen and all my projects lost was that it allowed me to delete the factory libs for K2, K3 and K4. -
sales KONTAKT 6 50% Off Until The End Of September
bitflipper replied to Simeon Amburgey's topic in Deals
Just occurred to me that I'd also have to buy another disk drive if I want to retain the older Kontakt factory libraries. I currently have two 1TB drives dedicated to samples, both nearly full. -
sales KONTAKT 6 50% Off Until The End Of September
bitflipper replied to Simeon Amburgey's topic in Deals
That's what it always comes down to: some must-have library comes along that demands an upgrade. Maybe history will repeat, I don't know. I already have well over a terabyte of Kontakt libraries. Every instrument category from basses to jug percussion is already covered, often many times over. My wishlist is currently empty. My favorite library developers sensibly (why intentionally limit your customer pool?) remain on K5 and probably will for some time. I go through this with every Kontakt release. As well as every iZotope release and every FabFilter update. Eventually, they'll get me with a price I can't refuse. Fifty bucks may just be that magic number, but I still have to justify it in my head. I do like vocal libraries, though. -
sales KONTAKT 6 50% Off Until The End Of September
bitflipper replied to Simeon Amburgey's topic in Deals
I have Kontakt 5 (as well as 2, 3 and 4). It's stable, hosts all my current libraries and offers all the features I need. I don't need Kontakt 6. Please - anybody - convince me I'm wrong. -
Man. I have missed SONAR (uhmm Cakewalk)
bitflipper replied to Stephen Rybacki's topic in Cakewalk by BandLab
Welcome back, SiberianK. You weren't the only one who panicked when Gibson locked up the office. Many migrated to other DAWs, with the most popular destinations seemingly Studio One and Reaper. I was not among the refugees. However, I did try just about every Windows-based DAW out there, just so I'd have a backup plan (I liked Samplitude, only because it was most similar to SONAR in workflow, but not nearly as sophisticated.) But I kept on using SONAR, knowing that a) it wasn't going to suddenly stop working, and b) already had all the features I needed. The good news is that today's Cakewalk is in fact SONAR under a new banner. This would be, what, SONAR X6 by now? Same brilliant fellow is handling its development, except that now the focus is on usability and stability enhancements rather than marketing-driven bells 'n whistles. Although there have been some truly excellent bells 'n whistles added that even a set-in-his-ways curmudgeon like me can love. Articulation maps! -
How to create muffled-to-clear audio intro?
bitflipper replied to Dave G's topic in Cakewalk by BandLab
Automate the cutoff frequency for the filter(s) in the EQ. That's a little tricky if you're using the Sonitus "Telephone" preset, as it uses three filters, IIRC. But do-able. When I do that particular effect, three automations are involved: 1. Cutoff frequency on a high-pass filter is automated (start high, automate to gradually lower) 2. Volume is automated (quieter at start, then louder as the full-frequency range comes in) 3. Reverb send is automated (more reverb transitioning to less reverb) -
What's the story with Snap enable/disable in PRV?
bitflipper replied to Keni's topic in Cakewalk by BandLab
My grid's always visible whether snap is enabled or not. Is there more than one way to toggle it? I always click on the snap unit button to turn it off and on. I don't really care whether the TV and PRV snap settings are linked, because I don't actually ever use grid snap in the track view, only in the PRV. That's just me, though.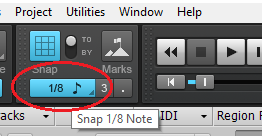
-
Some plugins require an extra step to authorize them. I don't know about your specific instrument (I have a policy about never buying any product that uses the word "Beatz":) but instructions were either included with documentation you downloaded or perhaps in an email they sent to you after purchase.
-
Exactly. You want all the tracks to be in sync with one another, and Cakewalk goes to great pains to assure that's always the case. Consequently, total latency can never be shorter than the most time-consuming effect. There is really only one reliable solution: track dry and add effects later. Even with a very fast computer, any fx that require significant internal buffering (e.g. reverb) is going to determine latency regardless of CPU speed or buffer sizes. Everybody's approach is going to be a little different. Personally, I am never concerned with latency at all. That's because I treat fx as part of the mixing and/or mastering phase, separate from tracking. My buffers are always at 2048. Direct monitoring through my interface lets me do that for audio inputs, which are always either recorded dry or with external fx. My solution for MIDI tracking might not suit you, though: I use an external synthesizer, recording only MIDI, and then substitute a soft synth afterward. It's a simple process and I don't have to jump through any hoops to keep everything in sync.
-
This problem didn't occur during registration, but rather during installation. The error code suggests a corrupt or missing file. When you re-install it, do so as Administrator. That should take care of it. But if the problem persists, try renaming the Melodyne folders files and re-install again. Melodyne lives in c:\program files\Celemony, c:\program files\Common Files\Celemony, and c:\program files\Common Files\vst3\Celemony.
-
Yup, that's how it's supposed to work. Any time I plop notes into the PRV by hand, copy-and-paste bits or append an existing MIDI clip, I end up with many clips. It's really not a problem; the last thing I do on such a MIDI track is select the entire track, right-click on any clip and select "Bounce to Clip(s)". That combines all the little clips into one big one.
-
Quick way to create the stutter effect?
bitflipper replied to Paul Montgomery's topic in Cakewalk by BandLab
If you're after simple pulsating rhythms, as opposed to being sequenced, any tremolo plugin will do the trick. Create a bus, route all the tracks to it that you want to effect this way, and insert the effect on the bus. Meldaproduction has a free one that lets you morph the LFO waveform. Cakewalk's own Sonitus Modulator can do it, too.


