


-
Posts
8,666 -
Joined
-
Last visited
-
Days Won
30
Everything posted by Starship Krupa
-
Once you have it, be sure to go to their sounds store and grab the following freebie preset packs: Ambient Soundscapes Ariel Proksa's Signature Bass Music Powerpack Dark Ambient Hansen's House House Chords Iconic Vibration Luminescent Lyli’s Signature Marc Houle's Signature Past To The Future Percussive Drive Starcadian’s Signature There's a bundle with Glitchmachines' Convex (their multieffect unit) and a new multiband delay from W.A. Production called Multibender, as well as noted resource hog SoundSpot Union. Glitchmachines' Palindrome, which is that trippy thing with the rectangular tunnel grid, is $10. There 5 SoundSpot "5 for 5" bundles for those who don't yet have every single SoundSpot effect under the sun from previous free-with-purchase offers. Cyclone, Glitch, Voxbox, and Overtone are in some of them and are all good.
-
I know about the base octave setting. But if I set that there are other MIDI-triggered plug-ins I have that don't line up, so I just leave it as-is and go with the transposer plug-in. It also has the advantage of being on a per-track basis, in case I have some other plug-in that uses some other convention.
-
Sigh. Yeah, I really wanted to like Stutter Edit 2, I thought it would be the way to level up on glitch and stutter effects. Had a hard time doing anything but browsing presets, so I took advantage of a trial membership at Producertech to take their course. Even after finishing the course, I still don't use it with anything but the presets, and infrequently at that. If one were to master it, it would be really powerful, but I pretty much just use stutters and glitches as a bit of seasoning in my ambient tracks, Chris Zippel style. A deep dive doesn't seem worth it at the moment. I agree about the UI and preset browser. Even just following along in the course, I kept getting into situations where none of the controls would move. I think it was behaving as designed, but it's poor design to let your users get stuck in potholes. One issue I found with Cakewalk is that the note names are 2 octaves off from what Cakewalk uses. No biggie if you put a MIDI transposer plug-in on the track, but something to be aware of if you can't get it to do anything. Still, it's worth $10, even if you only use it with the factory presets. There's no shame in presets. ?
-

All of my themes updated. Various small fixes and improvements
Starship Krupa replied to Starship Krupa's topic in UI Themes
Oh, I see, you thought that once it was imported, the name field would read "Blue Midnight" (or whatever). I agree that it should. Unfortunately, Cakewalk doesn't seem to pass the string. For confirmation that the import worked you can see the changes to the colors immediately if you have a project open to Track View. My custom color sets make the grid lines much more visible, especially the measure lines. I have a harder time seeing the grid lines if I don't have one of my custom color sets loaded. As a native English speaker I appreciate the work you've put in to learn it. Written English is difficult, too much old code. ? -
Move tool is moving every track!
Starship Krupa replied to RICHARD HUTCHINS's topic in Cakewalk by BandLab
Cakewalk got the Ripple Edit indicator in one of the first BandLab updates, so I've never known Cakewalk without it. I can only imagine the forehead contusions from continuous slapping. -
All of my themes updated. Various small fixes and improvements
Starship Krupa replied to Starship Krupa's topic in UI Themes
Can you elaborate on this? I think there may be a language barrier. Click on Import Colors, then from that dialog, browse to whatever folder you downloaded the .CLR, then select the one you want and click Open. That should result in the color preset taking effect. Once it's imported, type the name of the preset into the selection box and save it. These steps work just fine on my system. -
Are you using the latest ASIO driver from Soundcraft? What John said about leaving the Realtek alone and using only the Soundcraft is very good advice. Recording through one device and playing back through another on the same system is just a recipe for needless trouble. If you have everything pared down to just Soundcraft ASIO and you are still having latency issues, Latency Mon is a great utility for figuring out what processes or drivers are causing high latency on your system. That said, latency is only really an issue when playing softsynths in real time and when tracking audio. Your Soundcraft should be able to let you monitor realtime through itself without having to go through the DAW.
-
BUNDLE OR .CWB FILES ARE YOUR FRIEND.
Starship Krupa replied to Waldemar Pawlik's topic in Cakewalk by BandLab
One thing to know, especially when recording multiple takes of drums, which usually have, at minimum, 4 mics is that during playback, Cakewalk streams every audio file in the project whether the track or lane or clip is muted. So let's say you're using 6 mics on your kit, and you record 5 takes before you start comping. At that point, you'll have 30 audio files streaming from the disk every time you hit Play (or begin overdubbing). The way I found out about this is that I once had a friend do 20 takes of drums on my kit with 4 mics on it. That project got kinda sluggish, so I set about trying to figure out why. I used Resource Monitor to see what Cakewalk was doing. What can you do to alleviate it without deleting the tracks or takes? Archiving tracks stops the audio in them from being streamed. What I do to set takes aside until I'm ready for them, or just for deep storage in case I want to use them for further comping is that I drag the takes to new tracks and then put them all in a folder and Archive them. Mr. Cook and I have advocated for a means to archive Take Lanes in addition to entire tracks, but it doesn't seem to be on the horizon yet. -
Cakewalk by BandLab Wikipedia article now live
Starship Krupa replied to Starship Krupa's topic in Cakewalk by BandLab
Licensing section has now been updated to include references to the web installer. Something I'd like to add is a Cakewalk by BandLab logo, but the BandLab website doesn't have any logos that are specifically designated as licensed for creating other works. Wikipedia are very strict about image licensing, so I had to leave that out for now. You can't just grab a screenshot and put it up there. If anyone has any information or suggestions, let me know. -
Cakewalk by BandLab Wikipedia article now live
Starship Krupa replied to Starship Krupa's topic in Cakewalk by BandLab
Good heavens, the article is only a day old and already the information is out of date. ? In the how-to articles about publishing new content, they say that once you publish a new article, you will be making many changes and additions to it before it settles down. -
Cakewalk by BandLab Wikipedia article now live
Starship Krupa replied to Starship Krupa's topic in Cakewalk by BandLab
Ah, thanks Steve. I couldn't remember where to find the web installer. I only put that section on licensing in there because it's been a topic for so much discussion. I had to make a case with TPTB at Wikipedia not to get the article speed deleted when I published it. Now that it's there I (and others, of course, anyone can edit Wikipedia articles) can touch it up at leisure. The hard part is done. -
Computer Music #304 February 2022 - Free Synths: u-he Zebra CM, Fathom CM2
Starship Krupa replied to abacab's topic in Deals
I agree that I get a twinge every time I see it, but if I'm honest that's because I've taken advantage of Beat magazine's freebies without buying the issues. Not from hints in the forum, but via hacking the clues via context. In this case, I did buy the issue because while I was horking the freebies, I noticed that the issue was devoted to a favorite topic of mine, actually finishing things. It was worth dropping some coin to get some hints about that. The topic title should more accurately read "No software piracy please." I give the @Wookiee a break, he's got a tough, mostly thankless task in moderating the forum. He saw a bud forming and nipped it. Also letting any involved companies who might get alerted to the goings-on that BandLab have taken steps to discourage it. Cakewalk is already virtually invisible to these magazines, so they don't need to make it worse (not that it could be any worse in that regard). We were kinda being bad boys, IMO. Beat and CM and the software companies that offer up these premiums have been important to my development as a mix engineer. Magazines have a hard row to hoe these days, and Beat just took the step of expanding into the English language market. It's hard to hang on to my ethics when A|A|S soundpacks are dangled, though. ? -
Computer Music #304 February 2022 - Free Synths: u-he Zebra CM, Fathom CM2
Starship Krupa replied to abacab's topic in Deals
Go into your account area and you can manage your subscriptions, including disabling auto-renew: -
Whoo, it's finally there! I've been editing Wikipedia for years but had never created an original article. Quite the learning experience. I also went around to the various lists of audio software and company pages and updated them to link to this article. https://en.wikipedia.org/wiki/Cakewalk_by_BandLab
- 7 replies
-
- 17
-

-

-

-
Nostalgia on Humble Bundle .. Remember MYST
Starship Krupa replied to aidan o driscoll's topic in Deals
It is said that Myst was the killer app that sold CD-ROM drives, finally made it so that every computer had to have one. It had a very light profile on the HD, the resources were loaded from the CD-ROM as the game progressed. It required a double-speed drive, if you had a quad-speed CD-ROM, you could really fly in Myst. I think it came on two discs, you had to swap the second one in when you passed a certain point in the game. So with the "masterpiece" 24-bit graphics and 360 engine, no surprise that they're bigger now. Friend or coworker says "hey, check out this game I'm working my way through," person expects an FP shooter or arcade style, person sees this richly-detailed mysterious deserted island with cool vaguely unsettling sound effects and music constantly running in the background, person buys both the Myst CD and a drive to run it on. It and The 7th Guest were games that drew in non-gamers because they looked beautiful and exercised the brain more than eye-hand coordination. I still remember the day I walked into Fry's in Sunnyvale and saw The 7th Guest running on a PC they had set up. I thought to myself "this is going to change everything." I went back to work and told all of my fellow employees who were into games that they had to check this thing out and tell me what they thought. Their opinion was that the puzzles themselves were not that great but that the game as a whole was very engaging due to the pretty pictures. I never did solve The 7th Guest, but I did finish both Myst and Riven. Can't remember if I did Exile. Chris Brandkampt and Robyn Miller's work on the Myst soundtrack raised the bar for sound in video games. Miller's soundtrack music itself was eventually released by Virgin Records. Never played Revelation, End of Ages, Uru, or Obduction, so this seems like a heckuva deal. Bonus: they should all run really well on my systems. -
All of my themes updated. Various small fixes and improvements
Starship Krupa replied to Starship Krupa's topic in UI Themes
Thank you! The instructions for how to import the .clr file are in the .txt files in each theme's Dropbox folder. "...download the .clr file, then in Preferences>Customization>Colors, click "Import Colors." Browse to where you downloaded the .clr file." It should import from any location you downloaded it to. -
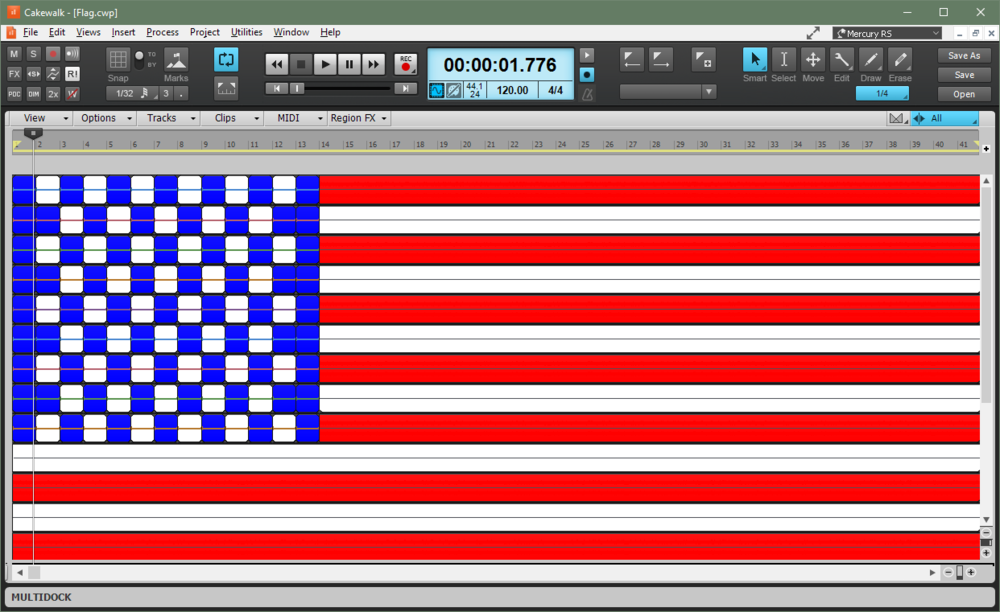
I was checking the official Cakewalk Instagram page (which is looking kinda dead) and saw that someone had done a German flag in this way to congratulate the German team for winning the World Cup, IIRC. Figuring out the fastest path for doing this, including setting the clip colors, slip editing, Groove clipping, copying and pasting, etc. was really good for honing editing/comping chops on a project with nothing musical at stake. Made in America, adopted by Singapore, currently developed in multiple nations.
-
- 5
-
-
Stuff you ignore in a DAW because you think 3rd party is always better
Starship Krupa replied to kitekrazy's topic in Deals
It is this process that has the biggest impact on Cakewalk startup time on my systems. It takes longer to scan that one shell than it does to start Cakewalk if I have plug-in scanning disabled. I've considered disabling automatic scanning for this reason. Not that I use their stuff all that often, but Analog Delay is a goodie for when I want that kind of sound. -
Lyrics in Staff View and Lyrics View don't match up.
Starship Krupa replied to Rick Rickoff's topic in The Coffee House
@Rick Rickoff and others, this is important information better reported in the Feedback Forum where the developers are likely to read it.- 7 replies
-
- 1
-
-
- lyrics problem
- lyrics view
- (and 2 more)
-
Buy an issue and you get their extensive collection of plug-ins along with it. Some real gems in there.
-
compressor sonitus compressor disappeared
Starship Krupa replied to jdbeatboss's topic in Instruments & Effects
De nada.... -
compressor sonitus compressor disappeared
Starship Krupa replied to jdbeatboss's topic in Instruments & Effects
From the Main Menu: Utilities/Cakewalk Plug-In Manager. Look in the right-hand panel as shown below. If The Sonitus Compressor is not in the list, select Show Excluded below. If the Sonitus Compressor is now in the list, click on it and then click Enable Plug-in. This procedure can work for other plug-ins that mysteriously disappear from the menus. Plug-ins can get excluded if Cakewalk runs into any problems while scanning them at start-up. Sometimes it will exclude a good plug-in by mistake.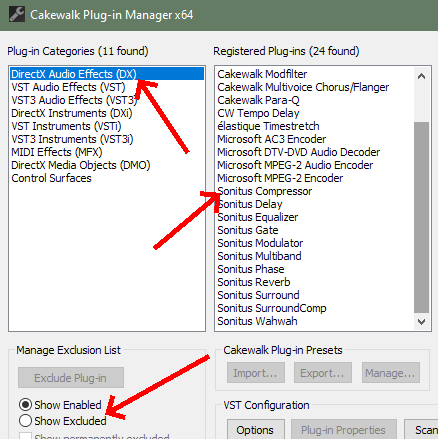
- 6 replies
-
- 2
-
-
- sonitus fx
- plug-ins
- (and 2 more)
-
I'm not of the opinion that Cakewalk is losing share in the overall DAW market. Compared to 4 years ago, there are now multiple YouTube channels dedicated, or largely dedicated, to Cakewalk tips and tutorials. There's a good balance, too, with, for instance, @Xel Ohh and @AdK Studios covering hip hop/EDM methods and @Creative Sauce leaning more toward the traditional "recording studio" approach. There are others, too, and they're all very good, I've learned things from all of them. As for why there's not more coverage in traditional print media, I think that's down to the aforementioned zero budget for marketing, and, unfortunately, the free license model. BandLab don't buy ads, period. Now whether magazines are biased toward companies who do, I'll be charitable and say that it helps keep them off the radar, because the magazines' staffs don't pay attention to the product. There has always been a certain amount of quid pro quo in publications: buy our ads and we cover your products. BandLab are outside that loop, despite owning multiple music publications. The magazines know that even if they did a cover story on Cakewalk, BandLab wouldn't buy an ad in the issue. I think REAPER has the same issue: Cockos don't spend money on advertising, and consequently are never featured in SOS or CM or Beat. The fact that it's Windows-only, IMO has little to do with it, as Logic is regularly covered and only made for a much smaller platform. Mixbus and REAPER even run on Linux and you never see articles about them either. As far as hardware and other integration, sadly, our cherished freeware licensing model likely impacts that, as companies may see users of a freeware DAW as being either broke or cheapskates who don't like to spend money on music making tools. Something that also impacts it is that there are no staff dedicated to selling other companies on the benefits of integration with their products. The way it works is that at the very least, someone reaches out via phone or email and pitches the other company on how popular their DAW (or whatever) is and how their users are clamoring for better integration with their devices, how they'll both benefit from the companies being able to advertise (oh, that word again) the integration. This is one of the things that going to NAMM in Anaheim is great for, it lets companies be visible to each other and the press, and gives them a chance to stop by booths and schmooze. But we've lost the NAMM Show due to the pandemic. It used to be a good way to catch headcolds, so the caution is well-founded. That's my take on why Cakewalk gets so little press. What's worked well for REAPER is grass roots advocacy by an enthusiastic user base. That can be annoying at times, as it can come across as proselytizing. But suggesting it when someone on a forum or IRL or wherever asks "what's a good DAW?" helps. Also mentioning in notes on your Bandcamp or SoundCloud page that you made it in Cakewalk. I try to do my part and "give back" by helping people out on this forum (and occasionally on Facebook), creating multiple themes for public consumption, and submitting thorough bug reports, and the aforementioned Wikipedia editing. Remember, anyone can edit Wikipedia. There are entries for Sonar, Cakewalk, Inc., and the original program called Cakewalk. They were a mess before I edited them; grammatical errors, factual errors, timeline errors, missing information. The current program is still waiting for its own entry. So I think that for now, at least, grass roots promotion by the userbase is all Cakewalk can get. The dev staff are all industry veterans who know their way around, but they were really hired to develop, not market. Noel does keep the KVR entry up to date with each release.
-
These are all fine ideas, but they require employees or consultants to do them. As far as I know, the only staff on Cakewalk are the developers and support. From my observations, BandLab's promotional budget for Cakewalk is next to nil. The only money I've seen them spend was sending some staff to Anaheim for the NAMM Show a couple of years back when we used to have NAMM Shows. I've suggested that there be Cakewalk laptop stickers and t-shirts made available for purchase. I've done some cleanup work on a few of the legacy Wikipedia pages, and made sure that Cakewalk by Bandlab is on all of the lists of DAW's and audio software, but there's still no page for Cakewalk by Bandlab itself.
-
I'm in favor of exposing as many commands as possible to keystroke bindings.

