


-
Posts
8,666 -
Joined
-
Last visited
-
Days Won
30
Everything posted by Starship Krupa
-
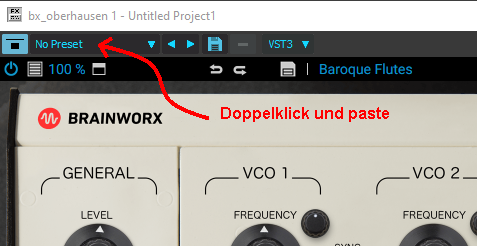
You know, the field up at the upper left that says No Preset until you double click on it and type a name for the preset you want to save and then click on the little floppy disc button to save it. Like this: Cakewalk actually stores these in <username>\AppData\Roaming\Cakewalk\Shared Presets. Each plugin seems to have its own folder labeled with a GUID-dy string. Inside these folders are the user's presets. I'm still working on how to propagate them across my various computers. I'm sure the GUIDish folder names are unique to each plug-in, but I don't know yet if the folder names will be the same across multiple computers. In any case, once you figure out which plug-in goes with which folder, you can probably copy them across. The challenge is to reverse-engineer the Cakewalk user preset files themselves, which have no extension, and see if it's possible to write a translator program. The best thing would be if Cakewalk is storing them in the VST3 spec's .vstpreset format. Then you could just drop them in and strip the .vstpreset extension off. Or you could do what I do, throw The Mandalorian on one screen and bang VST presets into the dialog on the other. Oh wait, wow. I just saw your reply to Steve. Did you not know that you can save your own presets in Cakewalk? If not, then I have now repaid you for the Shift-D key combo you bestowed on me. That was life-changing. I use it about every 5 minutes.
-

PA JOINSOUNDWIDE important if you haven't redeemed yet
Starship Krupa replied to Craig N's topic in Deals
Oh that is sweet. Like Waves, but better. -
PA JOINSOUNDWIDE important if you haven't redeemed yet
Starship Krupa replied to Craig N's topic in Deals
I guess I'm fortunate in that I have no idea what this thread is talking about in regard to dynamic discounts and getting plug-ins for nearly free. When I cashed in my 6 plug-ins voucher, I thought the cart said that it wasn't eligible for any dynamic discounts because of the voucher. I like being able to get things for next to nothing, but I don't understand how you all are doing it. How would I know if I have any coupons or whatever? They don't seem to list that stuff with my account the way that other places do. I think at this point that the only one of their products I would like to obtain is bx_refinement. I already have so many PA FX! I recall someone saying at one point that if you have all 3 of the Lindell "500" series FX that you get the Channel X framework for free, but I only see it listed at full price even though I have the set. -
I've posted about this in a few Plugin Alliance threads. Except for the Unfiltered Audio stuff, which has built-in plug-in management, the way to access presets for most Plugin Alliance plug-ins is via the "VST3" menu in the plug-in UI in Cakewalk. Up there at the top, usually a bit left of center. Click on that and select "Load Preset" and it will take you to a standard Windows file dialog where you can load the presets. It was a great day when I discovered this, because I thought all of their stuff just didn't come with any presets. Most of them do, though. I did some research on this, and they actually use the canonical locations and format specified by Steinberg. Aargh, once I discovered the preset situation with PA, and the fact that they were in the canonical locations (and format), I posted a feature request asking if Cakewalk could get this feature. I didn't know that S1 already had it because all I have is Artist 4, which of course does not allow 3rd-party VST's, with certain exceptions. I think nobody else knew WTH I was talking about, so my feature request sank like a stone. Now I sit and watch TV and bash PA presets into the Cakewalk system the hard way, one at a time. Go to Load Preset, copy preset name from file dialog, paste into Cakewalk's preset list, save, repeat 15-30 times.
-
What is the name of this term in Cakeland? (the wall)
Starship Krupa replied to Starship Krupa's question in Q&A
"Start" it is, I think. Thank you for the deep dive. -
One word of caution: I hope this means they've given more attention to their engine, because with the other stuff I have from them (notably Serenity Pro), they're kind of resource-y. Which for a ROMpler, is perplexing.
-
What I mean by "dry" is that I want no added reverb. Clean, mostly close mic'd hits. I'm picky about reverb, I use Exponential Audio and Meldaproduction's top of the line stuff. I'm usually trying for a sonic landscape where everything sounds like it's in the same space, and for me, that's harder to do if individual instruments are doing their own reverb thing. And with most (not all) VSTi's, the built-in reverb sounds to me like the onboard FX in a practice amp. This goes for virtual drum machines, too. I always go through and turn off all of the 'verb effects. I think companies load their VSTi's with internal reverb so that the patches will sound attractive when auditioning them. I'm looking at you, A|A|S.
-
I hear ya. From my POV, they're surely not all created equal. I like iZotope's, it checks for updates and downloads them, also keeping individual installers in your Downloads folder. Arturia's seems to work similarly. IK Multimedia's Product Manager is about the worst. Since they instituted it, I don't think I've had a single experience where it worked smoothly; I still have to fire up Authorization Manager and dance around to get everything to work. PA's is fine, but it doesn't do update checking, which is odd. Native Access would be okay if it didn't insist on spamming my drive with redundant copies of the plug-ins. I can delete the 32-bit and VST2 ones by hand, but then it complains that the installation is corrupt. I suppose that for safety's sake I should download and archive all of the individual installers for my PA stuff, but that's getting to be a pretty long list.
-
Fixed.
-
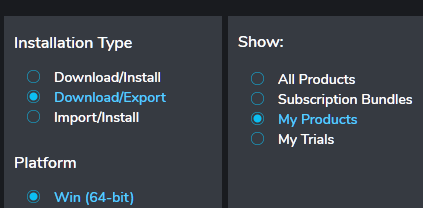
Indeed, and versatile as well. One concern might be that the individual installers might not be available for local archiving or reduction in download time/bandwidth. You can get around those concerns by using the Download/Export+Import/Install feature. Download/Export downloads whatever bundle you build, then you Import/Install using the Manager. A nice solution for people who want to have an archive of "the last version that worked without upside-down meters" or just don't feel like downloading everything over and over. I used it to snag only the Unfiltered Audio stuff after PA finally posted their 2021 builds. You still have to enter credentials and be validated via 'net to run the Manager, so it doesn't make for a completely offline solution. Smokin' pile of freebies. I only had one overlap, after mentally tossing the coin between Masterdesk and Refinement, I went with Masterdesk in the last sale, thereby helping to fund the giveaway. ?
-
Ha, I should have refreshed my browser, I guess. I knew there was no way I was firsties on this. ?
-
The scoop goes to Yan! Whompin' collection of freebies from PA, plus one each from NI and iZotope: https://www.plugin-alliance.com/en/blog/blogpost/items/introducing-soundwide.html
- 1 reply
-
- 6
-

-

-

-
freeze/unfreeze multiple tracks at once
Starship Krupa replied to John Bradley's topic in Feedback Loop
If something's not obeying Quick Group rules, it should be "bug reported."? -
Wow, I think I may have started using Brave because of your endorsement of it. I do see the page o'gobbledygook sometimes when I click on the results of a Google search, but I read up on it and Brave does that because it doesn't like Google Ad Services or something. Other than that Brave seems to be working quite well for me. Sometimes I have to tell it "shields down," so that I can get an ad-dependent site to let me aboard, but that's about it. It does sound like something unsavory crept onto your system, but I have no idea what could be done other than what you've already tried. The idea of getting web cooties that Malware Bytes can't handle is unpleasant.
-
Glitch: Clip Moving Violation When Snap Is On
Starship Krupa replied to sjoens's topic in Feedback Loop
I guess we'll watch and see if we can get a repro condition for the devs to work with. Heaven only knows why the program would suddenly start tripping over snap settings. -
freeze/unfreeze multiple tracks at once
Starship Krupa replied to John Bradley's topic in Feedback Loop
Yes, as there is room for one more button on Audio strips. Get that asterisk down there! -
This is especially a bugaboo for plug-in 'ho's like I admittedly am. Some manufacturers use the "Category" flags, which apparently never included "compressor," so compressors auto-sort into the "dynamics" category. It's actually easier when they don't, because I can look for the new plug-ins in the "uncategorized" category. I would love for recently installed plug-ins to be highlighted for, say the first 5 program starts after they are first scanned.
-
Glitch: Clip Moving Violation When Snap Is On
Starship Krupa replied to sjoens's topic in Feedback Loop
I think I saw this behavior just recently, and I think I solved it by changing my Snap settings. It may have been set to "By" when I wanted "To" or the value was set too high for the accuracy I wanted. Not 100% sure about this, but I do notice that your grid there looks like it's set to a whole note, which seems kinda big for moving clips with precision. I'd try turning off snap for a sec and then see what happens. -
What is the name of this term in Cakeland? (the wall)
Starship Krupa replied to Starship Krupa's question in Q&A
Yes, that's what I meant. Not what the graphical element is called, but rather the position. I apologize for not making that clearer and I thank everyone who responded. As in if I say "insert 2 measures at 1:01:00" Or "drag those clips to 1:01:00" I was wondering if there were a more colloquial term for "1:01:00." Nomenclature if you will. If I were to say "the beginning of the timeline" would that be accurate and understood? That's the basic issue, I just want to use the term that's most likely to be understood by other users of the program. I thought it might be "zero," due to the "RTZ" function, but really, there is no "zero," Cakewalk's timeline starts with "1:01:00." (I don't care for "the Wall" either, because to me, that's when my system has run out of resources to process audio. It "hits the wall" and I better either start freezing those synth tracks or change up what instrument I'm using. The only source I've heard it from was a friend of mine whose DAW is Pro Tools. He may have made it up himself for all I know, but he taught me a lot about using DAW's.) -
This is probably specific to different models of laptop, but my Dell Latitude also has the Intel graphics plus an extra nVidia GPU. It's set to run everything from the nVidia GPU, including Windows itself and all programs. If I remember correctly, it's a BIOS setting, to tell it that the nVidia is the primary GPU. Also, I think that's the default setting, otherwise, why even have a dedicated GPU? Do a Google search for your model of laptop with the question "how do I force XXX to use the nVidia GPU?" or similar. You will see better performance when using the GTX 1060; as mentioned earlier, some plug-ins, like Meldaproduction's and Newfangled Audio's, can use OpenGL for graphics processing, and since the 1060 likely supports a higher version of Direct X, anything that displays graphics will benefit. It won't necessarily "free up processing power," but just from the greater amount of video memory, and the faster speed of the video memory, things will draw more quickly. On my main system, I notice a marked difference in drawing speed between using my GTX 550 Ti and the onboard Intel HD graphics. With the Intel graphics, if I float the Multidock or individual views, they'll go black for a moment when I switch back and forth.
-
What I would like to see is the ability to drag the module separators up and down to resize. Or at least the separator between the Fader and Sends modules. These are all places where the user could resize, depending on their current need to view these modules (14" laptop screen like mine, or dual 23" monitors like mine): Currently, you can choose to hide or show certain modules, but that doesn't result in getting extra real estate for the faders. For me, the fader and pan controls are the most important ones on the console strips.

-
It's in every DAW, some call it "zero" or "the wall." The far left boundary of the timeline, beyond which you can't drag anything, yada yada. Don't say "Track Header," because the Track Header (or the Audio Scale, depending) is what is immediately to the left of it. What's it called in the Cakeverse?
-
I've taken to hiding my Audio Scale with the shortcut Shift+S (get it? It Shifts the Scale out of sight!) so that I can have that little bit of real estate back and because the only thing I ever do with the Audio Scale is drag it up and down to change the size of events. I've heard the starting point or left edge or whatever called "the wall," but there doesn't seem to be a canonical term for it in Cakewalkia. The Audio Scale is, technically, the element that's displayed immediately to the left of "the wall" in Cakewalk (unless I've Shifted it out of Sight).
-
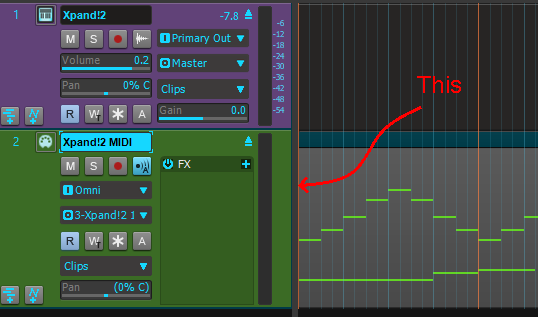
Well, specifically, I want them to be at the leftmost visible area of the clip header. So if a clip starts somewhere to right of the audio scale bar, it will show its name wherever it starts. That part is how it is now, and that's good, as shown in my screen grab. However, if that area is "behind" the track headers, the clip/group name(s) should slide to the right to remain visible. There shouldn't be any circumstance, short of there not being enough room, where you can't see the clip name and/or group number. Basically, there's no good reason for them to disappear when the left edge of the clip scrolls off screen. IMO, this would be a very useful enhancement to comping, especially with multiple tracks. When you're working multitracked grouped clips, it's important to know which groups (and takes) you're working with. (most of my comping-related feature requests come up when I've tracked drums and am trying to edit the takes)
-
Ah, I see. So the OP's "I've been wrestling with Cakewalk for years" comment takes on new meaning.

