


msmcleod
-
Posts
7,120 -
Joined
-
Last visited
-
Days Won
39
Everything posted by msmcleod
-
Cakewalk isn't an audio editor, but it's pretty simple to incorporate a 3rd party editor into the Utilities menu. SoundForge is probably the most popular editor out there, but others use Audacity or Acoustica. Acoustica Basic Edition v6 is free and is still available for download (under the Old Versions section) : https://acondigital.com/downloads/ @scook has written a utility to add 3rd party editors to the Utilities menu: https://docs.google.com/document/d/1eiVH_I1clbbRtWFh4-3Mo7HANjCxR8SwqHJtYXy19gw/pub This is how I set it up using scook's toolseditor: Once you've added it, you can edit any waveform in Cakewalk via the tools menu:
-
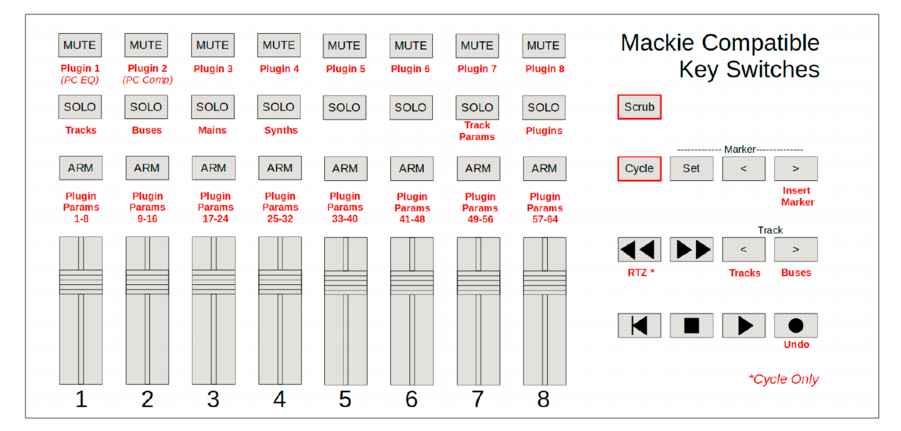
You can actually do a fair bit with the nanoKontrol 2 in CbB. I've still got mine, but it's stuck to the wall in my studio next to my vocal mic, so it's duties are limited to transport control & marker navigation. The cycle button can be used like a shift key to access other functions such as Track < > for switching between tracks & busses, and a bunch of other functions like plugin & synth parameter controls (using the pan knobs to change the parameter values):
-
Your old cakewalk.com should still be there, along with all of your products. IIRC X3 just needs the activation code, which should be listed with your products. If you're having problems accessing your old account, the support team can help - just send an email to support@cakewalk.com
-
I've got a Korg nanoKontrol Studio + Mackie C4 in the office, and a Mackie MCU/XT/C4 in the Studio... but as I'm constantly swapping between my laptop, office PC & studio PC, I must admit I don't use the control surface to its full. For tracking, I'll quite happy swap between the control surfaces, and the PC keyboard without a thought, but the control surfaces always come into play in two workflows: 1. At the beginning of mixing, when doing the initial rough mix balance 2. At the end of mixing, when doing my final bus automation. In both these scenarios, being able to control 8 faders at once (usually with my eyes closed) is a huge plus.
-

switch melodyne version in cakewalk?
msmcleod replied to Jono J Grant's topic in Cakewalk by BandLab
Normally Melodyne 4 is uninstalled (and its license removed) when you install Melodyne 5. It sounds like you've got some Melodyne 4 files lying around in your scan path. You'll need to find them and either remove or rename them... I recommend renaming to them to .old just in case you get the wrong one. Might be worth getting in touch with Celemony - they might be able to shed light on as to why Melodyne 4 wasn't removed. -
Maybe look at a Fernandes Burny : https://www.hotroxuk.com/burny-rlc-85s-sustainer-with-floyd-rose-trem.html I believe Steve Hackett uses these...
-
I guess the "official" way to do this is via a Drum Map, then bounce the output to a new track. However I used to use a CAL script for this when doing exactly the same thing from XG/GS drums to my Alesis DM5. Copy/Paste this into Notepad and save it to you CAL scripts folder as something like SimpleDrums.CAL . You'll need to copy / change the note numbers as appropriate. You can then bind it to a key mapping if you want within preferences. ;; XGDrums.Cal ;; (do (forEachEvent (if (== Event.Kind NOTE) (do (if (== Note.Key 36) (do (= Note.Key 35) ) ) (if (== Note.Key 38) (do (= Note.Key 40) ) ) ) ) ) )
-
When using COAX, the cable needs to be terminated with a 75Ohm terminator... what's confusing though, is that some devices have the terminator built in, and other's don't. Using no terminators or terminating twice will cause sync problems. I've found the only way to get things working is to try different combinations until one works.
-
Also check your "mains" volume. If this is higher than 0, things will sound louder within Cakewalk.
-
Selected Control Surface preset is not saved as current
msmcleod replied to azslow3's topic in Cakewalk by BandLab
This is fixed in the 2020.08 HotFix - you can get the preview release here: -
I've tried to reproduce with various settings and cannot reproduce this issue. Can you post a more detailed recipe, i.e. exactly what steps did you perform for this to happen?
-
Compressing your C:\ drive can cause these to disappear. If you have compressed your drive, try decompressing the following directories: C:\Program Files\Cakewalk\Shared Utilities\Internal C:\Program Files\Cakewalk\VstPlugins\CA2ALevelingAmplifier C:\Program Files\Common Files\VST3\CA2ALevelingAmplifier
-
Good suggestion for quantise... in the meantime, you can use "Apply Trimming" on the clip after quantising. Your second point, use CTRL + D to duplicate. This does exactly what you're wanting.
-
I suspect your ASIO output issue is not to do with Cakewalk, but instead a routing setup with your Mixer. I've not used the A&H QU16 specifically, but normally mixers of this type let you decide whether each channel is coming from the audio inputs, or from USB. You need to designate a stereo pair on the mixer that is fed from USB, and ensure that it is "hearing" the output from Cakewalk via the ASIO driver.
-
It's not ASIO not being in focus, it's CAKEWALK not being in focus. So when this setting is checked, if you bring another application to the foreground, Cakewalk will stop its audio engine. If you need Cakewalk to play while it's in the background, then don't use this setting. What I don't understand is why you need WDM for playback. Cakewalk will NOT be using WDM for playback, it'll be using ASIO. The A&H ASIO Driver supports 32 channels of audio via ASIO in BOTH directions. If you're playing back using another Windows application, then it may be using WDM. What I do personally, is use my onboard sound card for Windows (a Realtek device), and run both my audio interface and onboard sound-card through a mixer (actually a Mackie Big Knob) - this way I can easily switch between the two.
-
It sounds like the A&H drivers don't support access via ASIO & WDM at the same time. Cakewalk will be using ASIO for both recording & playback, whereas (as you've pointed out) Windows uses WDM/WASAPI. If you check "Suspend Audio Engine When Cakewalk Is Not in Focus" within Preferences->Audio->Playback and Recording, then Cakewalk will release the ASIO driver while it is not in focus. This will allow Windows to use the WDM driver.
-
This definitely shouldn't be happening. To give you an idea of what is happening in the freeze: 1. Instrument tracks are made up of two tracks: an audio track, and a MIDI track. 2. When the track is frozen, all that happens is the bounced down audio is stored against the audio track, and the MIDI track hidden. 3. When you unfreeze, the audio is deleted from the audio track - the MIDI track data should remain unchanged. Can you confirm that the MIDI data has actually disappeared, or that it's a cropping issue? In other words, if you extend the beginning of the clip back from bar 13 to 1 is the MIDI data restored? [Edit] - Can you also confirm which version of CbB was used (a) to Freeze the track, and (b) to Unfreeze the track.
-
I've found & fixed the issue. It's down to a combination of per output instrument tracks, auto-track zoom & showing the synth properties. If either of those were off, it would work fine. The fix will be in the next release.
-
Essentially everything except Per Output Instrument Tracks will ignore the track limit. In the next version, these will be greyed out if you pick any other option.
-
@Vernon Barnes - looks like an AutoZoom issue. Do you have this switched on? If you switch it off, does it insert the tracks successfully?
-
@scook - I took a look at the dump, and I've fixed that problem... basically now you must select one or the other, and the issue it caused (a divide by zero error) has also been fixed. @Vernon Barnes - thank's for the info... I'll look into it further. The options on the dialog work fine for me with Kontakt, so there must be something else happening here.
-
Can you give more detailed steps? If you can let me know which instrument you tried to insert, and a screen shot of the insert synth dialog that would be great.
-
It seems to be working fine for me with the Insert Soft Synth dialog. Did you have the "Max Available" checkbox checked? This will grey out the number you typed and create tracks for all available outputs.
-
I'm unable to set the input gain level
msmcleod replied to Dan Bartosik's topic in Cakewalk by BandLab
No, the Gain control is used to control the signal from the clip going to the fx bin /pro-channel (depending on pre/post pro-channel setting). The gain of the recorded signal is controlled by your audio interface. So when recording, the signal goes as follows: Audio Hardware Gain -> ASIO Input -> recorded clip -> Gain Control -> fx / pro-channel -> Volume The main use of the track gain control is to gain-stage plugin input signal. -
Creating multiple MIDI tracks when inserting soft synth
msmcleod replied to acm's topic in Cakewalk by BandLab
This is how I do it: Just remember to do the batch function again within Kontakt after adding any new instruments.


