


msmcleod
-
Posts
7,120 -
Joined
-
Last visited
-
Days Won
39
Everything posted by msmcleod
-

Midi over Bluetooth, Yamaha YDS-150 Digital Saxophone
msmcleod replied to twelvetone's topic in Cakewalk by BandLab
IIRC you need to set your MIDI driver mode to UWP to use Bluetooth MIDI in CbB. This certainly works with my Korg nanoKONTROL Studio in Bluetooth mode, but it doesn't play well with my other MIDI interfaces (midisport 8x8 / midiface 8x8), so I use the wired connection with MME. -
I'm still using my 18i20 - I love the pre's on that thing. However I'm likely to upgrade to an RME Digiface USB in the near future, allowing me to use my existing hardware / interface pre's via ADAT, while take advantage of the RME's excellent low latency drivers. The Digiface USB has 4 x ADAT inputs giving a maximum of 32 inputs / 34 outputs @ 44.1K / 48K. Anyone looking for a cheap way of getting an RME should take a look at the Digiface USB. An RME Digiface USB + Behringer ADA8200 will set you back around £500, with the option of adding or upgrading the ADA8200 to something better (e.g. Focusrite Octapre / Clarett Pre 8 / Audient ASP880) at a later date... or just adding a bunch of ADA8200 if you're happy with their pre's. If you've already got an interface with an ADAT out already, then you're half way there already.
-
SoundFonts... menu option, Version Control & Latency
msmcleod replied to Caldur's topic in Feedback Loop
FWIW I still use SoundFonts regularly. I sampled all the patches I use from my old hardware synths, and I chose SF2 as my preferred format for 2 reasons: 1. My soundfont player (SampleLord) is way more CPU friendly than Kontakt / Dimensions / Rapture Pro... PLUS I can use SampleLord on my V-Machine. 2. SF2 files are easier to manage, as they're one file vs 10's or 100's (in the case of sfz). At the end of the day, SoundFont is just a file format - it's no worse or better than any other format. Sure, there are advantages to some formats over others (e.g. release samples), but for me that's not an issue. If I export my samples as .nki, they sound exactly the same in Kontakt as they do as a sf2 in SampleLord. -
Yamaha P-200 INS File URGENTLY NEEDED
msmcleod replied to UCG Musician's topic in Instruments & Effects
As there's only 12 voices on the P-200, it should take less than 5 minutes to create a new ins definition from within Cakewalk itself: YamahaP200.ins -
I'm not sure uninstalling ASIO drivers is necessary, or even desirable unless you're having issues... but in saying that, you should definitely uninstall ASIO4ALL, and any other "generic" ASIO drivers such as Steinberg's or Reaper's. ASIOLink normally requires your existing ASIO driver to be there in order for it to use ASIO for your primary interface. All other interfaces are then connected via WDM. I noticed zero difference in latency between my Focusrite ASIO driver and ASIOLink... but that was only because ASIOLink was essentially passing calls directly through to the Focusrite ASIO driver. If I had uninstalled my Focusrite ASIO drivers and let ASIOLink only use WDM, the latency would have been much worse.
-
Dropouts no matter what latency I choose
msmcleod replied to Laurence Levin's topic in Cakewalk by BandLab
There's a number of things that could cause drop-out, although since you're recording MIDI and not audio, the fact that your 7200rpm disk is 85% full shouldn't really have too much of a bearing... however: If this is your system drive, and you've not got at least 16GB memory, disk activity could be high due to memory being swapped out. If you've got audio tracks streaming from your disk (or samples for your VSTi's), then this could slow things down... especially if your audio tracks are on the same drive as your OS. Do you have CPU hungry VST's on any audio tracks, or any CPU hungry VSTi's that could be causing dropouts? I'm assuming you're using ASIO on your Focusrite? If not, make sure you are. You can try increasing your ASIO buffer size to reduce CPU load. Another option would be to freeze any tracks that are causing drop-outs due to high CPU usage (although you then might have [2] to worry about). Your CPU is more than capable of coping with most projects (it's pretty much on par with mine). So personally I'd recommend: Consider investing in an SSD for your system drive. You could then re-purpose your 7200rpm HDD for audio. Having your audio on a separate drive from your system drive can make a huge difference. If you can afford to get an additional SSD for audio/samples do so. For me, swapping to an SSD was like night & day - Omnisphere could take 45 seconds to load a patch from an HDD, whereas the same patch on an SSD is 2 seconds. Look at your memory usage in Task Manager and in particular the swap file usage. If there's a large amount of swap file activity, or your memory is over 75% usage, consider getting more RAM. Before you make any purchase though, try to ascertain what is causing the drop out. Look at the drop out code, and refer to this chart: https://www.cakewalk.com/Documentation?product=Cakewalk&language=3&help=AudioPerformance.24.html . This should give you some indication as to what the underlying cause is. -
Bulk changing automation envelope nodes from Jump to Linear
msmcleod replied to Simon Wilkinson's question in Q&A
I'm pretty sure CAL doesn't support Shape events... Shape events came along long after CAL was deprecated. CAL was primarily designed to manipulate MIDI data. -
Feature Request - Change Volume, Pan and Pitch for each audio track
msmcleod replied to Yiz's topic in Feedback Loop
Every audio clip already has Gain & Pan automation. If you make it into a groove clip, you can change its pitch. -
Alesis Nitro Mesh doesn't trigger. Is showing
msmcleod replied to fdadf DFaf's topic in Cakewalk by BandLab
I'm using the Alesis Nitro Mesh kit. Here's how I've set mine up: - Alesis Nitro Mesh MIDI IN device enabled in CbB, but not the MIDI output device ( MIDI driver mode is MME ) - Insert Addictive Drums 2 as a simple instrument track - in AD2's map screen, I've created my own drum map to match the Nitro's notes. That's pretty much it. Seeing as the MIDI device is actually showing for you, I would look at the following: - First check your MIDI driver mode within CbB Preferences (MIDI -> Playback & Recording). If it's set to UWP, try setting it to MME. You need to have no projects loaded to change this. - Next, verify which MIDI notes are being sent. You could be really unlucky and find that the drum VST you're using has a completely different note mapping to the Nitro Mesh. Try inserting a piano VST or something that covers the full range of notes. If you're getting notes being played by hitting your pads, then look at the note mapping within your drum VSTi. If there's no way of mapping notes within the VSTi, then read up on creating drum maps. @Creative Sauce has a great tutorial here: https://www.youtube.com/watch?v=sIquUl-7NfE -
Just remember, unless you've got something to sync the word clocks of multiple interfaces, expect some timing issues. This can usually be done: - by connecting the SPDIF out of one device (the timing master) to the SPDIF in of another, and making it the slave. - by connecting the ADAT out of one device (the timing master) to the ADAT in of another, and making it the slave. - by using a coax wordclock cable fed from one device to another, or from a master clock device to all of your devices. If your audio interfaces have no way of doing this, you may need to nudge your audio clips a bit to line them up properly. In saying that... they may be close enough for you not to notice... but pay attention to any phase issues.
-
Does the GT-1 actually send audio over the USB ? I'd be surprised if it does. If it does send audio over USB probably could, but I'd be tempted to just stick with using the GT-1 analog out -> 2i2 audio in.
-
You need to uncheck all references of the Echo Pre 8 within CbB, and use the ASIO Link driver exclusively within CbB instead. You just need to make sure all the inputs / outputs are created & routed for all your devices within ASIO Link. IIRC there is a limit of 64 inputs/outputs in all. The last time I tried this, I noticed absolutely no difference in performance/latency using my Focusrite 6i6 going through the ASIO Link driver vs the native Focusrite driver.
-
Loopback function in Cakewalk with Focusrite Scarlett 4i4
msmcleod replied to Rainer Haack's topic in Cakewalk by BandLab
VB Audio has a bunch of utilities to allow you to do this: https://vb-audio.com/Cable/ -
It might be worth seeing if you can upgrade Kontakt 5.6 to Kontakt 5.8.1 - I'm running both Kontakt 5.8.1 and Kontakt 6 without issue. You should be able to do this via Native Access, but NI has also provided a link on their forum: https://support.native-instruments.com/hc/en-us/community/posts/360005447937-Kontakt-5-8-1-installer-de-
-
I've been reading about this is on the Avid & Steinberg forums, just to get any indication as to what plans they have, but its pretty much all speculation at this point. Going by past upgrades though (i.e. PPC to Intel, and also the OSX compatibility cycles), it's likely that the Intel Mac's will continue to be supported for around 5 years after the ARM macs start hitting the streets. The more worrying issues for those tied to the Apple platform are: - Will DAW companies, and more importantly plugin companies be able to make the switch? I mean, there's a lot of codebase there that may or may not be easy to port over. Some will simply be able to recompile for ARM, others may have DSP specially tuned for Intel and will require more work. Also differences in chip architecture / OS could mean major changes to their threading models. DAW companies that target both PC & Mac may have a tough decision to make here if they're looking at maintaining a divergent codebase moving forward. - Will the audio interface companies be ready with drivers for the ARM macs? Presumably Apple will also need to come up with some new Thunderbolt 3 solution for ARM too, unless they ditch Thunderbolt and come up with some new proprietary interface. - People who rely on bootcamp to run Windows will be out of luck. This feature was only viable because both OS's ran on the Intel architecture. So even if the DAW companies manage to make the transition, there's a pretty good chance that you'll have to upgrade your audio interface and say goodbye to many of your plugins. I can envisage a lot of pro studios moving over to Windows to avoid this pain.
-
I tend to rely on the Mix Module for this. If the record button in the mix module is highlighted, I just click it to disarm all tracks, then arm the track I want.
- 1 reply
-
- 1
-

-
- timesaver
- efficiency
- (and 1 more)
-
There's no N series emulation - I've had both those modules (still got the NX5R), and I sampled mine to use them in the box. The closest VSTi to the N series is probably the Korg M1 VSTi. The synth engine is actually better than the N series one, and the sound quality is far better, but it's not got as many multi-samples.
-
Shift-Click for envelopes & Shift click header to revert to clip
msmcleod replied to Max Arwood's topic in Feedback Loop
FYI - the "=" key will toggle between the last selected track envelope filter and the clip. Likewise SHIFT + "=" will toggle between the selected clip's gain envelope and the clip. -
Feature Request: Multi-Track Export by Arranger
msmcleod replied to Colin Nicholls's topic in Feedback Loop
You can kind of doing what your suggesting already (minus the meta data) by creating arrangements for each individual section. In other words, drag section 1 into arrangement 1, drag section 2 into arrangement 2 etc.. so each arrangement has only one section in it. Make sure you rename each arrangements to match each song name. When you select "Export as Audio" from the arrangement dropdown, you'll have the option of selecting all the arrangements (songs) and it'll export them all as individual audio files. -
Feature Request: Multi-Track Export by Arranger
msmcleod replied to Colin Nicholls's topic in Feedback Loop
@Colin Nicholls - just so I understand correctly... Do you mean: 1. Export a stereo mix down by sections, e.g: Section1.wav, Section2.wav, Section3.wav etc.. or 2. Export multiple tracks by sections, e.g.: Section1-Track1.wav, Section1-Track2.wav, Section1-Track3.wav, Section2-Track1.wav, Section2-Track2.wav etc ? -
The "There is not enough memory" error is what Windows returns when the device is already in use. Most MIDI devices only allow one application to open the device at any one time. The way around it is to use a loop-back device, e.g.: https://www.tobias-erichsen.de/software/loopmidi.html https://nerds.de/en/loopbe30.html The loopback devices are multi-client - i.e. they can be used in more than one application at once. You can use these either on their own, or in combination with MIDIOX if you need extra routing/processing. What I tend to do is create two loop back devices, with the MIDI input of my hardware MIDI device routed to one loopback device, and the MIDI output of my hardware MIDI device routed to the other. Be careful to get the loopback ports the right way around else you'll create a feedback loop.
-
@Mcu pro - can you post a screen shot of the Control Surfaces page within preferences (ALT + PrtScn) ? There were some issues with the first release of 2020.08 with the loading of presets/configuration. This was fixed in 2020.09. Can you confirm you're using the very latest MackieControl.dll that came with 2020.09 ?
-
Can you show a screen shot of the recorded waveform on the track?
-
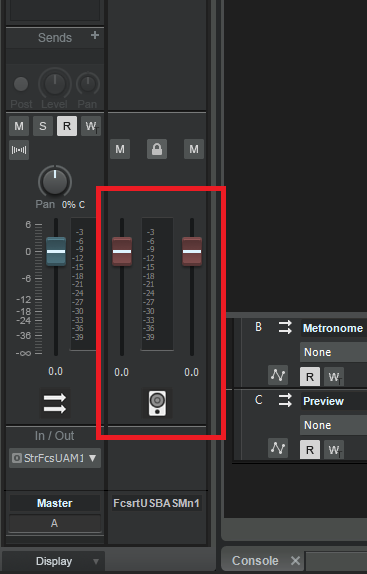
Check your mains outputs in Cakewalk, by clicking on your master bus and looking in the Inspector - the mains outputs have red faders. Check they're set to the same level:
-
If you're exporting to use the audio files in another DAW or audio editor, then you might want to keep the quality of 32bit / 64bit. However, if you're exporting to play the files, you'll need a bit depth that most sound cards support - e.g. 16 bit or 24 bit.

