


-
Posts
139 -
Joined
-
Last visited
Posts posted by Dave G
-
-
On 1/20/2023 at 10:18 AM, Todd Groemling said:
So, did you get your issue resolved and I've just missed the solution in this thread? I have the most current version of Cakewalk by Bandlab, have been using Cakewalk for years, well before Bandlab came in, and I still have the issue you do.
On 1/20/2023 at 12:31 PM, David Baay said:The screenshot below shows the PRV Track Pane with Filter enabled to hide drum MIDI and audio tracks I'm not concerned with from both the Notes and Track panes. Auto Lock is enabled to prevent inadvertent editing of any track that is not currently focused. Notes are displayed only for the tracks that are selected (track number highlighted) and only the notes in the currently focused track (track number and name highlighted white) show color and are editable. Selecting the track name in the track pane changes focus without affecting selection. If you sweep-select track numbers of multiple tracks, the first one you click will end up focused. You can Ctrl+click to add non-consecutive tracks to the selection as usual. Auto Focus is an alternative to Auto Lock that lets you change focus by clicking on a note. I prefer Auto Lock and changing focus by the Track Pane. See the documentation for more info.
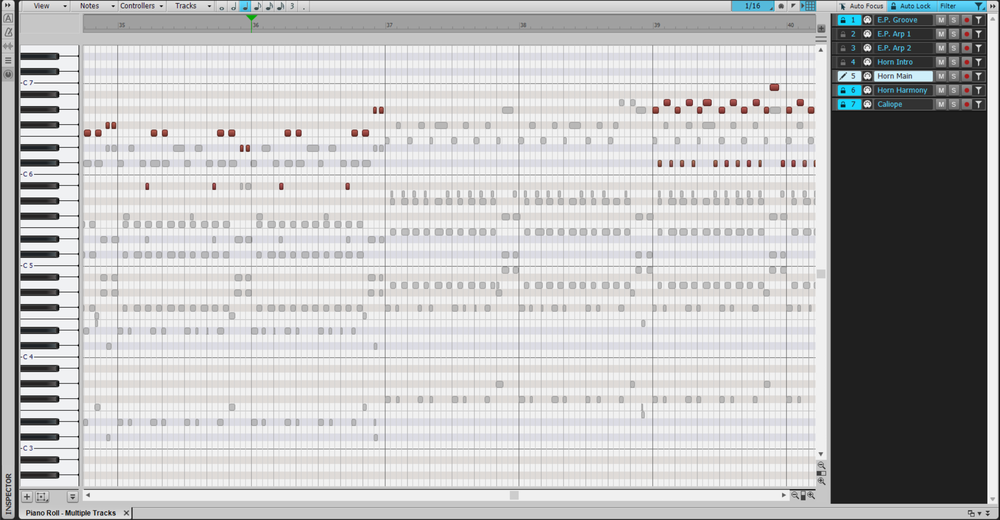
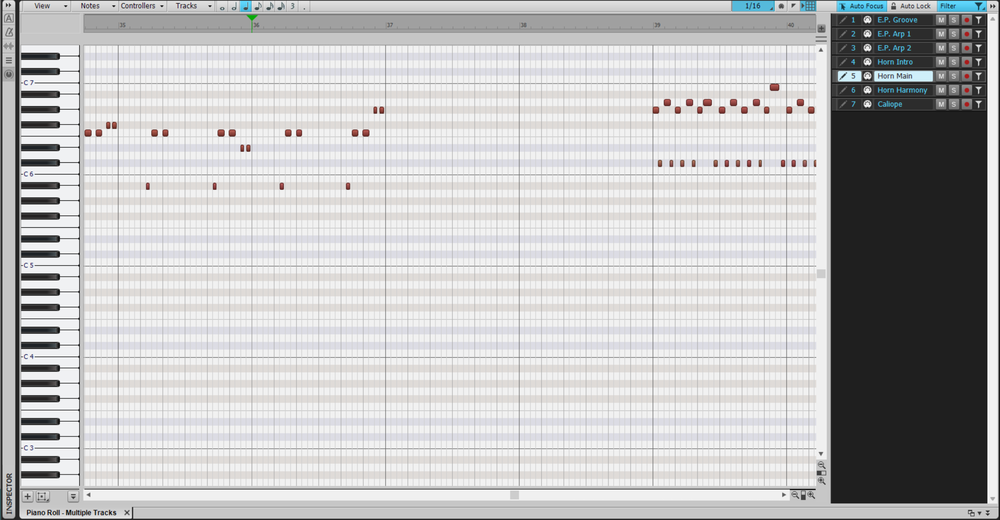
Here's the same view with only the one track selected and focused in the Track Pane:
I do apologize! I've been away from this thread the past few months, and somehow, I wasn't notified of replies.
Thank you both for your solution! (Is there a way to do this in Sonar also?) Otherwise, this was very well explained and I appreciate it.
")
-
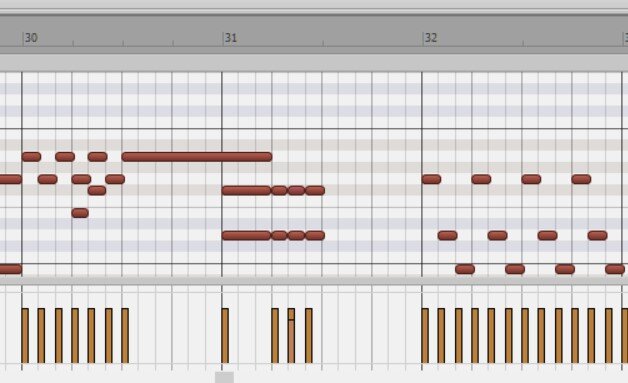
EDIT: Never mind, I found the answer. I changed the signature of measure 31 to 2/4, then at 32 back to 4/4. I tried this before posting, and for some reason, it didn't take.
I have a waltz-style piece in signature 4/4.
There's a particular measure only half-occupied by notes, then it should jump to the next measure. I don't know how to do this, let alone explain it. Screenshot attached.
I've never done a meter change in which "half the measure is to be played". But I need this to play normally until the notes in measure 31 finish (only play to measure 31, beat 2), then continue into measure 32. I'll have to do this one or two more times in this project, as other tracks will follow this pattern.
Any pointers and or insight would be appreciated. Thanks!
-
 1
1
-
-
2 hours ago, Jim Fogle said:
@Dave G, Did your older computer ever have a Creative Sound Blaster sound card? If so then the instrument sounds you remember may have been generated by the built-in Sound Blaster instrument patches.
+++ HERE +++ is a Github link to download the OPL 3 instrument patch soundfont that sounds like the patches used in the Sound Blaster 16 sound card.
You will need a Soundfont 2 compatible plugin like +++ Sforzando +++ to use the soundfont in Cakewalk.
Yes, that PC had a Creative Sound Blaster AWE32 sound card.
And thank you for the links! I will be sure to check them out.
-
 1
1
-
-
Thank you again, everyone, for your valued responses and insightful information.
I always find myself second-guessing everything so this turns out right in the long term. After all, I'm no professional, so I'm not trying to pursue professional results...just quality.
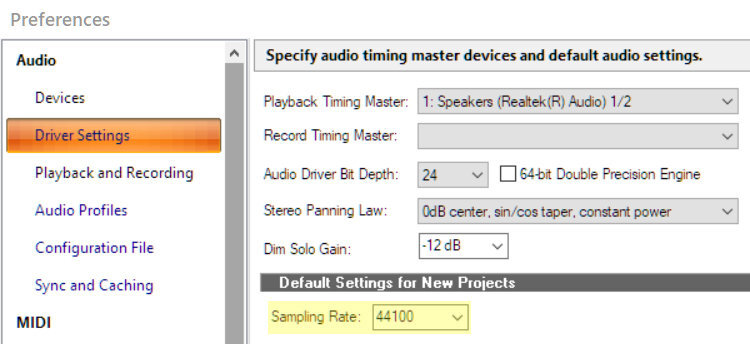
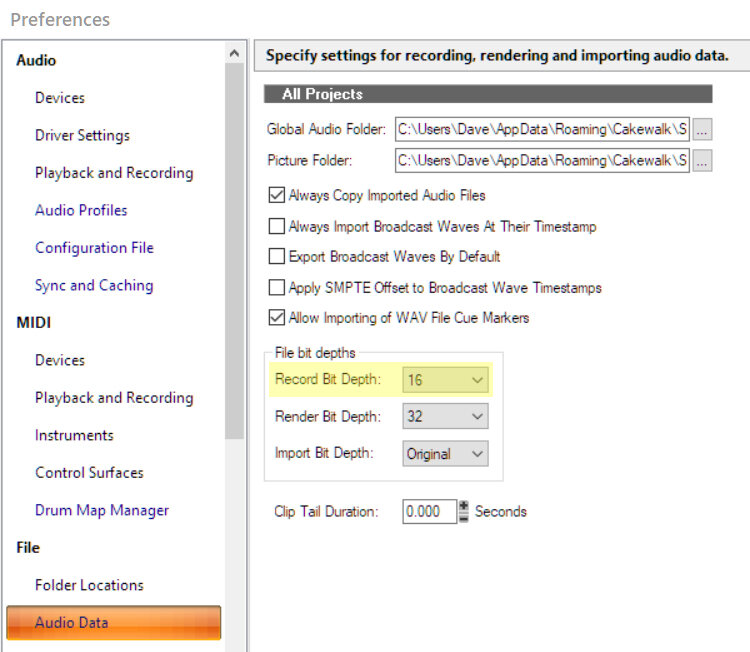
Per what I've learned here, I'm going to set the DAW's sample rate and bit depth accordingly (44,100 kHz, 24-bit) and leave it there, build it into the template for forthcoming projects.
Thanks for your help!
-
Thank you, all, for the concise and detailed answers!
To reiterate, my projects are strictly instrumental MIDI / SoftSynth-driven tracks with no audio / recorded data whatsoever. However -- when it comes time to finalize and "preserve" my finished tracks, I may bounce them to audio so they won't have to rely on the necessary installed VST's years down the road...
When composing MIDI back in the mid 90's, I don't recall any knowledge or adjustment of sampling rate or bit depth. (From what I recall, Cakewalk's default is 44 kHz.) So, relating to what you've all said, I was going to ask earlier:
1) Considering these tracks are already in progress, at what point during production does sampling rate become important? (I'm guessing this has been answered.)
2) I feel confused that Figure 1 in my original post seems to represent the DAW's rate/depth settings, rather than the project's settings. Am I misunderstanding?
3) Windows default 48 kHz sampling rate -- could I have left it alone, or as long as it's higher than my DAW's 44 kHz? Or must it match exactly?
Otherwise, is it safe to say (per the statement about halfway through this thread) that a MIDI-only project doesn't require these adjustments? Either way, I may set these anyway to 44 kHz/24-bit in a template so every project follows this setting.
I apologize for having to repeat myself in these questions, but I'm documenting what I've learned so it sinks in. Thank you again!
-
I have several projects in progress, and suddenly I'm concerned about the corrsampling rate and bit depth. (FYI: I use soft synths and no external hardware. All my projects are composed within the walls of my PC.)
I've been doing this for a very long time and learning things as I go. Before I go on further with my projects, I want to be sure these values are set correctly.
Windows default sample rate is 48,000. I've read that for my music tracks, I can change this to 44,000, so that's what I did (also, ensuring that the DAW's sample rate matches that). The DAW's values seem to remain in place, not reset per project.
My question is: do I need to change the sampling rate and bit depth at all, or leave them at default? I've done some research but I fail to understand what I'm reading about managing these values. I'd like to use 44,000 and 24-bit, but I don't want to mess up anything before I finish the projects.
Please advise! Thank you in advance.
-
This has been quite a revealing and educational discussion!
I was just going to note that I've probably been doing a lot of overthinking about it. I think it is a wise idea to save MIDI and audio copies.
Besides, that process won't happen for quite a while. Right now, my priority is remixing my old 90's tracks as indicated above -- and finishing several new tracks.
Thanks, everyone, for the insight!
-
19 hours ago, treesha said:
I was suggesting that you preserve a duplicate of a midi track in the project before you render the midi into audio. Then it is there as midi when you open the project in the future. You can archive it, hide it, put it in a folder in the project to be out if the way but its there if you want it someday. Its really not a mess, you can bounce to audio using the midi and its vst, and keep a copy of the midi. As for long term storage i keep my song project folders on 2 usb external hard drives saved as .cwp I dont do midi only recordings so have never saved a project as midi. Are you short on space that keeping instrument vsts on your computer is an issue? The ones you mention dont seem overwhelming. As you say to work on a song later and play the midi or redo the midi and bounce to audio anew you need the ones you used to be installed or reinstalled. I think its common to use multiple vsts in a project and reopening later goes fine if they are installed or reinstalled. (I would be surprised if ppl uninstall vsts after finishing a project. I think ppl keep installing more of them myself included ha). So save the project however you choose (midi only or midi/audio or only audio) and keep the vsts installed and all should be fine to reopen revisit. Hope that helps
There is no issue of hard drive space at all. I'm just trying to determine the best way to archive my work once it's finished. The main point, having to have all those VST's installed if I should ever have to edit the archived MIDI track.
I believe I further understand the function of bouncing my MIDI instrument tracks to audio, as I researched this and tried it a bit yesterday.
6 hours ago, John Vere said:That’s a very small list of VST’s compared to the majority of users. Someone just posted about their collection of 1,600 VST’s.
So what you might want to do is use the track note pad and write out what that track used and the settings etc. it’s found in the inspector.That's correct; I don't have a lot of VST's I'm using instruments from. However, for the sake of simplicity, I may opt to leave Session Drummer and SI Drums out of the equation completely, because Addictive Drums is far superior, from what I can tell.
Your suggestion to utilize the notepad is a very smart idea. I was pleased to see it recorded the actual creation date of my project.
If only Windows would maintain the file creation date (vs. Modified date) in that manner. If you have a file you save over and over again, you know what I mean.
Whether it be inside or outside the DAW, I may somehow keep notes of all the VST's and instruments I'm using in case those need to stay installed. Then again, for the audio only versions of my projects, those won't matter.
6 hours ago, bdickens said:I can't imagine going back and revising long finished songs. I try not to be like Wordsworth who couldn't stop messing with the Prelude or Whitman and his perpetual revisions of Leaves of Grass.
Because I consider myself a perfectionist, there's always the likelihood of changing something that doesn't need changed. Working a large project with so many variables and functions, the fear of doing something incorrectly and having to fix it is not just daunting, but quite paralyzing. This is why I have to question how to archive my projects and whether I want to preserve the notation. Because I know that strictly saving as audio only means losing the ability to edit them on a note level. I am aware that preserving these projects as audio tracks still allows for some editing capability, such as effects and volume. But that matter has already been discussed.
I'll let you in on some background. In the 90's, I composed several tracks in Voyetra Digital Orchestrator -- back then, one MIDI file, GM instrument set only, no external add-ons whatsoever. I knew nothing about mixing. After exporting the finished tracks to MP3, I foolishly discarded the MIDI files. Then, I gradually realized how unbalanced and poorly mixed those tracks are and wished I could correct them. When Sonar came around, I decided to remix all my old tracks for today's DAW, but I had to rewrite them all from scratch. I don't want that to happen again. This is why I have to decide archiving as MIDI vs. audio (and/or both).
For the average composer, I'm sure it's not as concerning. But for myself, I have to second-guess every decision, especially if it's permanent. Just want to do it all right.
5 hours ago, John Vere said:Everyone is different. I think the downside of all this free powerful software is it leads to folks making things way more complicated than they need to be.
A great song can be 1 track with no effects. There’s a million examples of this from the past.
Ah but there we go again, old farts complaining about how these youngsters not having a clue about the art of recording . Apologies to the OP this has nothing to do with your issue.Whether relevant or irrelevant, I do appreciate the conversation and the ongoing information. This is valuable to my education in this hobby.
5 hours ago, 57Gregy said:Saving as MIDI file will allow you to open the MIDI on just about any computer or DAW. When I double-click a .mid it will open and play in Windows Media Player or Groove Music without a problem, except the Microsoft GS Wavetable Synth sounds are not so good. You would also still have access to the notation, which is part of the MIDI standard. And open them in just about any modern DAW.
In most of my projects, I bounce down or record all my MIDI to audio, archive and hide the MIDI and soft synth tracks. Keeping it all audio is easier for me to mix.
I'm aware of the flexibility of MIDI files; it's simply a question of how to preserve the finished work. Not to beat a dead horse, just fielding everyone's input.
What I've learned here is: it comes down to saving the MIDI tracks (and all the VST's remain installed) or saving audio only (satisfied with my work and committing to the finished product). But furthermore, being awfully meticulous in mixing it properly before "setting it in stone".
Whatever the solution and the reason, I just want to finish my projects to my best ability but also keep them open for editing.
I know there's a lot of contradictory thought, confusion, and skepticism in my reasoning. It's hard to explain, but it's all part of the learning process. I will say, pertaining to my need for control, it's a huge thought process...even considering my music is strictly for personal enjoyment and no professional ventures whatsoever.
-
2
-
-
13 hours ago, treesha said:
One idea re preserving your midi, you could duplicate the midi track before doing any rendering etc, and keep it as is. You could archive it, hide it out of the way, put midi duplicates in a folder.
Just for clarification, by "MIDI track", you're referring to a "project" track, not as in "single MIDI instrument" track, correct?
11 hours ago, 57Gregy said:Furthermore, no VST or DX synths or effects are saved in any format, just references to where they are on the computer.
I would save my songs as audio and .mid, mixed down and separate tracks to CD, DVD, external hard drives, thumb drives, the cloud, etc. if I wanted to preserve them for a semi-eternity.
I kind of figured that there'd be no way to "lock in" my VST's and plugins to the project, rather than them be fetched outside the DAW from where they're stored.
9 hours ago, John Vere said:What Greg said. Saving a project as a midi file is 100% future proof. Example I still can open midi files I made on an Atari in 1985. With very little fuss I can add instruments and it’s good to go.
I also take all my projects even if they have audio and use “Save As “. And uncheck the Copy Audio box and save them to OneDrive. This gives me my midi backing tracks complete with instruments and effects and leaving the audio tracks blank but all ready to go to lay down new material.Thanks to all for your explanation. Although I have trouble putting my thoughts into words, I hope you understand my concern when it comes to keeping these projects "whole". I just wish the options were more finite, convenient, and clear cut.
I completely agree that MIDI files are 100% future proof, but when including the instruments and drum kits from several libraries, things will get complicated. This is the part I find cumbersome, that I have to keep all VST's installed for each project -- every single add-on + Sonar -- or the project isn't complete. Like a special recipe that has to have all the ingredients included all the time, or it fails.
So I'm guessing that my options are:
- Keep my MIDI versions accessible (but also keep all the included VST's installed)
- Bounce all the tracks to audio, thereby permanently losing notation editing ability, but editing clips instead (and not worry about VST's)
- As Treesha suggested, keep both MIDI + audio versions of each project (more files to keep track of)
Am I understanding this right?
Because with either option, I'll have a mess on my hands. I think the complication lies within how to save/store the projects in the simplest, cleanest way feasible. Kind of overwhelming. And this means, if I'm willing to lay down the notes and convert them to audio and leave it that way, I'll really have to commit to my decisions.
In that respect, I'll have to evaluate how many VST's I'm using and minimize those resources... (TTS-1, Cakewalk Sound Center + 19 add-on packs, Studio Instruments Suite, Session Drummer and Addictive Drums)
So I do have one remaining question: My project is all Simple Instrument Tracks. When I bounce the project to audio, do I have to bounce each track to its own audio track, or can I bounce the entire project/mix to one track before export? (I may have more questions on this later, as I'm confused.)
I know I'm overthinking, but it just feels to me that's necessary for such a big decision when it's time. Thanks for your responses.
-
So, let's assume I've finished a MIDI project (no audio tracks, just MIDI notation) and exported to MP3. I'll also want to archive the project...
I'd want to store the project in a way that's open to revisions as necessary, maintaining all the resources I've used (VST instruments, plugins, effects, etc.)
These resources are not "embedded" in the project in any way. Therefore, keeping a raw version of my project would mean also keeping all associated VST's and plugins (and Sonar, for those VST's not included in CbB) fully intact.
This concept seems to me a daunting task just to keep my projects "complete" for future use...and for all time. Otherwise, they'll be missing some of the aforementioned components.
I've heard talk about bouncing/freezing tracks. Would this function help "preserve" my projects to ensure nothing goes missing? If so, what's the difference between the two functions? And in doing so, would I ever be able to convert the tracks back to MIDI notation form?
And if bouncing/freezing is necessary, would I apply effects (reverb/delay, etc.) before or after?
The problem is, converting my tracks to audio format makes me uneasy -- if this means permanently rendering the MIDI notes uneditable. Most likely, I'd want to keep those tracks in MIDI notation form so they would be always be open to editing.
Anyway, when I do eventually finish my projects, I'll want to have them saved in a way that's final but still open for future edits. As said, my biggest concern is remembering to have all the included resources installed at all times.
How does one archive and adequately preserve a Cakewalk project they've finished -- MIDI notation or not -- with these concerns in mind?
Please advise. Thank you in advance! ?
-
35 minutes ago, bdickens said:
Yet another reason to switch to CbB. It gets harder and harder to help out people using farther and farther obsolete versions.
Agree, and totally understood.
-
18 minutes ago, John Vere said:
Actually as far as this goes I just opened Splat and it seems to be the same I forgot it was added then.
Your screens look different than mine. Notice the auto lock is highlighted. I can't see that feature on yours? Possibly a Sonar Artist version thing.
.thumb.png.7fe62bb53289521eafe6cde4bcdc9b9e.png)
Thanks for the explanation. Wow, that looks like a really intense mix! ?
Yes, I forgot to clarify I'm using Sonar Artist... for a while.
And yeah, it has been frustrating because I just can't seem to keep the PRV focused on only one track at a time.
Per your screenshot: all those extra functions I see in the Track Pane, I'm pretty sure that's the way I would much rather have it. Much more control.
-
3 minutes ago, John Vere said:
Oh I just realized your still using Sonar. So there's one good reason to upgrade to Cakewalk.
I totally get it! I have seen the differences. I keep switching back and forth, honestly. ?
I don't know what the hesitation is, I just want to know that CbB will always be available and there won't be any problems down the line.
-
3 hours ago, jackson white said:
https://www.cakewalk.com/Documentation?product=SONAR&language=3&help=EditingMIDI.10.html
There's a lot of really useful information in the documentation. Might be worth getting familiar with it.
Yeah -- I am sure it's well-documented. I've seen a few articles and YouTube tutorials, but I'm just somehow missing the part about being able to strictly edit one track at a time...
At least until I get the hang of how this works, and get comfortable editing multiple tracks at once. (shrug)
3 hours ago, John Vere said:Myself I just use the view on the right side in PVR to choose the track I want. If you hold Ctrl and click other tracks they will open and the first track will be showing as a ghosted track. In my screen shot I first selected track 1 Piano , held ctrl and selected track 6 strings. You can have as many ghosted tracks as you want. They show with locks. The one you edit has a pencil tools icon.
My default is only midi tracks but you can also show the audio tracks using the filter.
I use 2 monitors so PVR is always full screen. But even with one screen you can double click the PVR tab of the Multi Dock and it will go full screen like you see in my screenshot, then I use the D shortcut to hide show the whole thing. I hate having that half screen view.
Might be because you have the side view hidden you didn't know the side view existed. Use the little double arrows to hide show or the shortcut H if the PVR is in focus.
.thumb.png.3d9304be266b9e7597c3ba812b6d011b.png)
Thank you for the wealth of information.
My [physical] workspace only allows for one monitor. I haven't figured out how/when I decide to expand yet.
I am aware of the Track Pane, and I've used it before. It's just at some point, I became confused at the "focused/ghosted notes" behavior and can't make sense out of it.
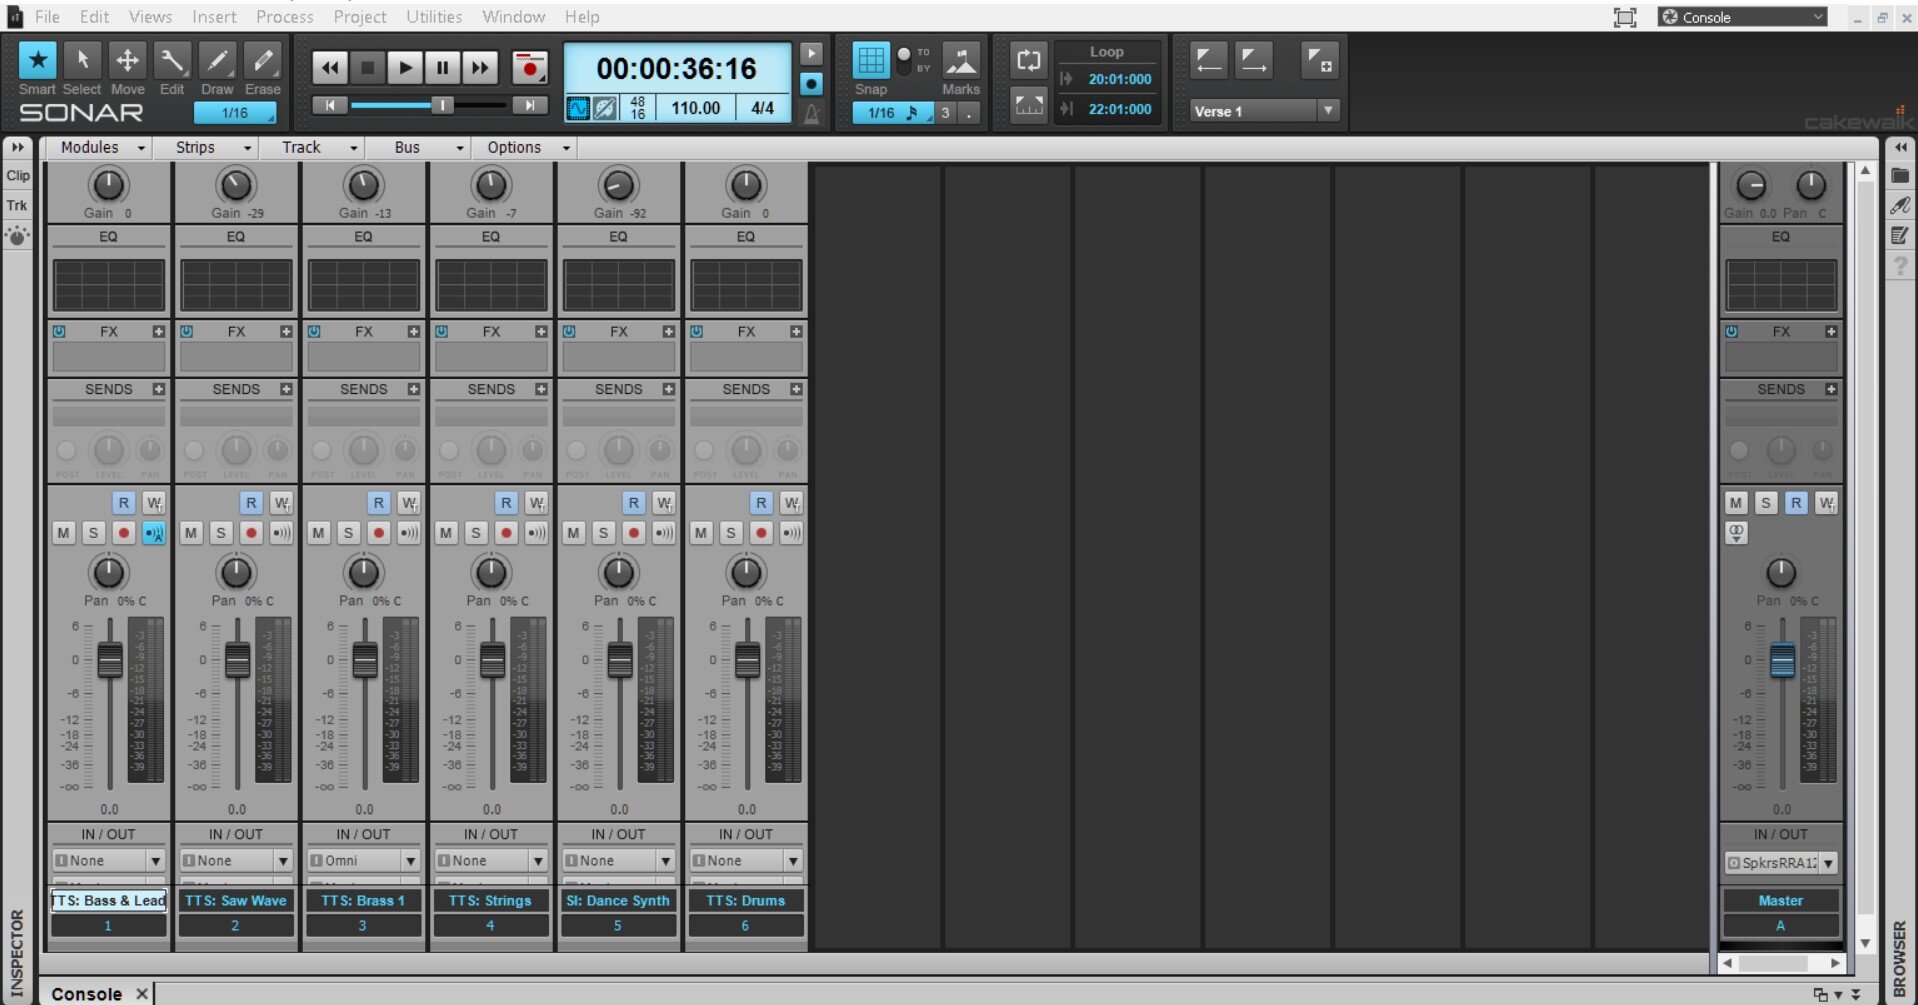
The screenshots here indicate my current [DAW] workspace set up, and each workspace appears as follows:
- Track window and PRV with browser on the right
- Full-screen PRV with Track Pane on the right*
- Full-screen Console, and nothing else
( * In this Workspace, Track 1 is in focused and Track 5 is ghosted. I think I understand that much.)
I'm still trying to tweak these Workspaces to streamline my productivity as smoothly as possible. The only exception: Long ago, I eliminated the Synth Rack from view because I didn't consider it vital.
[FYI: I am actively working in Sonar, because for some reason I still haven't committed to CbB. I'm aware the CbB is more current and versatile, as I just want to be sure that it is stable, reliable and accessible. ]


-
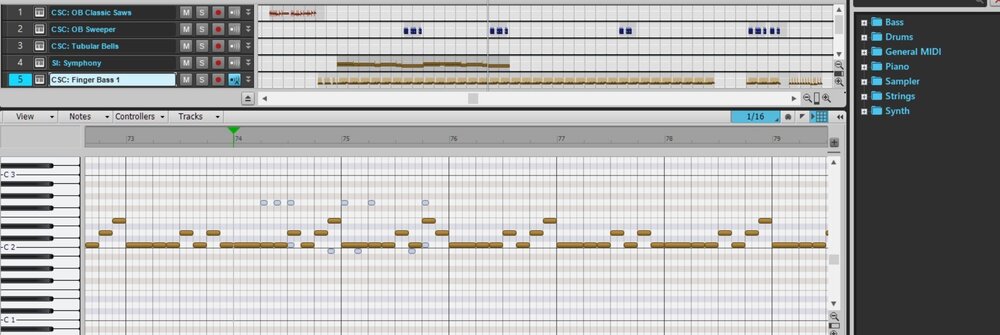
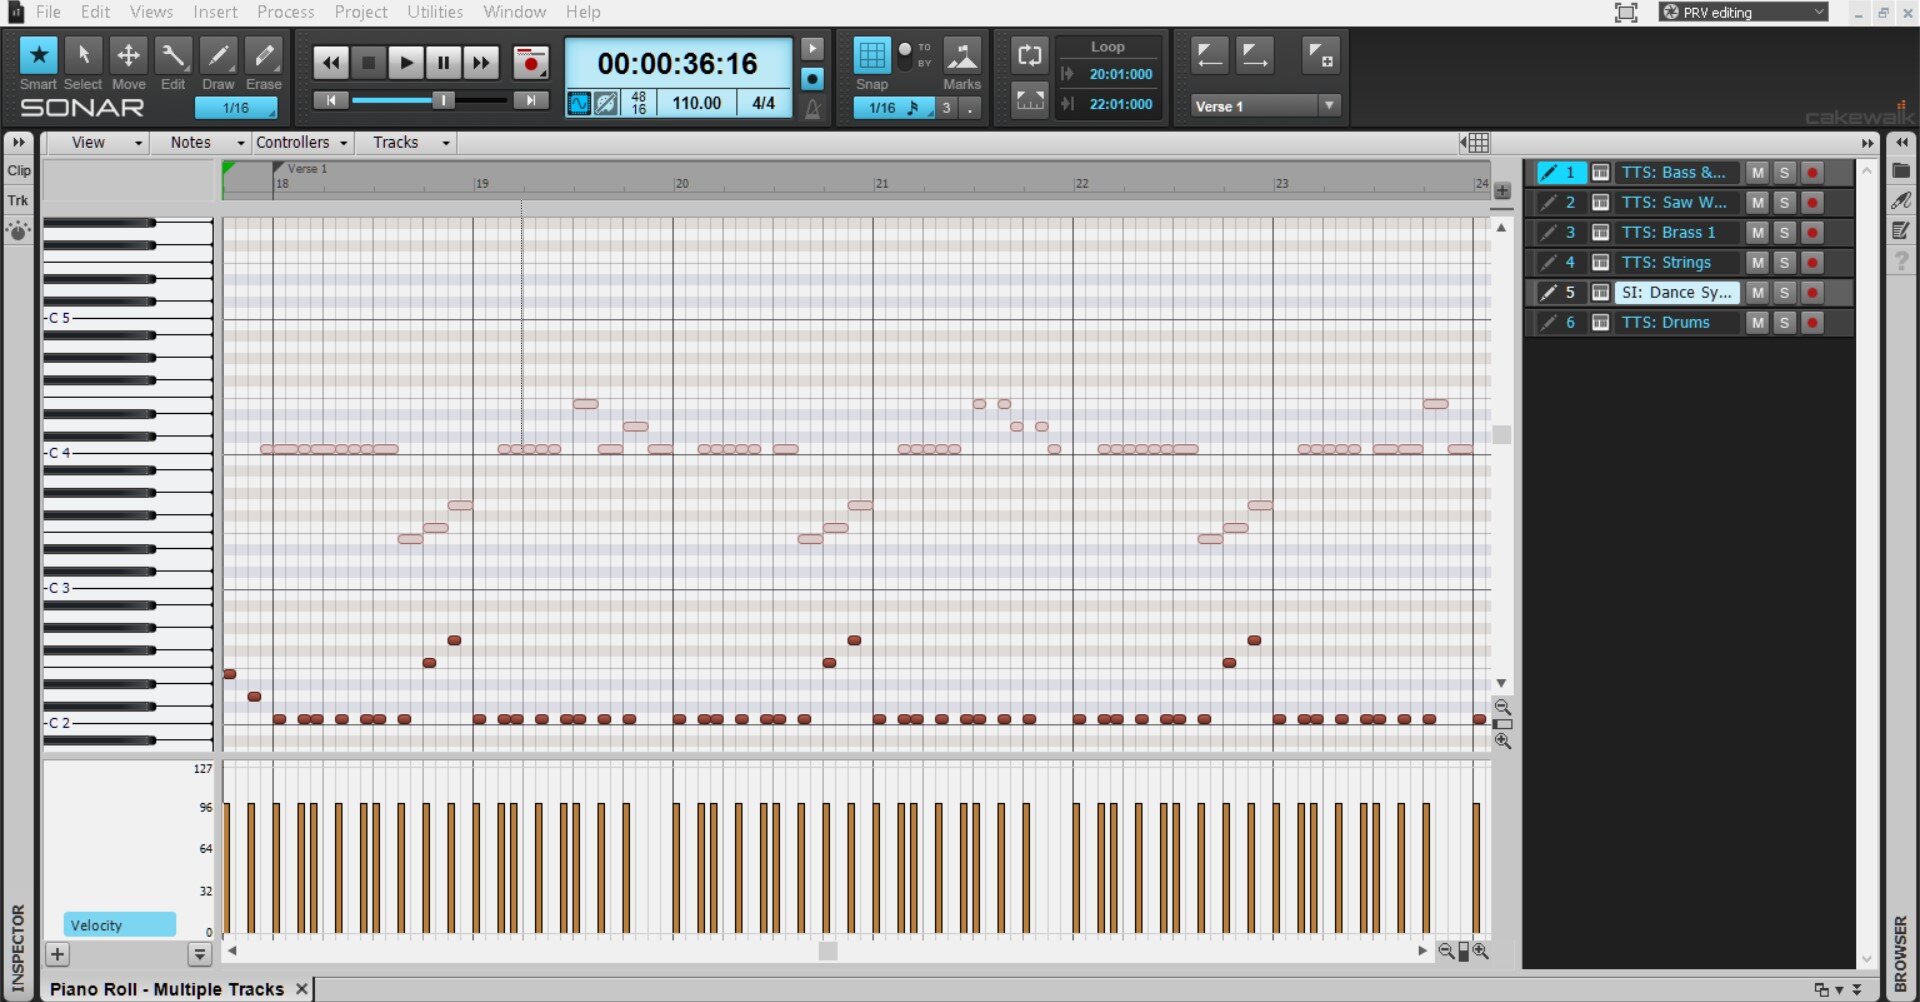
Sometimes, when I change instrument tracks, the PRV shows notes from multiple/last touched/a different track. And I don't always use the Track Pane to correct this.
This seems to happen randomly. Usually, I have to change workspaces and go back to that PRV screen to get it to show only one track for editing.
There are some times I wouldn't mind multi-track note editing, but other times, it's too confusing for me to mess with.
In the attached screenshot, the bass guitar track is the only one in focus, but the OB Sweeper notes are shown in the background. (That OB Sweeper track has no focus right now.)
How do I view the notes from only one track at a time, and keep it that way? Can I integrate that into a workspace or something?
Thank you in advance.
-
On 10/25/2021 at 11:46 AM, jackson white said:
Rimclick/Side Stick/Cross Stick are all gonna sound pretty much the same for practical purposes. Most drummers would acknowledge a difference between these and striking -just- the rim with a stick as the snare head contributes to the overall sound.
Snares can be fairly complex, depending on where you strike it (center to edge), how hard and which end of the stick you use. Mallets, hot rods, brushes, hands, etc. all expand the palette.
Awesome! Thanks for the explanation.
On 10/25/2021 at 2:22 PM, rsinger said:That's in the manual - there is an illustration showing the different strikes. Shallow is the head toward the rim and open is in the center.
https://assets.xlnaudio.com/documents/addictive-drums-manual.pdf
Page 45.
Thank you! I thought AD2 had a digital manual, just never thought to look or where to find it.
Checking the manual, I found clear diagrams of all the snare hits in the very back. (Wish I'd seen that before!)
?
-
7 hours ago, jackson white said:
Snare Rim = hitting the snare rim with a stick
Snare Sidestick = usually means "cross stick" which anchors one end (usually the tip) on the snare head and hitting the rim with the other
Thank you for the explanation!
I didn't realize these techniques are very YouTubeable, so I've learned a lot there.
Having just watched several of these videos, I notice that these drummers are saying the RimClick and SideStick are the exact same technique...
But, as you said, RimClick is simply just striking the rim like one would play the drum (not as common as SideStick?)
I think the way you explained it makes more sense to me.
What about the Snare Open & Shallow hits? Aren't those the same strike, but with different force?
?
7 hours ago, jackson white said:IIRC, the flexi slots are for specific articulations unique to that drum piece. (i.e brush strokes)
6 hours ago, Keni said:Flexi are just 4 additional sound slots on a virtual pad. Cowbell, wood block, etc can be loaded there.
I've confirmed that these assigned sounds change with each drum kit, and therefore not permanently assignable to a Flexi (i.e. assigning a hand clap, tambourine, and a cowbell, saving the custom map, and changing to a different kit...but those Flexis didn't "stay".)
-
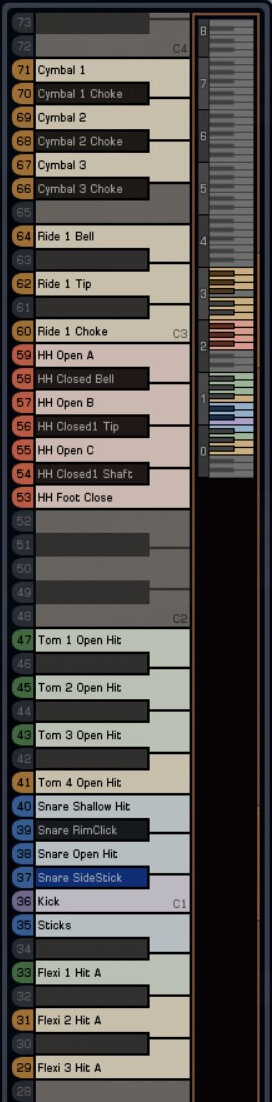
I've created an Addictive Drums 2 "minimalist" drum map. I found the default AD2 drum map too elaborate and too jumbled to manage, so I've reduced the entire map down to the sounds I'm most likely to use.
Image is attached here.
As pictured, I've neatly grouped each category of drum piece together as closely to the traditional GM map as possible. (I wasn't satisfied with the AD2 custom GM map either.) I'll eventually create a Cakewalk drum map that matches this so it's reflected in the PRV.
But, to further educate myself and tweak the drum map accordingly, I request clarification of the behavior of some drum sounds:
- What's the difference between Bell, Tip, and Shaft hits (esp. Ride and HiHat)?
- What's the difference between Snare Open / Shallow hits? (These sound alike.)
- What's the difference between a Snare RimClick and SideStick?
- Am I clear in understanding that the designated Flexi hits don't stay saved in the map, as they're variable with each AD2 kit?
Part of my confusion is that many of the corresponding hits sound alike.
If any drum enthusiasts out there can enlighten me, much appreciated. After all, this will be a universal drum map for me and I don't want to change it later after I've used it in several projects. Thank you!

-
17 hours ago, Starship Krupa said:
I don't know what Cakewalk Sound Center is, but when it comes to string VSTi's, I like one that's part of the freeware Orchestools Sections instruments.
Done by the forum's own @ilir bajri, they are great instruments.
I've never heard of Orchestools. I'll have to give that a look.
14 hours ago, Clovis Ramsay said:Rapture Session replaced CSC for me back in 2016 since RS integrated the sound library from CSC. CSC is only 32 bit and the sounds are very much dated and sound like the worst part of the 90s digital audio sounds, IMO.
But now i've retired Rapture Session and just solely rely on Reason Studios "Reason Rack" plug in for instruments, and even the included "Reason Rack Effects" plug in that lets you use their native SSL channel and compressor.
Reason 11 comes with Softube bass and guitar amp emulation, tons of drum kits, orchestrator samplers.....I literally no longer need a bunch of VSTi plug ins as the Reason Rack provides an entire suite of instruments and they SOUND INCREDIBLE!
I think the Session Drummer 3 and the Drums VST are terrible sounding things using sound fonts but are good tools if you can spend the time to gut out all of those awful samples they come with from the 90s! How does samples from the 70s and 80s sound just wonderful but the 90s sounds like a prozac commercial? Its hideous!I never thought CSC instruments sounded dated or bad at all. But then again, I purchased a bundle of Digital Sound Factory instrument expansion packs to populate my library.
As far as Studio Instruments Drums and Session Drummer 3, I like those about the same. I don't hear anything substandard of those VST's. Possibly though, because I'm not a seasoned audiophile, or I'm simply used to working with the resources I have.
Besides, I'm learning that a little bit of tweaking of the knobs/dials of the drum kit pieces can make a big difference.
I just want to make music and have fun. ?
-
1
-
-
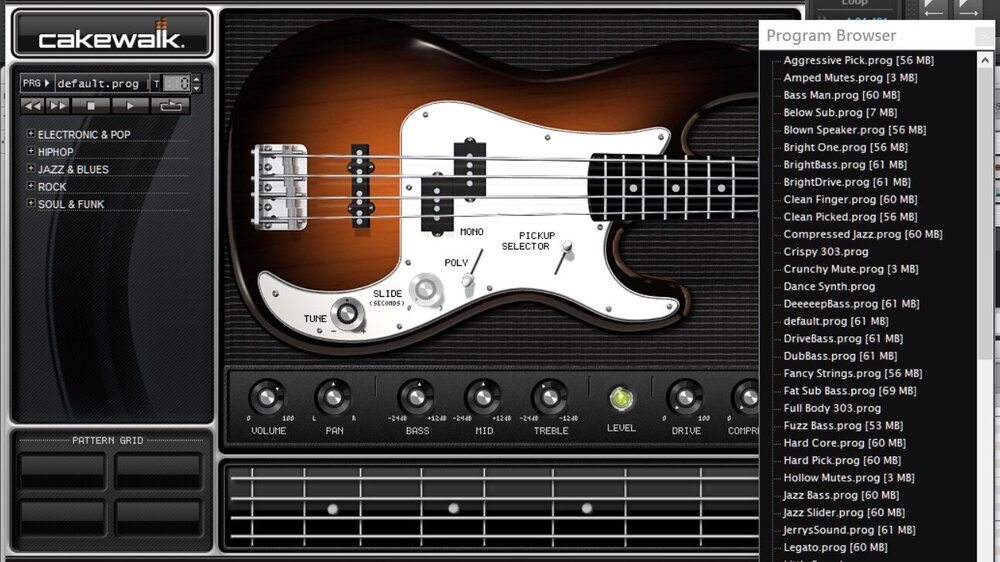
Which do you consider is the better VST: Studio Instruments Suite or Cakewalk Sound Center?
In choosing an electric piano, bass guitar, or stringed instrument, it's hard for me to decide which library to pick from. I like them both, and I don't necessarily have a "go-to" VST yet for these particular instruments. (However, I ultimately opt for CSC by the end of the mix process.)
Side note: They both have infinite possibilities for Strings! I'm not particularly well-versed in assembling string sections, so I usually opt for a generic string ensemble instrument.
I'm just kind of curious about others' thoughts as I try to commit to certain instruments. What is your opinion between the two? Thanks in advance.
-
59 minutes ago, Promidi said:
The NRPN parameter names that appear depend on the actual synth used. The Bend Up/Down parameters are Rapture. The NRPN parameters you’re seeing are for TTS-1
For TTS-1 you need to use RPN0 This is the GM standard for pitch bend range, which TTS-1 adheres to.
In TTS-1, to get the actual RPN value , you multiply 128 by the pitch bend range you want.
To get a range of 4 semi tones, you use RPN 0 > 512 (128 x 4)
To get a range of 7 semi tones, you use RPN 0 > 896 (128 x 7)
To get a range of 12 semi tones, you use RPN 0 > 1536 (128 x 12)Hmmmm...I suddenly wonder if we're talking about two different functions. RPN or NRPN?
I've learned the use of RPN and confirmed its functionality in TTS-1. However, I also learned that it doesn't work for Cakewalk Sound Center and Rapture Pro.
If we're crossing our signals, I apologize for dragging you through this. LOL. I'm inquiring whether NRPN events would satisfy the large bend function in the way that RPN doesn't?
If this is indeed the case, I'm perfectly happy delegating my large pitch bend needs strictly to TTS-1 and leaving it at that. TTS-1 and Cakewalk Sound Center are the only VST libraries I have (which I'm completely content with).
-
On 10/6/2021 at 3:37 PM, Promidi said:
With NRPN events, you can have 16384 discreet values. However, with Rapture Pro's pitch bend you have 25 discreet values (24 including zero)
What the formula does is changes Rapture Pro's 0 to 24 pitch bend range to NRPN Events 0 to 16384 so you know what NRPN value to use
Another way to get the NRPN value from the required range is to multiply the range by 683 (Which is 16384 / 24 rounded up)
A range of 4 semi tones, you use NRPN Bend Up 01 > 2732
A range of 7 semi tones, you use NRPN Bend Up 01 > 4781
A range of 12 semi tones, you use NRPN Bend Up 01 > 8196
I tested this by plugging these values into the event list view and the range does change on the fly as the track is playing
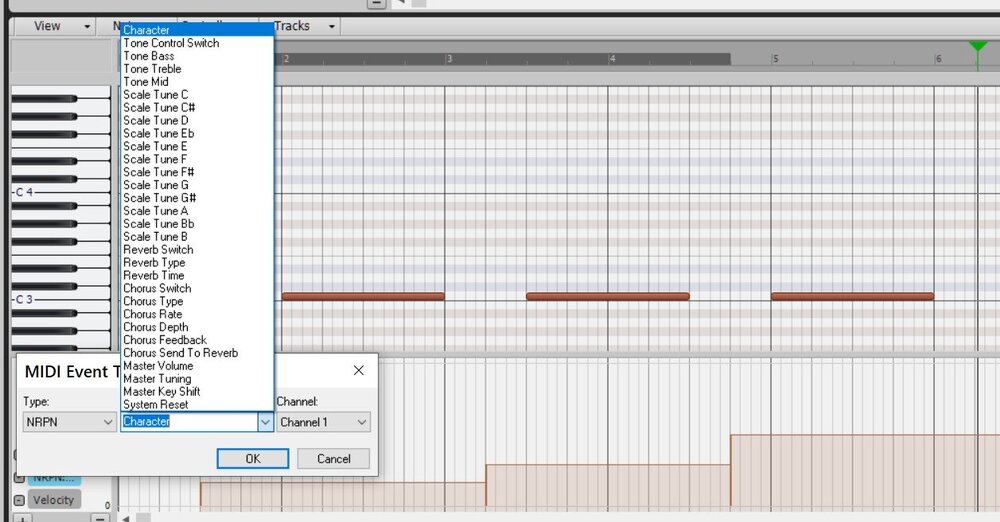
I had 4 notes (All B2) playing, each proceeded by an NRPN Bend Up 01 event and a pitch bend event at maximum (in that order)Per the attached screenshot, I drew three notes with a maxxed pitch wheel event on each (0 to 8,192), resetting it to 0 after each note is played. I inserted three preceding NRPN's which only resulted in a two-note bend, as expected. Then I realized that I neglected the Value drop-down menu...
I don't see a Bend Up/Down selection therein. Which entry from the Value menu am I supposed to select for this technique?
EDIT: I also just realized that the Value menu is dependent on the Track type. This menu appears for a Simple Instrument Track (the one below, TTS-1) and a MIDI Track, yet appears as a numerical input menu for a Waveform Track.
-
Thank you for the clarification on this. I believe this might be my last shot at making this work. Apart from that, back to existing methods. LOL.
-
On 10/5/2021 at 6:49 AM, Promidi said:
However, you can enter NRPN events the same way you enter any other events. When you add a Controller, you select “NRPN” as type. Rapture actually has 12 Bend NRPN events available (6 elements, separate up and down). Unfortunately, that values do not correspond to the actual range values.
The formula is NRPN value = 16383 * (range / 24)Thank you for the explanation. I've researched the potential usage of NRPN for pitch bend range, but couldn't locate anything useful.
Would you please elaborate on the equation you provided above, maybe give an example? I still kinda fail to understand this compared to a typical 2-note bend or an RPN bend...


.png.fee742f05034036b3d642943cd4f14ee.png)
.png.0d9ae79f217a257c3386724ed8c12aed.png)


PRV multi-track editing: Show notes of only ONE track at a time
in Cakewalk by BandLab
Posted
Thank you, everyone, for the valuable information pertaining to this!")