-
Posts
186 -
Joined
-
Last visited
Everything posted by JohnK
-
AAAAArrrrggghhhhh... I lost my post. So sorry for being short. You missed my original post, the only time I thought my computer was running slow, was when I had "CPU Conservation Mode" accidentally switched on. This PC twidles its thumbs most of the time. I even run a VBox with Win2019 Server edition, running SONAR, while Cakewalk is running on the real PC, operating fine. I also run a VBox of 32b XP when converting my older projects that use a 32B DXi; so I can see what was what and duplicate in the new 64b Cakewalk. The reason I posted details about my crappy GPU was simply to share that even with the crappiest of GPU's, Cakewalk can run fine for some.
-
To be clear, when I had/saw the issue, it wasn't my now time that I noticed the issue with either. It was basically the whole GUI. Most notably, the meters were being updated very intermittently, and my mouse interaction/responsiveness with the GUI was really very poor. It generally appeared like the PC was extremely overloaded. I would be interested if anyone knows of any on-screen indication when this mode is on? Apart from the poor performance. On a side, although my PC is decent (4,4GHz quad core [a safe overclock], hyperthreaded, with 24GB RAM), my video card is really very poor. I use the onboard graphics card, that came with the motherboard, that I think is >5 years old now. Its an Intel(R) HD Graphics 3000, I'm not a "gamer", so it has done the job for me thus far. I just checked the driver, and that's at mid 2015, which would of been released well after the motherboard, as an update, not originally with the motherboard. i.e.. you would be hard pressed to get a poorer video card than me.
-
When I first started using Cakewalk by Bandlab (over using SONAR previously), I noticed some strange behavior where, working on one project and the ui was very responsive while on another or a different time, the UI was laggy. i then found that Cakewalk had an option to limit/minimise UI updates. From memory, its the 'pause/break' key that is the hotkey to switch between the two modes. Oh, and my PC is more than powerful enough to handle cakewalk, which is what only added to the confusion. Have you checked this? or is this what you are talking about? a laggy UI? OK, searched the doc for my own confirmation. Its called "CPU Conservation Mode" https://www.cakewalk.com/Documentation?product=SONAR&language=3&help=Troubleshooting.34.html
-
I am unclear on where you are clicking that does not show the "jump" option? I use Jump more often than not, but to change it, I know that I have to right click on a line, and from memory, I don't think it can be a vertical line or some other strange limit like that. From memory, I make the line a linear gradient by pulling a node horizontally, then right clicking that diagonal line, set it to jump, then move / delete the nodes I no longer need. And as a warning, I have found that Jumps don't play nice when exporting to audio, even though they work perfectly when simply playing back.
-
ahhh yes, I forgot they sent me a email on receipt. I ignored and forgot it, as it had a bunch of unrelated suggestions for fixing audio dropouts.
-
Yep, that was it. 🏁 Now in hindsight, on reading the manual, it says all controls that are in offset mode have a "+" symbol next to them, and looking back at my screenshots above, they all have the "+" symbol. I don't normally have the Mix module visible in my control bar. What I am also *guessing* is that there is possibly a hot key (couldn't find it documented) as I often start typing into a text entry (such as a track name) while looking down at my keyboard, but when I look up, I notice I have left the text entry and have been unwittingly pressing numerous unknown hot-key combinations. Now to somehow revert the support request I made yesterday to Cakewalk.
-
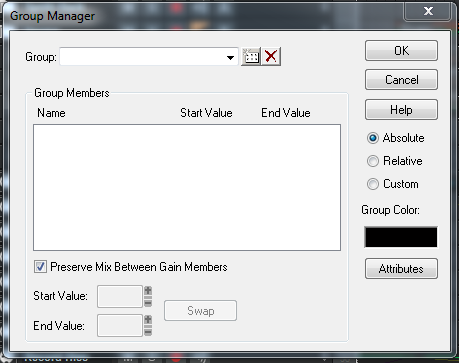
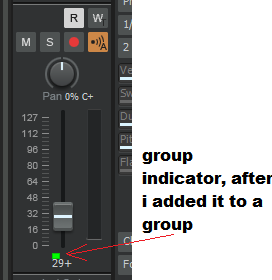
Nope. I checked, and I have no groups assigned. i also tried adding a group, and found that there is a pretty clear indicator that the control is in a group. i guess cutting back the project and forwarding to Cakewalk will be my only option. although i know how to "correct it' (ie moving all the MIDI to a new track), i have a lot of old projects I have converted, so its probably not the only project with the issue, but simply the first one I have noticed it. i was messing with the project last night, and noticed the final audio out signal was pretty low, but when i went to turn up the midi parts, I found that this project is rife with this issue, to the point where I need to set the volume to >127, which gets scaled down even when set to 127, so i cant mix it. thanks to all for your input & help.
-
The VSTi is loaded into a SIT. I used the insert VSTi when i was converting over from my old LiveSynth DXi to the VSTi (BassMIDIVsti) as the soundfont player. I probably used "Replace Synth", but since its multi-timbral, all my individual midi channels are on different tracks. There is no MIDi on the SIT, its just for an audio out for the synth, i'll do that when I get a chance a little later, and let you know. i understand it is really just for extra info, and wont really pin-point a specific issue? Of course, you should never assume, i am with you on that one, even the obvious👍 I am using the latest available. Just explicitly checked the help/about, and it shows as 'Version: 2020.09 (Build 006, 64bit)' As for dropping a line into Bandlab, i was trying here first as it seemed like i was missing something obvious. i have used cakewalk since back in v1.0 for windows, then Sonar, and have recently switched to cakewalk by bandlab, and hence the conversion of old projects. But it has always been with years and years of breaks between each change, and hence i thought i better ask here, after I searched the help of course. Cant remember if i made this clear previously, but if i explicitly insert a MIDI CC7 (ie volume) into the MIDI track, that gets sent unmodified, so it really is the control. Hence this group/link thing with a relationship may just be the ticket. i'll have to read the help, have a play, and get back to you on this one a little later.
-
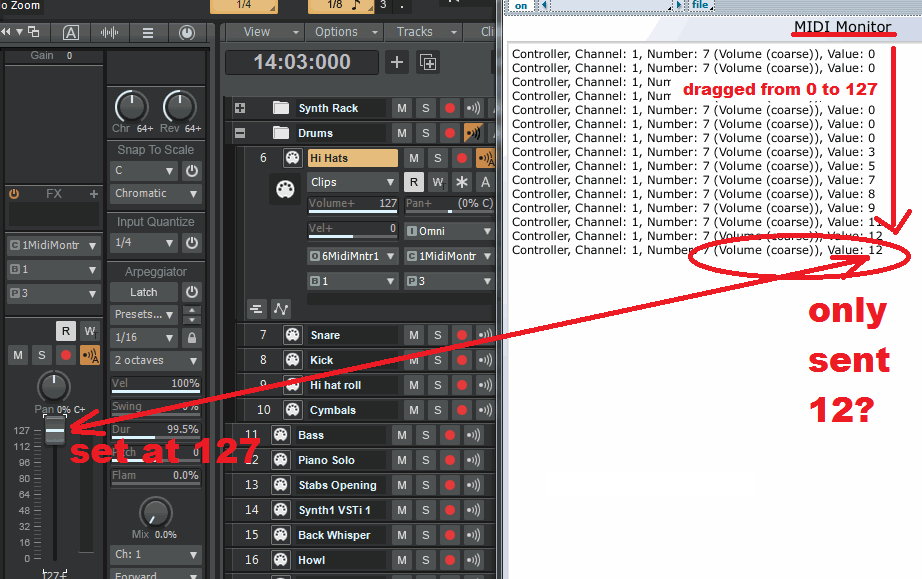
Not sure what you mean by ""SIT"? originally, the MIDI track pointed to an actual VSTi (64b), and i found I could not raise the volume on that track. Then when I checked, i saw that the volume only moved a little (ie 0 to 12). So I added an instance of TTS-1 and pointed the MIDI track to it (in case it was a VSTI specific issue). And its sliders could only be moved from 0-12. ie its not the VSTi. And that's when I downloaded a MIDI Monitor VST (I only found a 32b version), as used in the above screen shot, it clearly showed that the MIDI CC7 (ie Volume) only moves between 0 and 12. The fact that TTS-1 also acts the same, it is clearly not dependent on if its 32 or 64b. And further, the original VSTi that I noticed it on, was also 64b. And hence my question, what is the issue? Its as if there is some track setting, that i cannot find, which sets a map of the Volume slider range output to 0-12, instead of 0-127. Going out on a limb with a crazy idea, because it was a project from an older version of Sonar, It may be possible that Sonar had the functionality to set the limits of a control (ie volume), and now Cakewalk can read and apply those values, but does not have an interface to edit/view/change/reset this property? It is specific to this project, however, I just noticed that another MIDI track is having the same issue, but it is being mapped from 0-67. ARRRrrrrrgghhhhh! The original track is very simple (a single hi-hat clip repeated throughout, using a linked clip). So I created a new MIDI track, copied and pasted the clip (as linked) into the new MIDI track (at bar 3), and then copied and pasted-special that new copy of the clip throughout the song (as repeated linked clips) and changed the MIDI channel to something unused (its a multi-timbral VSTi), while using the bank and patch of the original. Then Deleted the original track. And now the MIDI volume works 100% as expected. Its a workaround, but I would prefer to know how to fix it correctly, instead of the kludge / nuclear approach I used above.
-
I have a single project, where one (only the one track in the project) appears to be limited with a maximum MIDI Volume of 12 instead of 127. To try and see what the heck has been sent to the VSTi, I replaced it with a MIDI monitor, and when I drag the volume control, it only goes between 0 and 12. I have also tried closing and re-opening the project (with the monitor on) to see if there are any stray MIDI events being sent, and there are none. The only other thing being sent are "all notes off" messages to every channel (ie 1-16) of the VSTi; in this case a MIDI monitor. I also tried pressing the MIDI Panic, and that does not fix the issue. If I insert Volume MIDI message into the event list for the track (of 127), then that gets sent / received as expected (ie it works). However, as soon as I try the volume slider on the track, it is again only sending values 0-12. I have also checked the LSB for volume, and that made no difference. I have also tried (not that it should) set the value for Expression to 127. I have looked everywhere I could think of and I can not find anywhere where you can set the range for the volume slider to only send 0-"v" (v=12 in this case). Does anyone know of what could be causing the above behavior? Some extra info, this project was originally created using an older version of SONAR.
-
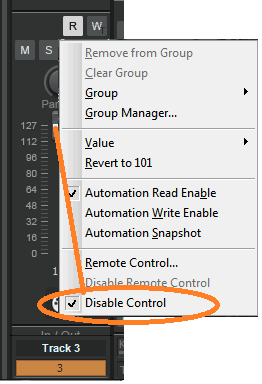
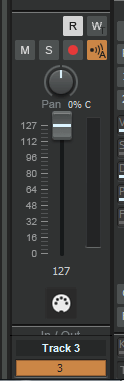
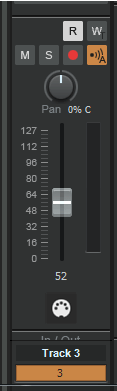
 Currently, when a control is disabled in the track inspector, there is no visual clue apart from the pop-up menu checkbox. Additionally, if another track to the same VSTi and MIDI channel has the control enabled, and therefore is the 'master', changing the 'master's'value makes no difference to the track (on the same VSTi & midi channel, ie 'slave').. i request that the slave control is shown visually differently to let the user know. for example, in the current state, i have track 2 & 3 both going to the same VSTi (tts-1 in my example), but have the volume on track 2 set to 52, and the volume control on track 3 disabled. Currently, Track 2 would like like this: And because i had set the value on track 3 before I disabled it, it would look like: My proposal is two fold: 1. The disabled control on track 3 (same MIDI channel and VSTi as track 2) would have a visual clue that it is disabled (semi-transparent is just one possibility. I would make it darker than my example below, but its simply for illustration purposes) 2. It would actually follow the value set by the controlling track (i.e track 2 volume which is not disabled and goes to the same VSTi and MIDI channel) PS: All the above is based on my use of MIDI and not Audio. PPS: similar logic can be applied to the other controls eg Reverb & chorus etc etc etc
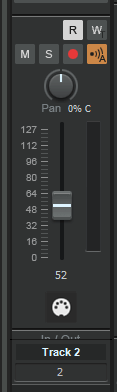
-
For the first point, I note you made the statement as a question, not as a clear statement of fact. i.e. its not cut-n-dry to you either. Just to be clear my question was trying to understand what the practical reason for wanting such would be, not a re-statement of "that's what happens, if you want that to happen". i.e. why? and you answered with a question. So, that's what happens, but the more common case, at least that I can think of, is kind-of the opposite. For a simplified example, say I make a 1 bar drum pattern for my chorus start, which I plan to be 16 bars. I would wish to copy that first bar and paste another 15 bars (to make up a 16 bar chorus in total), with the first 14 bars linked to the first bar and the last bar to be a variation (un-linked), as a lead in back into the next verse; so the last bar would not be linked. I think it sounds more common and logical with music, instead of having the first two bars linked and the other 14 bars as variations/un-linked. As for the second point, saying it would be even worse if done the opposite is not a reason for having it at all; i.e. the lesser of two evils is not a reason for any evil in the first place. I think at the very least, when the "Linked Repetitions" is checked, the "Link to original Clip(s)" should be disabled and checked automatically. As that's what actually happens, and leaving it enabled and unchecked is simply wrong. NB: I haven't looked/thought into/about the logic of what happens when you have more than a single clip being pasted and repeated.
-
The documentation and the interface is not clear, and could be read to mean either way. The fact we can see what it does, and then reading the documentation, we read it as the way it has happened. Regarding the form, if I type in 2 in the repetitions text box, and check the "Link to original clip(s)", I would assume that check-box applies to ALL my repetitions, as it resides on the same form. Regarding the documentation, it says "Link to Original Clip(s)" check-box creates A linked clip; "A" is singular I would grant you that. It is really not logical software GUI wise to me, to have parts of the form not apply to all (i.e. all repetitions), unless it is explicitly stated such as "Link first to Original Clip(s)." i.e. the first assumption is that whatever is set on the form, applies to the whole process, unless explicitly stated. This label clarification would also avert the need to read the manual (carefully) to understand what is about to happen. Interesting: I just tried un-checking the "Link to Original Clip(s)" but did check the "Linked Repetitions", and the first pasted WAS linked. So now the first paste IS a repetition and not controlled by the "Link to Original Clip(s)". Another way to look at it, the "Link to Original Clip(s)" is ignored/useless (and thus confusing) once you check the "Linked Repetitions" box. Checking it makes no difference; at least that I saw. Out of interest, what is the logical reason to have 1 linked clip followed by a number of un-linked clips?
-
Thanks, that looks exactly like what I was looking for. Just being a little picky, in the image above, I select "Link to Original Clip(s)" AND "Linked Repetitions". The confusing thing, when trying/testing it, if I do not click "Linked Repetitions" but only "Link to Original Clips", from what I am seeing, it creates the first repetition as a linked clip and then all the rest as independent clips. Am I understanding the behavior correctly? It just seems like a strange behavior which I cannot think of a time I would of sought for it. Of course, everyone has a different use.
-
How do I make multiple copies of MIDI linked clips? To put it into a practical example, lets say I am building a new project, and start with a single bar kick pattern. If I want 120 bars of the same kick pattern as a linked clip, currently I click and drag the first bar to the second bar holding the ctrl-key down, and then select the two bars and click and drag while holding the ctrl-key to up it to four bars and so on until I either get to 120 bars, or more likely the number of bars being dragged gets unmanageable. There must be a better way! is there?
-
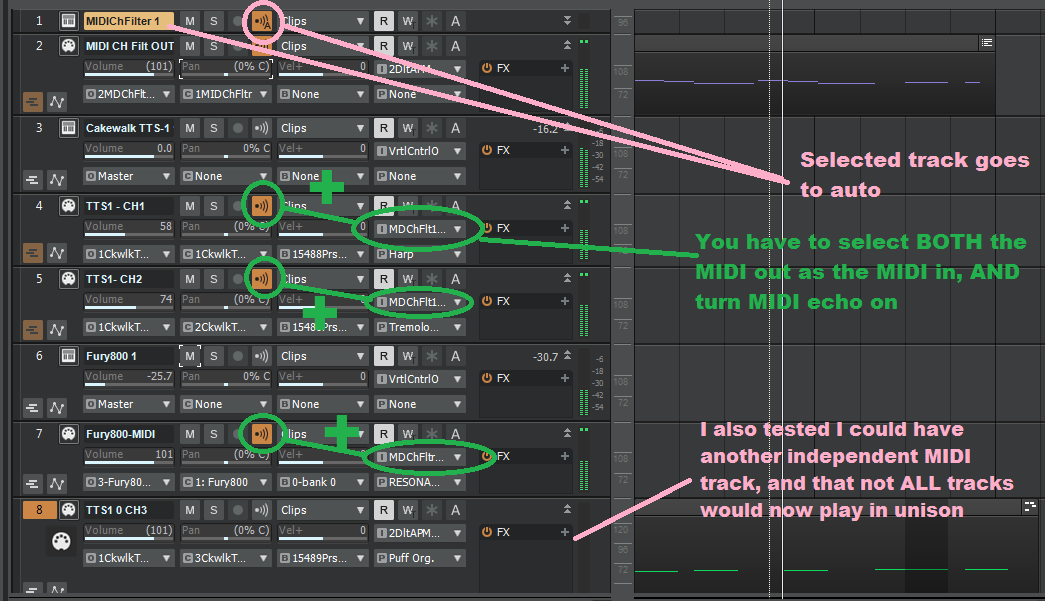
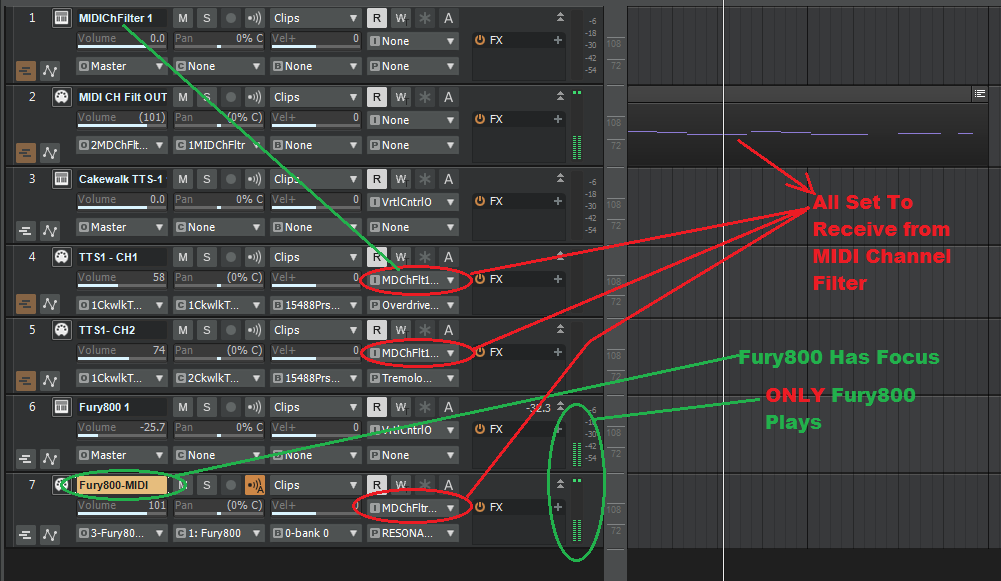
The VST MIDI Channel Filter I referenced in my previous post basically, for all practical purposes, enables the feature.
-
OK, for those not following the other thread, I have found out what I was doing wrong (in regards to MIDI out). You can see the details at There is also a very utilitarian VST for doing it (MIDI Out Filter).
-
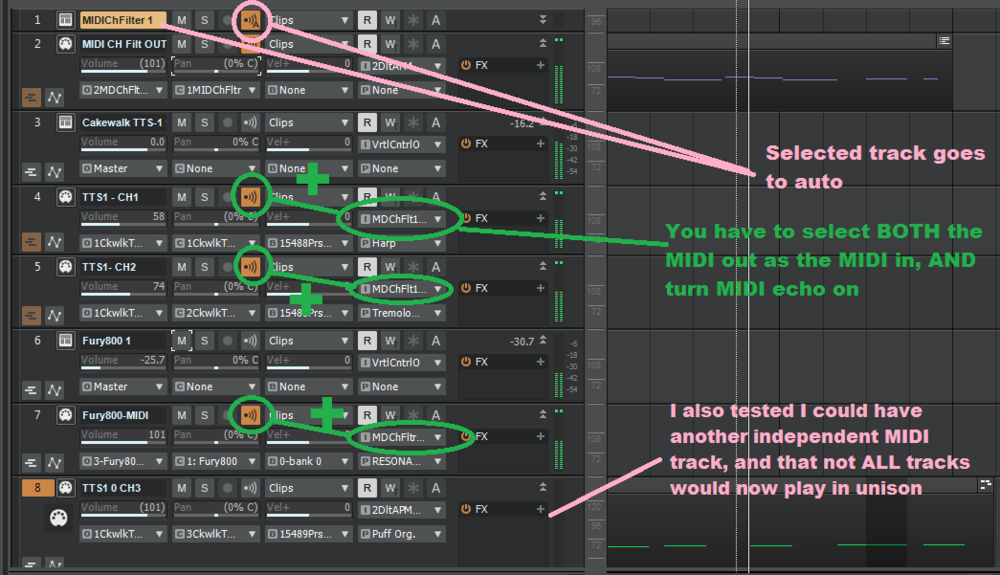
OK, I now know it was ME! I read the instructions at https://www.codefn42.com/faq_routing_cakewalk.html and I was missing the MIDI echo being turned on. The selected MIDI track has an AUTO MIDI echo enabled when it is selected and is turned off, when another track is selected, so that explains what I was seeing with only one working at any one time.
-
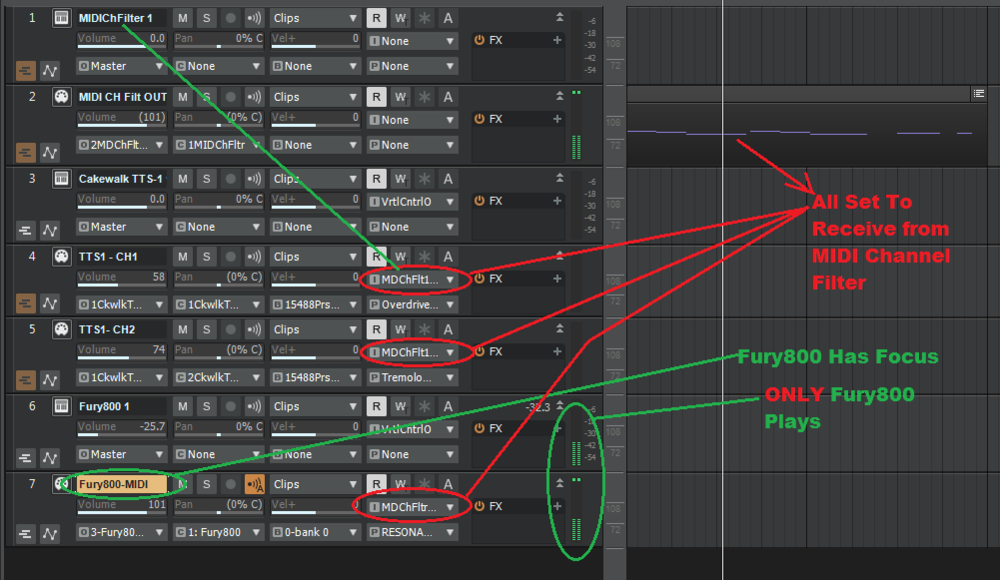
MIDI Channel Filter is ALL about MIDI out, and ONLY about MIDI out. It makes no sounds of its own. It's meant to filter the MIDI in, down to a list of user selected number of MIDI channels (that are played into it, and hence the name). And it is doing it, but Cakewalk is only playing the MIDI out to a single track at a time. Either I am doing something wrong, or Cakewalk is, and in both cases, changing the VSTi again, would simply result in the same. To mis-quote Albert Einstein - "Insanity is doing the same thing over and over again and expecting different results" I have no idea what "Nelda SoundFactory" is, nor how it would do anything more/different than a specific MIDI out VST i.e. "MIDI Channel Filter". People keep saying Kontact Player, but the "MIDI Out filter" VST (and multiple other VST's I have tried) does do MIDI out, but it appears that Cakewalk is not transporting the MIDI out, to all the tracks in unison, but only to one at a time (NB: MIDI out IS however going out). I do not wish to get into a trailing of synth after synth after synth. If MIDI out works, its not only going to be the Kontact Player that it works for.
-
AAAArrrrgggghhhhh! I'm getting the exact same behavior. Only the single destination track that has focus at any one time, receives and plays the MIDI. And correspondingly, if none have focus, none will play.
-
My mistake, You would be right. I probably downloaded the Lite version to try in SAVIHost before I installed Cakewalk, and totally forgot about it. Are there any synths bundled with Cakewalk that support MIDI Out?
-
There are two ways around this, and still I can not get it to play out to multiple "receiver" tracks. 1. Only play on the one string 2. Set the destinations to receive on MIDI OMNI (ie all channels) from Ample Guitar (free). So, that would bypass/avert that issue, but I still can not get it to play more than 1 destination I want this to work, I want to be proven wrong, in that I am doing something wrong. And to be clear, it will only play on a destination track that has focus at the time. The fact that Ample Guitar is provided as a part of a default Cakewalk install, I would really expect it to work.
-
@Starship Krupa I tried to get one MIDI track to play out to multiple tracks (and thereby multiple synths). I could get the one track to play out to one track at a time, but not multiple. Only whichever track had focus (see video). https://streamable.com/phklm2 @Nigel Mackay says below "Cakewalk doesn't handle it". I'm too am not convinced MIDI out is fully working to multiple destination tracks. I have not seen any proof of it working for multiple tracks, just statements. It should not be sensitive to the VSTi. Once the MIDI out has been given/consumed by Cakewalk, it then becomes Cakewalks responsibility to distribute that MIDI to all subscribed channels. The fact it works for one track, shows Cakewalk is clearly getting the MIDI data, and as such, the VSTi has done its job. I have tried both Ample Guitar, which has an internal MIDI out setting to be turned on, and comes with Cakewalk, and also FURY-800. They both acted the same. I also tried multiple 32b VSTi's that appear to support MIDI out, but they didn't even drive a single other track.
-
You say " Trimming is for individual clips". When I split a clip, I have TWO individual clips, so that requirement is satisfied. And I am only trimming a single one of those clips at any one time. You say "Splitting a single clip in 2 without providing a gap between them may be why Trimming isn't working here.", which was actually my first thought, especially since by manually trimming the clip a little, enabled the trimming to be applied. HOWEVER, I have since found that splitting the clip, running the trim (which appears to do nothing) and then running the exact same trimming again, works So, the second time when it does work, there is also no gap. Also, logically, it should not make any difference if there is a gap. A clip should be reduced to the time of the last midi event and its duration, regardless of other clips. As I have said before, I already have a solution(two now that I know I can simply run it twice) so am not looking for a solution. I am simply reporting a bug. Which, it is.
-
Now that I have fine tuned its repeatability, and how it could be accidentally sidestepped, I will report it as a bug. I didn't do it as a bug first, as it seemed like such a basic thing that I assumed I was doing something wrong, or very unique (eg my export options) that was triggering the fail and it worked in Sonar. Instead of a simple switch between Linear and Jump on the envelope curve. Thanks for helping clear that up.👍