-
Posts
214 -
Joined
-
Last visited
-
Days Won
8
Everything posted by Morten Saether
-
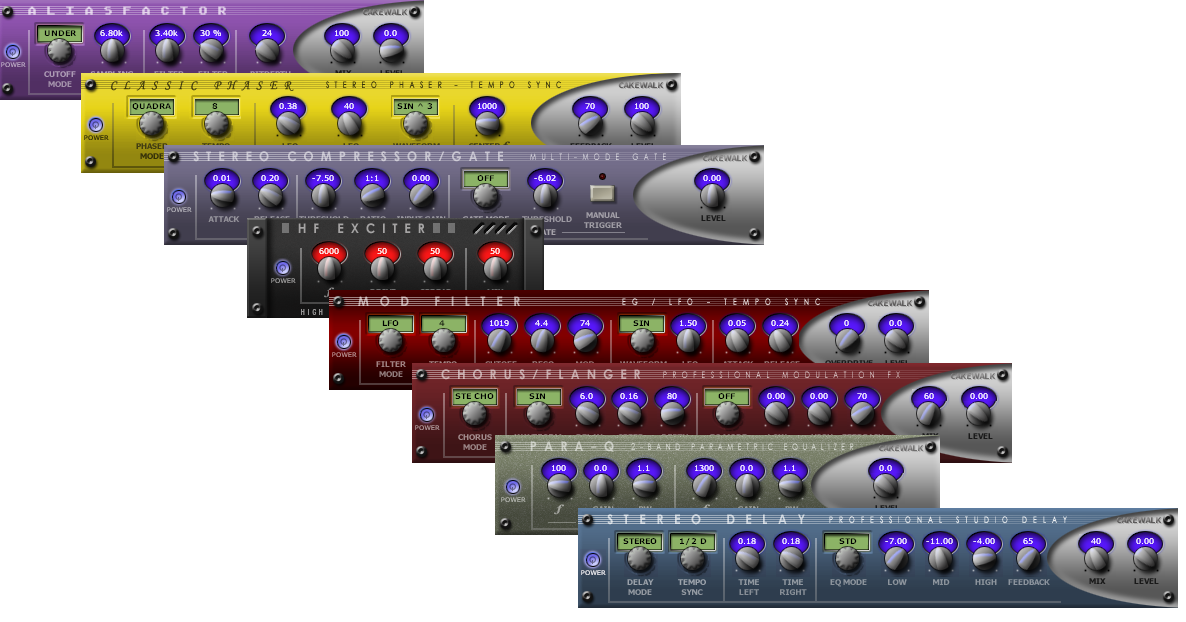
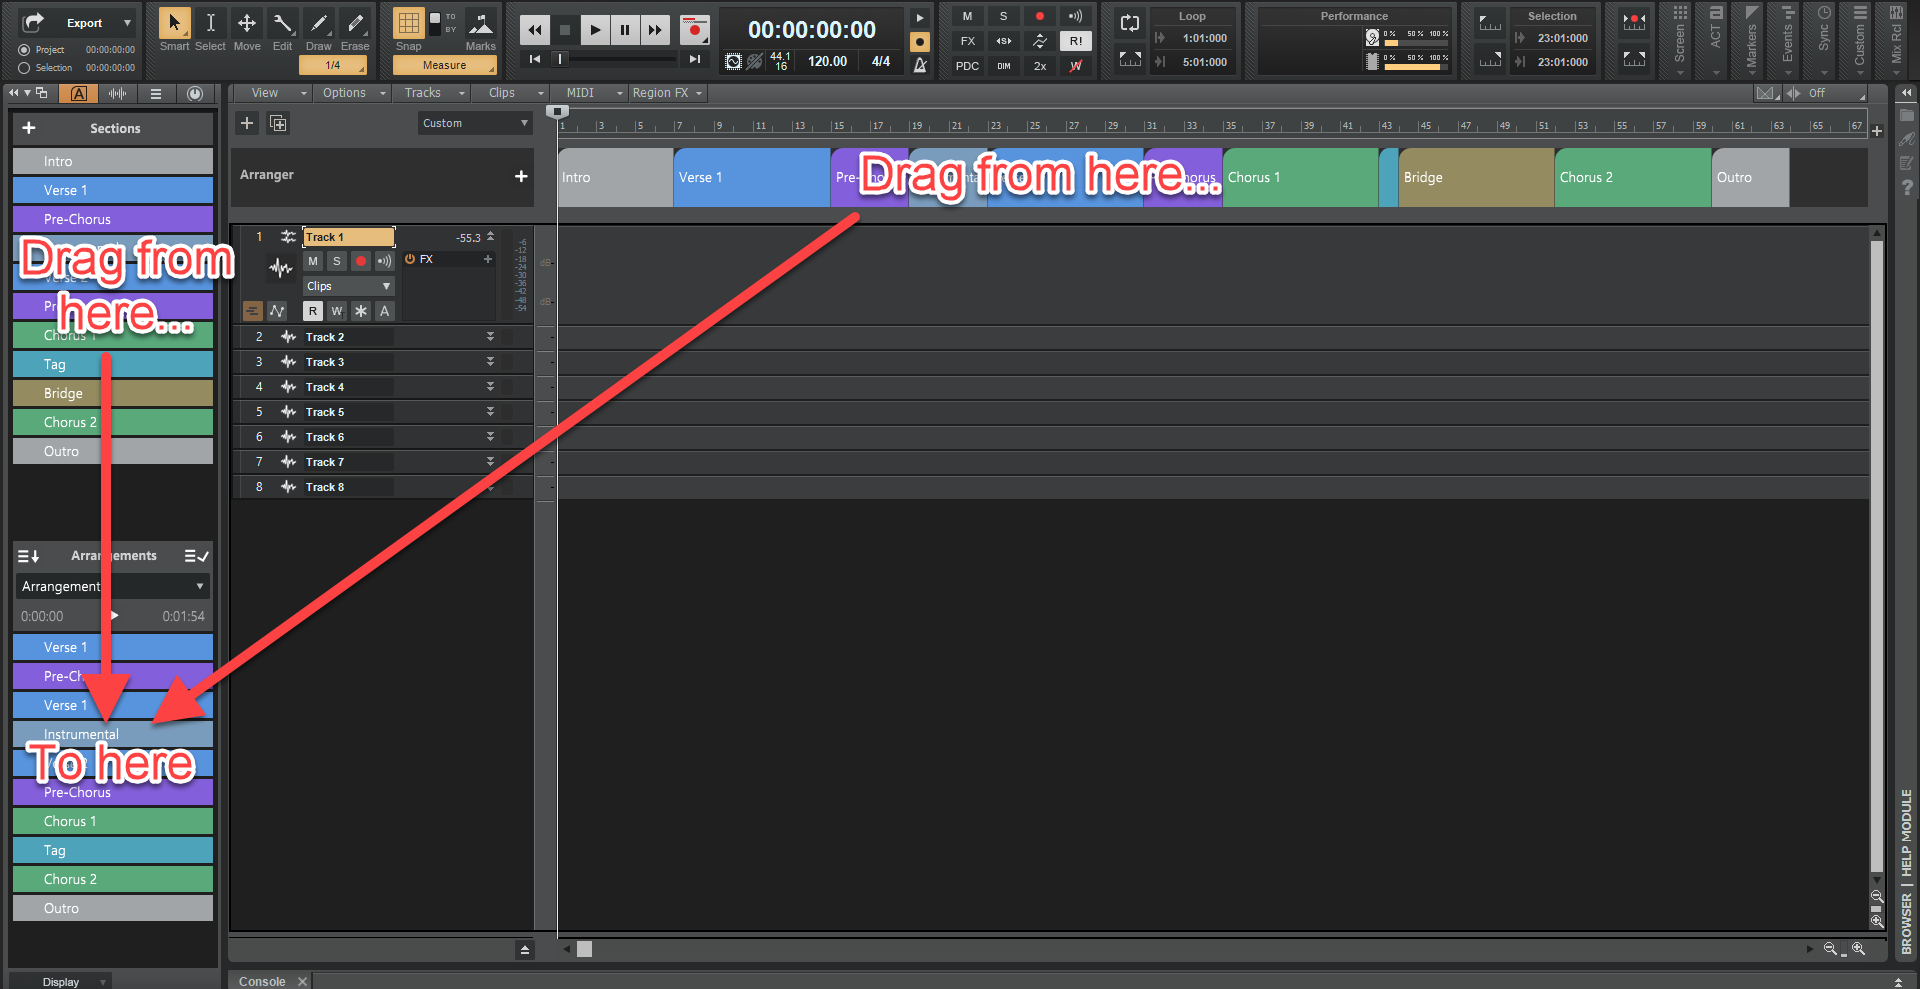
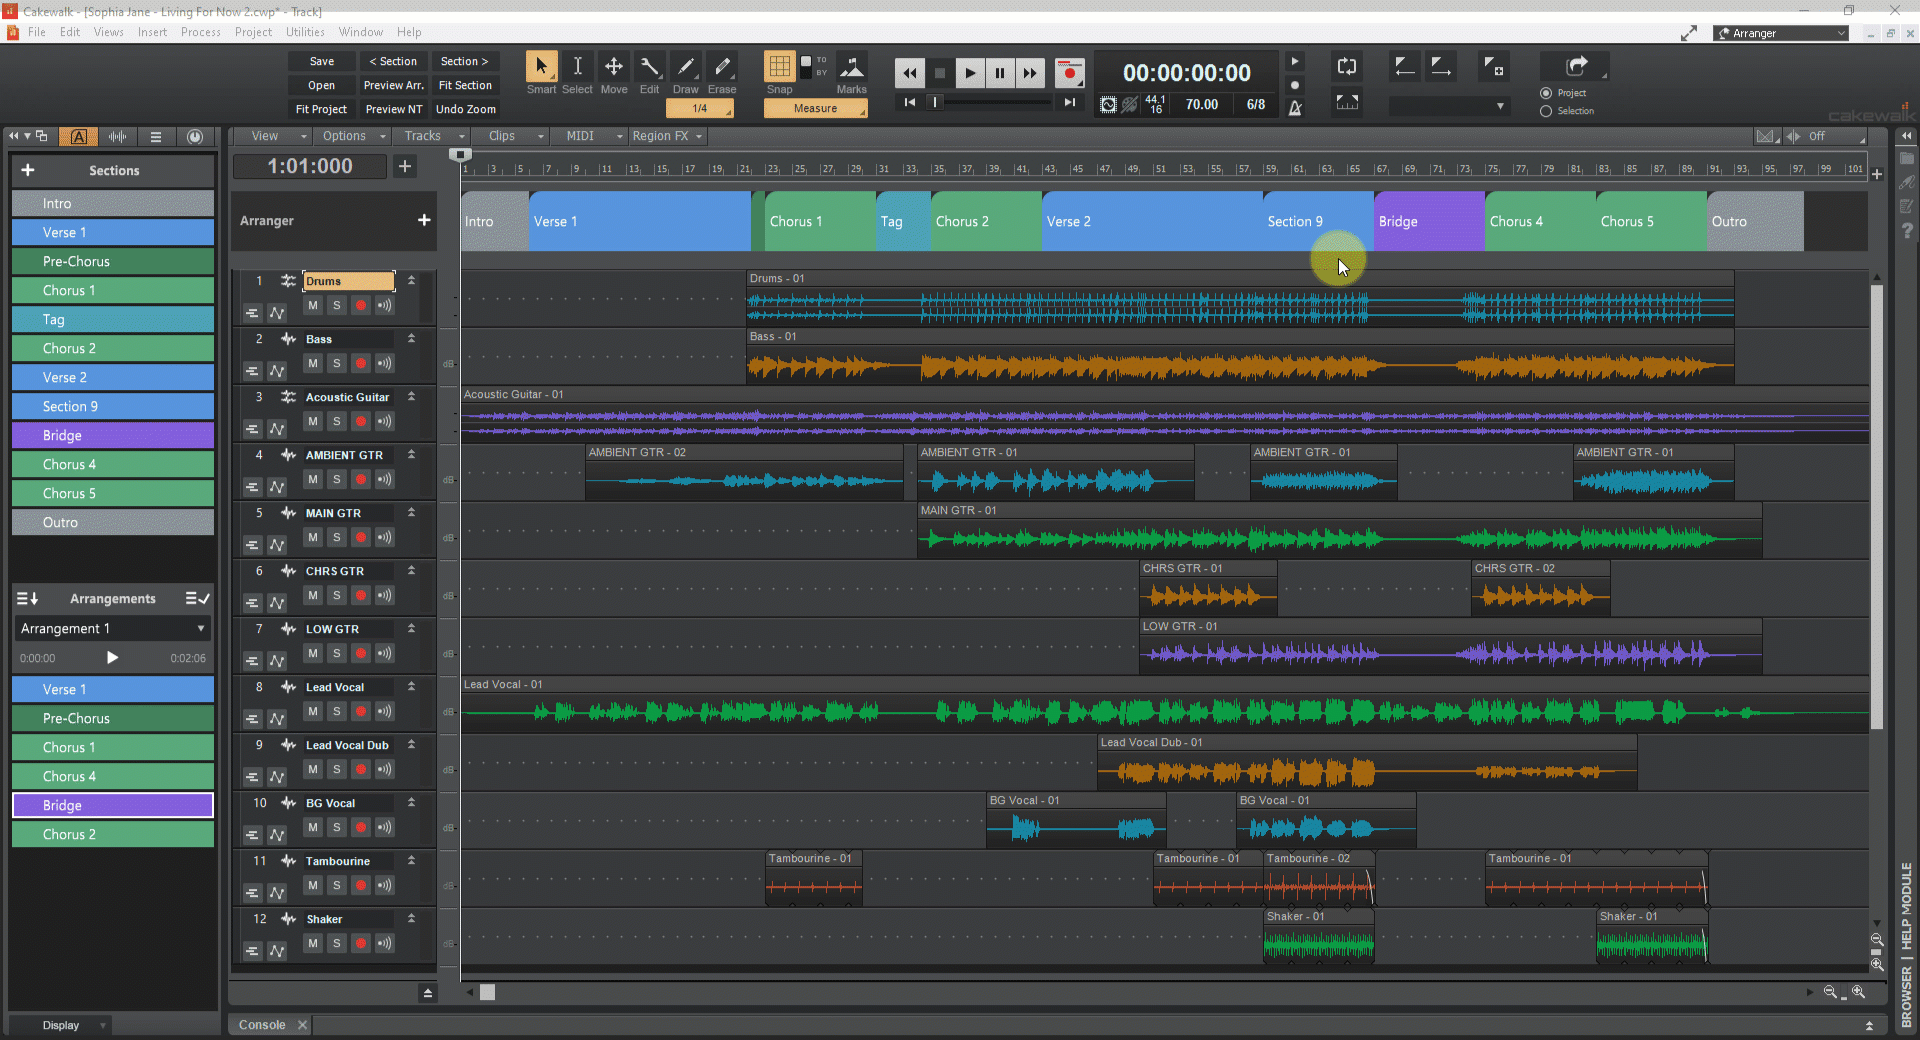
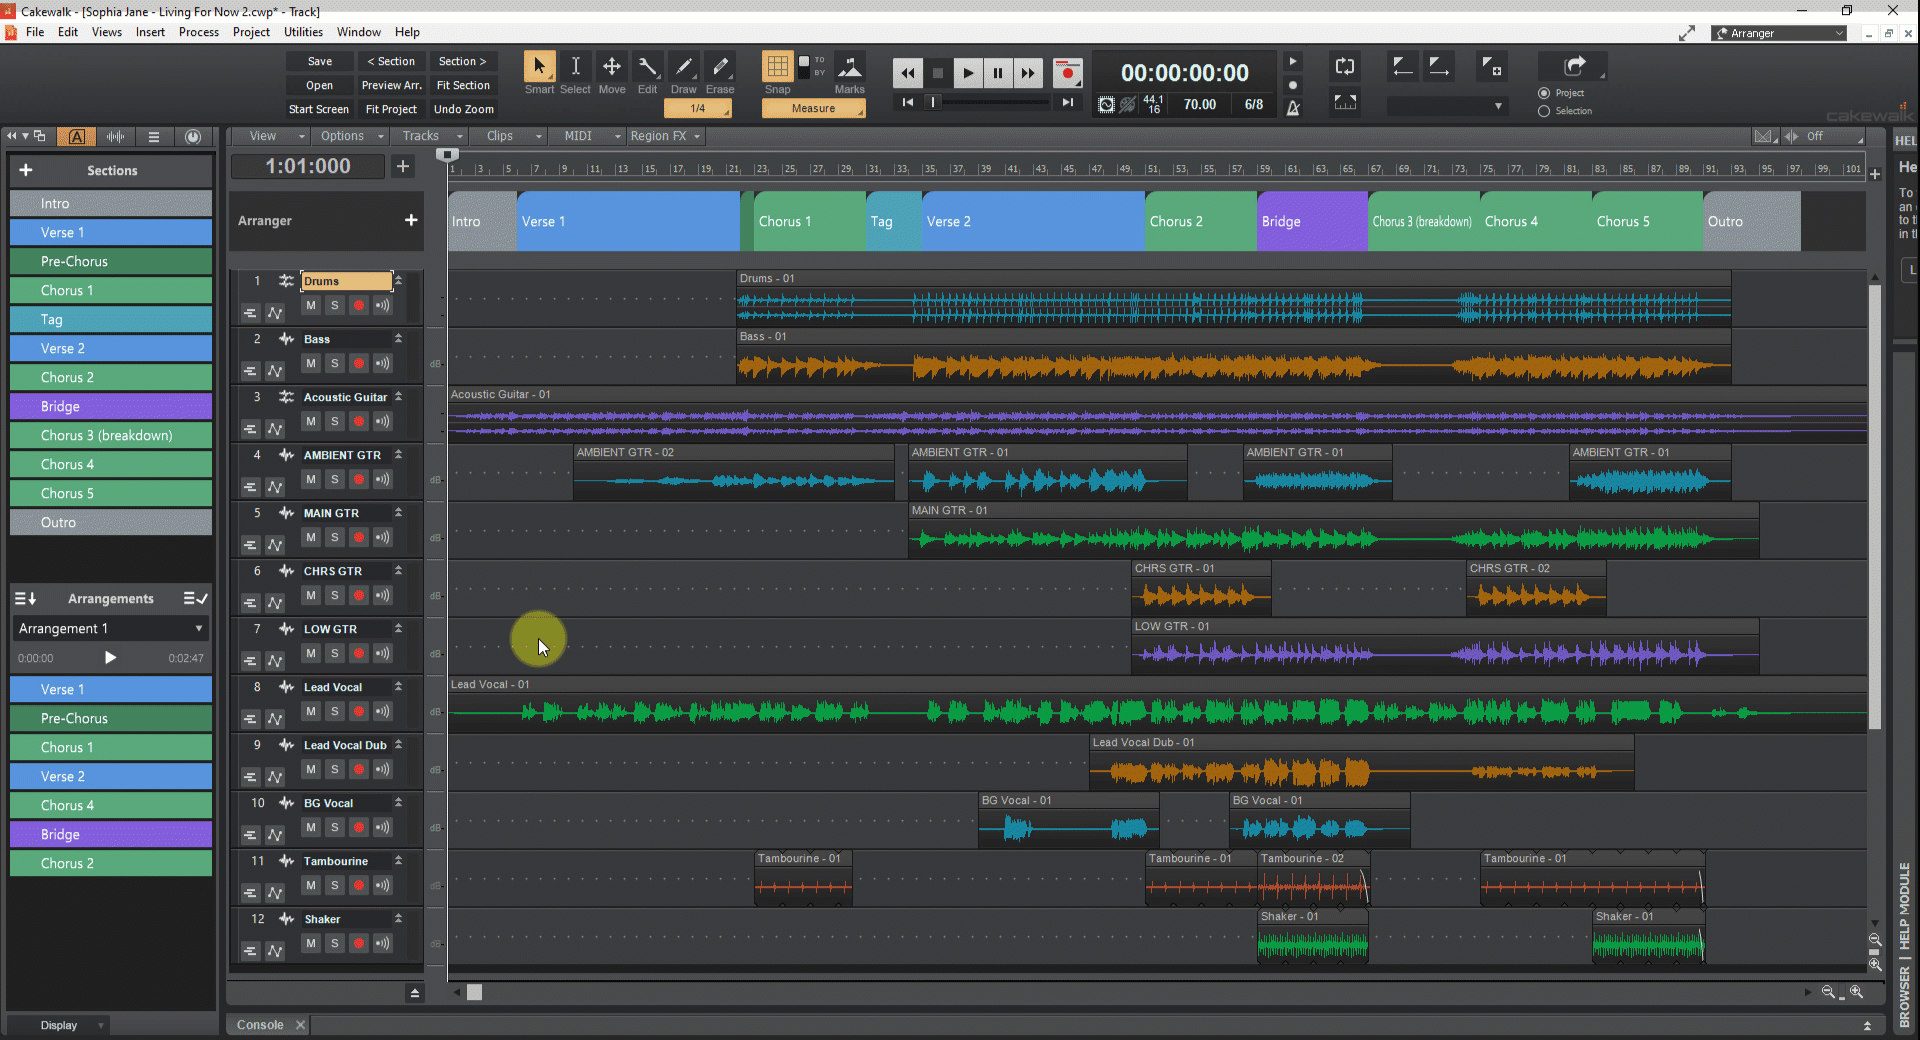
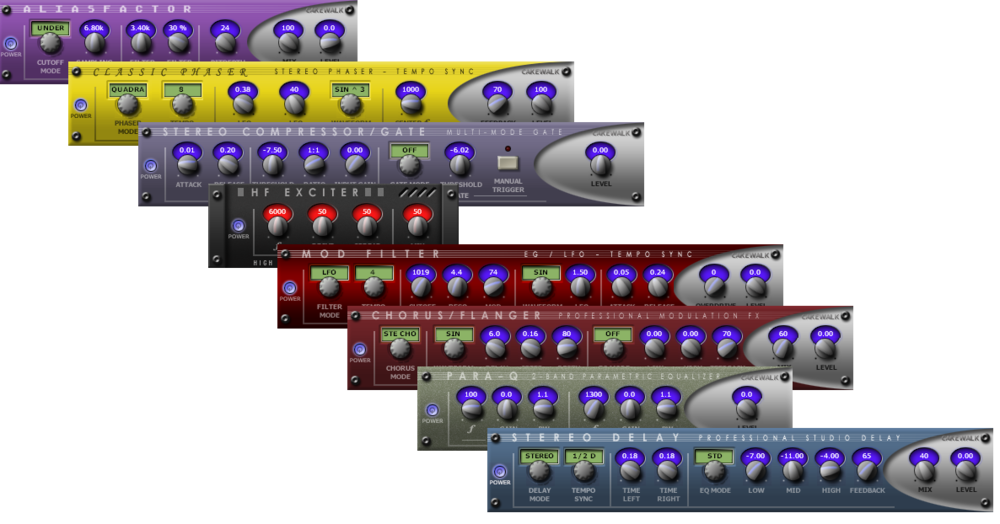
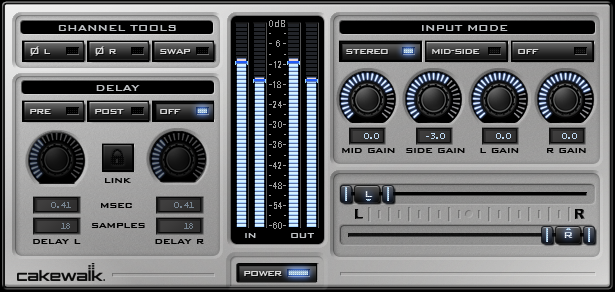
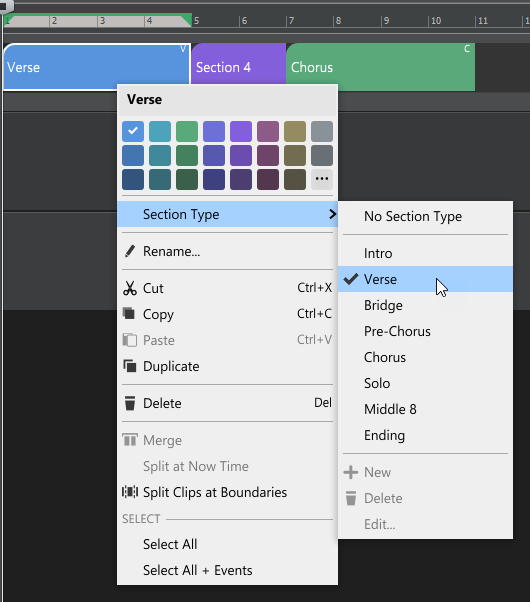
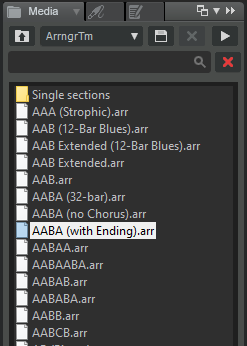
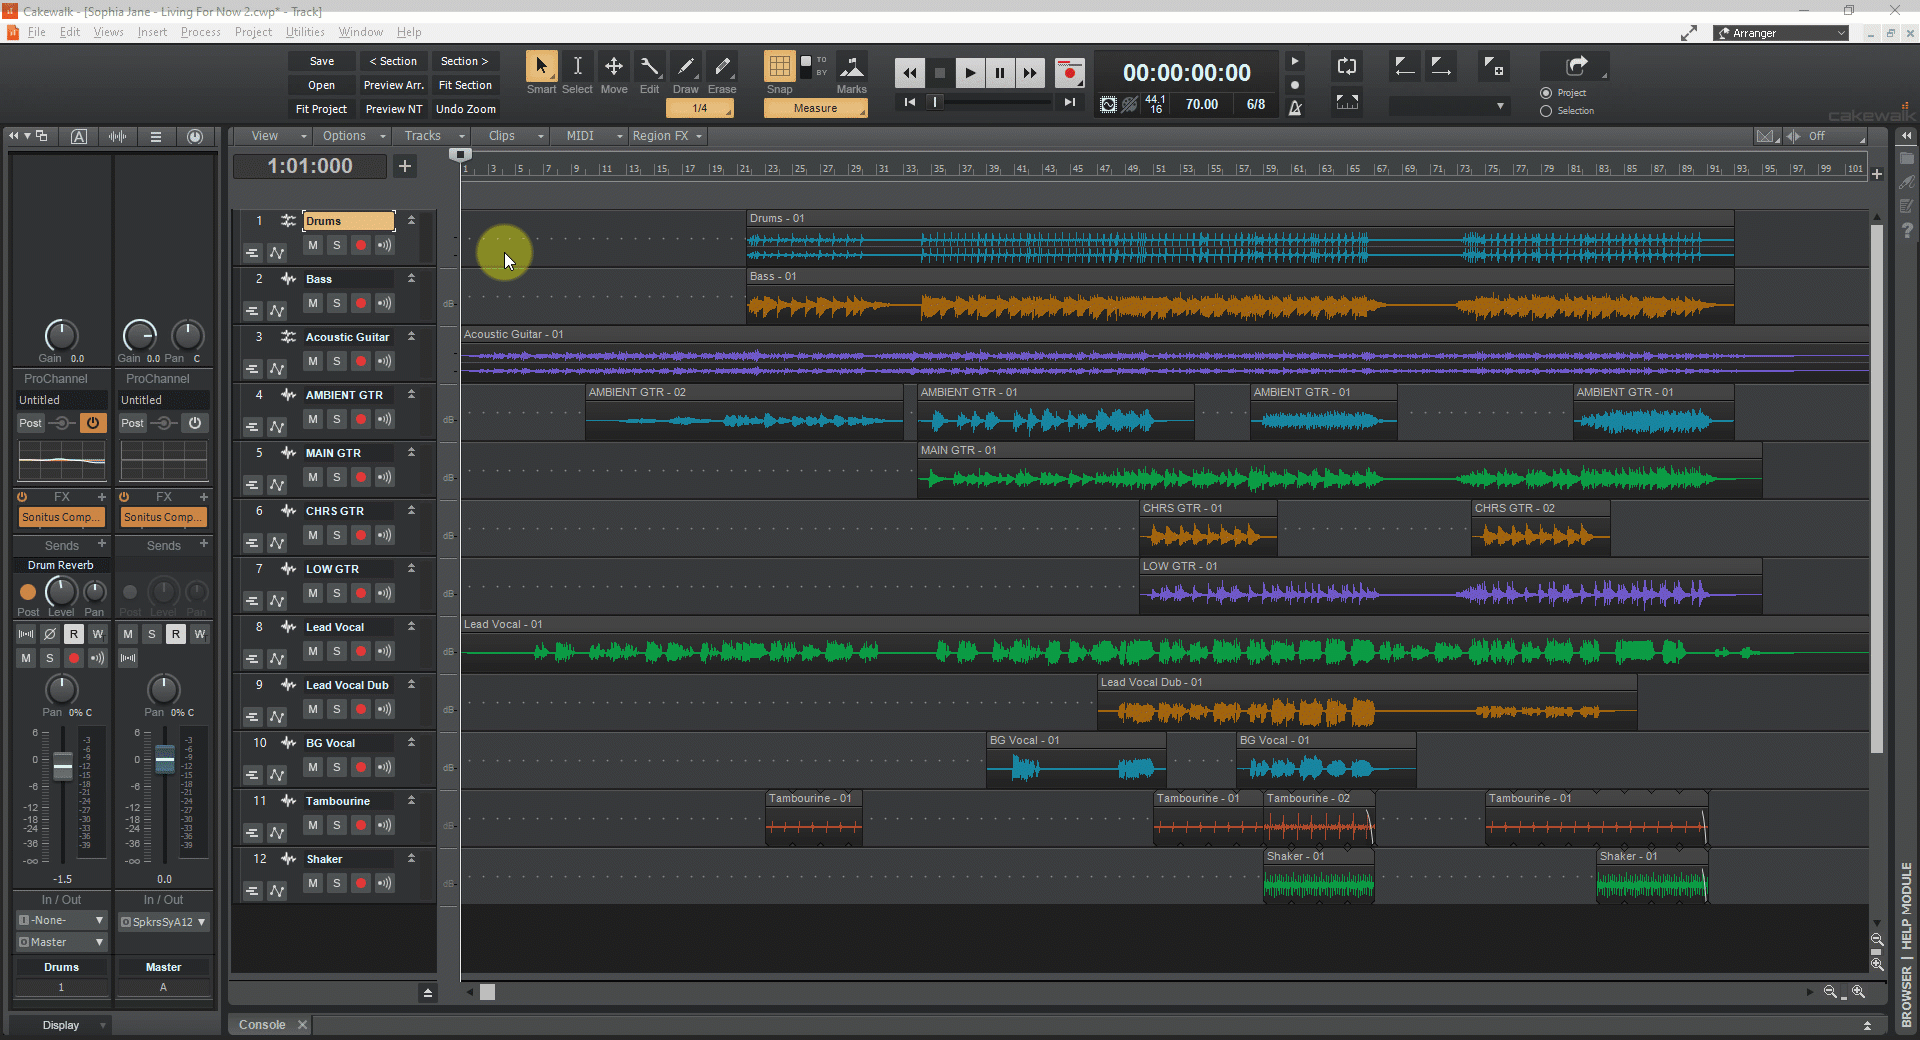
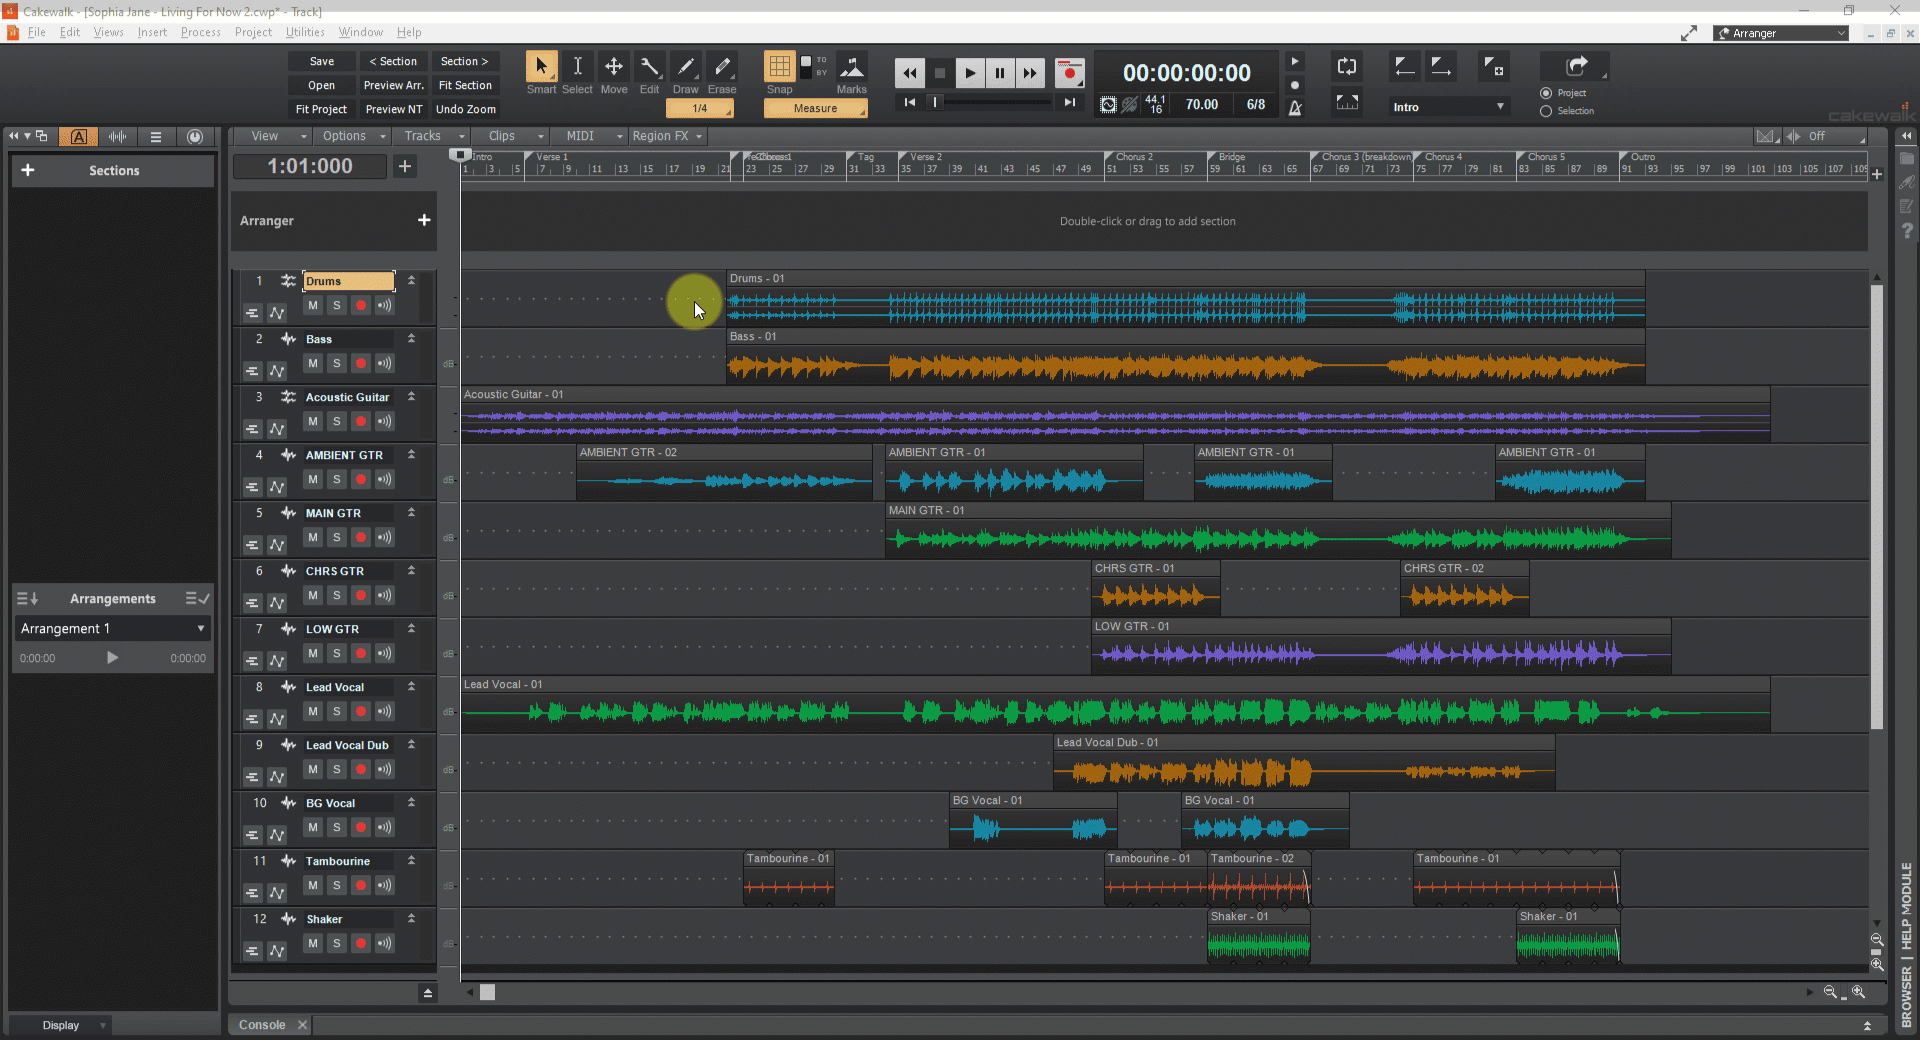
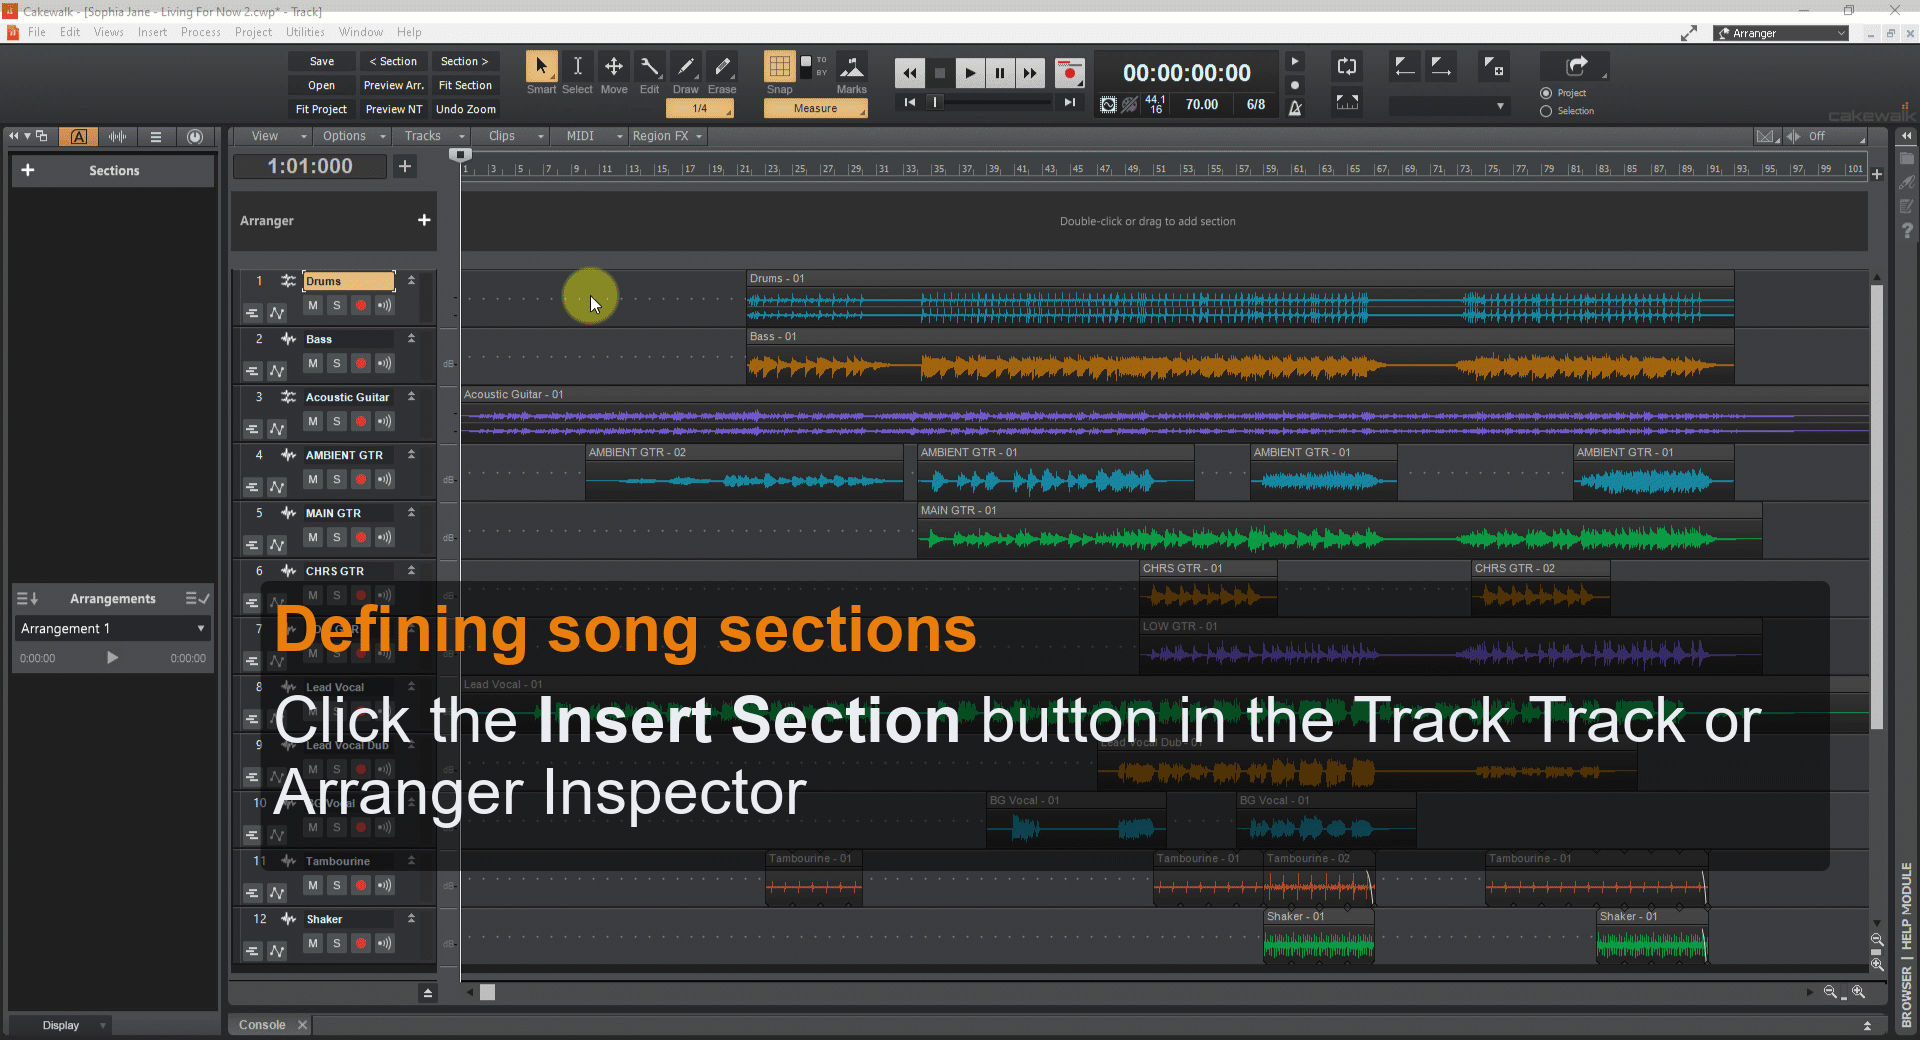
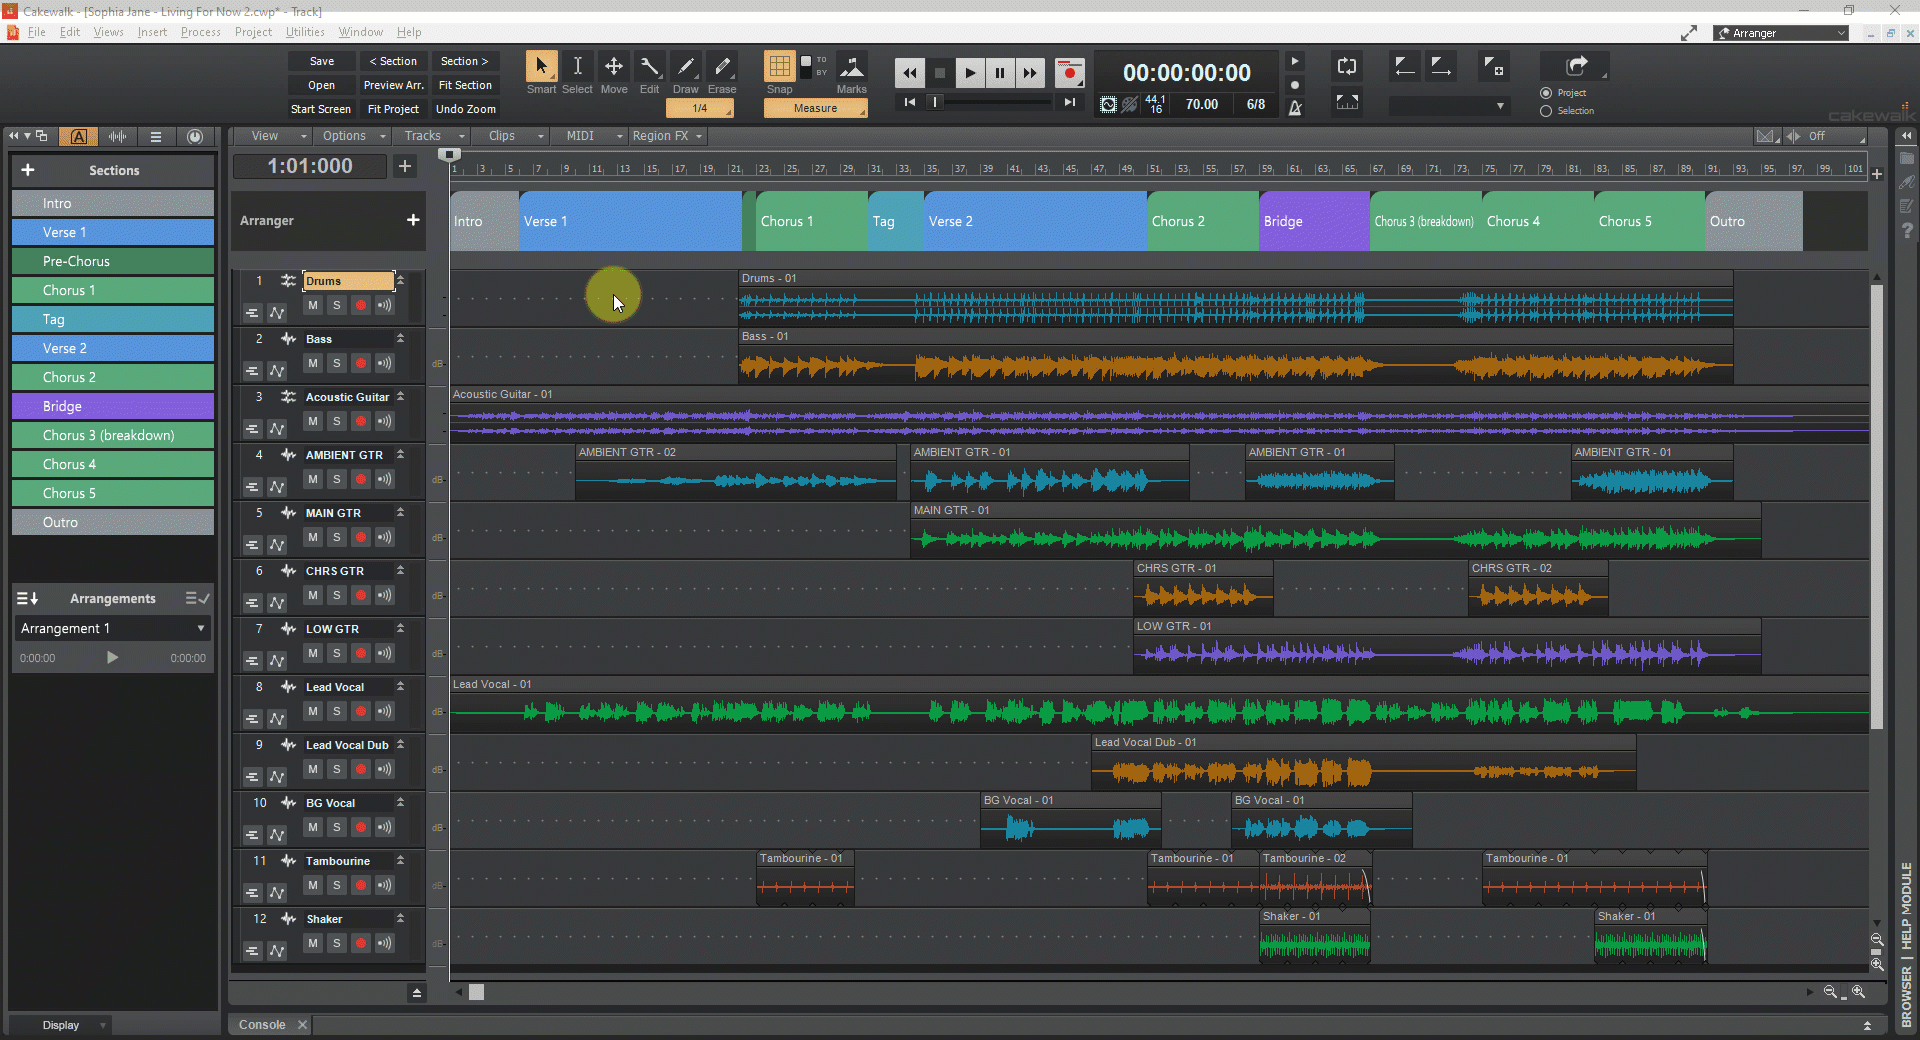
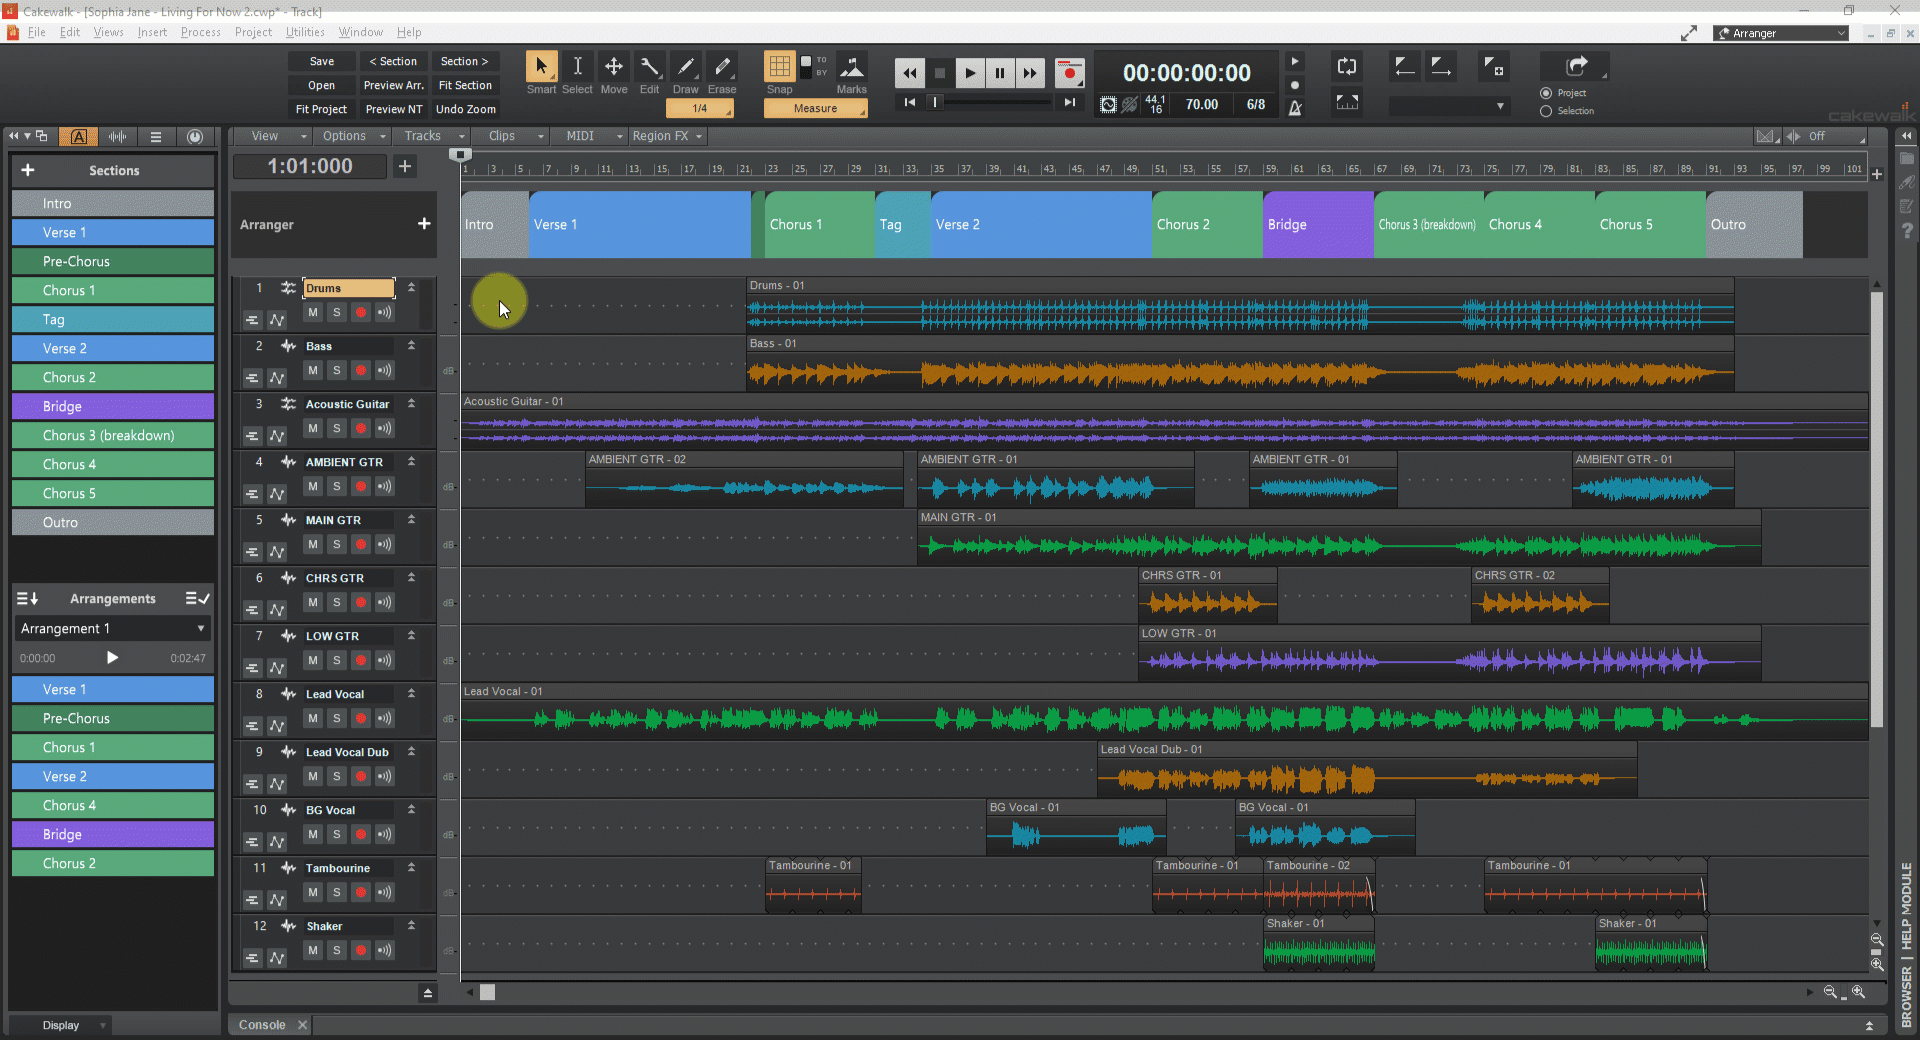
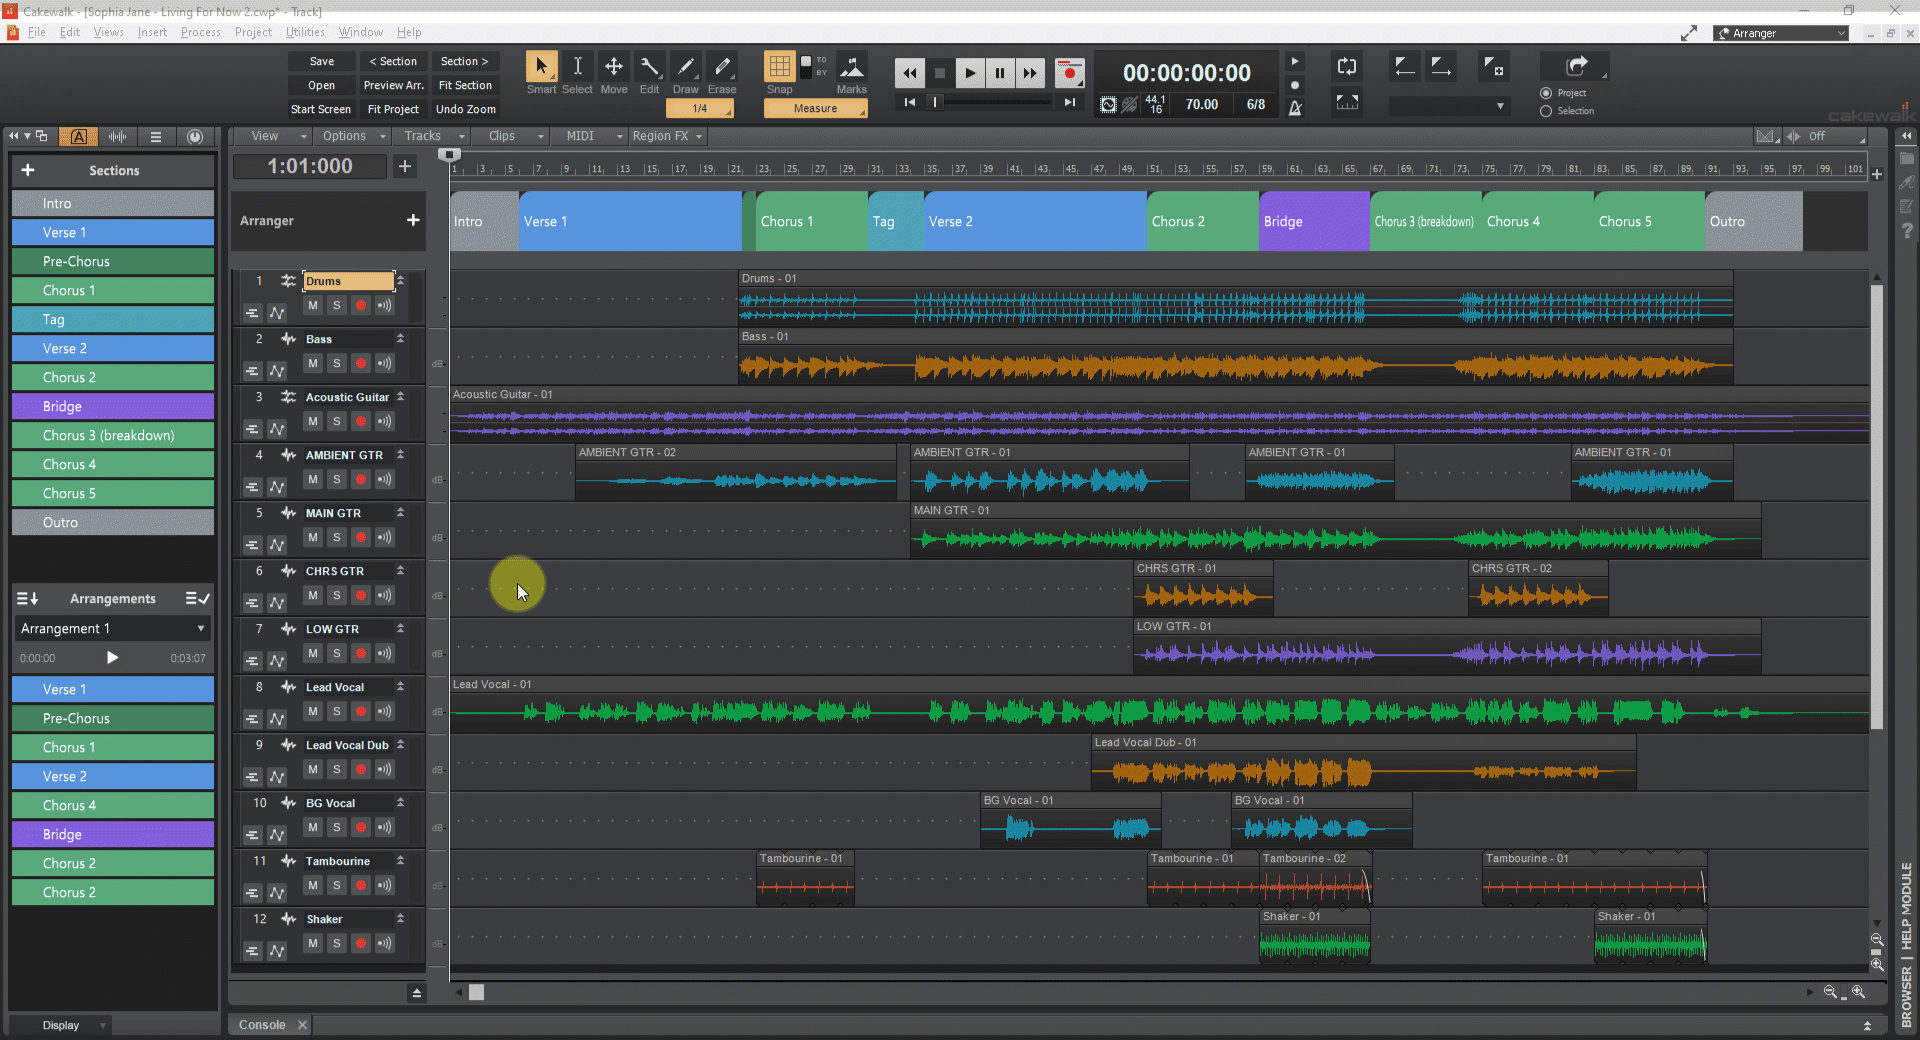
2020.07 Early Access installer now available! We're pleased to announce Early Access for 2020.07! This release introduces support for multiple Arranger tracks, Arranger section types, Arranger templates, MIDI automation on Instrument tracks, Workspace enhancements, Classic Creative Suite and Channel Tools plug-ins, new FX Chain presets, export directly to Standard MIDI File, optimizations, and much more, including over 60 bug fixes. We'd love for you to check it out before we drop the official public version. This time we're also providing an easy rollback installer should you need to quickly revert to the last public release for any reason. Please note that Early Access installers are update installers, which only update from a specific version. To install the 2020.07 Early Access build, you must be on the latest public release of 2020.05. Download Cakewalk 2020.07 EA installer Should you need to revert to the 2020.05 release, you can download the Cakewalk 2020.05 Rollback installer. If you haven't already done so, please read about the Early Access Program before participating. Thanks again for your participation! The Bakers 2020.07 Highlights For detailed info, see the attached PDF. New Features in Cakewalk 2020.07.pdf New features Multiple Arranger tracks A project can contain multiple Arranger tracks, with each track containing its own set of sections. Multiple Arranger tracks provides many benefits, including: Simultaneously declare multiple sections intersecting within a given range of time. Define and organize sub-sections within a larger section. For example, if you have a live recording of multiple songs, you can use one Arranger track to mark out each song, and another to mark out the verses and choruses within each song. Use multiple sections for generic annotation within a project. Multiple Arranger Tracks.mp4 Arranger section types Arranger sections can be assigned to an optional section type attribute, such as Verse, Chorus, Bridge, etc. Cakewalk includes many common section types, and you can create your own custom section type presets. Section types provide the following benefits: By tagging sections with type attributes, you can use Arranger templates to instantly create new arrangements from your existing sections. Quickly assign consistent names and colors to sections that serve specific musical functions in a song. Directly insert new sections that automatically use appropriate names and colors. Arranger Section Types.mp4 Arranger templates Arranger templates are pre-defined song forms that store the order in which sections are arranged. You can think of an Arranger template as a map of an entire song. Arranger templates are global and can be used in several ways: Create a new Arranger track from a template. The template is applied to the Arranger track, which creates new sections. This is useful when starting a new song and you want to quickly create all Arranger sections for a typical song form that you can fill in with music. Insert sections in an existing Arranger track. Drag Arranger templates from the Media Browser and drop them in existing Arranger tracks. Sections in the template are inserted into the target track. Create a new arrangement. If your project already contains existing sections, you can use Arranger templates to create new arrangements from the existing sections. This allows you to preview your existing sections with different song forms. Sections that exist in the template but not in the project can be optionally created at the end of the project in the active Arranger track. Arranger Templates.mp4 Show and edit MIDI automation on Instrument tracks Instrument tracks can now show and edit MIDI automation. Previously, Instrument tracks only showed the automation available for the audio output section of the track. Now both MIDI and audio automation parameters can be set from the track’s Edit Filter. Classic Creative Suite audio effects The Classic Creative Suite is made up of powerful and easy to use Cakewalk effects including Alias Factor, Classic Phaser, Compressor/Gate, HF Exciter, Modfilter, Multivoice Chorus/Flanger, Para-Q, and Tempo Delay. Channel Tools plug-in The Channel Tools plug-in provides easy and powerful channel processing for gain, Mid-Side decoding, delay and stereo panning. Channel Tools is ideal for enhancing and adjusting stereo separation for stereo tracks and full mixes. New FX Chain presets Cakewalk includes many new FX Chain presets that use the new Classic Creative Suite and Channel Tools audio effects. Export to Standard MIDI File The File > Export > Standard MIDI File command lets you directly export the current project’s MIDI data to a Standard MIDI File. Enhancements Enhanced ‘Instrument Track Per Audio Output’ When inserting a multi-timbral soft synth, you can use the Instrument Track Per Output option in the Add Track menu and Insert Soft Synth Options dialog box to specify how many Instrument tracks to create. This allows you to have multiple Instrument tracks for a single instance of a synth. However, if you specify more output tracks than the synth supports, Cakewalk will now create additional synth instances as required. For example, adding 16 TTS-1 tracks will create 4 TTS-1 instances as the TTS-1 supports 4 audio outs per instance. Workspace enhancements ‘Apply Workspace on Project Load’ option When using a workspace, you can now specify if the active workspace should be automatically applied when loading projects. This is specified with the Apply Workspace on Project Load option in the Workspaces menu. The Apply Workspace on Project Load option is disabled by default. When enabled, the active workspace is always applied to an opened project. When disabled, projects load with their saved window layout, even when a workspace is active. To apply the active workspace, re-select the workspace form the Workspaces menu. Track view View and Options menu settings are not saved in workspaces The Track view View and Options menu settings are global, and no longer saved in screensets or workspaces. This change prevents global settings from being overwritten when applying a workspace. Ripple Edit affects Arranger section move/copy operations The Ripple Edit setting is respected when moving and copying Arranger sections. Auto Crossfades is applied to Section Split/Arrangement Commit Section operations now respect the Auto Crossfade enable in the Track view. Section Split and Commit Arrangement operations will now have crossfades applied when enabled. Option to center Now Time when zooming with the keyboard The Track view Options menu has a new Center on Now Time with Keyboard Zoom option that centers the Now Time when zooming with keyboard shortcuts (CTRL+LEFT ARROW and CTRL+RIGHT ARROW). Key binding to open soft synth on current track A new key binding named Open Soft Synth on Current Track allows you to open the soft synth UI on the focused Instrument track. You can assign the key binding in Edit > Preferences > Customization - Keyboard Shortcuts (under Area: Global Bindings). Improved loading of synth data Loading soft synths is now a two step process: first the plug-in is loaded, then its content is loaded (samples, etc.). A new toast notification shows the loading status. Enhancements to Duplicate Selected Clip(s) command The Duplicate Selected Clip(s) command now respects the selection when duplicating instead of reverting to clip size. It also no longer sets the Now Time during playback. Toggle Clip Gain edit filter You can quickly toggle between Track Volume and the last/previously shown data type on the current track. To do so, press the = key. This only works on the current parent track, not in Automation lanes. To toggle between Clip Gain and the last/previously shown data type on the current track, press SHIFT+=. Improved handling of temporary removal of control surfaces Cakewalk now better handles the temporary removal of devices related to connected/configured control surfaces. If the MIDI input or output ports are not available, the control surface is now disabled. The control surface name will be shown in parentheses and any missing ports will be shown as -- None --. Regardless of whether MIDI ports have been remapped or not as a result of adding or removing MIDI devices, only user changes to the control surface setup will be saved. Unchanged control surfaces will retain their original settings. Therefore, if a MIDI port is unavailable and the ports are shown as -- None --, as long as this surface is left unchanged, it will automatically restore its previous settings the next time Cakewalk is restarted with the MIDI device available. ALT+drag in time ruler to select both tracks and buses By default, making a time selection by dragging in the time ruler only selects tracks. To select both tracks and buses, hold down the ALT key while dragging in the time ruler. ‘Split MIDI Notes’ and ‘Non-Destructive MIDI Editing’ options in MIDI menu The Non-Destructive MIDI Editing and Split MIDI Notes options that are found in the Edit > Preferences > Customization - Editing dialog box impact Arranger track editing, so we have made them more accessible by also adding them to the Track view MIDI menu: Non-Destructive MIDI Editing. Select this option to make all MIDI editing non-destructive. When toggled on, this option forces deleted data to be retained even though it is not visible. When you split or crop clips, the old MIDI events are still there but they're hidden. So you can extend the ends of the clips to reveal the MIDI events again. If this is turned off, you lose those events when you split. In most cases you should leave this option enabled. Split MIDI Notes. Select this option to split any underlying MIDI notes when you split clips, and insert MIDI chase events (such as continuous controllers, Pitch Wheel, and Patch Change) at the split position. The advantage of this is that you don’t get lost notes when copy/pasting or cut/pasting notes that start just before the split point. The disadvantage of this is that if you extend the clip ends, as the note has now been split, it will be retriggered at the split point. The menu commands are also available as key bindings. You can assign the key binding in Edit > Preferences > Customization - Keyboard Shortcuts (under Area: Track View). Add Track menu now supports plug-in layouts The Add Track window’s menu now supports the use of plug-in layouts. The Plug-in Browser and Add Track menu display the same layout. Copy and assign automation envelopes Copy and Assign Envelope is now available via the context menu for envelopes to facilitate copying an existing envelope and assigning it to a different parameter. Staff view respects global Snap to Grid settings The Staff view respects the global Snap to Grid settings for note positioning when drawing notes. Optimizations Improved scrolling in the Track view with Snap to Landmark Events enabled. This fixes a reported issue where Snap to Landmarks with AudioSnap transients was causing scrolling to become sluggish. Bug fixes Stability Crash attempting to rename drum map note in Piano Roll view Crash when attempting to duplicate Instrument track Crash when closing Cakewalk with Arranger context menu open Crash when re-doing a Copy after undoing a Create Section Crash when applying arrangement in project Crash importing MIDI file to project iZotope Iris crashes if the project sample rate differs from the default sample rate Automation Bus automation deleted when dragging Arranger section if no clips present Automation for multiple instances of a plug-in delete unexpectedly MIDI automation does not update slider on Instrument track lanes Custom Automation lane names are easily lost Copying clips with envelopes creates extra envelopes on Instrument tracks Ability to toggle between Clips and Clip Gain envelope on active track Bus Envelope being copied to tracks on Cut/Paste Paste from bus envelopes go to synth envelopes unexpectedly UI Ripple Edit button status incorrect when opening template Piano Roll view Snap button does not have tooltip Export as MIDI defaults to .cwp file extension Selected buses should give clearer indication of selection Scrolling in Clips pane is sluggish with Snap to Transients enabled Current tab in Multidock does not persist Allow for background colors in Synth Rack Change text for "Move Checked Devices to top" button in Preferences > MIDI - Devices to specify outputs Arranger If selection does not include audio, automation is not moved with sections Arranger Preview should not be impacted by Stop at Project End Arranger Sections not rippling properly when moving clips with Ripple Edit set to ALL Ensure only MIDI tracks are having trim applied after splitting notes in arranger commands Dragging audio to extract tempo broken by Arranger code Not possible to drag multiple sections that are lasso selected Section events do not move/copy if the selection only contains long MIDI notes outwith the selection extent Clicking on project end icon in control bar doesn't include sections Update section selection on Project Selection Extent change Creating new section should snap to nearby section or time boundary Inconsistent behavior between section selection move and single section move Disable Autosave triggering during Commit Arrangement Show onboarding text in Arrangements inspector Commit arrangement should auto-crossfade if Auto Crossfade is enabled Misc. Cropped MIDI notes chase unexpectedly Aim Assist Text status not persisting Auto Crossfade button not updating between projects Nudge in tracks fails to crossfade Unexpected results when nudging comped clips with auto crossfades Automatic Crossfades does not bind as expected in Preferences Cakewalk includes FX Chain presets that reference non-included plug-ins Autosave firing every few patch changes in VSTi Projects with Kontakt load slowly if sample rate differs from default sample rate Increase MackieControl.ini plug-in entry limit Disabling 'Recycle Plugin Windows' not working as expected Dragging plug-ins from browser stops playback CTRL dragging a plug-in should not open the plug-in UI Staff view should respect the global snap setting for note positioning when drawing notes Unable to move notes in Staff view Right-click should not clear the selection in the Piano Roll and Staff views Reduce minimum control surface timeout to 25ms Select All causes Insert > Time/Measures to only insert at beginning of project Shift + +/= should toggle clip gain for Lanes Duplicate Instrument track not working when drum maps are defined Incorrect behaviour when moving multiple clips past the end of a cropped clip Ripple Edit adds time unexpectedly when pasting controllers MIDI Ripple Edit in Lanes fails partially Show and fit selection command is not working for tracks in folders Show and Fit Selection for CLIPS in Track Folders does not work as expected Export Audio does not append chosen file extension


- 226 replies
-
- 28
-

-

-
We appreciate the fact that different users have different preferences. The next release will have an option to center the Now Time when zooming with the keyboard.
-
[CLOSED] 2020.05 Early Access 2 (EA2) installer now available! Please note: EA2 is a release candidate that will be released early next week, pending any last minute critical issues reported by testers. Our sincerest thanks to those of you who have provided feedback on Early Access 1 - your support this week has been fantastic! We've addressed all issues reported by Early Access 1 testers and found opportunities for additional refinements as well. We invite you to try out the latest updates in EA2. Please note that Early Access installers are update installers, which only update from a specific version. To install the 2020.05 EA2 build, you must be on the latest public release of 2020.04 or 2020.05 Early Access 1. Cakewalk 2020.05 EA2 installer Should you need to revert from the 2020.05 EA2 build to the public 2020.04 release, you can download the Cakewalk 2020.05 EA2 to 2020.04 Rollback installer. If you haven't already done so, please read about the Early Access Program before participating. Thanks again for your participation! The Bakers New in Early Access 2 Misc: Major UI improvements to prevent screen flickering when loading projects or switching between open documents Exporting with Thread Scheduling model 3 can fail when plug-in load balancing is enabled Playback glitches with Thread Scheduling model 3 and plug-in load balancing enabled With console open in larger projects UI scrolling can be sluggish Under high system load, UI is unresponsive and playback cannot be stopped Using Clip Gain on some Groove Clips causes unexpected drawing when clipping Null Pointer crash after reordering automation lanes in attached project Committing an arrangement containing clips set to absolute time moves data past the end of the original project Deleting "n" folders only deletes one folder Make Rename Clip available in key bindings Synth and bus automation is not selected after duplicating clips Early Access toast notifications added Dragging ARA clips out of the Clips pane can impact VocAlign clips to lose timing Allow .midi as a supported MIDI File extension for reading Host reports incorrect path for VST2 plug-ins via audioMasterGetDirectory View list of updates in Early Access 1
- 32 replies
-
- 12
-
-
-
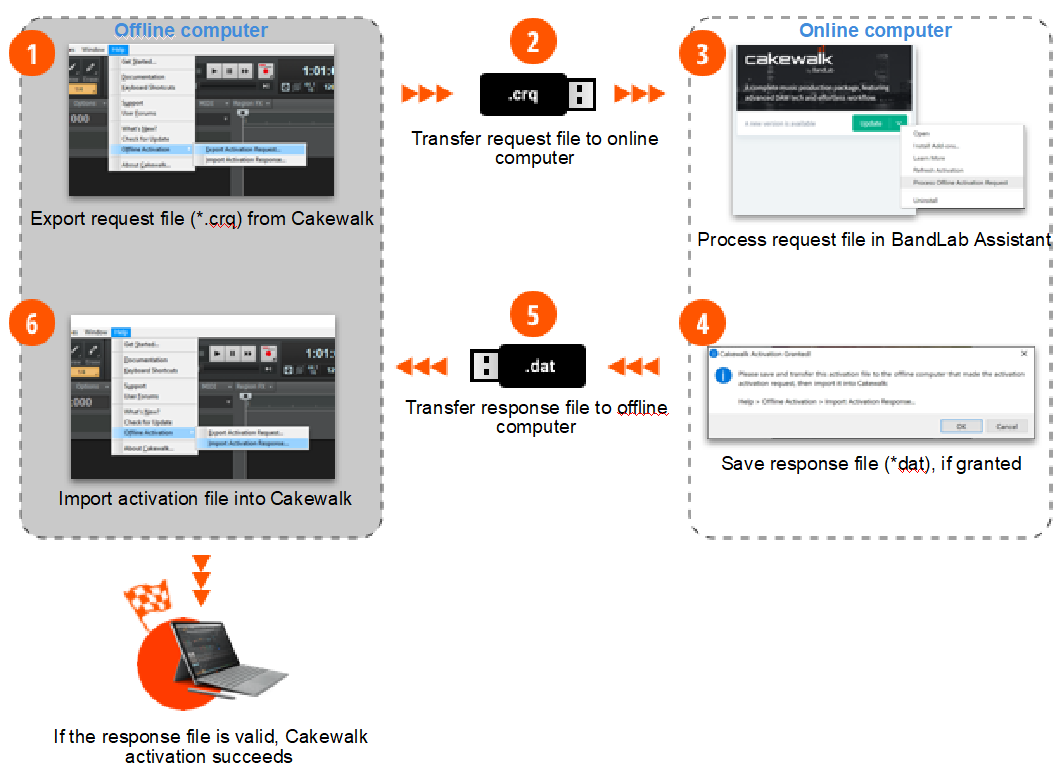
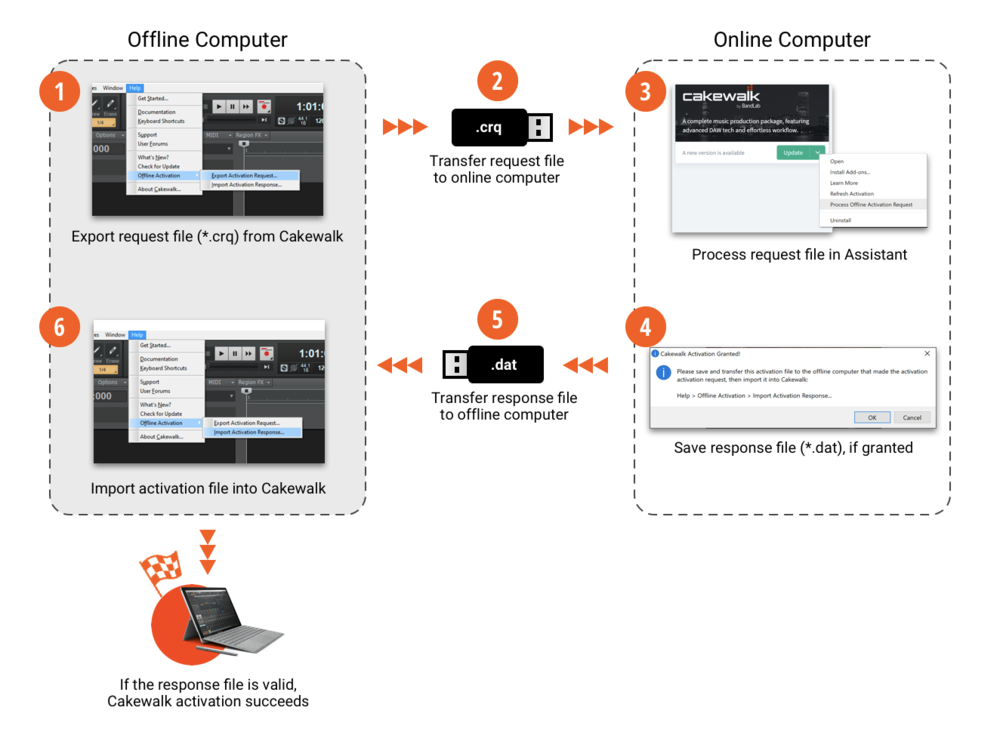
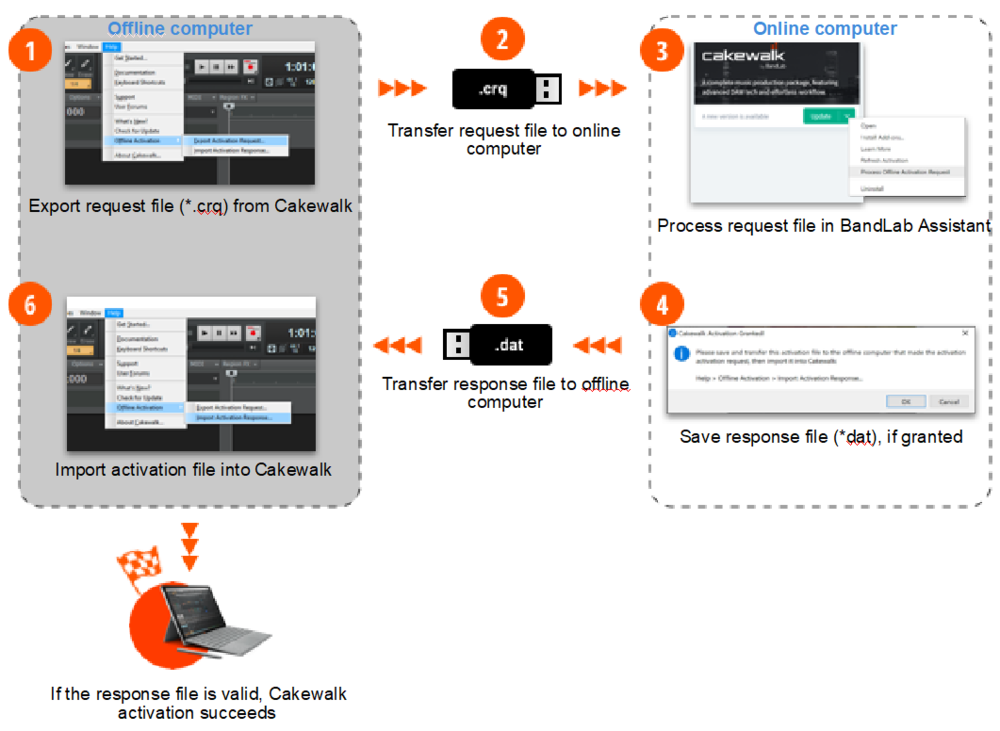
Introduction The 2020.05 release introduces dynamic waveform scaling when changing clip automation, offline activation, enhancements to mono plug-in support, improved mouse wheel handling, lots of automation enhancements, smoother UI transitions, engine/UI optimizations, and over 60 bug fixes, all in keeping with our goal of making CbB as reliable and enjoyable as possible. The following highlights are intended to provide an overview of the more significant changes. Please also refer to the new features section of our documentation for more detailed information on the features. Please give us feedback on this release. We hope you like it! 2020.05 Highlights Dynamic waveform scaling when changing clip automation When Display Clip Fade/Envelope Attenuation is enabled in Edit > Preferences > Customization - Display, Cakewalk dynamically updates the waveform amplitude when changing clip fades, clip gain automation and clip pan automation. The waveform display is pre clip FX Rack and only applies to clip automation, not track automation. Additionally, clip gain and pan envelopes are not applied to active Region FX clips. i.e. If you have a clip gain envelope on a Region FX clip, it will be ignored unless the effect is bypassed. The Display Clip Fade/Envelope Attenuation option is now also available as a key binding in Edit > Preferences > Customization - Keyboard Shortcuts (under Area: Track View). Offline activation Activation is the process by which Cakewalk validates that your software is genuine and being used in accordance with the license agreement. Cakewalk can now be activated by an online or offline process. Cakewalk will operate in Demo mode until it is activated, and saving and exporting will be disabled. A toast notification appears at the bottom of the screen to inform you if Cakewalk has not been activated yet. If your computer is connected to the internet, click the toast notification to open BandLab Assistant and activate Cakewalk. If Cakewalk is installed on a computer that is not connected to the internet, you can use offline activation as long as you have access to another computer that is connected to the internet. To use offline activation In Cakewalk, go to Help > Offline Activation > Export Activation Request to open the Save activation request dialog box. Select the folder you want to save the activation request file to, then click Save. Cakewalk saves a Activation request.crq file. This file is encrypted and machine-specific, and can only be used to activate Cakewalk on the machine that was originally used to create the Activation request.crq file. By default, Cakewalk appends a timestamp to the file name, using the following format: <Month><Day><Year>_<Hour><Minute>. For example: 052120_1157Activation request.crq. Copy the Activation request.crq file to removable media, such as a USB flash drive, that you can transfer to another computer that is connected to the internet. Using an online computer, open BandLab Assistant and sign in with your BandLab ID and password. Click the Apps tab. Under Cakewalk by BandLab, click the drop-down arrow next to the Open button, then click Process Offline Activation Request. If activation is granted, BandLab Assistant generates an Activation response.dat file. Copy the Activation response.dat file to removable media that you can transfer back to your offline Cakewalk computer. In Cakewalk, go to Help > Offline Activation > Import Activation Response to open the Import activation response dialog box. Select the Activation response.dat file and click Open. If the response file is valid, Cakewalk is activated. Early Access toast notification Early Access availability is checked whenever normal updates are checked, and a toast notification appears if an Early Access build is available. The Early Access Program provides pre-release versions of Cakewalk to the public for general testing and issue reporting. We provide Early Access builds to help us get better real world test coverage from users, which is useful to improve the reliability and quality of our releases. Participation is 100% voluntary. Please read this topic to learn more about the program. Enhancements Mono plug-in support changes This release greatly improves the FX Rack handling with respect to mixing and matching mono/stereo plug-ins. These improvements are across the board and work in track/bus/clip FX Racks, FX chains and the ProChannel. These changes apply primarily to compatibility with pure mono plug-ins (mono-in, mono-out). Mono in stereo out plugin compatibility will be addressed in a future update. Bypassing or removing plug-ins in an FX Rack, Rack bypass or global FX bypass operations will now revert any mono/stereo interleave changes caused by the plug-in, and recalculate delay compensation properly. Changing the mono/stereo interleave from the track strip button now updates the FX Rack routing correctly (Note: this is dependent on whether the ProChannel bin is pre FX Rack and if it contains mono plug-ins). Pitch shifted audio and distortion were symptoms of issues that are fixed in this release. This could occur under multiple scenarios, such as moving plug-ins, bypassing, deleting or undoing. Improved mouse wheel handling Console view vertical scrolling via mouse wheel is less prone to inadvertently adjusting parameter values if there is a brief pause during the scroll gesture (for example, while vertically scrolling with the mouse wheel, suddenly it starts scrolling the volume slider instead). The internal timer that waits for inactivity before treating the next mouse wheel movement as a new operation has been increased from 500ms to 1,000ms. This ensures that the current scroll operation doesn't change mid-gesture. In the Console view, tooltips dynamically show values when changing parameters via mouse wheel. FX Racks for tracks, buses and clips can be scrolled via mouse wheel. Increased contrast of ghosted envelopes The color contrast of ghosted automation envelopes has been increased, making them easier to see against the dark Clips pane background when Automation Lanes are collapsed. Clicking on the bus pane now automatically sets the bus focus strip This facilitates copying and pasting bus envelopes by clicking and pasting. Scrollable Clip FX Rack in Inspector Clip FX Racks in Inspector now display up to 10 plug-ins and are scrollable using both mouse wheel and the scroll bar. Improved support for recording automation via numeric input When recording automation, envelope nodes can now be recorded by typing a value in the pop-up edit controls in the Inspector, Console view, Track view, ProChannel EQ, and EQ fly-out module. The numeric input will be recorded as a Jump during automation recording. To show the numeric input pop-up, give focus to a control or its value display, then press F2, or double-click the value display. Improved recording automation of synth parameters Multiple synth parameters can be recorded in a single record pass and all envelopes are now retained. While loop recording, in order to avoid clutter the automation preview only shows the last loop record pass. All recording envelopes will be displayed when you stop playback. Improved support for copying and pasting automation envelopes Automation envelopes can now be easily copied and pasted from tracks to buses and vice versa. To copy track automation to a bus, first select and copy the envelope from the track, then click on the target bus or lane and paste. You can also copy and paste bus automation to tracks the same way. Moving or copying arrangement sections now properly manages copying and pasting the associated bus and synth automation envelopes. Bus delete stability improvements Bus deletion can now be performed while the transport is rolling without stopping the audio engine. Also an intermittent crash and app shutdown on undoing bus deletion was solved. Rename Clip key binding The Rename Clip command is now available as a key binding in Edit > Preferences > Customization - Keyboard Shortcuts (under Area: Track View). Support for .midi MIDI File extension In addition to .mid, the .midi file extension is now supported for reading. Track view's View and Options menu settings persist globally The Track View’s View and Options menu items now persist globally instead of being stored within screensets. Build numbers uses 3 digits Due to how BandLab Assistant compares versions, the Cakewalk installer now uses three digits for the build number to allow updates to work correctly. Update toast notifications throttled by a period of one day Automatic display of update toast notifications now only appears once daily. Optimizations Flicker free UI transitions when opening projects or switching between projects. Reduced excessive messaging load in the UI. This speeds up operations like scrolling and zooming in larger projects with console view and track view visible. Meters have better general performance while scrolling When using workspaces, projects now open with the correct initial UI layout, rather than opening with the project layout and then visibly switching to the workspace layout. This is faster and prevents unwanted flicker. Many improvements and optimizations for editing mono effects in FX Racks Improvements to drag and drop between clip and track FX racks Solved multithreading race condition leading to latency when using Aggressive thread scheduling model Meters to have better general performance while scrolling Latest release notes are here. See prior release notes. Check out all new features released to date. Previous release: 2020.04 Feature Overview 2020.01 Feature Overview 2019.11/12 Feature Overview 2019.09 Feature Overview 2019.07 Feature Overview


-
Hi all - please use this topic to post feedback specific to 2020.05. Release-specific feedback is valuable to us, and consolidating it in a single topic is extremely helpful. Thanks in advance! 2020.05 Release Notes
-
We're pleased to announce the 2020.05 release! This release introduces dynamic waveform scaling when changing clip automation, offline activation, enhancements to mono plug-in support, improved mouse wheel handling, lots of automation enhancements, smoother UI transitions, engine/UI optimizations, and over 60 bug fixes, all in keeping with our goal of making CbB as reliable and enjoyable as possible. Thanks, The Bakers For new feature details, see New Features. Should you need to revert to the 2020.04 release, you can download the Cakewalk 2020.04 Rollback installer. 2020.05 Highlights Dynamic waveform scaling when changing clip automation When Display Clip Fade/Envelope Attenuation is enabled in Edit > Preferences > Customization - Display, Cakewalk dynamically updates the waveform amplitude when changing clip fades, clip gain automation and clip pan automation. The waveform display is pre clip FX Rack and only applies to clip automation, not track automation. Additionally, clip gain and pan envelopes are not applied to active Region FX clips. i.e. If you have a clip gain envelope on a Region FX clip, it will be ignored unless the effect is bypassed. The Display Clip Fade/Envelope Attenuation option is now also available as a key binding in Edit > Preferences > Customization - Keyboard Shortcuts (under Area: Track View). Offline activation Activation is the process by which Cakewalk validates that your software is genuine and being used in accordance with the license agreement. Cakewalk can now be activated by an online or offline process. Cakewalk will operate in Demo mode until it is activated, and saving and exporting will be disabled. A toast notification appears at the bottom of the screen to inform you if Cakewalk has not been activated yet. If your computer is connected to the internet, click the toast notification to open BandLab Assistant and activate Cakewalk. If Cakewalk is installed on a computer that is not connected to the internet, you can use offline activation as long as you have access to another computer that is connected to the internet. To use offline activation In Cakewalk, go to Help > Offline Activation > Export Activation Request to open the Save activation request dialog box. Select the folder you want to save the activation request file to, then click Save. Cakewalk saves a Activation request.crq file. This file is encrypted and machine-specific, and can only be used to activate Cakewalk on the machine that was originally used to create the Activation request.crq file. By default, Cakewalk appends a timestamp to the file name, using the following format: <Month><Day><Year>_<Hour><Minute>. For example: 052120_1157Activation request.crq. Copy the Activation request.crq file to removable media, such as a USB flash drive, that you can transfer to another computer that is connected to the internet. Using an online computer, open BandLab Assistant and sign in with your BandLab ID and password. Click the Apps tab. Under Cakewalk by BandLab, click the drop-down arrow next to the Open button, then click Process Offline Activation Request. If activation is granted, BandLab Assistant generates an Activation response.dat file. Copy the Activation response.dat file to removable media that you can transfer back to your offline Cakewalk computer. In Cakewalk, go to Help > Offline Activation > Import Activation Response to open the Import activation response dialog box. Select the Activation response.dat file and click Open. If the response file is valid, Cakewalk is activated. Early Access toast notification Early Access availability is checked whenever normal updates are checked, and a toast notification appears if an Early Access build is available. The Early Access Program provides pre-release versions of Cakewalk to the public for general testing and issue reporting. We provide Early Access builds to help us get better real world test coverage from users, which is useful to improve the reliability and quality of our releases. Participation is 100% voluntary. Please read this topic to learn more about the program. Enhancements Mono plug-in support changes This release greatly improves the FX Rack handling with respect to mixing and matching mono/stereo plug-ins. These changes apply primarily to compatibility with pure mono plug-ins (mono-in, mono-out). Mono in, stereo out plugin compatibility will be addressed in a future update. These improvements are across the board and work in track/bus/clip FX Racks, FX chains and the ProChannel. Bypassing or removing plug-ins in an FX Rack, Rack bypass or global FX bypass operations will now revert any mono/stereo interleave changes caused by the plug-in, and recalculate delay compensation properly. Changing the mono/stereo interleave from the track strip button now updates the FX Rack routing correctly (Note: this is dependent on whether the ProChannel bin is pre FX Rack and if it contains mono plug-ins). Pitch shifted audio and distortion were symptoms of issues that are fixed in this release. This could occur under multiple scenarios, such as moving plug-ins, bypassing, deleting or undoing. Improved mouse wheel handling Console view vertical scrolling via mouse wheel is less prone to inadvertently adjusting parameter values if there is a brief pause during the scroll gesture (for example, while vertically scrolling with the mouse wheel, suddenly it starts scrolling the volume slider instead). The internal timer that waits for inactivity before treating the next mouse wheel movement as a new operation has been increased from 500ms to 1,000ms. This ensures that the current scroll operation doesn't change mid-gesture. In the Console view, tooltips dynamically show values when changing parameters via mouse wheel. FX Racks for tracks, buses and clips can be scrolled via mouse wheel. Increased contrast of ghosted envelopes The color contrast of ghosted automation envelopes has been increased, making them easier to see against the dark Clips pane background when Automation Lanes are collapsed. Clicking on the bus pane now automatically sets the bus focus strip This facilitates copying and pasting bus envelopes by clicking and pasting. Scrollable Clip FX Rack in Inspector Clip FX Racks in Inspector now display up to 10 plug-ins and are scrollable using both mouse wheel and the scroll bar. Improved support for recording automation via numeric input When recording automation, envelope nodes can now be recorded by typing a value in the pop-up edit controls in the Inspector, Console view, Track view, ProChannel EQ, and EQ fly-out module. The numeric input will be recorded as a Jump during automation recording. To show the numeric input pop-up, give focus to a control or its value display, then press F2, or double-click the value display. Improved recording automation of synth parameters Multiple synth parameters can be recorded in a single record pass and all envelopes are now retained. While loop recording, in order to avoid clutter the automation preview only shows the last loop record pass. All recording envelopes will be displayed when you stop playback. Improved support for copying and pasting automation envelopes Automation envelopes can now be easily copied and pasted from tracks to buses and vice versa. To copy track automation to a bus, first select and copy the envelope from the track, then click on the target bus or lane and paste. You can also copy and paste bus automation to tracks the same way. Moving or copying arrangement sections now properly manages copying and pasting the associated bus and synth automation envelopes. Bus delete stability improvements Bus deletion can now be performed while the transport is rolling without stopping the audio engine. Also an intermittent crash and app shutdown on undoing bus deletion was solved. Rename Clip key binding The Rename Clip command is now available as a key binding in Edit > Preferences > Customization - Keyboard Shortcuts (under Area: Track View). Support for .midi MIDI File extension In addition to .mid, the .midi file extension is now supported for reading. Track view's View and Options menu settings persist globally The Track View’s View and Options menu items now persist globally instead of being stored within screensets. Build numbers uses 3 digits Due to how BandLab Assistant compares versions, the Cakewalk installer now uses three digits for the build number to allow updates to work correctly. Update toast notifications throttled by a period of one day Automatic display of update toast notifications now only appears once daily. Optimizations Flicker free UI transitions when opening projects or switching between projects. Reduced excessive messaging load in the UI. This speeds up operations like scrolling and zooming in larger projects with console view and track view visible. Meters have better general performance while scrolling When using workspaces, projects now open with the correct initial UI layout, rather than opening with the project layout and then visibly switching to the workspace layout. This is faster and prevents unwanted flicker. Many improvements and optimizations for editing mono effects in FX Racks Improvements to drag and drop between clip and track FX racks Solved multithreading race condition leading to latency when using Aggressive thread scheduling model Bug fixes Stability Crash on undo and redo of automation recording of synth parameters Deleting or undoing bus delete operation can crash User reported crash in 2020.04 Waves OVox plugin crashes on project load Crash when using SmartSwipe gesture in Piano Roll view track list Potential crash on startup unless specific Windows DPI settings are used Memory leak when using the Aggressive Thread Scheduling model Null Pointer crash after reordering automation lanes Playback can become stuck after starting Automation Unexpected envelopes created when moving section in project Bus automation copies to tracks unexpectedly with (Arranger) Section move Assigning a bus envelope could cause a crash and display incorrectly in Lanes after reassigning Duplicate automation lanes can be created for unedited automation Draw Tool draws random points when drawing automation outside of lane Draw Tool not working as expected on bus automation in user project Stop at Project End not respected in projects with automation after deleting buses or replacing synths Automation behaves incorrectly after manually typing in a value Automation not fully removed when deleting bus Pasting bus automation should not rely on Copy/Paste Special Pasting bus automation doesn't change the edit filter leading to hidden envelopes Automation envelopes appear out of scale Cannot copy synth automation to buses Draw Tool does not update envelopes preview during playback Adding nodes by typing values during write automation over existing envelope causes unexpected results Synth automation gets discarded unexpectedly while write recording multiple parameters Synth and bus automation is not selected after duplicating clips Using Clip Gain on some Groove Clips causes unexpected drawing when clipping UI Scale for Synth automation not displaying correctly Clip FX in Inspector does not display more than 6 plug-ins Hit zone for Draw Tool on buses does not match Insert Soft Synth Options dialog should remember the checked/unchecked state of the Enable MIDI Output option User reported issue with zoom fader control becoming stuck [Chinese version] Overlapping text in Preferences > Customization - Display Tooltips for controls in the Console view do not update when changing values by mouse wheel Incorrect Track view tooltips when creating a new project with the Basic workspace Console view control tooltips show incorrect value and obscure value label when adjusted via mouse wheel Track view horizontal zoom slider window is shown in wrong position on secondary monitor Now Time cursor draws incorrectly Project load screen flickering Truncated text in various localized dialog boxes Arranger Arranger options in Keyboard Shortcuts should specify “Arranger Track” Arranger Section time-format needs to be backwards compatible Bus Edit Filter changes unexpectedly after moving Section Section operations do not always move/copy track/bus automation Duplicating Section won't duplicate MIDI envelopes for Instrument tracks Double-click rename of Arrangement sections should not rewind to start of section during playback Committing an arrangement containing clips set to absolute time moves data past the end of the original project Misc. Moving mono Waves plug-in forces track into mono unexpectedly Eventide VST3 plug-ins hang when changing interleave Loading projects saved with Melodyne 5 cause invalid archive ID assertions Host reports incorrect path for VST2 plug-ins via audioMasterGetDirectory Hitting Play fails to start Play List when no project is open Make Instrument track not working with multiple split instrument tracks MIDI Chase not working as expected with 2 tracks assigned to single synth Delete Track can fail unexpectedly with MIDI tracks Mackie C4 does not respond to modifier keys in plug-in mode Markers/Meters do not ripple as expected when pasting special with meter/key changes Duplicate does not Ripple Edit in the Piano Roll view Duplicate Clips should respect Select Track Envelopes with Clips setting Race condition when closing a project before a workspace has been loaded Cancelling Bounce causes first play attempt to fail Unexpected latency when using the new thread scheduling model Select by Filter key binding not working as expected Dragging ARA clips out of the Clips pane can impact VocAlign clips to lose timing Deleting 'n' folders only deletes one folder Projects saved as MIDI file save unexpected extra tracks Latest release notes are here. See prior release notes. Check out all new features released to date.
-
2020.05 Early Access installer now available! We're pleased to announce the Early Access for 2020.054! This release introduces dynamic waveform scaling when changing clip automation, offline activation, enhancements to mono plug-in support , improved mouse wheel handling, lots of automation enhancements, optimizations, and over 50 bug fixes. We'd love for you to check it out before we drop the official public version, which should be in roughly a week. This time we're also providing an easy rollback installer should you need to quickly revert to the last public release for any reason. Please note that Early Access installers are update installers, which only update from a specific version. To install the 2020.05 Early Access build, you must be on the latest public release of 2020.04. Download Cakewalk 2020.05 EA installer Should you need to revert to the 2020.04 release, you can download the Cakewalk 2020.04 Rollback installer. If you haven't already done so, please read about the Early Access Program before participating. Thanks again for your participation! The Bakers 2020.05 Highlights New features Dynamic waveform scaling when changing clip automation When Display Clip Fade/Envelope Attenuation is enabled in Edit > Preferences > Customization - Display, Cakewalk dynamically updates the waveform amplitude when changing clip fades, clip gain automation and clip pan automation. The waveform display is pre clip FX Rack and only applies to clip automation, not track automation. Additionally, clip gain and pan envelopes are not applied to active Region FX clips. i.e. If you have a clip gain envelope on a Region FX clip, it will be ignored unless the effect is bypassed. The Display Clip Fade/Envelope Attenuation option is now also available as a key binding (under “Track View”). Offline activation Note: This will be available in the next update of BandLab Assistant, which will be released soon. Activation is the process by which Cakewalk validates that your software is genuine and being used in accordance with the license agreement. Cakewalk can now be activated by an online or offline process. Cakewalk will operate in Demo mode until it is activated, and saving and exporting will be disabled. A toast notification appears at the bottom of the screen to inform you if Cakewalk has not been activated yet. If your computer is connected to the internet, click the toast notification to open BandLab Assistant and activate Cakewalk. If Cakewalk is installed on a computer that is not connected to the internet, you can use offline activation as long as you have access to another computer that is connected to the internet. To use offline activation In Cakewalk, go to Help > Offline Activation > Export Activation Request to open the Save activation request dialog box. Select the folder you want to save the activation request file to, then click Save. Cakewalk saves a Activation request.crq file. This file is encrypted and machine-specific, and can only be used to activate Cakewalk on the machine that was originally used to create the Activation request.crq file. By default, Cakewalk appends a timestamp to the file name, using the following format: <Month><Day><Year>_<Hour><Minute>. For example: 052120_1157Activation request.crq. Copy the Activation request.crq file to removable media, such as a USB flash drive, that you can transfer to another computer that is connected to the internet. Using an online computer, open BandLab Assistant and sign in with your BandLab ID and password. Click the Apps tab. Under Cakewalk by BandLab, click the drop-down arrow next to the Open button, then click Process Offline Activation Request. If activation is granted, BandLab Assistant generates an Activation response.dat file. Copy the Activation response.dat file to removable media that you can transfer back to your offline Cakewalk computer. In Cakewalk, go to Help > Offline Activation > Import Activation Response to open the Import activation response dialog box. Select the Activation response.dat file and click Open. If the response file is valid, Cakewalk is activated. Early Access toast notification Early Access availability is checked whenever normal updates are checked, and a toast notification appears if an Early Access build is available. The Early Access Program provides pre-release versions of Cakewalk to the public for general testing and issue reporting. We provide Early Access builds to help us get better real world test coverage from users, which is useful to improve the reliability and quality of our releases. Participation is 100% voluntary. Please read this topic to learn more about the program. Enhancements Mono plug-in support changes This release greatly improves the FX Rack handling with respect to mixing and matching mono/stereo plug-ins. These improvements are across the board and work in track/bus/clip FX Racks, FX chains and the ProChannel. Bypassing or removing plug-ins in an FX Rack, Rack bypass or global FX bypass operations will now revert any mono/stereo interleave changes caused by the plug-in, and recalculate delay compensation properly. Changing the mono/stereo interleave from the track strip button now updates the FX Rack routing correctly. (Note: this is dependent on whether the ProChannel bin is pre FX Rack and if it contains mono plug-ins) Pitch shifted audio and distortion were symptoms of issues that are fixed in this release. This could occur under multiple scenarios, such as moving plug-ins, bypassing, deleting or undoing. Improved mouse wheel handling Console view vertical scrolling via mouse wheel is less prone to inadvertently adjusting parameter values if there is a brief pause during the scroll gesture (for example, while vertically scrolling with the mouse wheel, suddenly it starts scrolling the volume slider instead). The internal timer that waits for inactivity before treating the next mouse wheel movement as a new operation has been increased from 500ms to 1,000ms. This ensures that the current scroll operation doesn't change mid-gesture. In the Console view, tooltips dynamically show values when changing parameters via mouse wheel. FX Racks for tracks, buses and clips can be scrolled via mouse wheel. Increased contrast of ghosted envelopes The color contrast of ghosted automation envelopes has been increased, making them easier to see against the dark Clips pane background. Clicking on the bus pane now automatically sets the bus focus strip This facilitates copying and pasting bus envelopes by clicking and pasting. Scrollable Clip FX Rack in Inspector Clip FX Racks in Inspector now display up to 10 plug-ins and are scrollable using both mouse wheel and the scroll bar. Improved support for recording automation via numeric input When recording automation, envelope nodes can now be recorded by typing a value in the pop-up edit controls in the Inspector, Console view, Track view, ProChannel EQ, and EQ fly-out module. The numeric input will be recorded as a Jump during automation recording. To show the numeric input pop-up, give focus to a control or its value display, then press F2, or double-click the value display. Improved recording automation of synth parameters Multiple synth parameters can be recorded in a single record pass and all envelopes are now retained. While loop recording, in order to avoid clutter the automation preview only shows the last loop record pass. All recording envelopes will be displayed when you stop playback. Improved support for copying and pasting automation envelopes Automation envelopes can now be easily copied and pasted from tracks to buses and vice versa. To copy track automation to a bus, first select and copy the envelope from the track, then click on the target bus or lane and paste. You can also copy and paste bus automation to tracks the same way. Moving or copying arrangement sections now properly manages copying and pasting the associated bus and synth automation envelopes. Bus delete stability improvements Bus deletion can now be performed while the transport is rolling without stopping the audio engine. Also an intermittent crash and app shutdown on undoing bus deletion was solved. Optimizations When using workspaces, projects now open with the correct initial UI layout, rather than opening with the project layout and then visibly switching to the workspace layout. This is faster and prevents unwanted flicker. Many improvements and optimizations for editing mono effects in FX Racks Improvements to drag and drop between clip and track FX racks Solved multithreading race condition leading to latency when using Aggressive thread scheduling model Bug fixes Stability Crash on undo and redo of automation recording of synth parameters Deleting or undoing bus delete operation can crash User reported crash in 2020.04 Waves OVox plugin crashes on project load Crash when using SmartSwipe gesture in Piano Roll view track list Potential crash on startup unless specific Windows DPI settings are used Memory leak when using the Aggressive Thread Scheduling model Automation Unexpected envelopes created when moving section in project Bus automation copies to tracks unexpectedly with (Arranger) Section move Duplicate automation lanes can be created for unedited automation Draw Tool draws random points when drawing automation outside of lane Draw Tool not working as expected on bus automation in user project Stop at Project End not respected in projects with automation after deleting buses or replacing synths Automation behaves incorrectly after manually typing in a value Automation not fully removed when deleting bus Pasting bus automation should not rely on Copy/Paste Special Pasting bus automation doesn't change the edit filter leading to hidden envelopes Automation envelopes appear out of scale Cannot copy synth automation to buses Draw Tool does not update envelopes preview during playback Adding nodes by typing values during write automation over existing envelope causes unexpected results Synth automation gets discarded unexpectedly while write recording multiple parameters UI Scale for Synth automation not displaying correctly Clip FX in Inspector does not display more than 6 plug-ins Hit zone for Draw Tool on buses does not match Insert Soft Synth Options dialog should remember the checked/unchecked state of the Enable MIDI Output option User reported issue with zoom fader control becoming stuck [Chinese version] Overlapping text in Preferences > Customization - Display Tooltips for controls in the Console view do not update when changing values by mouse wheel Incorrect Track view tooltips when creating a new project with the Basic workspace Console view control tooltips show incorrect value and obscure value label when adjusted via mouse wheel Track view horizontal zoom slider window is shown in wrong position on secondary monitor Now Time cursor draws incorrectly Arranger Arranger options in Keyboard Shortcuts should specify “Arranger Track” Arranger Section time-format needs to be backwards compatible Bus Edit Filter changes unexpectedly after moving Section Section operations do not always move/copy track/bus automation Duplicating Section won't duplicate MIDI envelopes for Instrument tracks Double-click rename of Arrangement sections should not rewind to start of section during playback Misc. Moving mono Waves plug-in forces track into mono unexpectedly Eventide VST3 plug-ins hang when changing interleave Hitting Play fails to start Play List when no project is open Make Instrument track not working with multiple split instrument tracks MIDI Chase not working as expected with 2 tracks assigned to single synth Delete Track can fail unexpectedly with MIDI tracks Mackie C4 does not respond to modifier keys in plug-in mode Markers/Meters do not ripple as expected when pasting special with meter/key changes Duplicate does not Ripple Edit in the Piano Roll view Duplicate Clips should respect Select Track Envelopes with Clips setting Race condition when closing a project before a workspace has been loaded Cancelling Bounce causes first play attempt to fail Unexpected latency when using the new thread scheduling model Select by Filter key binding not working as expected
- 97 replies
-
- 21
-
-
-
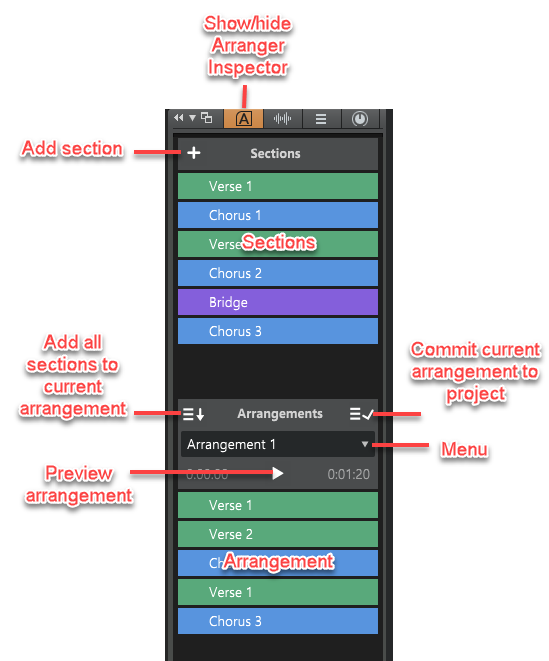
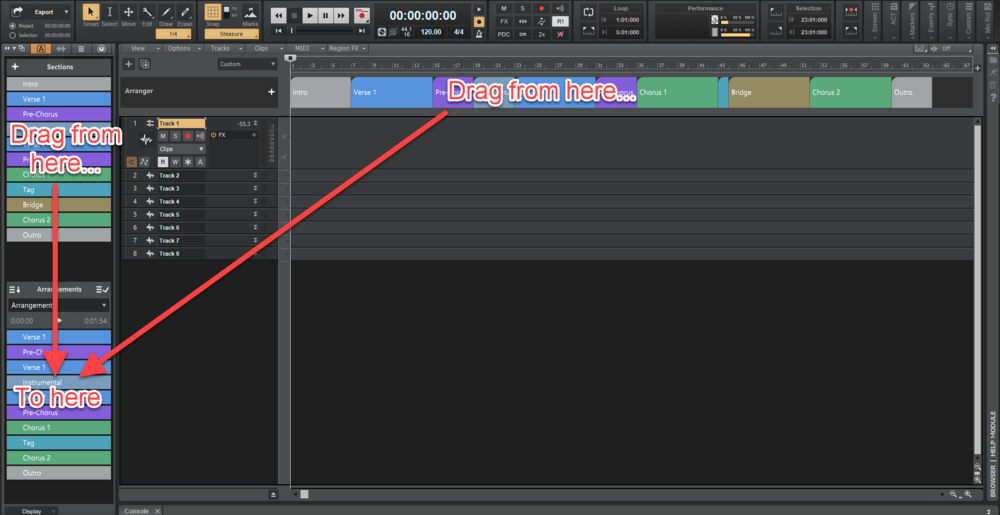
Introduction The 2020.04 release is our biggest release to date, and introduces an exciting non-linear Arranger Track feature that is very useful for song creation and creative experimentation. Also included are many other significant feature improvements such as ProChannel module presets, instrument track improvements and many bug fixes, all in keeping with our goal of making CbB as reliable and enjoyable as possible. The following highlights are intended to provide an overview of the more significant changes. Please also refer to the new features section of our documentation for more detailed information on the features. Please give us feedback on this release. We hope you like it! 2020.04 Features & Enhancements Behavior changes Add Track menu behavior change: The behavior of the Track(s) counter has changed when inserting a multi-timbral soft synth via the Add Track menu. When Instrument Track Per Output or Split Instrument Track is selected, the Track(s) counter now specifies how many Instrument output tracks to create instead of how many unique instances of the synth to create. Changes to Delete Track: CTRL+DELETE deletes tracks. Delete Track only deletes the focused track if the focused track is not also selected. When a combination of tracks and track folders are selected, the context menu displays Delete Selected Tracks and Folders. Enable/Disable Enhanced Keyboard Editing Mode shortcut is unassigned by default. The default keyboard shortcut (0 on the numeric keypad) to enable/disable Enhanced Keyboard Editing Mode has been removed. To enable/disable Enhanced Keyboard Editing Mode, go to Edit > Preferences > Customization - Keyboard Shortcuts and assign Enhanced Keyboard Editing to an unused keyboard shortcut. Bypass All Audio Effects shortcut is unassigned by default. The default keyboard shortcut (E) to bypass all audio effects has been removed. To bypass all audio effect, do one of the following: Go to Edit > Preferences > Customization - Keyboard Shortcuts and assign Bypass All Audio Effects to an unused keyboard shortcut. Click the Bypass all Effects button in the Control Bar’s Mix module. Horizontal zooming no longer centers Now Time. When zooming with the mouse wheel or CTRL+LEFT/RIGHT ARROW shortcuts, if the Now Time is currently within view, its position will be retained while zooming. If the Now Time is not present in the view, the zoom behavior is unchanged. CTRL+ALT+SPACEBAR is assigned to Preview current arrangement from the Now Time, and no longer plays the next event in the Event List view. Arranger Track Overview The Arranger track is an arrangement tool that provides several workflow benefits: Easily rearrange sections of the entire project as one unit instead of moving individual clips. For example, instantly swap the positions of the first and second chorus for all tracks, or copy the first verse in order to double its duration. Experiment with different song structures in a non-destructive and non-linear manner. For example, does your song work best in AABA, ABAB, or ABAC song form? Define time range sections and sequence them in any order without destructively moving any clip data. You can even save multiple arrangements within each project. Create a color coded overview of the song structure, and use the Arranger Inspector to quickly navigate around the project and jump to song sections. Create arbitrary song sections anywhere on the project timeline, then later string them together for seamless playback. Sections provide an additional way to perform time based selections and edits of the project. Create an unlimited number of arrangements per project, which can all be exported simultaneously. Arranger functionality is distributed across two views: Arranger track. To show or hide the Arranger track, click the Track view View menu and choose Arranger Track Show/Hide, or press A. The Arranger track timeline shows all defined sections. You can drag to create and rearrange sections, then freely move them along the timeline. Any changes in the Arranger timeline are immediately reflected in the Arranger Inspector’s Sections list, and vice versa. Arranger Inspector. To show/hide the Arranger Inspector, click the Show/Hide Arranger button at the top of the Inspector pane, or press ALT+SHIFT+I. An arrangement is comprised of Sections, each spanning a unique time range. Other section properties include name and color, to clearly delineate regions of time and track content by musical function. Important: By default, clicking an Arranger section also selects underlying track events. Clicking again deselects track events, while retaining selection of the section. This behavior allows you to easily determine whether or not track events are included in section edit operations. Note that the selection highlight in the Clips pane indicates selected track events. To disable automatic selection of track events when selecting sections, click the Track view Options menu and disable Select Events with Sections. Arranger Inspector Sections are the building blocks that make up the song. Each section defines a time range in the project, such as Intro, Verse, Chorus, etc. An arrangement is an ordered set of sections. You can sort the sections in any order to define the playback order. To do so, drag the sections from the Sections area down to the Arrangements area in the Arranger Inspector. The Sections area lists all the arranger sections defined in the project’s timeline, from which a custom arrangement can be built. The order of the sections reflect the order in which they appear in the timeline. The Sections list provides an additional way to edit time based selections of the project. Any operation performed in the Sections list is immediately reflected in the project/timeline, and vice versa. To copy all sections to the current arrangement, click the Add All Sections to Arrangement button . If one or more sections are selected, only the selected sections will be copied. The Arrangements area allows you to sequence sections in a non-linear manner without destructively moving any clip data, regardless of which order they appear in the project’s timeline. Defining sections of your song To use the Arranger track, you must first define time range sections such as Intro, Verse, Chorus, etc. Sections can be of any duration, but it is common to start/end them at measure boundaries. New sections can be created by any of the following means: Draw a range within the Arranger track timeline (below the time ruler). Double-click a blank area in the Arranger track. The new section duration is inherited from the last clicked section. Right-click in the Arranger track timeline and select Insert Section Here, Insert Section at Now Time, Span Sections, or From Selection. Click the Add Section button in the Arranger Inspector or Arranger track. Editing sections Drag sections to move them around on the timeline. Drag a section edge to resize the section. Right-click a section to access edit options. Converting markers to sections To convert markers to sections, make a time selection in the time ruler that spans the text markers, then right-click in the time ruler and select Create Sections from Markers. Creating a custom arrangement Sections can be sequenced in any order to create arrangements, without affecting project data. The sections don’t have to live on the project timeline in any specific location or order, because the arrangement determines in which order they are played back. To define the section playback order, drag sections from the Sections list down to the Arrangements list. You can also drag sections directly from the Arranger track. Previewing an arrangement To play the current arrangement, click the Preview button or press ALT+SPACEBAR. During Arranger preview, the main transport Play button shows a small “A” icon to indicate it is playing back an arrangement instead of following the project’s linear timeline, and the active section shows a progress indicator. Committing an arrangement To (destructively) render the current arrangement to the project’s timeline, click the Commit Arrangement to Project button . Exporting arrangements You can export one or more arrangements without first having to render it to the timeline. To do so, click the Arrangements menu and select Export as Audio. ProChannel module presets In addition to saving presets of the entire ProChannel chain (all modules), you can also save and load presets of individual modules. The per module preset controls are located on the left side of each module header bar. To select a module preset Click the module’s category type icon to open the preset menu, then select the desired preset. The category type icon tooltip shows the name of the selected preset. To save a module preset Adjust the ProChannel module controls to the desired settings. Click the module’s category type icon to open the preset menu, then select Save Preset. Type a name in the Save Preset dialog box, then click OK. To select the next preset To select the next preset, do one of the following: Click the Next Preset button . Hold down the CTRL key and click the module’s category type icon. To select the previous preset To select the previous preset, do one of the following: Click the Previous Preset button . Hold down CTRL+SHIFT and click the module’s category type icon. To delete a module preset Click the module’s category type icon to open the preset menu, then select the preset you want to delete. Click the module’s category type icon to open the preset menu again, then select Delete Preset. Copy/paste settings between ProChannel modules You can copy settings from any ProChannel module and paste the settings to any other instance of the same module. on any track or bus. There are two ways to copy/paste settings between identical modules: Drag and drop In the Console view, show the ProChannel for both the track/bus you want to copy from, and the track/bus you want to paste into. Hold down the CTRL key, and drag from the source module’s header bar (i.e., the module title) to the target module. The source and target ProChannel modules must be identical. Note: If the target module has not been enabled/initialized yet, it will automatically become enabled after pasting. However, if the target modules has been manually disabled, then it will remain disabled after pasting. Copy/Paste menu commands Click the source module’s category type icon to open its preset menu, then select Copy Settings. Click the target module’s category type icon to open its preset menu, then select Paste Settings. Append per-output Instrument tracks When you insert a multi-timbral soft synth, you can specify how many Instrument output tracks to create, up to the maximum supported by the synth. If you do not initially create the maximum number of available output tracks, you can later add additional tracks on demand from the Synth Rack view. To do so, do one of the following: Right-click the instrument in the Synth Rack (Views > Synth Rack View) and select Append Instrument Track. Right-click the instrument track strip in the Track view and select Append Instrument Track. Note: If you originally created used per-output Instrument tracks for that synth, then Cakewalk will create another per-output instrument track. If originally created split instrument tracks, then Cakewalk will create another split instrument track. Misc. enhancements App has been updated for all languages. The Display Clip Fade Attenuation option in Edit > Preferences > Customization - Display is now available as a key binding. Audio Driver Mode in Preferences now changes immediately without needing to click the Apply button. Updated to latest VST3 SDK, which includes VST bug fixes. Latest release notes are here. See prior release notes. Check out all new features released to date. Previous release: 2020.01 Feature Overview 2019.11/12 Feature Overview 2019.09 Feature Overview 2019.07 Feature Overview


-
@HIBI Custom JA affirmations appear to display correctly for me in 2020.04 build 179: Make sure the ProjectOpenNotification.txt file is saved with UTF-8 encoding. The attached test file contains random JA text. Copy the file to your local %APPDATA%\Cakewalk\Cakewalk Core folder, and set CbB's language to Japanese. First back up your own custom ProjectOpenNotification.txt file so you don't accidentally overwrite it. You can even try to copy/paste your custom affirmations into the attached file since it is saved with UTF-8 encoding. If you're experiencing problems, please post a screenshot and send us a copy of your text file. ProjectOpenNotification.txt

-
 An updated Reference Guide PDF will be available next week.
 -
Hi all - please use this topic to post feedback specific to 2020.04. Release-specific feedback is valuable to us, and consolidating it in a single topic is extremely helpful. Thanks in advance! 2020.04 Release Notes
-
We're pleased to announce the 2020.04 release, our biggest release to date which also celebrates two years of active Cakewalk by BandLab development! This release introduces an exciting non-linear Arranger Track feature that is very useful for song creation and creative experimentation. Also included are many other significant feature improvements such as ProChannel module presets, instrument track improvements and many bug fixes, all in keeping with our goal of making CbB as reliable and enjoyable as possible. Thanks, The Bakers For new feature details, see New Features. Should you need to revert to the 2020.01 release, you can download the Cakewalk 2020.01 Rollback installer. 2020.04 Features & Enhancements Behavior changes Add Track menu behavior change: The behavior of the Track(s) counter has changed when inserting a multi-timbral soft synth via the Add Track menu. When Instrument Track Per Output or Split Instrument Track is selected, the Track(s) counter now specifies how many Instrument output tracks to create instead of how many unique instances of the synth to create. Changes to Delete Track: CTRL+DELETE deletes tracks. Delete Track only deletes the focused track if the focused track is not also selected. When a combination of tracks and track folders are selected, the context menu displays Delete Selected Tracks and Folders. Enable/Disable Enhanced Keyboard Editing Mode shortcut is unassigned by default. The default keyboard shortcut (0 on the numeric keypad) to enable/disable Enhanced Keyboard Editing Mode has been removed. To enable/disable Enhanced Keyboard Editing Mode, go to Edit > Preferences > Customization - Keyboard Shortcuts and assign Enhanced Keyboard Editing to an unused keyboard shortcut. Bypass All Audio Effects shortcut is unassigned by default. The default keyboard shortcut (E) to bypass all audio effects has been removed. To bypass all audio effect, do one of the following: Go to Edit > Preferences > Customization - Keyboard Shortcuts and assign Bypass All Audio Effects to an unused keyboard shortcut. Click the Bypass all Effects button in the Control Bar’s Mix module. Horizontal zooming no longer centers Now Time. When zooming with the mouse wheel or CTRL+LEFT/RIGHT ARROW shortcuts, if the Now Time is currently within view, its position will be retained while zooming. If the Now Time is not present in the view, the zoom behavior is unchanged. CTRL+ALT+SPACEBAR is assigned to Preview current arrangement from the Now Time, and no longer plays the next event in the Event List view. Arranger Track Overview The Arranger track is an arrangement tool that provides several workflow benefits: Easily rearrange sections of the entire project as one unit instead of moving individual clips. For example, instantly swap the positions of the first and second chorus for all tracks, or copy the first verse in order to double its duration. Experiment with different song structures in a non-destructive and non-linear manner. For example, does your song work best in AABA, ABAB, or ABAC song form? Define time range sections and sequence them in any order without destructively moving any clip data. You can even save multiple arrangements within each project. Create a color coded overview of the song structure, and use the Arranger Inspector to quickly navigate around the project and jump to song sections. Create arbitrary song sections anywhere on the project timeline, then later string them together for seamless playback. Sections provide an additional way to perform time based selections and edits of the project. Create an unlimited number of arrangements per project, which can all be exported simultaneously. Arranger functionality is distributed across two views: Arranger track. To show or hide the Arranger track, click the Track view View menu and choose Arranger Track Show/Hide, or press A. The Arranger track timeline shows all defined sections. You can drag to create and rearrange sections, then freely move them along the timeline. Any changes in the Arranger timeline are immediately reflected in the Arranger Inspector’s Sections list, and vice versa. Arranger Inspector. To show/hide the Arranger Inspector, click the Show/Hide Arranger button at the top of the Inspector pane, or press ALT+SHIFT+I. An arrangement is comprised of Sections, each spanning a unique time range. Other section properties include name and color, to clearly delineate regions of time and track content by musical function. Important: By default, clicking an Arranger section also selects underlying track events. Clicking again deselects track events, while retaining selection of the section. This behavior allows you to easily determine whether or not track events are included in section edit operations. Note that the selection highlight in the Clips pane indicates selected track events. To disable automatic selection of track events when selecting sections, click the Track view Options menu and disable Select Events with Sections. Arranger Inspector Sections are the building blocks that make up the song. Each section defines a time range in the project, such as Intro, Verse, Chorus, etc. An arrangement is an ordered set of sections. You can sort the sections in any order to define the playback order. To do so, drag the sections from the Sections area down to the Arrangements area in the Arranger Inspector. The Sections area lists all the arranger sections defined in the project’s timeline, from which a custom arrangement can be built. The order of the sections reflect the order in which they appear in the timeline. The Sections list provides an additional way to edit time based selections of the project. Any operation performed in the Sections list is immediately reflected in the project/timeline, and vice versa. To copy all sections to the current arrangement, click the Add All Sections to Arrangement button . If one or more sections are selected, only the selected sections will be copied. The Arrangements area allows you to sequence sections in a non-linear manner without destructively moving any clip data, regardless of which order they appear in the project’s timeline. Defining sections of your song To use the Arranger track, you must first define time range sections such as Intro, Verse, Chorus, etc. Sections can be of any duration, but it is common to start/end them at measure boundaries. New sections can be created by any of the following means: Draw a range within the Arranger track timeline (below the time ruler). Double-click a blank area in the Arranger track. The new section duration is inherited from the last clicked section. Right-click in the Arranger track timeline and select Insert Section Here, Insert Section at Now Time, Span Sections, or From Selection. Click the Add Section button in the Arranger Inspector or Arranger track. Editing sections Drag sections to move them around on the timeline. Drag a section edge to resize the section. Right-click a section to access edit options. Converting markers to sections To convert markers to sections, make a time selection in the time ruler that spans the text markers, then right-click in the time ruler and select Create Sections from Markers. Creating a custom arrangement Sections can be sequenced in any order to create arrangements, without affecting project data. The sections don’t have to live on the project timeline in any specific location or order, because the arrangement determines in which order they are played back. To define the section playback order, drag sections from the Sections list down to the Arrangements list. You can also drag sections directly from the Arranger track. Previewing an arrangement To play the current arrangement, click the Preview button or press ALT+SPACEBAR. During Arranger preview, the main transport Play button shows a small “A” icon to indicate it is playing back an arrangement instead of following the project’s linear timeline, and the active section shows a progress indicator. Committing an arrangement To (destructively) render the current arrangement to the project’s timeline, click the Commit Arrangement to Project button . Exporting arrangements You can export one or more arrangements without first having to render it to the timeline. To do so, click the Arrangements menu and select Export as Audio. ProChannel module presets In addition to saving presets of the entire ProChannel chain (all modules), you can also save and load presets of individual modules. The per module preset controls are located on the left side of each module header bar. To select a module preset Click the module’s category type icon to open the preset menu, then select the desired preset. The category type icon tooltip shows the name of the selected preset. To save a module preset Adjust the ProChannel module controls to the desired settings. Click the module’s category type icon to open the preset menu, then select Save Preset. Type a name in the Save Preset dialog box, then click OK. To select the next preset To select the next preset, do one of the following: Click the Next Preset button . Hold down the CTRL key and click the module’s category type icon. To select the previous preset To select the previous preset, do one of the following: Click the Previous Preset button . Hold down CTRL+SHIFT and click the module’s category type icon. To delete a module preset Click the module’s category type icon to open the preset menu, then select the preset you want to delete. Click the module’s category type icon to open the preset menu again, then select Delete Preset. Copy/paste settings between ProChannel modules You can copy settings from any ProChannel module and paste the settings to any other instance of the same module. on any track or bus. There are two ways to copy/paste settings between identical modules: Drag and drop In the Console view, show the ProChannel for both the track/bus you want to copy from, and the track/bus you want to paste into. Hold down the CTRL key, and drag from the source module’s header bar (i.e., the module title) to the target module. The source and target ProChannel modules must be identical. Note: If the target module has not been enabled/initialized yet, it will automatically become enabled after pasting. However, if the target modules has been manually disabled, then it will remain disabled after pasting. Copy/Paste menu commands Click the source module’s category type icon to open its preset menu, then select Copy Settings. Click the target module’s category type icon to open its preset menu, then select Paste Settings. Append per-output Instrument tracks When you insert a multi-timbral soft synth, you can specify how many Instrument output tracks to create, up to the maximum supported by the synth. If you do not initially create the maximum number of available output tracks, you can later add additional tracks on demand from the Synth Rack view. To do so, do one of the following: Right-click the instrument in the Synth Rack (Views > Synth Rack View) and select Append Instrument Track. Right-click the instrument track strip in the Track view and select Append Instrument Track. Note: If you originally created used per-output Instrument tracks for that synth, then Cakewalk will create another per-output instrument track. If originally created split instrument tracks, then Cakewalk will create another split instrument track. Misc. enhancements App has been updated for all languages. The Display Clip Fade Attenuation option in Edit > Preferences > Customization - Display is now available as a key binding. Audio Driver Mode in Preferences now changes immediately without needing to click the Apply button. Updated to latest VST3 SDK, which includes VST bug fixes. Bug fixes Applying a Workspace/Screenset referencing track based views to an empty project can crash or cause unexpected behavior. Crash when freezing archived track. Crash when freezing track after setting input to None. Crash when cancelling a real-time Freeze operation. Crash on undo of Ripple Edit delete. Missing project file patch causes crash. Hang on project close. User reported crash: Cakewalk.exe!CFretControlBar::resetNow() Line 220. Cannot remove ARA plug-in as Region FX if the plug-in is not installed. iZotope Relay does not draw Advanced tab in VST3. iZotope plug-ins display track names incorrectly. SPACEBAR doesn't work with new Waves StudioRack plug-in. Background not repainted in Waves StudioRack plug-in when opening module or resizing from UI. Seeking with lower Disk Buffers/Higher Audio card latency causes audio to cut out. Archived Aux tracks pass signal. Soloing Aux tracks mutes metronome on playback. Having no playback master selected causes loss of audio with no reported errors. Cancelling Freeze can cause Interleave and Phase buttons to change unexpectedly. Incorrect audio range when bouncing or exporting with no audio drivers present. Inspector strip context menu appears on wrong monitor. Double-click to open Clip Properties Inspector not working as expected. Inspector displays wrong output strip after clicking Inspector strip with track sending to aux. Inspector flickers when switching between tabs. Some Inspector keyboard shortcuts fail to close tabs. Aim Assist gets stuck at time zero after dragging a plug-in from the Browser. Reverse touchpad scrolling direction in some views. Marker view 'Lk' column does not show locked status in Tungsten theme. Dragging clips with Snap By can have unexpected results. SHIFT+rigt-click behavior not consistent with MIDI tracks. Screensets and view state unnecessarily persisted for unused internal views. Using mouse wheel in "Locked & Centered" Control Bar results in left aligned Control Bar. Instrument tracks mute MIDI channel when using ALT+M. Verify failed duplicating instrument track. Keybinding for Input Echo does not update Simple Instrument Tracks in Track view. Unexpected behavior with Instrument tracks when adding MIDI ports. Adding or removing MIDI devices can cause soft synths to be assigned to incorrect ports. Custom project load affirmations truncate messages that are more than one line. Custom project load affirmations display unexpected characters in multibyte languages like Japanese and Chinese. Deleting multiple tracks in folders removes folder from project. Project looping turns off after recording. Editing text in Piano Roll view Drum Map triggers keyboard shortcuts. Hardware MIDI devices with the same names cannot be opened. Latest release notes are here. See prior release notes. Check out all new features released to date.
-
2020.04 Early Access 2 (EA2) installer now available! Our sincerest thanks to those of you who have provided feedback on Early Access 1 - your support this week has been fantastic! We've addressed more issues and found opportunities for additional refinements as well. We invite you to try out the latest updates in EA2. Please note that Early Access installers are update installers, which only update from a specific version. To install the 2020.04 EA2 build, you must be on the latest public release of 2020.01. If you are updating from 2020.04 Early Access 1 (EA1): If you currently have the 2020.04 Early Access 1 build installed, you must first roll back to the public release of 2020.01: Download and install the Cakewalk 2020.04 Early Access 1 to 2020.01 Rollback installer. Download and install the Cakewalk 2020.04 EA2 installer If you are updating from 2020.01: Cakewalk 2020.04 EA2 installer Should you need to revert from the 2020.04 EA2 build to the public 2020.01 release, you can download the Cakewalk 2020.04 EA2 to 2020.01 Rollback installer. If you haven't already done so, please read about the Early Access Program before participating. Thanks again for your participation! The Bakers New in Early Access 2 Arranger: Misc. Arranger UI tweaks Section color picker Incorrect behavior when dragging a section beyond the left edge of the Arranger track Drawing issues when resizing Arranger track When dragging multiple sections, the highlight draws outside the Track view Arranger track difficult to resize to minimum without collapsing Aim Assist for sections should mirror Aim Assist for clips Section header and name disappear when zooming in Arranger track supports Snap To but not Snap By Arranger track auto scrolling doesn't work when resizing a section Display hint marker / drop indicator for section edits Creating a new section by dragging fails if the new section overlaps two or more existing sections Aim Assist is lost due to mouse events not being fired in Arranger track Commit Arrangement should copy contiguous sections in one go Commit Arrangement should handle MIDI notes that are cut off at the left section boundaries Arranger track does not auto-show when closed by dragging the splitter bar Delete Section has inconsistent behavior with Ripple Edit All enabled Arrangement drop-down menu shows incorrect arrangement after committing arrangement SHIFT+double-click to zoom to section should be a toggle Odd behavior when resizing section to the left when using Snap By Arrangement does not preview properly when Set Now Time With Full Restart enabled in Track view Options menu Inconsistent Aim Assist / Tool-tip when section is snapping to gesture Arranger sections no longer add "(2)" and "(copy)" to section names when split or copied Track view View menu should say Arranger Track Show/Hide Incorrect section context menu is shown in the Arranger track Clicking a section in the Arranger track should scroll the section into view in Sections pane of Arranger Inspector Unable to scroll clips pane when hovering over Arranger track Arranger Track.pdf Misc: Split MIDI Notes option in Split Clips dialog box and Edit > Preferences > Customization - Editing CTRL+mouse wheel scroll direction is reversed Inspector displays wrong output strip after clicking inspector strip with track sending to aux Inspector flickers when switching between tabs Soloing aux tracks mutes metronome on playback Editing text in PRV Drum Map triggers keyboard shortcuts Custom project load affirmations truncate messages that are more than one line Custom project load affirmations display unexpected characters in multibyte languages like Japanese and Chinese Crash copying ProChannel Console Emulator settings Unexpected behavior with ProChannel Modules when Short Names are disabled in Windows Some Inspector keyboard shortcuts fail to close tabs Applying a Workspace/Screenset referencing track based views to an empty project can crash or cause unexpected behavior Keybinding for Input Echo does not update Simple Instrument Tracks in Track view Verify failed duplicating instrument track Screensets and view state unnecessarily persisted for unused internal views View list of updates in Early Access 1
-
[CLOSED] Cakewalk 2020.04 Early Access 1
Morten Saether replied to Morten Saether's topic in Early Access Program
Localization is not complete in the Early Access build. This will be addressed before the final release. -
[CLOSED] Cakewalk 2020.04 Early Access 1
Morten Saether replied to Morten Saether's topic in Early Access Program
@MarianoGF This happens because you are using a custom theme that needs to be updated to account for the new and resized Inspector buttons. You will need to update any custom themes if you intend to use them in 2020.04 and beyond. Please see the following post. In the meantime, switch to the factory Tungsten or Mercury theme. -
Below is a history of recent theme changes in CbB. Themes created in earlier versions of CbB may not display properly in the latest version until the themes have been updated. If you use custom themes, please be aware of the following additions/changes in Theme Editor: 2021.12 : Track view > Track Pane: Archive 2021.04 Update 1: Meter/Key view: Insert Delete Properties Note: Custom user themes saved in the public release of 2021.04 or Update 1 Early Access should be updated and resaved in Theme Editor after installing 2021.04 Update 1. The buttons listed above affect the Meter/Key view, Event List, and Markers view. 2021.04: Inspectors: Arranger Tab Arranger Tab (small) Tempo Tab Tempo Tab (small) Tempo Tab (collapsed) Clip Tab Clip Tab (small) Track Tab Track Tab (small) Bus Tab Bus Tab (small) ProChannel Tab ProChannel Tab (small) 2021.01: Control Bar > Modules > Select: Select Track Envelopes with Clips Select Events with Sections Select Track Articulations with Clips Select Sections with Time Ruler Background (large) Background (medium) 2020.04: Control Bar > Modules > Transport: Arranger preview Arranger preview (small) ProChannel: Previous Preset Next Preset ProChannel > ProChannel category: Default Category Frequency Category Dynamics Category Simulation Category Distortion Category Time Category Modulation Category Imaging Category FX Chain Category Analysis Category Inspectors: Arranger Tab Arranger Tab (small) Arranger Tab (collapsed) Clip Tab Clip Tab (small) Clip Tab (collapsed) Track Tab Track Tab (small) Track Tab (collapsed) Bus Tab Bus Tab (small) Bus Tab (collapsed) ProChannel Tab ProChannel Tab (small) ProChannel Tab (collapsed) Markers view: Marker Lock Indicator 2019.09: Track view: Auto Crossfade Button 2019.07: Control Bar > Modules > Tools: Smart Tool (customized) Time Ruler > Markers: Selection Markers 2019.03: Inspectors: Arpeggiator Lock Rate Button 2019.01: Track view: Ripple Edit Button Browser > Plug-in Browser: Plug-in Tree Text VST2 Text 32-bit Plug-ins Text Plug-in Tree Icons 2018.11: Control Bar > Modules > Export: Background (large) Background (small) Background (collapsed) Icon Menu Button (large) Menu Button (small) 2018.06: Global > Note Draw Duration Buttons: Whole 1/2 1/4 1/8 1/16 1/32 Triplet Dotted 2018.05: Browser > Synth Rack > Synth Strips: Connect/Disconnect Synth (undocked) Piano Roll view > Track Pane: Auto Focus Auto Lock Track view > Track Pane: Interleave Phase
-
2020.04 Early Access installer now available! [UPDATE 17-Apr-2020: Cakewalk 2020.04 Early Access 2 is now available] We're pleased to announce the Early Access for 2020.04, our biggest release to date which also celebrates two years of active Cakewalk by BandLab development! This release introduces an exciting non-linear Arranger Track feature that is very useful for song creation and creative experimentation. Also included are many other significant feature improvements such as ProChannel module presets, instrument track improvements and many bug fixes, all in keeping with our goal of making CbB as reliable and enjoyable as possible. We'd love for you to check it out before we drop the official public version, which should be in roughly a week. This time we're also providing an easy rollback installer should you need to quickly revert to the last public release for any reason. Please note that Early Access installers are update installers, which only update from a specific version. To install the 2020.04 Early Access build, you must be on the latest public release of 2020.01. Download Cakewalk 2020.04 EA installer Should you need to revert to the 2020.01 release, you can download the Cakewalk 2020.01 Rollback installer. If you haven't already done so, please read about the Early Access Program before participating. Thanks again for your participation! The Bakers 2020.04 Highlights Behavior changes Add Track menu behavior change: The behavior of the Track(s) counter has changed when inserting a multi-timbral soft synth via the Add Track menu. When Instrument Track Per Output or Split Instrument Track is selected, the Track(s) counter now specifies how many Instrument output tracks to create instead of how many unique instances of the synth to create. Changes to Delete Track: CTRL+DELETE deletes tracks. Delete Track only deletes the focused track if the focused track is not also selected. When a combination of tracks and track folders are selected, the context menu displays Delete Selected Tracks and Folders. Enable/Disable Enhanced Keyboard Editing Mode shortcut is unassigned by default. The default keyboard shortcut (0 on the numeric keypad) to enable/disable Enhanced Keyboard Editing Mode has been removed. To enable/disable Enhanced Keyboard Editing Mode, go to Edit > Preferences > Customization - Keyboard Shortcuts and assign Enhanced Keyboard Editing to an unused keyboard shortcut. Bypass All Audio Effects shortcut is unassigned by default. The default keyboard shortcut (E) to bypass all audio effects has been removed. To bypass all audio effect, do one of the following: Go to Edit > Preferences > Customization - Keyboard Shortcuts and assign Bypass All Audio Effects to an unused keyboard shortcut. Click the Bypass all Effects button in the Control Bar’s Mix module. Horizontal zooming no longer centers Now Time. When zooming with the mouse wheel or CTRL+LEFT/RIGHT ARROW shortcuts, if the Now Time is currently within view, its position will be retained while zooming. If the Now Time is not present in the view, the zoom behavior is unchanged. CTRL+ALT+SPACEBAR is assigned to Preview current arrangement from the Now Time, and no longer plays the next event in the Event List view. Arranger Track Overview The Arranger track is an arrangement tool that provides several workflow benefits: Easily rearrange sections of the entire project as one unit instead of moving individual clips. For example, instantly swap the positions of the first and second chorus for all tracks, or copy the first verse in order to double its duration. Experiment with different song structures in a non-destructive and non-linear manner. For example, does your song work best in AABA, ABAB, or ABAC song form? Define time range sections and sequence them in any order without destructively moving any clip data. You can even save multiple arrangements within each project. Create a color coded overview of the song structure, and use the Arranger Inspector to quickly navigate around the project and jump to song sections. Create arbitrary song sections anywhere on the project timeline, then later string them together for seamless playback. Sections provide an additional way to perform time based selections and edits of the project. Create an unlimited number of arrangements per project, which can all be exported simultaneously. Arranger functionality is distributed across two views: Arranger track. To show or hide the Arranger track, click the Track view View menu and choose Arranger Show/Hide, or press A. The Arranger track timeline shows all defined sections. You can drag to create and rearrange sections, then freely move them along the timeline. Any changes in the Arranger timeline are immediately reflected in the Arranger Inspector’s Sections list, and vice versa. Arranger Inspector. To show/hide the Arranger Inspector, click the Show/Hide Arranger button at the top of the Inspector pane, or press ALT+SHIFT+I. For details about using the Arranger Track, see the attached PDF : Arranger Track.pdf An arrangement is comprised of Sections, each spanning a unique time range. Other section properties include name and color, to clearly delineate regions of time and track content by musical function. Important: By default, clicking an Arranger section also selects underlying track events. Clicking again deselects track events, while retaining selection of the section. This behavior allows you to easily determine whether or not track events are included in section edit operations. Note that the selection highlight in the Clips pane indicates selected track events. To disable automatic selection of track events when selecting sections, right-click in the Arranger track timeline and disable Select Events with Sections. Arranger Inspector Sections are the building blocks that make up the song. Each section defines a time range in the project, such as Intro, Verse, Chorus, etc. An arrangement is an ordered set of sections. You can sort the sections in any order to define the playback order. To do so, drag the sections from the Sections area down to the Arrangements area in the Arranger Inspector. The Sections area lists all the arranger sections defined in the project’s timeline, from which a custom arrangement can be built. The order of the sections reflect the order in which they appear in the timeline. The Sections list provides an additional way to edit time based selections of the project. Any operation performed in the Sections list is immediately reflected in the project/timeline, and vice versa. To copy all sections to the current arrangement, click the Add All Sections to Arrangement button . If one or more sections are selected, only the selected sections will be copied. The Arrangements area allows you to sequence sections in a non-linear manner without destructively moving any clip data, regardless of which order they appear in the project’s timeline. Defining sections of your song To use the Arranger track, you must first define time range sections such as Intro, Verse, Chorus, etc. Sections can be of any duration, but it is common to start/end them at measure boundaries. New sections can be created by any of the following means: Draw a range within the Arranger track timeline (below the time ruler). Double-click a blank area in the Arranger track. The new section duration is inherited from the last clicked section. Right-click in the Arranger track timeline and select Insert Section Here, Insert Section at Now Time, Span Sections, or From Selection. Click the Add Section button in the Arranger Inspector or Arranger track. Editing sections Drag sections to move them around on the timeline. Drag a section edge to resize the section. Right-click a section to access edit option. Converting markers to sections To convert markers to sections, make a time selection in the time ruler that spans the text markers, then right-click in the time ruler and select Create Sections from Markers. Creating a custom arrangement Sections can be sequenced in any order to create arrangements, without affecting project data. The sections don’t have to live on the project timeline in any specific location or order, because the arrangement determines in which order they are played back. To define the section playback order, drag sections from the Sections list down to the Arrangements list. You can also drag sections directly from the Arranger track. Previewing an arrangement To play the current arrangement, click the Preview button or press ALT+SPACEBAR. During Arranger preview, the main transport Play button shows a small “A” icon to indicate it is playing back an arrangement instead of following the project’s linear timeline, and the active section shows a progress indicator. Committing an arrangement To (destructively) render the current arrangement to the project’s timeline, click the Commit Arrangement to Project button . Exporting arrangements You can export one or more arrangements without first having to render it to the timeline. To do so, click the Arrangements menu and select Export as Audio. ProChannel module presets In addition to saving presets of the entire ProChannel chain (all modules), you can also save and load presets of individual modules. The per module preset controls are located on the left side of each module header bar. To select a module preset Click the module’s category type icon to open the preset menu, then select the desired preset. The category type icon tooltip shows the name of the selected preset. To save a module preset Adjust the ProChannel module controls to the desired settings. Click the module’s category type icon to open the preset menu, then select Save Preset. Type a name in the Save Preset dialog box, then click OK. To select the next preset To select the next preset, do one of the following: Click the Next Preset button . Hold down the CTRL key and click the module’s category type icon. To select the previous preset To select the previous preset, do one of the following: Click the Previous Preset button . Hold down CTRL+SHIFT and click the module’s category type icon. To delete a module preset Click the module’s category type icon to open the preset menu, then select the preset you want to delete. Click the module’s category type icon to open the preset menu again, then select Delete Preset. Copy/paste settings between ProChannel modules You can copy settings from any ProChannel module and paste the settings to any other instance of the same module. on any track or bus. There are two ways to copy/paste settings between identical modules: Drag and drop In the Console view, show the ProChannel for both the track/bus you want to copy from, and the track/bus you want to paste into. Hold down the CTRL key, and drag from the source module’s header bar (i.e., the module title) to the target module. The source and target ProChannel modules must be identical. Note: If the target module has not been enabled/initialized yet, it will automatically become enabled after pasting. However, if the target modules has been manually disabled, then it will remain disabled after pasting. Copy/Paste menu commands Click the source module’s category type icon to open its preset menu, then select Copy Settings. Click the target module’s category type icon to open its preset menu, then select Paste Settings. Append per-output Instrument tracks When you insert a multi-timbral soft synth, you can specify how many Instrument output tracks to create, up to the maximum supported by the synth. If you do not initially create the maximum number of available output tracks, you can later add additional tracks on demand from the Synth Rack view. To do so, do one of the following: Right-click the instrument in the Synth Rack (Views > Synth Rack View) and select Append Instrument Track. Right-click the instrument track strip in the Track view and select Append Instrument Track. Note: If you originally created used per-output Instrument tracks for that synth, then Cakewalk will create another per-output instrument track. If originally created split instrument tracks, then Cakewalk will create another split instrument track. Misc. enhancements The Display Clip Fade Attenuation option in Edit > Preferences > Customization - Display is now available as a key binding. Audio Driver Mode now changes immediately instead of waiting for Apply click. Updated to latest VST3 SDK, which includes VST bug fixes. Bug fixes Cannot remove ARA plugin as region effect if the plugin is not installed Using mouse wheel in 'Locked & Centered' Control Bar results in left aligned CB User Reported Crash Cakewalk.exe!CFretControlBar::resetNow() Line 220 Clicking Freeze on archived track crashes CbB Seeking with lower Disk Buffers/Higher Audio card latency causes audio to cut out Inspector strip context menu appears on wrong monitor Shift + Right Click behavior not consistent with MIDI Tracks Aim Assist gets stuck at time zero after dragging a plugin from the browser Instrument tracks mute MIDI channel when using ALT+M Reverse touchpad scrolling direction in some views Marker View Lk column not listing locked status in Tungsten theme Dragging clips with Snap By can have unexpected results Missing project file patch causes CbB to crash Remove default key NUM-0 binding to Enhanced Keyboard Editing Mode Make "Display Clip Fade Attenuation" key bind-able Double-Click to open Clip Properties not working as expected Devices tab of Preferences should say "Double-click on a friendly name to edit it" Crash when freezing track after setting input to None Deleting Multiple tracks in folders removes folder from project iZotope Relay does not draw Advanced tab in VST3 iZotope Plugins Display Track Names incorrectly Project Looping turns off after recording Spacebar doesn't work with new Waves StudioRack plugin Background not repainted in Waves StudioRack plugin when opening module or resizing from UI Hang on project close Cancelling a real time freeze operation crashes and shuts down application Cancelling Freeze can cause Interleave and Phase buttons to change unexpectedly Archived Aux tracks pass signal Soloing aux tracks mutes metronome on playback Inspector displays wrong output strip after clicking inspector strip with track sending to aux Custom project load affirmations display unexpected characters in multibyte languages Custom project load affirmations truncate messages that are more than one line Having no playback master selected causes loss of audio with no reported errors Crash on undo of ripple edit delete Incorrect audio range when bouncing or exporting with no audio drivers present Known issues Showing the Arranger Inspector also automatically shows the Arranger track. However, this currently only works if the Arranger track was closed with the A keyboard shortcut or the Track view View > Arranger Show/Hide command, not by dragging the divider bar. When multiple Arranger sections are selected, when clicking to drag, the preview runs off screen. When resizing the Arranger track, drawing artifacts are left behind. Arranger track auto scrolling doesn't work when resizing a section. A few Arranger context menu commands have not been localized yet, and will appear in English for all languages. CTRL+mouse wheel scroll direction is flipped. The Insert Soft Synth Options dialog box is not formatted properly in non-English languages. Localization work in general is pending. Japanese localization is incomplete.
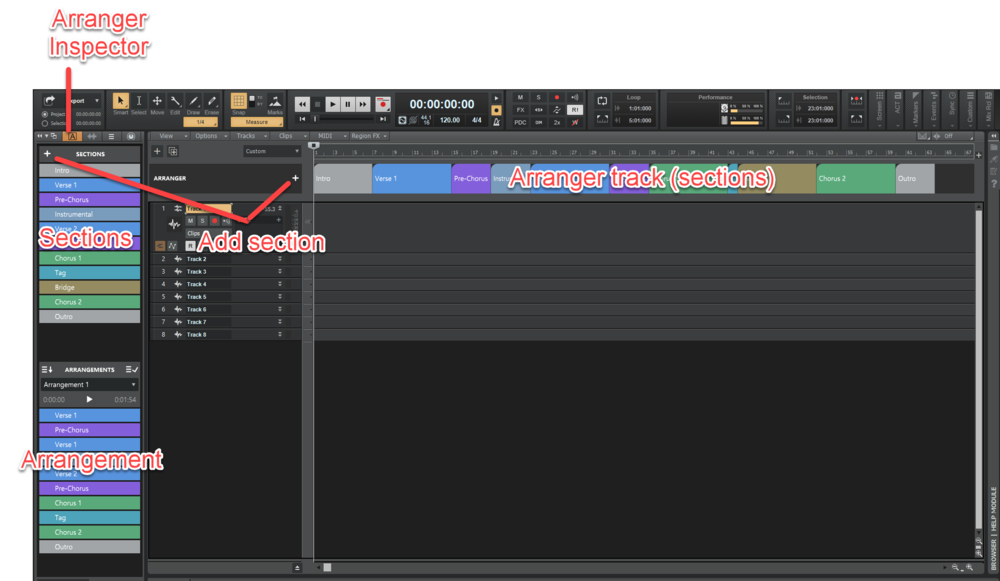
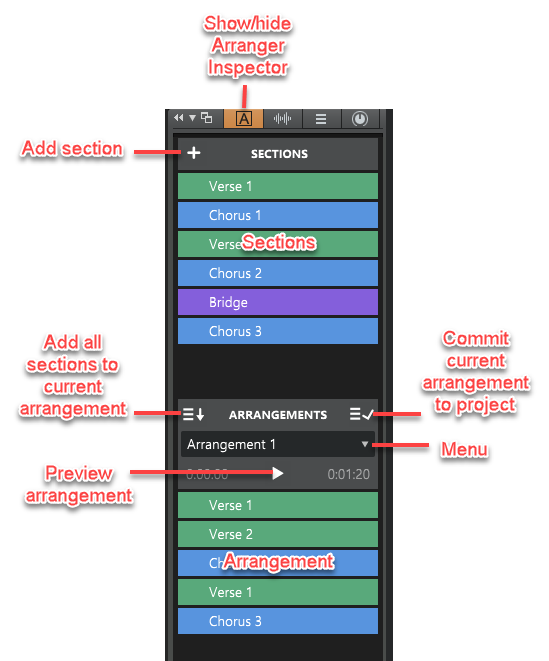


- 234 replies
-
- 29
-
-
-

-
Cakewalk 2020.01 Feature Overview For all new feature details, see New Features.
-
Hi all - please use this topic to post feedback specific to 2020.01. Release-specific feedback is valuable to us, and consolidating it in a single topic is extremely helpful. Thanks in advance! 2020.01 Release Notes
-
It's our pleasure to announce the 2020.01 release, a continuation of our focus to make Cakewalk as stable as possible and easy to use. A big thanks to our community for sharing your valuable time and feedback - you're helping us build an unquestionably superior Cakewalk with each release! Thanks, The Bakers For new feature details, see New Features. Update Feb 13 2020: Build 26.01.0.28 hotfix Fixed several stability issues. Long MIDI project crashes on playback after seeking to high time value. Smart Solo does not unsolo as expected with Instrument Track Per Output. Insert Time/Measures only shifts markers if clip data exists. Instrument Track Per Output does not insert tracks in folder if Create Folder is selected. CWAF Tool does not work with Cakewalk 2020 builds. Mackie Control does not mute per-output Instrument tracks properly. Update Feb 24 2020: Folders with 'VST3' as part of the name ('VST32', etc.) are treated as VST3 folders and fail to scan VST2 plug-ins. Note: If you installed the Build 26.01.0.28 hotfix prior to February 24, 2020, it did not include the updated VST scanner. To get the latest VST scanner, download it from here , then copy the VstScan.exe file to C:\Program Files\Cakewalk\Shared Utilities. Lastly, perform a VST scan in Cakewalk (Edit > Preferences > File - VST Settings). 2020.01 Features & Enhancements Behavior changes The Duplicate Clip command now respects Snap By. Multi-timbral soft synth enhancements Instrument Track Per Audio Output In Cakewalk 2019.11 and earlier, Simple Instrument Tracks are limited to one track per instance of a VSTi, and a single stereo audio out. Cakewalk 2020.01 has a new Instrument Track Per Output option in the Add Track menu and Insert Soft Synth Options dialog box for multi-timbral soft synths that support multiple outputs. It pairs a MIDI track with a separate audio output track (mono or stereo) for each synth output, assigning sequential MIDI channels. This allows you to have multiple Instrument tracks for a single instance of a synth. The Instrument Track Per Output option is similar to the All Synth Audio Outputs: Stereo and All Synth Audio Outputs: Mono options, except Instrument tracks are created instead of Audio tracks. Note: As with Simple Instrument Tracks, you must split the Instrument tracks if you wish to edit MIDI automation. MIDI chase support for MIDI event buses MIDI chase is now supported for VST3 MIDI event buses that support it (e.g. Vienna Symphonic Library). Show/hide Aim Assist text in Time Ruler You can now show/hide the Aim Assist text in the time ruler. To do so, do one of the following: Go to Edit > Aim Assist and select Show Aim Assist Time. Right-click in the time ruler and select Aim Assist > Show Aim Assist Time. Press ALT+X (can be reassigned to any other shortcut in Edit > Preferences > Customization - Keyboard Shortcuts). CPU metrics Diagnosing glitches in audio playback is now easier with the new Engine Load and Late Buffers metrics in the Control Bar's Performance module tooltip. To view these new metrics, hover the mouse over the Performance module. Note: you must have Show Tooltips enabled in Preferences > Customization - Display to see this. The Engine Load value is a percentage of the total time the engine took to process an audio buffer. If it takes 100% or more of the allotted time, the buffer is processed too late and it will result in audio glitches/distortion. The value in parenthesis represents the max engine load since the time the engine started. Engine load is a better metric to help troubleshoot audio glitches during playback since it accounts for other delays in synchronizing and processing audio workloads beyond what the CPU meters report. It's normal for engine load to be higher than the average CPU meter value shown. The Late Buffers count indicates the total number of buffers that took too long to process since the time the engine started. Too many late buffers will result in audible glitches or distortion in playback due to the audio device not receiving buffers in time. Note: It's OK to have a few sporadic late buffers during playback since it will not result in audible glitches. Optimizations Experimental aggressive task scheduling model We continue to work on improving our multi-threaded engine performance and have added a new "aggressive" task scheduling model. The aggressive task scheduler utilizes more efficient task management that can result in better multi-processing and fewer thread context switches. This feature is still experimental so report back if you notice any improvements or problems when using it. The new scheduling model is activated by setting the ThreadSchedulingModel value to 3. This can be done via Edit > Preferences > Audio - Configuration File. Bug fixes WASAPI Exclusive mode fails to open inputs on multi-channel audio devices. Cannot open some audio devices such as Roland Octacapture as 16 bit in WASAPI Exclusive mode. WASAPI Shared mode kills audio in other apps. Edit tool has inconsistent drop arrow in Mercury theme. MIDI Chase should support VST3 event bus. Duplicate Clip command doesn't obey Snap By, only Snap To. Split tool uses fade-in curve for both fade-in & fade-out. CPU meters do not work at buffer sizes lower than 1 msec. Audio engine won't restart when changing latency while Preferences is open. Scan of VST3 folder should only scan .vst3 files. Potential crash on app shutdown. Plug-In Browser search is not functional with FX Chain presets. Latest release notes are here. See prior release notes. Check out all new features released to date.
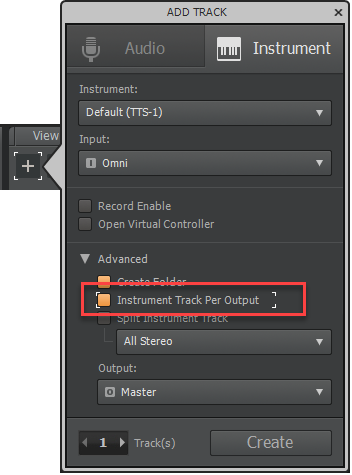
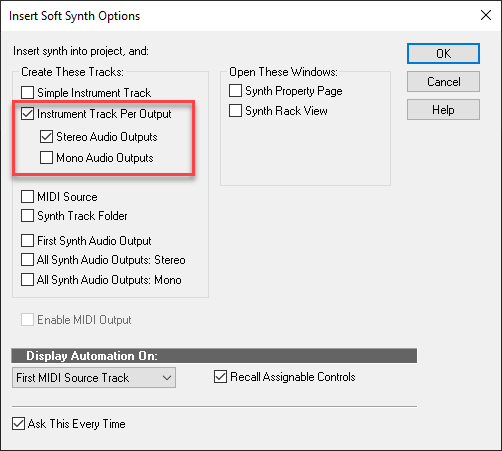

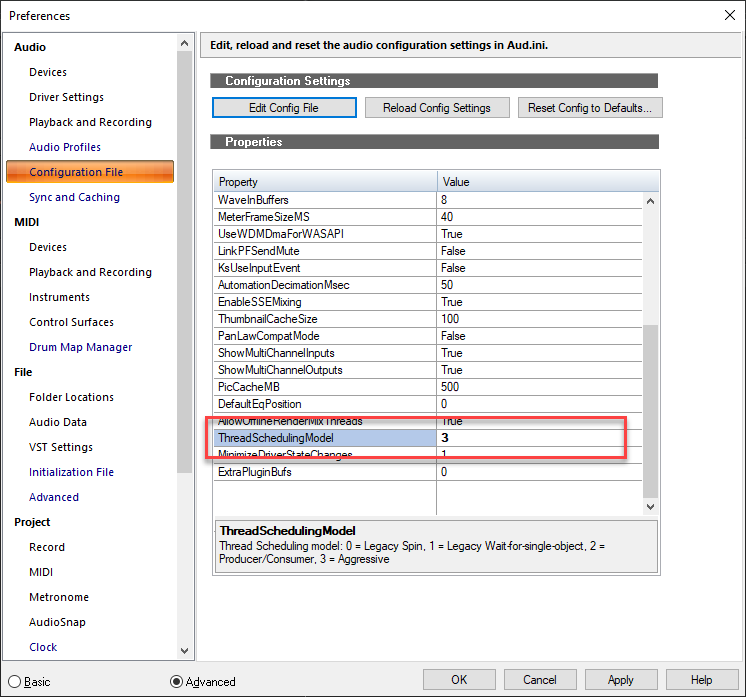
-
2020.01 Early Access installer now available! We're pleased to announce the Early Access for 2020.01, which includes many significant improvements and bug fixes, all in keeping with our goal of making CbB as reliable and enjoyable as possible. We'd love for you to check it out before we drop the official public version, which should be in roughly a week. Please note that Early Access installers are update installers, which only update from a specific version. To install the 2020.01 Early Access build, you must be on the latest public release of 2019.12. Download Cakewalk 2020.01 EA installer If you haven't already done so, please read about the Early Access Program before participating. Thanks again for your participation! The Bakers 2020.01 Highlights Behavior changes The Duplicate Clip command now respects Snap By. Multi-timbral soft synth enhancements Instrument Track Per Audio Output In Cakewalk 2019.11 and earlier, Simple Instrument Tracks are limited to one track per instance of a VSTi, and a single stereo audio out. Cakewalk 2020.01 has a new Instrument Track Per Output option in the Add Track menu and Insert Soft Synth Options dialog box for multi-timbral soft synths that support multiple outputs. It pairs a MIDI track with a separate audio output track (mono or stereo) for each synth output, assigning sequential MIDI channels. This allows you to have multiple Instrument tracks for a single instance of a synth. The Instrument Track Per Output option is similar to the All Synth Audio Outputs: Stereo and All Synth Audio Outputs: Mono options, except Instrument tracks are created instead of Audio tracks. Note: As with Simple Instrument Tracks, you must split the Instrument tracks if you wish to edit MIDI automation. MIDI chase support for MIDI event buses MIDI chase is now supported for VST3 MIDI event buses that support it (e.g. Vienna Symphonic Library). Show/hide Aim Assist text in Time Ruler You can now show/hide the Aim Assist text in the time ruler. To do so, do one of the following: Go to Edit > Aim Assist and select Show Aim Assist Time. Right-click in the time ruler and select Aim Assist > Show Aim Assist Time. Press ALT+X (can be reassigned to any other shortcut in Edit > Preferences > Customization - Keyboard Shortcuts). CPU metrics Diagnosing glitches in audio playback is now easier with the new Engine Load and Late Buffers metrics in the Control Bar's Performance module tooltip. To view these new metrics, hover the mouse over the Performance module. Note: you must have Show Tooltips enabled in Preferences > Customization - Display to see this. The Engine Load value is a percentage of the total time the engine took to process an audio buffer. If it takes 100% or more of the allotted time, the buffer is processed too late and it will result in audio glitches/distortion. The value in parenthesis represents the max engine load since the time the engine started. Engine load is a better metric to help troubleshoot audio glitches during playback since it accounts for other delays in synchronizing and processing audio workloads beyond what the CPU meters report. It's normal for engine load to be higher than the average CPU meter value shown. The Late Buffers count indicates the total number of buffers that took too long to process since the time the engine started. Too many late buffers will result in audible glitches or distortion in playback due to the audio device not receiving buffers in time. Note: It's OK to have a few sporadic late buffers during playback since it will not result in audible glitches. Optimizations Experimental aggressive task scheduling model We continue to work on improving our multi-threaded engine performance and have added a new "aggressive" task scheduling model. The aggressive task scheduler utilizes more efficient task management that can result in better multi-processing and fewer thread context switches. This feature is still experimental so report back if you notice any improvements or problems when using it. The new scheduling model is activated by setting the ThreadSchedulingModel value to 3. This can be done via Edit > Preferences > Audio - Configuration File. This value is at the bottom of the list. Bug fixes WASAPI Exclusive mode fails to open inputs on multi-channel audio devices WASAPI Shared mode kills audio in other apps Edit tool has inconsistent drop arrow in Mercury theme MIDI Chase should support VST3 event bus Duplicate Clip command doesn't obey Snap By, only Snap To Split tool uses fade-in curve for both fade-in & fade-out CPU meters do not work at buffer sizes lower than 1 msec Audio engine won't restart when changing latency while Preferences is open

- 52 replies
-
- 10
-
-
-
@paulo As a result of Microsoft discontinuing Windows 7 support, we will no longer officially support Windows 7. It should be fine to update CbB until further notice, but we highly recommend you upgrade to Windows 10.
-
Hi all - please use this topic to post feedback specific to 2019.12. Release-specific feedback is valuable to us, and consolidating it in a single topic is extremely helpful. Thanks in advance! 2019.12 Release Notes
-
We're pleased to announce the 2019.12 release, which is a stability update in keeping with our goal of making Cakewalk as reliable and enjoyable as possible. A big thanks to our community for sharing your valuable time and feedback - you're helping us build an unquestionably superior Cakewalk with each release! Thanks, The Bakers 2019.12 Highlights Behavior changes & optimizations Improved audio resampling quality in WASAPI Shared mode. The default MIDI Prepare Buffer size has been changed to 200 msec. Limitations preventing the MIDI buffer from being set lower have been removed. There should be no need to change the buffer size from the new default value anymore, since the engine automatically raises the internal size when necessary. On first launch, Cakewalk will reset the MIDI buffer size to the new default value of 200 msec (Preferences > MIDI - Playback and Recording > Prepare Using n Millisecond Buffers). Bug fixes Opening Cakewalk in WASAPI Shared mode stops audio in other apps that share the audio device(s). Potential crash when changing audio configuration settings (Preferences > Audio - Configuration File) during playback in ASIO driver mode. Potential crash when opening ASIO panel from Preferences > Audio - Driver Settings. Deleting data clears the selection. In rare cases, Input Echo could not be disabled in Instrument tracks. Reassigning a synth output track's Input control to None no longer disables the Input Echo control. When doing a real time export of a project (Fast Bounce disabled), the project no longer scrolls. Now time in musical time (H:M:S:F or any time based format) doesn't update to reflect new time when changing tempo. PreSonus Studio 192 crashes when changing buffer size. Playback distortion at certain buffer sizes with some ASIO drivers after 2019.11 update. Changing the audio latency in Preferences > Audio - Driver Settings can cause audio distortion in ASIO and WASAPI Exclusive mode if the driver doesn't accept the new latency value. Plug-in Load Balancing crashes if MixThreadCount in Preferences > Audio - Configuration File is set to a value of 1. Potential hang if certain kinds of dropouts occur in the audio engine while using Plug-in Load Balancing. Setting Fade On Stop in Preferences > Audio - Playback and Recording to >0 prevents RestartEngineAfterDropout from working.
-
2019.12 Early Access installer now available! We're pleased to announce the Early Access for 2019.12, which is a stability update in keeping with our goal of making Cakewalk as reliable and enjoyable as possible. We'd love for you to check it out before we drop the official public version. Please note that Early Access installers are update installers, which only update from a specific version. To install the 2019.12 Early Access build, you must be on the latest public release of 2019.11. Download Cakewalk 2019.12 EA installer If you haven't already done so, please read about the Early Access Program before participating. Thanks again for your participation! The Bakers 2019.12 Highlights Behavior changes & optimizations Improved audio resampling quality in WASAPI Shared mode. The default MIDI Prepare Buffer size has been changed to 200 msec. Limitations preventing the MIDI buffer from being set lower have been removed. There should be no need to change the buffer size from the new default value anymore, since the engine automatically raises the internal size when necessary. On first launch, Cakewalk will reset the MIDI buffer size to the new default value of 200 msec (Preferences > MIDI - Playback and Recording > Prepare Using n Millisecond Buffers). Bug fixes Opening Cakewalk in WASAPI Shared mode stops audio in other apps that share the audio device(s). Potential crash when changing audio configuration settings (Preferences > Audio - Configuration File) during playback in ASIO driver mode. Deleting data clears the selection. In rare cases, Input Echo could not be disabled in Instrument tracks. Reassigning a synth output track's Input control to None no longer disables the Input Echo control. When doing a real time export of a project (Fast Bounce disabled), the project no longer scrolls. Now time in musical time (H:M:S:F or any time based format) doesn't update to reflect new time when changing tempo. PreSonus Studio 192 crashes when changing buffer size. Playback distortion at certain buffer sizes with some ASIO drivers after 2019.11 update.
- 19 replies
-
- 11
-
-