
Josh Wolfer
-
Posts
214 -
Joined
-
Last visited
Everything posted by Josh Wolfer
-
So a friend of mine showed me Logic's Beat Mapping and it would work perfectly for this. Essentially, he creates a marker and that marker is tied to smpte time and designated the start of measure X. You can set measure at now time, which gives part of the fix here, but it's not tied to a maker. You can't move it around. I think that's the missing piece. I still think this would be wonderful if the arranger pieces worked in the way this feature request describes, but copying beat mapping to markers like Logic does, would he a nice middle ground. Thanks
-

Feature: Bounce to clips toggle: Include X-fades or not
Josh Wolfer replied to Josh Wolfer's topic in Feedback Loop
It is primarily for audio quality. But also other things. I also have many many file versions. Recalling old edits is not an issue. -
Feature: Bounce to clips toggle: Include X-fades or not
Josh Wolfer replied to Josh Wolfer's topic in Feedback Loop
There's nothing to freeze. These are audio manipulations via clips, not part of a VSTi. -
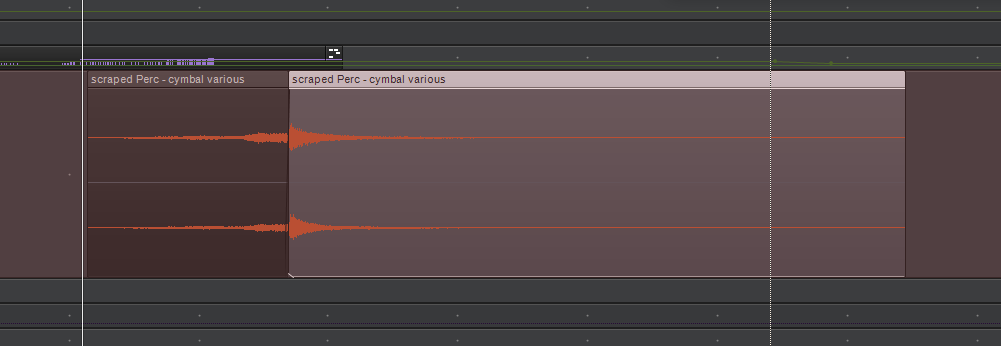
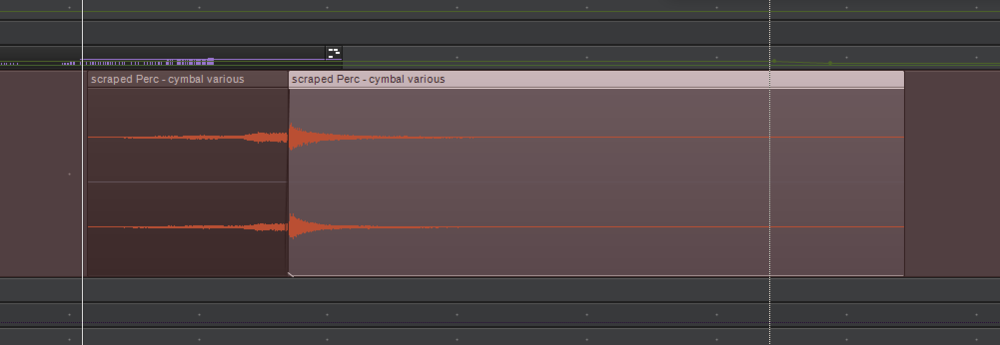
There are times when I'd like to bounce a clip, but not have the X-fade committed to the clip bounce. For example: I have a scraped percussion sample. I split the clip before the main transient and stretched out he rising part to make it longer. I bounce the clip to get the higher quality stretch engine, but I don't want the xfade committed, as I make slide it around and continue making it sit perfectly. In this case, I also built my own gain curve using clip gain automation and wanted to commit that, but still not commit the xfade. What I end up doing currently, is just remove the xfade, bounce and re-add the xfade. Not horrible bad, but It'd be nice to have the option. In general, my workflow is typically something like: Bouncing multiple clips together = I want the xfades to be committed to the final clip. Bouncing a single clip on it's own = I want the xfades to not be committed to the final clip. I'm bouncing to commit the higher quality stretch algorithm and/or commit gain clip gain automation. As always, my workflow doesn't speak for everyone else's. So it'd be nice to have a toggle that is keybind assignable as well. Also, if it had a quick toggle icon like ripple editing, and xfades does, bonus But I already filed a feature for that, to bring back some of the lost 8.5 functionality
-
When adding an instrument track, insert it under the currently selected track. Currently, it adds it to the very end of my track list and I have to move it to where I actually want it. This behavior is already good when adding an audio track by right clicking a track -> Insert Audio Track. It looks like the track is first created at the end and then quickly moved to after the current track. The way I add instrument tracks is to double click on the plugin in the plugin browser and select instrument track. If nothing else, it'd be nice if it put the new track into the same track folder the selected track is in. Not trying to be pedantic, but over the last 2 hours, I've added 6 instrument tracks and each time, I had to drag it back up into the folder of tracks I'm working with. Is this reasonable? Thoughts?
-
Also, even If I can lock clips, I have found no way to lock automation nodes. So that gets screwed up too. My only recourse is to not automate until the arrangement is done. But that's a pain too.
-
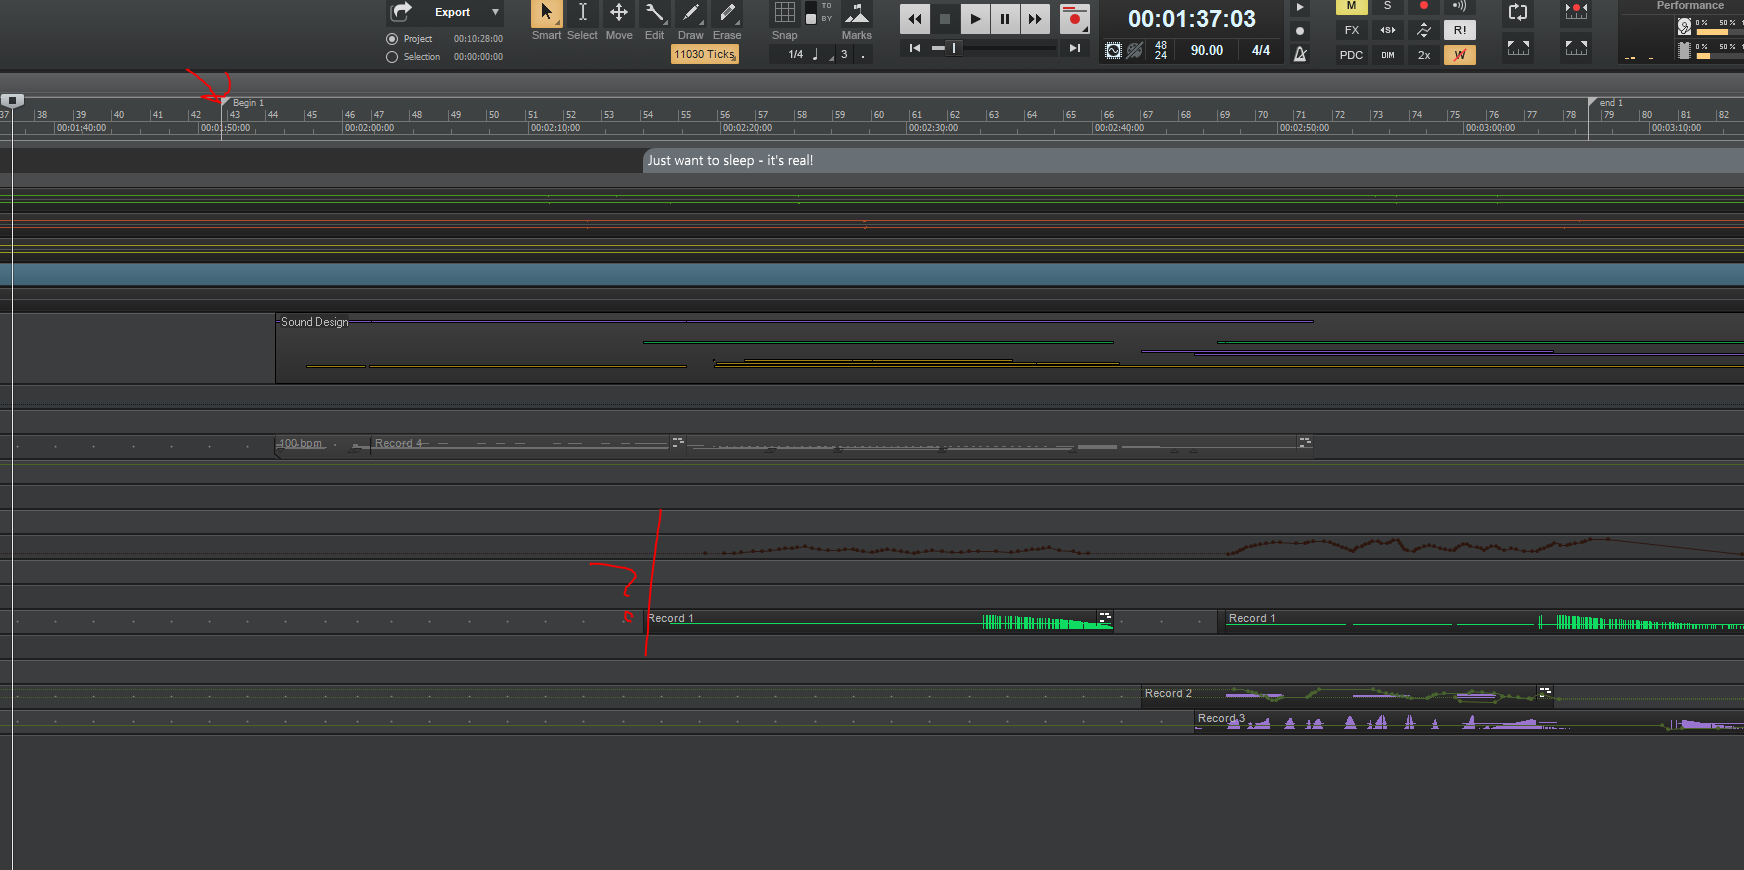
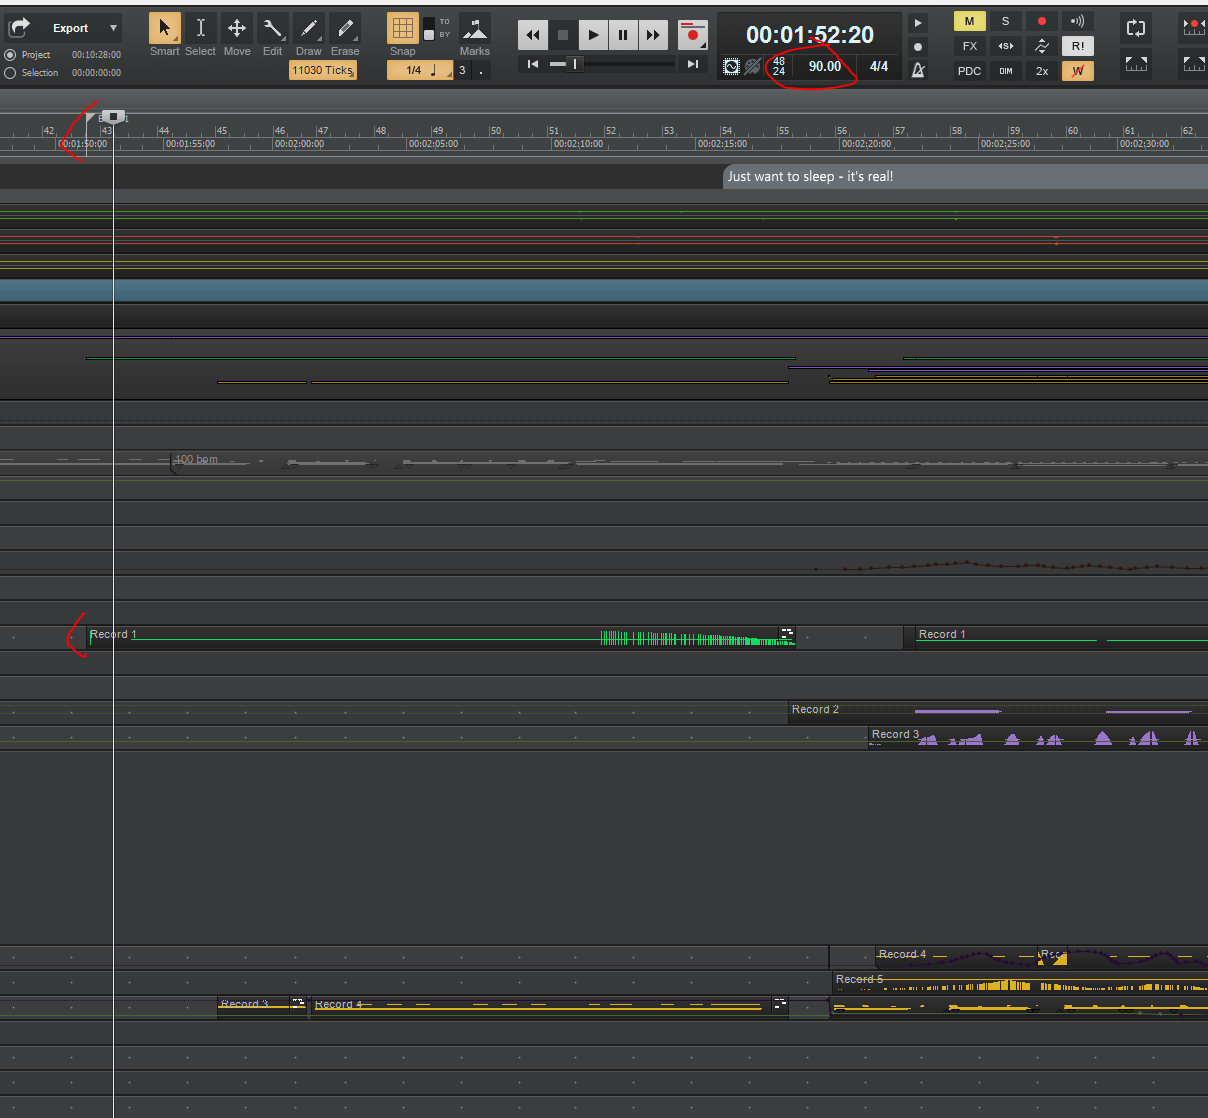
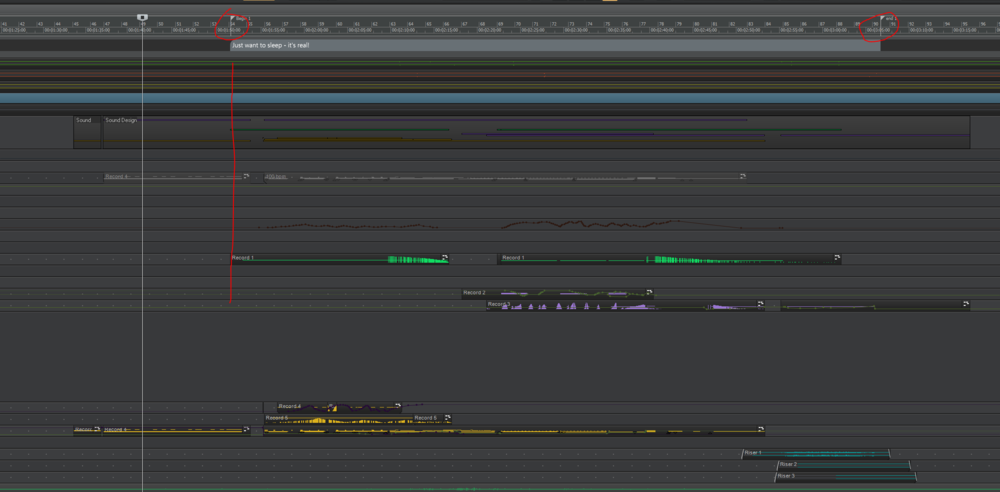
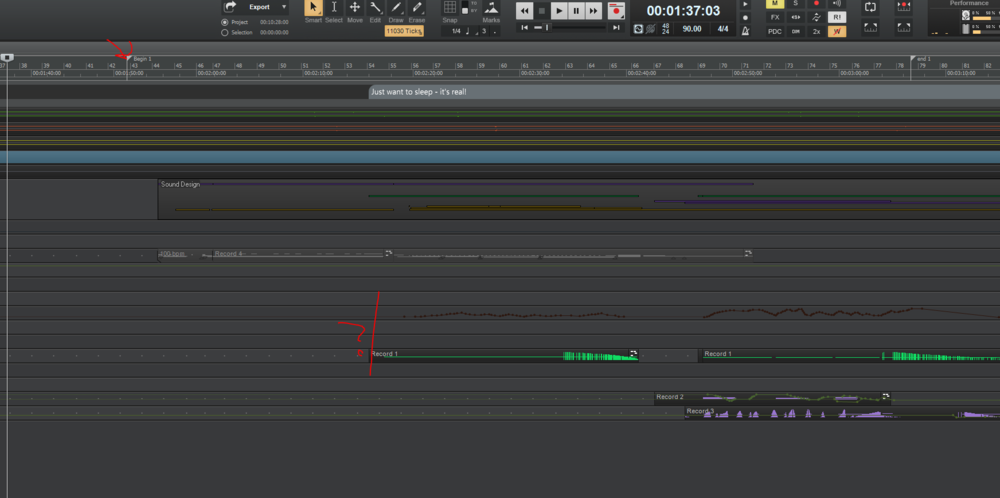
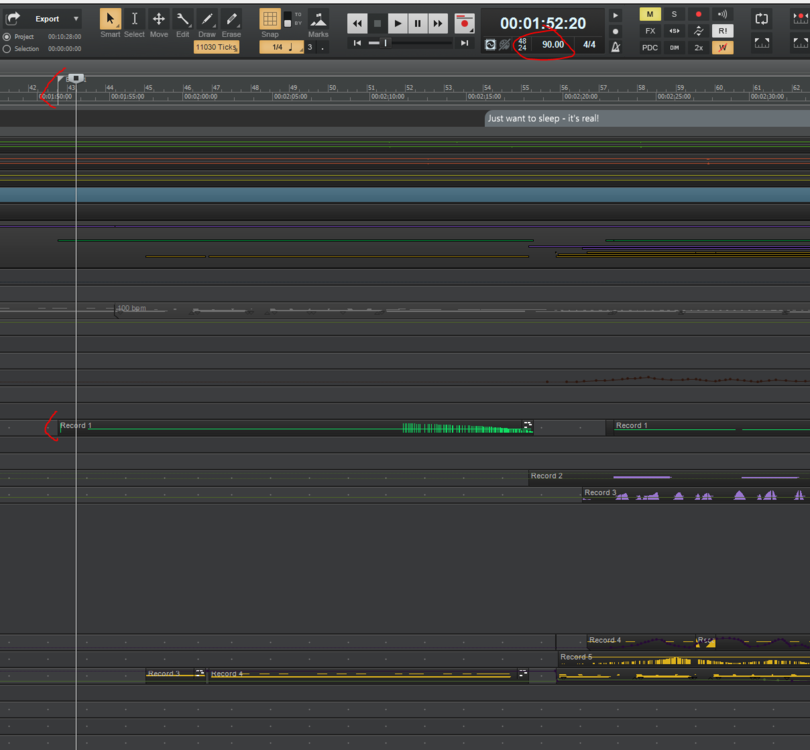
First, thank you for the response. I was unaware of smpte locked markers. This is nice. I still think SMPTE locked arranger sections with their own parameters would be EXTREMELY helpful to me. It's still not working the way I'd like. Here is my example. Tempo of my section is 116 bpm, rest of project is set to 113. If I change the 113 bpm temp before this section, it complete screws up the alignment: As you can see, the marker stayed in the correct spot locked to film (smpte) but the audio did not. The only way I can make this work right now, is if I lock each clip to absolute time, instead of musical time. But if I do that, the musical time is now no longer relevant. It doesn't start on the correct beat and the section is now registered in the new tempo, which I set to 90 bpm The only way I'm aware that I can get around this is to lock all the clips to absolute time, and then re-insert my tempo / key changes at the marker start, and then change all my clips back to musical time. This is a royal pain in the *****. And the feature request I'm asking for would completely make this change trivial in work flow. major head ache saving. If I'm missing something, let me know. I don't think I am. But thank you for teaching me about markers locked to absolute smpte time. This is an improvement.
-
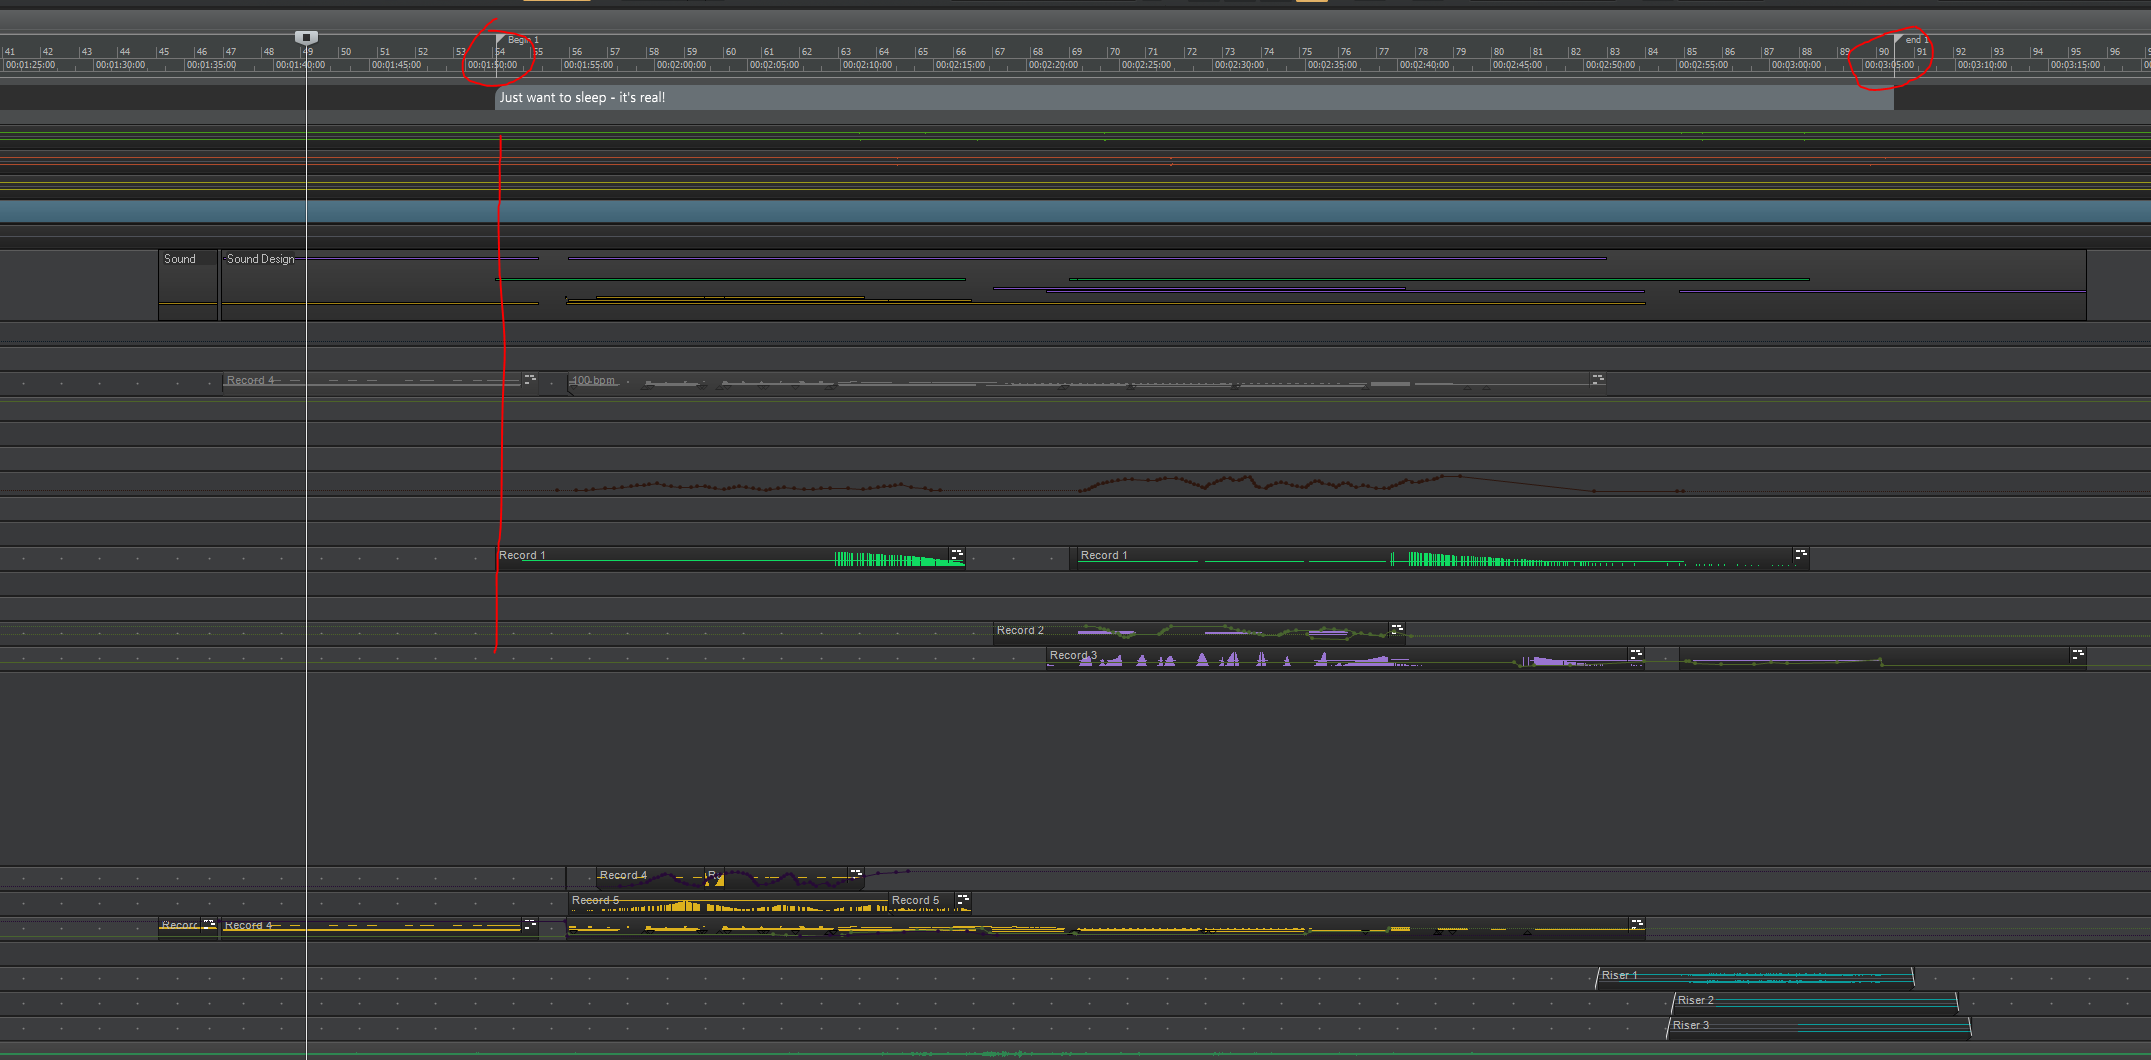
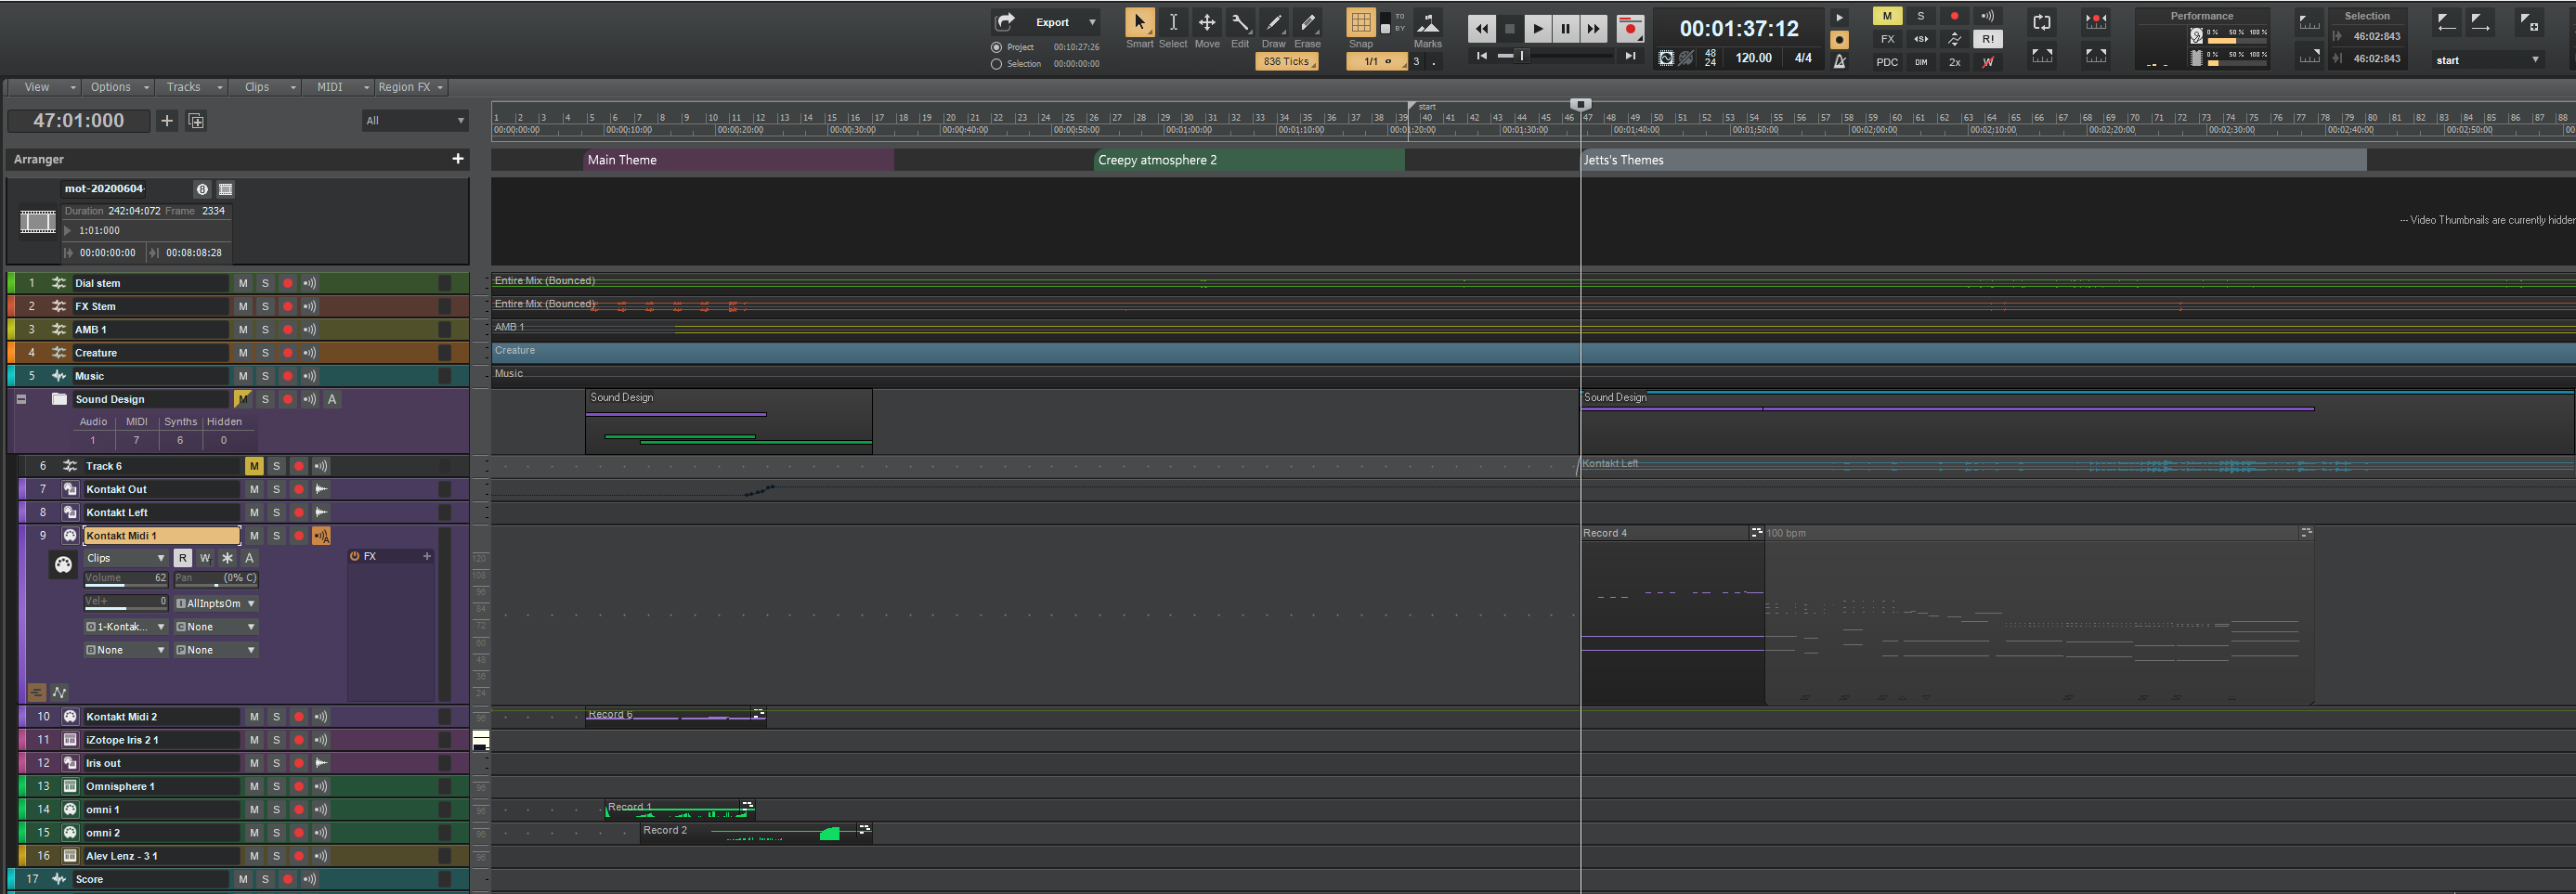
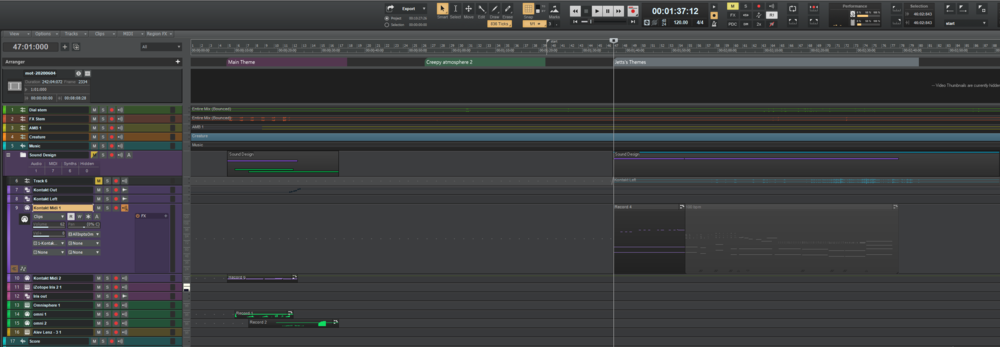
I've been doing a lot more score work and I'm having a few difficulties with Cakewalk that could be resolved with this feature. Right now, Cakewalk is very much designed for a single "works" project and although the projects can handle tempo mapping and time signature changes fairly easily for a song, the work flow is very challenging from a scoring context (Visual Sync). I need to experiment a lot with tempo especially, but also time signatures, in order to figure out what belongs where in context to the film. If I already have the musical piece "figured out", I might set a section to the tempo, say 120bpm for example. But as I'm reworking the mood, I might need to change it to 121 bpm. This is fine if I'm working in a linear fashion from start to end, but I'm not. I'm jumping all over the place. See my screen shot here: = I started with Jett's theme (as marked by the arranger bar). This has a set time signature and bpm. Now I'm working on the Main theme. Any changes I make to the main theme, completely screw up where jett's theme starts, because Cakewalk is all about the musical time instead of the absolute time. Every change in the main theme area affects all other music further along. My current workaround to this is to set ALL of my clips in Jett's theme to "Absolute time", instead of "musical time". This at least allows me to make changes to the other prior sections. And then when I'm done, I have to re-setup jett's theme area with the previous tempo and signature at the start of the first clip in Jett's theme and then change all of my clips to be "musical" instead of absolute (so if I need to move things around or change jett's tempo, the clips all stay relative and correct). As you can imagine, this is incredibly painstaking. The good news is that Cakewalk over the years has been leading up to the functionality I need. First came Ripple Editing. Then came Arranger, with movable arrangements (basically advanced ripple editing) Now we need the Film score arranger! What I'm proposing is that there be an option to make it so the Arranger sections essentially become their own tempo / signature scenes that are locked to "absolute time". This would have major benefits: You could easily make changes to earlier sections and NOT affect the later sections, because the later section is locked to an absolute time and no changes to the previous section affect it. IE: I can change the main theme BPM and at the beginning of "creepy atmosphere 2", the tempo / bpm for "creepy atmosphere 2" take over. If I decided to move "creepy atmosphere 2" later in time, Cakewalk just automatically extends the previous "scene" boundary to the new point. This would allows for EASY realignment during film edits. It's VERY common that a score writer doesn't get a locked film. They may add a few seconds or even frames here and there and I need to EASILY re-align the score to the new time. If the scene is locked to absolute time, I just find the new start and slide the film score arranger scene to the new start and BAM. Done. No tedius resetting of the tempo to get the start point re-done. Today, I have to do a lot of "set measure / beat at now time" in order to get the "scene" to start where I want it. Tedious. I have a suggestion to make this as simple as possible. Have a "default project tempo / time signature". This will set the project frame of reference. Using my screenshot example, we'll say 100 bpm 4/4. Any part of the project that DOESN'T have a film score arrange scene assigned, gets this bpm / tempo. All arranger sections have their own assigned tempo / bpms. So in my example case: Main theme (purple) : 145bpm 4/5 Start: 00:00:08:07 (absolute time) Finish: 00:00:35:28 (absolute time) Creepy atmosphere 2 : 111 bpm 4/4 Start: 00:00:53:23 (absolute time) Finish: 00:01:21:16 (absolute time) Jett's Theme : 113 bpm 4/4 Start: 00:01:37:11 (absolute time) Finish: 00:02:43:15 (absolute time) Everything else without a arranger assigned: 100bpm 4/4 I would legitimately pay $300 of my own money to see this implemented. I'd get the money back incredibly fast with the streamlined flow from scoring money. Please Please Please consider this. I've been using Sonar since v1 and I'd like to keep using it. I've found that for most aspects of film (ADR, dialogue editing, sound editing), it works just fine. But scoring is a real pita. Thank you for your consideration.
-
@msmcleod I'm sure yall don't hear it enough, but you guys are life savers. 1 for saving Cakewalk from the depths of abandon-ware. But also for supporting the community and continuing to mature the product. Seriously, from the bottom of my heart, thank you.
-
This works perfectly. Thank you so much. I was shocked when I couldn't find it. This is perfect.
-
Locking clips to HMSF location for film
Josh Wolfer replied to Josh Wolfer's topic in Cakewalk by BandLab
I straight up could hug you right now. Thank you @msmcleod It works perfectly. -
I have posted here, because I have a nagging suspicion that the answer is going to be that Cakewalk can't do it. Which is going to make scoring extremely cumbersome. I'm in the process of working on my first film score and I've hit a wall right off the bat. Details are in that link post above. I really hope I'm just missing something obvious.
-
I'm in a bind. I'm working on scoring a film and I've already created a few clips of music parts 1/2 way through the video. In order to write the whole thing, I need to make changes to temp and time signatures (no problem), but I want everything I've already created, to lock to the exact same HMSF time they they are already placed at. Meaning that these elements are already synced to the film visuals. Not that it matters, but I've already synced some creepy horror risers and what not. I went down the rabbit hole if clip lock position, but it appears that the only thing it does is prevent the user from moving a clip. It doesn't lock it to any particular position. I've tried clip locks, I've tried ripple edit on / off. Doesn't matter. If I change the BPM, my clips stay on the same measure context, but not HMSF (loss of visual sync from the film) If I change the time signature, my clips DO stay at the same HMSF, they just change what measure context they are. How should I be doing this? The only workaround I have come up with is to bounce all my existing clips and drag out the handle on the left so they "start" at the project start and then stay in their HMSF positions, but that is a horrible workaround because I'll have to lose all my soft edits, like xfades, slip edit, fades and clip gain automation, because I'll have to bounce all the clips on a track into a single track first. I'm at a total loss. I was hoping to really get some score work done tonight, but with this issue, I'm stuck. I asked on a FB group and someone mentioned they had to manually change the clip name to be the HMSF start so they could re-align the clips after a change. That's crazy talk. I have no idea how many changes to tempo and signature I'm going to have to make for this project. If I'm gonna have to keep cat and mousing these clips starts that's going to make Cakewalk extremely cumbersome.
-
Feature: Partial clip gain via control shortcut + selection
Josh Wolfer replied to Josh Wolfer's topic in Feedback Loop
I have found that I am relying more on auto track Zoom. So that almost all of the tracks are at the minimum height possible, and then the one track I'm working on scales to about one-third of the track view height. There's usually gives me plenty of visibility to make fine adjustments on clip gain. -
Feature request : NI Komplete Kontrol
Josh Wolfer replied to Richard Sheppard's topic in Feedback Loop
What he most likely wants is NKS support. Which I second. It would be fantastic. I have an S88 mkii and only use a fraction of the functionality in cakewalk. -
Feature Request - Color Trigger Keyswitches Articulation ISs
Josh Wolfer replied to sadicus's topic in Feedback Loop
I'd happily start paying for cakewalk again for major improvements. Don't get me wrong, I love the things they're fixing and adding. It's fantastic! But I'd pay. I bought most of the sonar releases since 1.0. -
Feature: Partial clip gain via control shortcut + selection
Josh Wolfer replied to Josh Wolfer's topic in Feedback Loop
Film sound. When I'm working on music production, 6dB is fine. On fx tracks I have to muck with the gain in all sorts of extremes. And for Dialogue, on intimate scenes I may have to boost really quiet breaths to an unnatural level in order to make them sit with the scene intensity. I do all sorts of leveling with clip gain. -
Feature: Partial clip gain via control shortcut + selection
Josh Wolfer replied to Josh Wolfer's topic in Feedback Loop
This is exactly the work flow I'd like. Exact same thing as Adobe Audition. I'm getting use to the selection and drag method in the second response, but it's still messy. And still limited by +6dB gain. I find that when I'm really working with film sound editing, there are many times that I need to boost a portion upwards of 12dB, so I end up dragging it up to 6dB, bouncing the clip, and then doing it again. It's just not efficient. And of course when I bounce it, I'm committing all the other clip gain changes. Which makes me start having to split the clip into multiple sections as to just affect the portion I want to, which then leaves split clips everywhere. It's a lot of added chaos for which there is an easier solution -
crossfade Bug: Crossfades prevent clip splitting
Josh Wolfer replied to Josh Wolfer's topic in Feedback Loop
It was driving me nuts, because I've never run into it before. I just finally figured out it was the xfade preventing the snip. -
When you attempt to split a clip via alt+click or the split tool, it won't split if a crossfade exists in the area you are attempting to split. This requires you to move the fade first. Example: I have a single clip with a longer fadeout and I want to split it at now time to move a transient around. But the X-fade is preventing the split.

-
Feature: Partial clip gain via control shortcut + selection
Josh Wolfer replied to Josh Wolfer's topic in Feedback Loop
A big part of it is that the gain automation nodes get royally mess up, especially when you're working in multiple clips with cross fades. The edge nodes get covered, and impossible to drag at times unless you go through some gymnastics. Also, because boost is limited to 6dB, there are times where I have to bounce a clip multiple times to get it to where it needs to be. And yeah, you could offline process the whole clip and gain it massively all at once, but it's just a slow workflow. It's clear I'm in the minority on this one. Is what it is. -
This kind of makes me wanna try Studio One again. 😕
-
Feature: Partial clip gain via control shortcut + selection
Josh Wolfer replied to Josh Wolfer's topic in Feedback Loop
OMG. This Studio One work flow clip is a dream compared to how Cakewalk does it currently. -
@msmcleod Thanks for looking into it. I use Cakewalk a lot and the comps are one thing that's quite challenging for my work flow. While you're at it, I'd love to see it where after you collapse a track with comps, the ghosted clips are invisible and have no interaction. There is an option to make ALL clips that are muted disappear from track view, but I really don't want that. I need muted clips to continue showing as ghosted and I'm constantly moving and muting clips around (film sound editing) trying things out. So I don't want all muted clips to disappear, just the ones that are part of unused comps. Hope that makes sense. Cheers!