


msmcleod
-
Posts
6,931 -
Joined
-
Last visited
-
Days Won
36
Everything posted by msmcleod
-

What sample rate are you recording at (and recommend)?
msmcleod replied to Christian Jones's topic in Cakewalk by BandLab
It can, but it comes out as a square wave. The speakers can't reproduce the extra harmonics of the square waves though (neither can our ears at that frequency), so the fact that its a square wave probably don't matter for listening. Try it yourself - record a 20Khz sine wave at 44.1Hz at take a look at the waveform. For lower frequencies however, the quantisation effect becomes more apparent. Again, the speakers will smooth a lot of this out, but it does matter more during processing. -
Great job on the Plug-in Manager in 2019.01
msmcleod replied to Roger Wicks's topic in Cakewalk by BandLab
The Plugin-Manager is meant to be completely replaced by the Plugin-Browser at some point, but there are still areas of functionality that are only covered by the Plugin-Manager. So until the Plugin-Browser gets all the functionality of the Plugin-Manager, the Plugin-Manager will stick around. The speed issues with the Plugin Manager were obviously easier/quicker to fix than Noel had original thought, so he put the fix in. BTW @Noel - l love the new colour changes to the Plugin Browser to distinguish between 32bit / VST2 / VST3. Very handy. -
What sample rate are you recording at (and recommend)?
msmcleod replied to Christian Jones's topic in Cakewalk by BandLab
Whilst what you say is largely true, it's worth pointing out that at 96Khz the analog signal can only produce a square wave at 48Khz. Even at 96Khz, the approximation of a 12Khz sine wave will only have 4 steps from zero to peak. That goes down to 2 steps at 48Khz. So the argument for using a higher sampling frequency is more to do with getting better accuracy of the audible high frequencies... i.e. ones that will look less like tetris blocks. -
Track Manager Enhancement Suggestions (easy?)
msmcleod replied to Todd Groemling's topic in Feedback Loop
FWIW, for (1) you can tell if a track has data in or not by looking at the clip area. If the clip as "dots" in it, it's got data: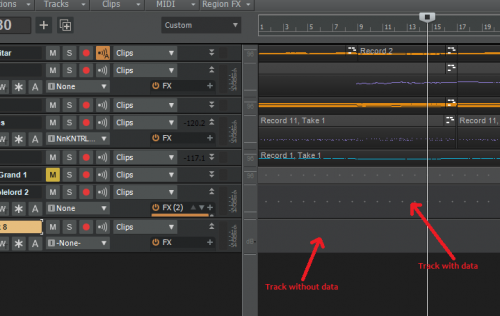
-
Does it still happen if you run Cakewalk as Administrator?
-
You don't need to open BandLab Assistant to launch Cakewalk, it can be launched directly. The installer should have created a shortcut on your desktop, just double click that. You only really need to launch the BandLab Assistant for checking for the initial installation, periodic checking of updates, and the loop content.
-
Maybe it's my relatively ancient motherboard, but my both my Scarlett 6i6 and 18i20 are working fine plugged into USB 3 ports. When plugged into a USB 2 port, I couldn't get it to run reliably with less than 6ms latency. When plugged into the USB 3 port and until the Windows 1809 update, I was running the latest "release" version drivers (MixControl v1.8) for the mk1 6i6 / 18i20. I could run at 2ms latency with no issues. For some reason the 1809 update upset things, so I moved over to the latest beta drivers (MixControl v1.10b3) which has changed the drivers considerably (the ASIO panel is now separate from MixControl). Still plugged into the USB 3 port, I'm running reliably with a buffer of 64 which gives me a latency of 1.5ms. It can run with a buffer of 32, but not without the odd pop & click. But in any case, Scarlett + USB 3 works well with my setup.
-
I had exactly this problem with the Virtual Guitarist plugins. Enabling "Load with JBridge wrapper" within the plugin properties solved it for me (even though it's wrapping a 64 bit VST in a 64 bit VST) If you've got JBridge, give it a try.
-
What sample rate are you recording at (and recommend)?
msmcleod replied to Christian Jones's topic in Cakewalk by BandLab
Same here 24/44.1. I've got ADAT running between 4 (soon to be 5) bits of gear, and I want all 8 channels on each link. -
I found that when I first installed Windows 10, I started losing files. It turned out that both my laptop and my desktop were both logged into the same Microsoft account, and syncing to the same OneSync repository. I ended up disabling OneSync, although you can configure it to sync to different remote directories if necessary. Have you got OneSync running on more than one computer using the same Microsoft login?
-
I've not ever seen release notes for the BandLap app - that's not to say they don't exist - it's just I've not seen them. Maybe someone else knows?
-
I think the 2019.01 release must have literally just come out. I did a check yesterday, and 2018.11 was the latest version. I'd give it a few hours until the guys in Boston wake up - the release notes should follow.
-
I'm certainly not experiencing this, and I'm sure it would have been mentioned before if others were seeing it regularly. Does this happen when opening up a blank (or no) project? If so, it may point to an issue with your audio drivers, in which case make sure you've got the latest Windows 10 compatible drivers installed and delete cakewalk's AUD.INI (it'll recreate it when you next start Cakewalk). If it's only happening occasionally, then it might point to a plugin issue, in which case you'll need to narrow it down. Re-installing the plugin might help. If this doesn't, using the JBridge wrapper can also help.
-
Upgrading Computer - How do I migrate all of my SONAR stuff
msmcleod replied to Ray Olson's topic in Cakewalk by BandLab
Well spotted - I stand corrected! -
Upgrading Computer - How do I migrate all of my SONAR stuff
msmcleod replied to Ray Olson's topic in Cakewalk by BandLab
First thing, don't uninstall Sonar. The bundled plugins you would have otherwise had to pay for will still work with Cakewalk. Secondly, make sure your VST paths in Cakewalk match what you've got in Sonar. Thirdly, if you've changed any of the default folders (e.g. Picture, Global Audio, and Projects directories etc) make sure they match what you've got in Sonar. After that you're pretty much good to go. -
I agree. I'm have the 2i2, 6i6 & 18i20 and I can run at around 2ms playback latency, which is fine for me. I find 6ms playback latency intolerable for piano.
-
The External Insert is a generic effect for any external effect, so depending on how many hardware outputs you've got, it could go to various outboard devices. So renaming the External Insert itself doesn't make much sense. What you can do, is wrap it up in an FX Chain and save that as an FX Chain Preset which you can then just drag on to your track (or ProChannel) from the browser. Here's a thread with an example:
-
I would say 32", but 27" is pretty large already, so maybe 40" is a better bet. I've been seriously thinking about using a 32" or 40" TV for DAW work as it doesn't need the high refresh rates gamers require from a monitor. If you've got a TV you can try it out on, that might be the way to go... that's assuming of course that you're happy sticking with 1080P, although there are 4K TV's. If there's a small independent TV shop local to you, they might let you bring a laptop along to try them out.
-
How do I provide feedback about this community itself?
msmcleod replied to Jesse Jost's topic in Frequently Asked Questions
On the unread content list, it would be nice to have a "mark topic as read" link/button on each post. The "mark site read" is useful, but there's always a danger I've missed something in between clicking the link & clicking the confirmation box, and also the list of unread post can be quite long and it's easy to lose your place. It would be nice to just mark off the obvious ones I want to skip one by one - especially if they're short posts and I've effectively read it on that list. -
I've still got Sonar 5 running on an old Intel Atom based 1U racked MicroServer. I used it alongside a Yamaha 01X for live recording / band jamming sessions. I don't get to do much recording with it anymore, but it still runs just as solid as it ever did, and its perfect for that purpose... mind you, my laptop would be my preference nowadays.
-
Apart from some legacy DirectX effects, I haven't found a 32 bit plugin that doesn't run in CbB. I do find that JBridge does a much better job than BitBridge though, especially as there's some options to tweak things when incompatibilities arise (mainly GUI issues).
-
A hallmark card in the middle of the forum
msmcleod replied to Screaming For Attention's topic in Cakewalk by BandLab
Thanks for including me in your list - I'm glad to have been of help -
It does make me wonder why BandLab didn't do this in the first place. I suspect some of the sounds may have been using libraries that were licensed to Cakewalk Inc. and there were reasons why those weren't part of the BandLab acquisition. A paid version of RapturePro however, could probably cover the cost of renewing any licenses. Just speculating tho...
-
If you're using your internal sound card, you probably want it set to WASAPI, with the option to share the device selected. MME is really only there for really old sound cards for compatibility, and its performance is nowhere near as good as WASAPI or ASIO.
-
The 688 was great as it had the MTC encoder/decoder built in, so you could stripe your timecode on to a track and use the MIDI out directly. I used the Yamaha MT8X which didn't have this facility, so I used a Philip Rees PPS100 for striping tracks/syncing to MIDI. I found for small projects or things like automation using Cakewalk was fine, but for projects with a lot of MIDI information, Cakewalk struggled to keep up - especially if starting mid way through a song. I think in those days I still ran a Cirrus P166 which probably explains this! To solve this I recorded the whole MIDI song to a Alesis DataDisk. On playback this received MTC/SongPointer information from the PPS100 (with the timecode coming from track 8 of my MTX8) and played my sound modules in time with the audio. I also used this method in the studio when working with an ADAT/BRC : the BRC would send the sync information to the DataDisk and everything would play in time, regardless of where I started in a song. So what I ended up with was the melodic MIDI information being played by the DataDisk, automation of my Fostex DCM100/MixTab mixer being controlled by Cakewalk and the PPS100 acting as the master clock. As the MIDI instruments were basically live, I then had 7 tracks left on my MT8X for audio. The 7 audio tracks, and sound module output were fed into my DCM100 so I could automate my final mix.

