msmcleod
-
Posts
6,958 -
Joined
-
Last visited
-
Days Won
36
Everything posted by msmcleod
-

Audio file causes popping when opening Cakewalk Project
msmcleod replied to Leepster's topic in Cakewalk by BandLab
Two things come to mind, 1. A plugin on your master bus may be causing this - try bypassing FX before adding the audio track (either by pressing the "FX" button in the control bar, or just bypassing the FX bin on your master bus). If this solves it, then you can narrow it down by enabling the plugins one by one until you reproduce it. 2. Cakewalk is stopping/starting the audio engine. Some drivers create a popping noise when the driver is initialized. Making sure "Always Stream Audio Through FX" is checked, and "Suspend Audio Engine When Cakewalk is Not in Focus" is unchecked should ensure Cakewalk keeps the engine running: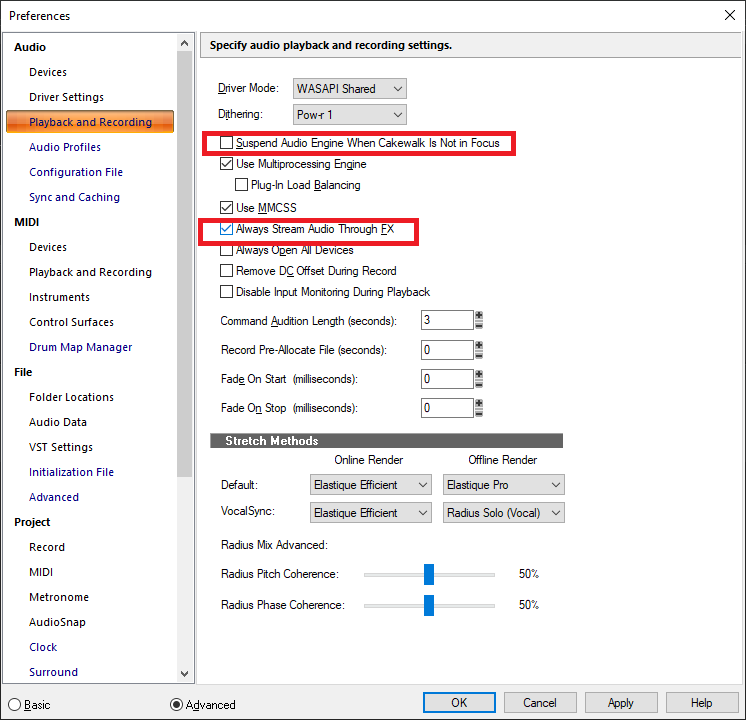
-
Found this on the Ardour forum, by one of their developers: https://discourse.ardour.org/t/aaf/87442/2 Most interesting, is the comment from one of the AATranslator developers (which certainly echoes my experience): https://discourse.ardour.org/t/aaf/87442/8 Pay particular attention to his comment about the fact that every application (whether DAW or NLE) has chosen to interpret the "standard" in their own way, so there's no guarantee that an AAF format will load properly in another application - even from the same vendor it seems! If you look at the features of OMF & AAF they're almost identical with respect to Pro Audio. The notable exception being Video Cue Marker support. I had another play with AAF yesterday - it doesn't even support stereo WAV files. You not only have to separate them into L & R channels, the WAV files themselves have to be deconstructed and the data & headers stored in different places. To make things worse, the example code they supply to do this is full of bugs and only supports a very narrow set of WAV files. To say I was shocked was an understatement. To top it off, you need to use Visual Studio 2012 to build everything as it won't support VS2013, VS2015, VS2017 or VS2019 (which meant digging out one of my old laptops).
-
It should be easy to create your own - here's me doing it using the UI for the Yamaha P-200:
-
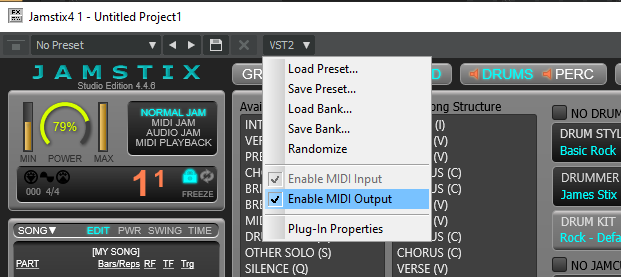
Disable the MIDI output of your drum VSTi: Or alternatively set the MIDI input filter on your recording MIDI track to "All External Inputs"
-
[SOLVED] Can't hear my bass guitar well when recording.
msmcleod replied to tdehan's topic in Cakewalk by BandLab
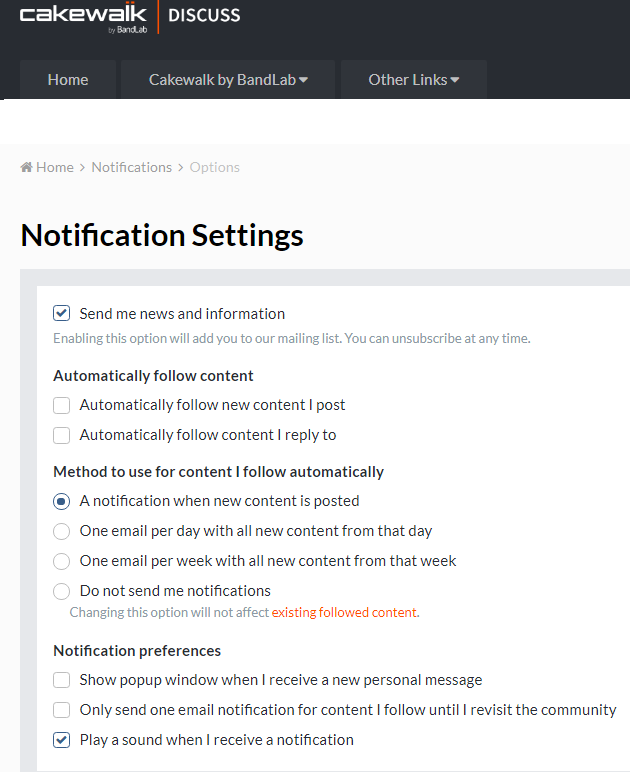
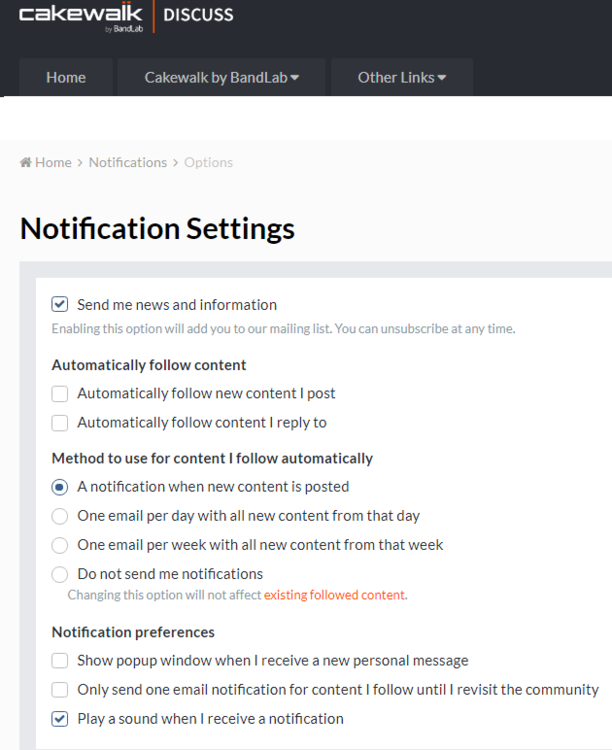
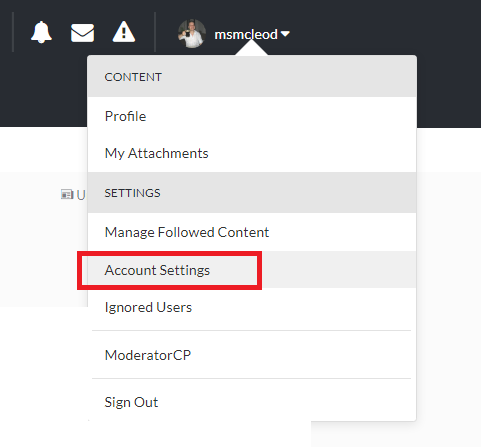
@tdehan - you can configure your notification settings within your account settings. First click on the dropdown where your username is on the top left: This will take you to your account settings page. Click on Notification settings: You can now adjust your notification settings: You can also opt-in to follow a particular topic by clicking on the Follow link to the left of the topic header:

-
These guys have been around since 1994. I tried out a trial version of their software as I was considering applying for a job there at one point. It's pretty good: https://www.earmaster.com/
-
Not if all the individual instruments are all listening on the same MIDI channel... unless of course, you use assign a different controller for volume within Kontakt for each instrument. To be honest, I would actually go about this a different way. I would create per-output instrument tracks for a single Kontakt instance then copy the MIDI clip as a linked clip to the other tracks. This gives you two advantages: 1. Each track has its own (audio) volume automation, and its own effects bin. 2. By using linked clips, you only need to edit one of them and the rest automatically get updated. Audio volume automation has a much finer granularity than MIDI automation too, so your far less likely to get a "stepped" effect when automating your volume. However if you really do just want a single track, another way of doing this would be: 1. Create four per output instrument tracks for each of the instruments 2. Copy the MIDI clip to the other 3 tracks as linked clips 3. Hide tracks 2,3 & 4. You could then use MIDI volume automation for channels 1,2,3 & 4 on the first track. OR another way: 1. Keep the track you have now. 2. Create 3 other MIDI tracks, assigning the output channels to 2,3 & 4 and copy the MIDI clip as a linked clip to those tracks 3. Hide the 3 tracks. 4. In Kontakt, change the MIDI input for instruments 2,3 & 4 to channels 2, 3 & 4. 5. Use MIDI volume automation for channels 1,2,3 & 4 on the first track.
-
Is there a simple way to even out vocal signal
msmcleod replied to RICHARD HUTCHINS's topic in Cakewalk by BandLab
To be clear, what Craig and I do is slightly more than normalize them... what we do is split the clips at each phrase, then normalize or clip-gain adjust them individually. So each individual phrase is normalized against itself, not the whole vocal track. Although in saying that, I tend to reach for Vocal Rider or MAutoVolume far more often now, even if it means applying that effect, then doing the tweaking afterwards using clip gain automation, as it saves a lot more time. -
@GreenLight - why not just rename your automation lane?
-
feature request Groove Clip Looping Feature request :)
msmcleod replied to Ez Goen's topic in Feedback Loop
Isn't that almost the same as just setting the clip length in the clip properties? -
What you're talking about is a chord track. This is something we're considering, and Noel has asked for input on this:
-
I'm assuming that the MIDI chord track is sending on a single channel, and all Kontakt instruments are listening on the same MIDI channel? If this is the case, you need to route each Kontakt instrument to separate audio outputs, have an audio track for each of the audio outputs (with their audio input set as the corresponding Kontakt output). You can then use volume automation on each audio track to automate each instrument. If however, your instruments are listening on different MIDI channels, you could use MIDI volume automation on each channel.
-
They're all embedded in TTSRES.DLL I'm afraid. The closest thing that is public facing is in the control surface SDK: https://github.com/Cakewalk/Cakewalk-Control-Surface-SDK/blob/master/Framework2/CommandIDs.h It's not been updated in a while though.
-
ARA doesn't do any conversion, it's just an method to allow Melodyne (and other ARA region effects) direct access to the WAV file on disk. The whole point of ARA is there's no conversion. If any conversion is taking place, it will be in Melodyne itself.
-
Create 7/8 MIDI Groove Clip in a 4/4 project?
msmcleod replied to Agincourtdb's topic in Cakewalk by BandLab
I rarely use groove clips myself, but I do use 7/8 a lot and in some cases change time signatures every few bars or so. This is what I would do: 1. Do what @Colin Nicholls suggested - make it twice the length so it's aligned to 1/4 notes, then slip edit the clip back to 3.5 beats long 2. Change the time signature for that bar to 7/8, setting the time signature back to 4/4 on the next bar. This will mean everything is properly measure aligned. -
Contact support@cakewalk.com
-
Use the Cakewalk Command Center - that should authorise L-Phase EQ for you. You can't use the Pro Channel EQ anywhere apart from the Pro Channel.
-
This is incorrect. 64 bit double precision floating point numbers are exactly the same in both 32 bit and 64 bit operating systems - they're both 64 bit structures. This is not the same as 32 bit vs 64 bit address pointers which is what you were referring to in your earlier post.
-
Cakewalk needs a Humanize feature in the PRV
msmcleod replied to Arabic Dude's topic in Feedback Loop
Studioware panels were deprecated back when SONAR 1 came out - that's SONAR 1.0 - not SONAR X1 !! The last version to officially support Studioware panels was Cakewalk Pro Audio 9 (released in 2000). The Studioware panel editor was removed in Sonar 1, so you need CWPA 9 to create/edit them. -
Enabling the 64 bit engine means that all internal audio processing is done using 64 double precision floating point arithmetic, rather than 32 bit floating point. This has nothing to do with the bit depth of the audio files. What it does mean though, is that there is a huge amount of dynamic range when the engine is internally mixing tracks. Internally, the audio can go to 1000's of dB without ever clipping, before it scales the mixed volume back down based on the track count. Only then does it convert it back to 16 bit / 24 bit integers. If you were just using 16 bit integer arithmetic (or even 24 bit integer arithmetic for that matter), you'd lose quality very quickly as your track count increases.
-
Something in Cakewalk is WIDENING all my tracks!!!
msmcleod replied to Marcello's topic in Cakewalk by BandLab
@Marcello - if your audio device is also being used by Windows, make sure that all Windows effects are off (e.g. Spatial sound):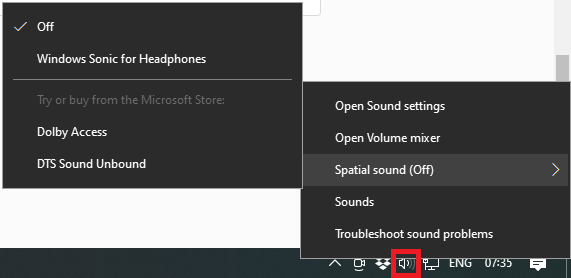
-
If you've got UAC disabled, or you're actually logged in as Administrator this might explain why you can do this.
-
Click on the time ruler to set the now time, then CTRL + click on the arrangement play button:
-
This is how I do this:
-
No, they're just standard 100m long throw faders. I don't actually use any of my analog gear for mixing - all of that is in the box, so the mixer is basically used as 16 preamps for tracking (same with the 8 channels on the Alice). I've got a Mackie MCU / XT & C4 for ITB mixing duties. The MCU & XT have motorized faders, and the C4 is just a dream for controlling plugins. I've spent a lot of time mapping the parameters of compressor/eq plugins to the C4 knobs so they all have a consistent layout regardless of what plugin I'm using.