
-
Posts
2,311 -
Joined
-
Last visited
-
Days Won
2
Everything posted by mettelus
-
 Did you try using the number row on your keyboard? It is possible that field does not accept negative numbers (not sure), but if it will, the - in the number row (not the NumPad) should work. If entering -3 comes up as 0 (totally different number), it is quite possible that field will not accept negative numbers 😞
 -
Buzzing/clipping speakers and headphones.
mettelus replied to Gerry 1943's topic in Cakewalk by BandLab
Low frequencies carry more power... and that increases the lower you go. Try something aggressive at first, like a low shelf set to -12dB and slide the value up the frequency spectrum... the buzz should disappear at a certain point (like 125Hz or so). Just get a feel for where that is and shut it off. To rectify that, you want only the crux (usable portion) of the bass/kick to poke through that spectrum range. To find the "crux" of the instrument, use a parametric EQ bell curve (highest Q it will do, high gain) and scoot frequency around till you are getting the sound that best fits your piece. That is the focal frequency you want to keep (kick is simpler than bass). The term "frequency microscope" is often used for doing this. Once you know that value, you can use a combination of HPF (to remove all low end below that frequency), roughly 10-20Hz below the focal point you found. Then adjust the bell curve Q/gain down to bring back in frequencies to fill the sound out (roughly 1 or 2 dB gain, but keep the Q above 1 so you roll off frequencies on either side). Many instruments have low end frequencies that do not contribute to the sound, yet add power to that low end (adding to the buzz). For this reason, a lot of instruments that are not kick/bass have a HPF applied to remove everything <100Hz (roughly). You can isolate that region with a LPF to listen for yourself as to what is there to check, but that "unnecessary power" removes overhead room for the kick and bass to be adjusted. That said, don't blindly apply "generic settings," the above is more how to find/rectify them. Basically removing frequencies from things not adding to the piece lets you raise gains on frequencies that do without making speakers rattle. I am pretty tame with bass settings for playback, but every once in a while I will get even commercial tracks that cause my subwoofer to "rattle the room." Quick edit: The below video is by far the one I have shared most over the years. It is 14 years old now, but highly relevant, and he covers a lot of techniques in 10 minutes. The beginning of that video specifically demonstrates what I typed above (you can do the same with any EQ). -
Did you try using the - in the number row on your keyboard? IIRC, the - on the NumPad is hard coded into the program and 1) highlights a cells contents and 2) decrements any existing value by a single whole number (with each press). You have to watch the cell contents to see this behavior, but entering "-3" with the NumPad will often come up as "3." For years I thought all of those affected cells wouldn't accept negative numbers.
-
The inexplicable wretchedness of trying to use the drum pane
mettelus replied to Starship Krupa's topic in Feedback Loop
This gave me a chuckle. I seem to do similar with MDrummer from time to time, and have a file somewhere with notes on all of it. The "Random Loops," which defaults to ON causes a lot of grief being buried in one of the sub menus (Quick Setup tab->Additional button in the middle of the right side->Shut "Random Loops" off). ALSO... in that same window (the Additional button is also on the Rhythm Editor tab), shut off "Sequencer Mode" in the Advanced section if you are working on a specific rhythm and don't want it to change when previewing it, i.e., previewing an Intro or Break will jump to a beat once it completes otherwise. I think those two settings are the biggest stumbling blocks for new folks. What I have learned with MDrummer (my preference) is to do all kit/beat work inside the VST (so can easily save/manipulate them), and focus on using the DAW via a Drum/Articulation map to trigger the rhythms (Intros, Beats, Breaks, Long Breaks, Outros, you get 12 of each). The Tutorial #2 on MIDI Command Method sorta jumps straight into that one. Grace notes you can fire from within the DAW. You "can" also do the entire kit this way, but that undermines the internals of MDrummer (which is best to think of as its own DAW TBH). Once a kit is set up (which alone can be complex, since you can layer/FX just about anything internally), I tend to spend most of my time in the Rhythm Editor tab, but MDrummer is insanely complex with what it can do. The internal "Song" tab I find superfluous if running within a DAW, so be sure to also shut that off (another thing that defaults to "on"). The play buttons can make the DAW and MDrummer play simultaneously. -
^^^^ this pretty much nails it. In a studio environment, there are so many tools available to streamline this process post-production (comping, automation, Melodyne, etc.). Because of post-production, the "one take wonder" isn't a requirement, but the "best product possible" remains a goal. Live is where the best rendition possible comes into play, and they are definitely two different beasts. This statement immediately makes comping come to mind. We are always our own worst critics, and perfectionists tend to invest too much time in the details, when often an observer would not even notice. The trick is knowing when "good enough" is the place to stop (and many things can be revisited later). I have a lot of hobby projects where I see every square inch of something as I work (cars, house, guitar work, etc.), and always have to rein myself in with a couple of questions: 1) "Is anyone but me ever going to notice (or even care) about that?" (especially if there are hours of additional effort involved to fix something), and 2) "Does the 6-foot view apply?" (with automotive work, this if often used to distinguish view from a distance versus having one's nose planted on the paint in a specific location, but is akin to hearing/seeing something in passing versus trying to dissect it).
-
Are you using a VSTi that is actively pulling samples "as needed" at that point in the project... such as a VSTi that first comes online at measure 69? Once those samples are loaded into RAM, they will persist for the session, but when first loaded that glitch may be from pulling the samples into RAM.
-
@Jim Roseberry might have some insight on that. He has experience with the Kemper, but not sure if he did re-amping with it.
-
If you did a screen capture on the from prior to submitting, but some text boxes need to be scrolled if you put a lot of material in them. Many forms let you log in to see the submission, with those you can copy/paste text or use the screen cap (if it fits). Just be careful of any PII you may not want to share. Consider re-evaluating that situation to close projects down if needed. Some plugin vendors (and DAWs) already idle FX that have no audio passing through them, but if you are getting CPU loading with an idle project, that is something to address. Way back when, I OC'd my 2600K and as it degraded I benchmarked it both OC'd and normal. While OC'd ran faster, it threw more page faults as it got older, so was gaining no ground performance-wise and was just subjecting it to undue heat. Dielectric breakdown accelerates dramatically with heat/voltage. Windows can also play a part in a crash if any sleep/hibernation schemes are in play.
-
LOL... AD3 is coming next week! The 2.5 update was just a check to get marketing pings on everyone.
-
Yeah, for a product with nearly 10 years under its belt, that caught me off guard too.
-
He has quite a few world instruments that sound rather good as is. Most of them have associated YT videos which seem also to be the "tutorial." What I find fascinating with his videos is that he delves into the construction/performance of each instrument. What is more impressive is these are synths, not sample-based, so the footprint on a computer is tiny by comparison. His SIM-DIZI (also called a Qudi) and SIM-GUZHENG are instruments that Ample Sound sampled and charges $149/$169 for respectively. When I have more time, I am curious about running these through FX chains to see how they sound.
-
Someone had asked about harmonica sims a while ago, and this seems to be emulate most of a harmonica as well (he does specify that down bending is limited to draw notes only, but this does all notes). Rather interesting fellow with a lot of knowledge. I never heard of him before, but clicking on the Quilcom section I was surprised... he has a LOT of free plugins available. A few of them are quite unique in their design and purpose.
-
Correctly delete old vocal tracks form recording?
mettelus replied to Pathfinder's topic in Cakewalk by BandLab
You may find in the future that you might want the old vocals. The simplest way to remove vocals from a project is simply highlighting clips and deleting them (will retain the track and FX/sends used this way). You can also delete the entire track (but will lose the FX/sends). Both of these methods do not delete the previously recorded audio (so you can reference them again in the future if needed), but they will remove the audio from the project itself (which is typically the desired result). It is also best practice when noodling around to save a new project file (e.g., Project X vocals removed.cwp) so you still have the original one just in case. If you get into a situation where your Project folders are getting huge, that is when removing unused audio from project folders gains more attention. -
This was what I was wondering initially in case those folders had been copied/moved from another computer (the read-only will often get applied doing this). I am not sure if you are familiar with xcopy/robocopy, but robocopy in particular has a nasty default of adding H (hidden) to both directories and files, so when you copy, things "vanish." The default robocopy command I use is: robocopy "[source]" "[target]" /A-:RASH /xo /fft /xj /e /j /njh /njs /ndl Note: I always use quotes, since they are required for anything with a space in the name (e.g., Program Files). The /A-:RASH is very important, because it forces those 4 attributes to be removed during the copy (regardless of what they were for the source). Doing that in Windows Explorer is sometimes hit-or-miss (what I posted above), but robocopy has never failed. More details on the robocopy can be found here (xcopy is faster, but robocopy is more robust).
-
Check quick with Windows Explorer and right-click your top level Projects folder and select "Properties." On that first (General) tab there is a "Read-Only" checkbox in the Attributes section at the bottom. It has probably got a black box in it because some folders are set to read-only (if they are all read-only, it has a check mark; if there are no read-only's it is blank). This can happen when archiving/moving folders around, particularly between PCs. Click on that Read-only box until the box clears, then hit Apply and select "Apply changes to this folder, subfolders and files" in the next popup. You will need to have the projects closed to change attributes (best to just close Cakewalk as well to be sure nothing it in use).
-
Try shifting your Driver Mode to WASAPI Shared and see if that does anything. I shifted mine to WDM mode to check quick and the Surround was still there, but is odd that it is not listed for you.
-
Lost ability to drag Console to 2nd monitor
mettelus replied to Chris Rydstrom's topic in Cakewalk by BandLab
Another thing to check is your Windows Display settings with 2 monitors. You may also have switched which monitor is 1 vs 2 as well. Windows will only allow dragging in the direction that connects them. Have you tried dragging a window off both sides of your main monitor (left and right)? Only one of those will work based on how Windows "thinks" they are oriented per the Display Settings. -
I wanted to revisit this comment for you. There are VST synths specifically designed for game audio, meaning that the presets in the synth are going to be "pretty close" to something you are looking for in many cases. These will minimize control/filter manipulation and you can focus on Cutoff and Resonance and learn other tweaks as you go. Quick caution here... synth presets often use the entire frequency range (so they sound great solo), but they will not fit well in a mix. For this reason, hi-pass and lo-pass filters are often used (HPF/LPF) to isolate the content you want to keep from a synth, yet allow it to "fit" with other instruments. HPFs and LPFs is another thing to research and learn as you go... they apply to ANY instrument and are core functions of most EQs. I did a quick search for "free gaming-specific synths," and the below video might help you focus more quickly. Check that out and grab a few of those synths to play with and focus on as you learn. The controls are very common to all synths, but these synths tend to have presets already geared toward gaming audio, so you should be able to get "usable sounds" fairly quickly. Also note... if you make a sound you love, be sure to save that as a new preset, so you can easily find/use it again in the future.
-
Most synths have two very important controls readily available, "Cutoff" and "Resonance." These are essentially EQs that allow only certain frequencies to pass (Cutoff), and then enhance a select band (Resonance)... and you can do that with pretty much any EQ (even if the virtual synth doesn't have those controls). For your first example, that can be done with a small "horns ensemble" and tweaking the output filters. There is a lot that goes into tailoring a sound, so this is more to get you on a path for learning (sorry that there isn't a "slam dunk" answer for you). Attached is a video that focuses more on Cutoff and Resonance and how they work. For you, it would help learn with a "synth" instrument and play with Resonance and Cutoff on a "horns" patch to understand how they work. There are a lot of FREE virtual synths out there to play with. The reason I say that is that BBC Orchestra is limited in its controls and to get the "synth" sounds from it would require more FX added to the output. Lastly, don't get discouraged with this (very important)... focus on playing and learning. Once you begin to understand controls/FX and what they do, it gets easier each time you set something up.
-
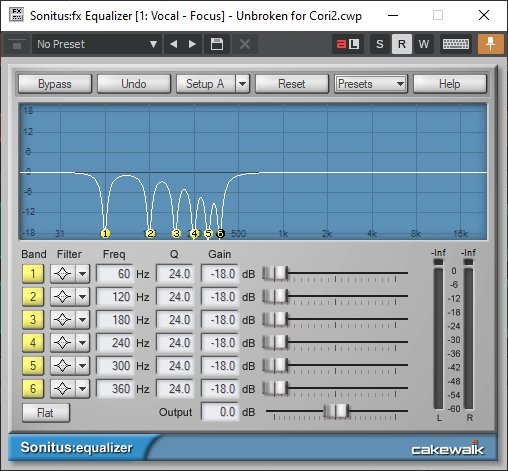
Does Anyone Have The Hum Removal Presets For Sonitus EQ?
mettelus replied to Trevor's topic in Instruments & Effects
Dupe -
Does Anyone Have The Hum Removal Presets For Sonitus EQ?
mettelus replied to Trevor's topic in Instruments & Effects
Are you clicking on the "Preset" button in the upper right of the GUI (in the grey area of the plugin)? The one at top left of the VST window doesn't work, but the button in grey area at the upper right does.
-
Digital Painting - Rebelle 7 $10 and 7 pro for $15
mettelus replied to Brian Walton's topic in Deals
Flame Painter 4 (on sale for $9.99) is worth an honorable mention as well. It has 6 particle systems total, but 3 of them come with that basic version. It is similar to Corel's Particle Shop for adding FX to images (best to do with layers). Side note on Flame Painter 4... that was released 5 years ago, so it probably won't have any upgrades to a new version any time soon. Rebelle is the only application getting active development. If you got the Humble Bundle in the past, you probably also got Flame Painter 4. -
The upper right corner of your posts has ... Click on that for the original post and select "Edit."
-
Edit your initial post. The thread title is part of that.
-
This would be worth submitting feedback to the developer on if you like it and want to keep using it. Many complex VST(i)s have a Panic button in the VST GUI itself, but the Panic button inside the host (any host) is going to try to the same routine Cakewalk is doing. If the VST doesn't accept that input, there is no way to control it externally. The host is doing its job (and no way to make it better), but the VST is in its "own little world." Side note: some VST(i)s have that kill switch hard coded to a specific MIDI note, but I couldn't find any documentation on Loop Track.


