

-
Posts
8,617 -
Joined
-
Last visited
-
Days Won
30
Everything posted by Starship Krupa
-

Theme: Racing Green (updated for 2021.12)
Starship Krupa replied to Starship Krupa's topic in UI Themes
Being critical is good, how else would I know what elements work or don't work? The folder arrows were indeed your idea, and once I put them there, it felt "right." Unfortunately, the buttons for expanding track headers are on the right side, and when I tried that, it just made it seem backwards. Yeah, I hear ya. I spent some time mulling that, believe me. You prefer the little double triangles to one big one. In the original scheme of the UI, the doubles are what they used to denote "this opens a panel," and my themes have replaced that with single sharper ones. The drop arrows in Track Headers was the stickiest wicket in the bunch. The idea behind it is in the overall UI, the triangle/arrow says "click here to open something." I really like consistency, and the Cakewalk UI, with all of its Views and features added over the years, can be challenging in that department. In Track View and Staff View you can click on the track icon to open a synth UI, but not in Piano Roll View, that sort of thing. So going to single arrows (I tried to elongate them, make them pointier, maybe I can do more with that) seemed more consistent. Basically, from an aesthetic standpoint, I think the tiny arrows make the UI look kind of spindly or fragile. They tried to cram too much icon into too few pixels. I'll pay attention to it as I use Cakewalk and see if I can think of something. If I had more pixels to work with, I could definitely come up with something more pleasing. I set aside the idea of keeping things similar to what people were used to and went with "how would I have done this." Have you noticed how many menu buttons have the little arrow in the right hand corner vs. ones that have a larger triangle? I tried to figure out a logic for that, but it's inconsistent. I studied the UI's of other programs, particularly Ableton Live. They are very triangle-centric. It's interesting to study various programs' UI's. People get drooly over Ableton, but their buttons are inconsistent too. Turny triangles in the browser, stacked lines elsewhere, flippy triangles elsewhere. What did you think of my Markers module? Using the words on the buttons and labeling it with "Markers." -
The way I do it is: download and archive the installer (if VST2 support is still available, the installer usually contains both). At first I install only the VST3. If the plug-in has problems, I install the VST2 and try that. So for me, the VST2 is just something to try if the VST3 fails. My VST3 folder is 7.5G. I don't wish to duplicate that. There are other downsides to just installing both. First, any time a host program scans for plug-ins, its scanner will take longer. If the plug-in manufacturer hasn't been diligent about giving both the VST2 and VST3 the same plug-in ID, you'll wind up with two of the same plug-in in the host's plug-in list. This can lead to a situation where you accidentally use the VST2 version, then open the project later if the VST2 gets removed from your system by a future update. Also, the VST3 will sometimes scan okay but the VST2 won't and the scanner will mark the plug-in "failed." This can happen the other way around, of course.
-
Theme: Racing Green (updated for 2021.12)
Starship Krupa replied to Starship Krupa's topic in UI Themes
Smaller facelift for the racer, some color changes for visibility and updating to new EVA 01-style buttons and arrows. @Colin Nicholls, I'm especially interested to know what you think of my Explorer-style turny triangles on the folders and the changes to the Arpeggiator art. Cakewalk's arpeggiator is really powerful, but the button layout has always confused me a bit. Specifically the Latch button, by default it looks like a menu more than a button and it has the arp on/off right next to it, with a separator bar between both buttons and the label. I made a "real" button for the latch function and cut the separator bar between the text label and the arp on/off. -
I'm a free cloud storage packrat. I use Dropbox, Box, Google Drive, and MEGA for various things. They have different strengths; Dropbox is usually for public sharing, Google Drive is good for transferring music collaborations because their upload speeds aren't too throttled and most people have Google accounts, which makes the sharing easier. MEGA is great for backups because of the humongous amount of storage they give you. I, too would like to see a central repository for custom Cakewalk themes and color presets, but I also understand that there are issues that might come up for anyone hosting it. It is possible to put offensive content in a theme, in the wallpaper for instance.
-
Over the last few weeks, I've done a major overhaul of EVA 01, including panel hide and show buttons, a more coherent, flat look, and addition of another color (which I had missed from the anime that inspired the theme). Warning: due to the extensive art changes, some of the buttons and controls diverge from what you'll see in the Cakewalk documentation. Anyone savvy enough to try out custom themes shouldn't have trouble with this. This update includes a lighter, less eyeball-assaulting purple: One big thing from a usability standpoint is that I've changed the Selected Clip backgrounds to go darker for greater waveform visibility. When you click on a clip in this one, it gets sharp and contrast-y. This is a big difference from Tungsten, which has unselected clips with darker backgrounds and "greys" them when selected. This has been a source of confusion for me since I started using Cakewalk. Use of the custom color .CLR file in the Dropbox folder is recommended. That's what makes for the more visible grid lines and header names in Track View, so if you like to work to a grid, be sure to try it. Comments, critiques most welcome. If you like it, let me know, if you don't, tell me why. ?
-
So, if you think it's suitable, please post it! Even if I don't care for a given custom theme, they can help inspire my own efforts. I copped it from TYLIP. Sometimes I have 3 instances of Theme Editor open copying and pasting. More than 3 it starts running the risk of error. With all of the shared elements your many themes, this will be a time saver for sure. The advantage that export/import has is that the images end up being archived somewhere other than within the .STH files.
-
documentation Young Lady's Illustrated Primer to Theming Cakewalk
Starship Krupa replied to Colin Nicholls's topic in UI Themes
Yes, when I first unleashed Racing Green on my fellow Cakewalk users. You pointed out that the difference in colors between the area below the track headers and the area below the clips pane was "jarring." That got me to start thinking about where in the UI our eyes should want to rest, and what things should stand out so that we can spot them easily when we want them. It's like a car's dashboard for driving at night, you want things to be bright and legible when you glance down to check speed and indicators, but you don't want it to pull the eye away from the road. As you might imagine, with my next theme, which uses the colors from a giant anime robot, that theory got a real workout. My palette for EVA 01 is purple, orange, green, black and violet. My only variation from the color palette information that I found online was that I came up with a slightly brighter green to use to stand out from certain backgrounds. I'm doing a deep rework of both EVA 01 and Racing Green right now. A lot of buttons and tabs have been altered. Selected clip backgrounds have gotten as dark as I could practically get them without losing visibility of that damn coal black clip fade line. When working on projects, I've always had trouble with distinguishing between the various clip states (selected, unselected, muted, unmuted, and combinations thereof). I'm trying to make that easier. -
I must admit that all this about overlays and whatnot is baffling. Themes have needed compatibility updates twice since I started publishing mine about 6 months ago. I do pretty much exactly as you say. It takes a matter of minutes to delete the non-compliant images and at that point I have a working theme, maybe with a couple of buttons that don't quite match. Maybe I can drop better placeholders in from Tungsten. It only takes me as long as updated whatever handful of images have changed to have it ready to publish. If I had a 3rd-party theme I was as attached to as much as the OP seems to be to the Logic-esque one, and couldn't work with an editing program to update the buttons, I'd probably just use it as-is with Mercury or Tungsten images. I make great use of the shortcut of opening two instances of Theme Editor and copying and pasting between them. This saves a LOT of time and effort as opposed to exporting images as .PNG or .BMP and then importing them. Works well with colors, too.
-
Application used to design Cakewalk’s/Sonar’s UI?
Starship Krupa replied to Daryl L. Samuel's topic in UI Themes
Careful, hang around in the Themes forum too long and next thing you'll find yourself spending hours with Paint.NET updating hundreds of buttons that you yourself never use in Cakewalk. -
Can't see where this is used, not Media Tab (narrow no corner). Maybe used to be used when the Browser was undocked?
-
First-timers, please remember to register for the newsletter to get the $10 voucher. Get 20% off your purchase with my referral code, MELDA1923165, combine it with the voucher, and if you wait for a 50% off everything sale, you can end up getting the FreeFX-to-pro upgrade for under $10, depending on the prevailing exchange rate.
-
documentation Young Lady's Illustrated Primer to Theming Cakewalk
Starship Krupa replied to Colin Nicholls's topic in UI Themes
That was my thinking as well. "+" means adding something, "-" means getting rid of it. As we've both remedied in our themes (I notice), having "x" be the button for deleting a take lane while it's a "-" for automation lanes....I really have to wonder about that. I have plans to experiment with Mac-style "turny triangles" as I once heard them referred to by a new Mac user. Where the convention is like Explorer, that pointing to the right ">" means "closed" and pointing down "v" means "open." Ableton use that in their browsers in Live! Cakewalk's convention says that arrows point in the direction of the resulting action. Up to fold things up, down to expand them downward, right to collapse or expand to the right, etc. It could get confusing. I've even been thinking of places where the "hamburger" or half-a-hexagram or whatever icon might be used. I just don't like those darn tiny double arrows. A downward arrow for docking options? Ugh. -
Application used to design Cakewalk’s/Sonar’s UI?
Starship Krupa replied to Daryl L. Samuel's topic in UI Themes
This is pure speculation, but from my examination of the elements, and my experience in commercial software development, the art is often initially done by a consultant. Depending on the size of the company, they often don't have a need for a fulltime UI designer and pixel jockey. They'll call someone in to do it each time they need to update it or add features. Meldaproduction is doing this now, their next release is going to include skeuomorphic panels in some of the UI's. As for the tools, I have no theories. -
I'm curious what that means to you. Some of Colin's are pretty darn pale, esp. FLIGHT DECK. There has to be some contrast. I've rejiggered my clip backgrounds for my next releases to this end. I'm very grid-y when I work, so I like to have my gridlines stand out.
-
documentation Young Lady's Illustrated Primer to Theming Cakewalk
Starship Krupa replied to Colin Nicholls's topic in UI Themes
Something tells me that I may have the wrong idea about what "TBD" stands for ("to be determined" or "to be documented" is how I used to use it professionally), and that you've explained it to me and I've forgotten. Apologies if I made it seem as if I thought you had missed the obvious. I plead American; as far as the English language goes, we're like The Ramones vs. your King Crimson. I made the purpleated graphic in case you wanted to use it. Yeah, not everyone's gonna be down with such a thing, I know. Maybe I should have versions where it has the double arrows. I'm just having so much fun here. There is that danger that it starts not to match the documentation, but my hope is that anyone who is far enough along to know and be able to install a custom theme doesn't need it to have an exact resemblance. Wait'll you get an eyeful of what I'm doing over in the Inspector/Arpeggiator. I'd appreciate it if you could give me anything specific on why my flippy triangles might not work, as your themes and book are my biggest inspirations. I know you won't consider it a compliment, but I never would have gone for something as weird as EVA 01 if you hadn't done Steam Punk. That's when the idea clicked that a theme could be a "theme" rather than just utilitarian. It could be humorous or whimsical or evoke a feeling. There is the issue that @Kevin Perry brought up in a different context, that things that catch the eye and aren't part of the clips pane itself may distract the eyes. There's also the issue, which I'm less concerned about, that the "I started using Cakewalk when you had to start it by flipping switches on the front panel of your computer" crew are resistant to change (especially for change's sake ?). I can go the other way, I get stimulated creatively when I can switch the look around. -
documentation Young Lady's Illustrated Primer to Theming Cakewalk
Starship Krupa replied to Colin Nicholls's topic in UI Themes
I've told people to click "in the space to the left of the folder name" to open and close them because the default buttons are so hard to see. -
documentation Young Lady's Illustrated Primer to Theming Cakewalk
Starship Krupa replied to Colin Nicholls's topic in UI Themes
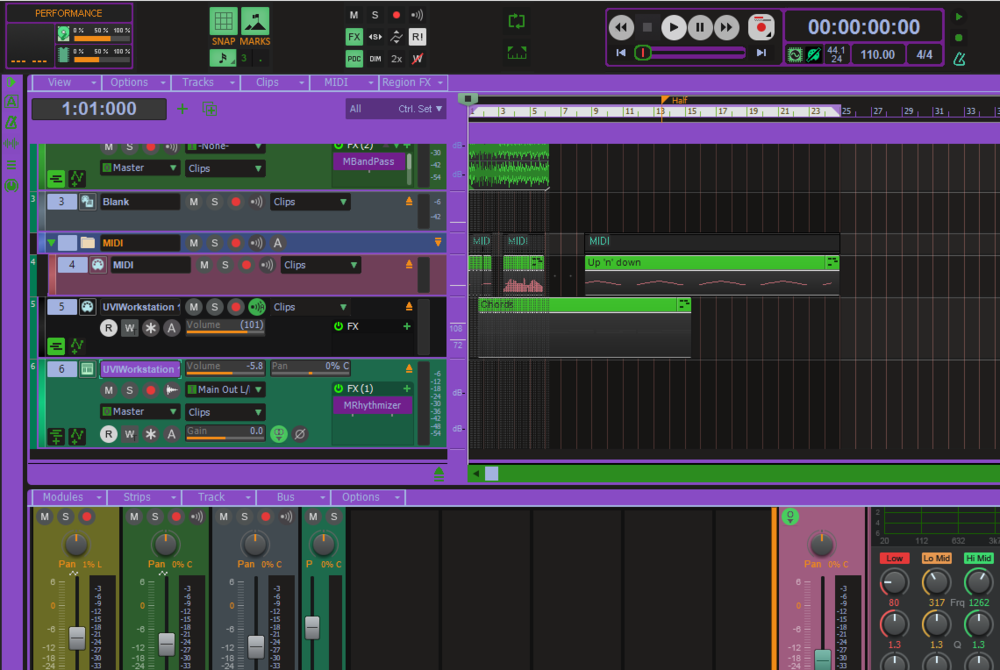
Image ID this time. On p. 35, Track view / Folders / Open/Close Folder is listed as "TBD." I've been using this one since the last revisions of Racing Green and EVA 01. It's a side-by-side +and - sign to indicate that's where you click to open or close a folder. I made the ones for my themes big bright green triangle arrows for greater legibility. Here is a purpletrated shot in "folder open" state: For another reference, here's a shot of the same folder in the next revision of EVA 01. Notice also that my track header minimize button has been changed from the two tiny grey arrows to a single larger orange one: Wherever I get the chance I simplify and enlarge arrows for better visibility. I think it gives Cakewalk a more solid appearance.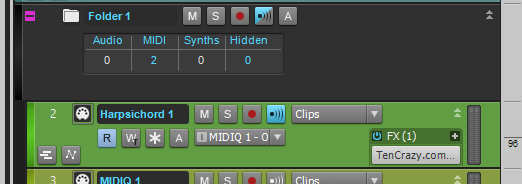
-
Yeah, yeah, nobody here needs a 4th license for Xpand!2. If you don't have a license and want one, I can fix you up. Great tool. And IIRC a bunch of people tried Union when it came out and went "whatever." However: Venom is a wild tool that belies its often low price. It's part of the IP that WA Production got from Re-Compose. Hard to describe, but it does things to audio. Beautiful and disturbing things. Convex is from Glitchmachines. If that by itself doesn't tempt, it's one of their newer, more straightforward ones, with a resizable GUI. When I say straightforward, I mean that most of the time when you turn a knob you can figure out what it's doing, which sets it apart from a lot of the Glitchmachines products (which I love, all of them). I haven't tried Initial Slow-Mo, but I do like their Reverse, which does what it says. I think Slow-Mo is similar to the very popular Cableguys Half-Time. Even if you know how to do slow downs and reverses in the DAW, these little goodies make it so much easier. So even if you, like apparently everyone else, have enough Xpand!2 licenses (I think I have 3 of them at this point from all the bundles), there are other goodies in this bag. Venom, really, is a cool sound design tool, the best thing in this bundle and of course worth the tenner all by itself.
-
Favorite Freeware FX Thread
Starship Krupa replied to Starship Krupa's topic in Instruments & Effects
Here's one if you're looking for a Pultec type EQ. WARMY EP1A TUBE EQ -
This has inspired me to try to cop Justin's tone myself. A couple of favorites: "The Story in Your Eyes" and "Ride My Seesaw." Gives me a good excuse to dive into Trash 2.
-
I'm hoping to harvest some more referral credits before the next storewide half off. If I have enough and there's nothing else I want (I'm still just scratching the surface of my EssentialFX bundle), I might just spring for the LE. I definitely DO have more than enough synths, but I'm a Meldamoonie. As for price increases, I've seen him do that with bundles more than individual plug-ins. One thing that has inspired me to mess with MSFP a bit more is that I've been chatting with a couple of the guys who have been making instruments for it (and giving them away for free). HorusAnd in particular. One scary thing: Horus told me that a Meldaproduction update broke some of the 3rd-party instruments, which, if people are going to be making these things and selling licenses for them, raises some questions about how long it would take the 3rd-party developers to fix whatever might get broken. ? For anyone new to Meldaproduction, you get 20% your first purchase if you use my referral code: MELDA1923165. Also sign up for their newsletter and get a coupon for $10. Combining these things can get you a pretty good discount, especially when they're having one of their half-off sales.
-
Clicks and Pops -- The Final Frontier
Starship Krupa replied to jonathan boose's topic in Cakewalk by BandLab
And that's the confounding thing: I was running the driver from Dell and needed to switch to the Microsoft driver. But this was years ago, and I think I've since gone with the Intel driver. With my Dells, I have the choice of Dell, Intel, and Microsoft drivers. Dell's are usually rock solid, but in this case, it messed things up with latency. -
Clicks and Pops -- The Final Frontier
Starship Krupa replied to jonathan boose's topic in Cakewalk by BandLab
Whatever system I run, be it my tower or laptop, I always have some kind of network turned on, and they work fine. Caveats: having both hardwire ethernet and wifi active at the same time has caused trouble on my laptop. So whenever I have it plugged in, I turn off wifi. Simple. Years ago I chased down an issue with my IntelGigabit ethernet adapter and the light at the end of the tunnel was that I needed to get rid of the Dell/Intel supplied driver and replace it with Microsoft's. Once I did that, Latency Mon was much happier. You can try playing around with that in Device Manager. Right click on the NIC and choose Properties and there will be options to update or roll back the driver. If you dig deeply enough into update, there are options for switching to the Microsoft driver. But first just turn off your wifi adapter. You don't need it when you're plugged in anyway. There's a big button for it if you click on the Notification Center at the lower right of your toolbar. -
I'm not going to spring for it unless it gets put on some deep discount at a reseller or whatever, but man, those oscillators sound ferocious on Super Saw. I'm guessing that MPowerSynth uses the same oscillator code (Vojtech being the king of code reuse). I just have way too many synths as it is, especially after Ocean Swift released theirs as freeware.
-
Thanks for the heads-up on scanning from Preferences. I'm just clutching at straws at this point. Do you have any ideas as to what might actually be going on here, not being able to turn MIDI input on?


