-
Posts
476 -
Joined
-
Last visited
Everything posted by winkpain
-
Gotcha. (sorry - yes I did hijack the OP's question, I guess ?) I think that was it. You do say to check Follow Option before Follow Project. I think I did it the other way 'round because their order in the Inspector is that way. This all makes sense along with the Timebase and stretching settings. Yes I agree, it's not a thing I'd be doing much either, but good to know it can be done if need be and these precautions are taken. Thanks!
-
CW "includes" Melodyne which functions for a while then needs to be registered/bought, it seems. I think you can use it for a month to try out. In the main Track View, choose the audio clip you want to work on, then go to the Region FX above the clips pane, choose Melodyne > Create region FX
-
This is something not highly needed in my own workflow in CW, it's something I've always thought to be outside the realm of CW's strong points and would opt for using Ableton in a project where tempo stretching audio a lot and collectively was going to be needed (sorry to mention "the other guy". I'm a huge fan of each platform and they each excel in their own separate ways) BUT... This was an eyeopener to me! I would say there seem to be criteria for this to work well. I have just tried this, following exactly your steps above, on several projects with varying results, ranging in quality from "as expected" to catastrophic! First point to make (perhaps obvious to some - wasn't to me) it doesn't work if groove clips are involved - AudioSnap Enable is simply not available in this case. I had several cases where after clicking Enable, the "Follow options" and "Follow proj tempo" were not available to me to choose (with all tracks chosen). And several times when "Follow proj tempo" was available and clicked it caused all the audio clips to be stretched and/or compressed (after much deliberation on CW's part), out of sync with each other, and this happened right away, without me having made any changes to the original proj tempo yet. Sometimes simply clicking the Enable caused CW to crash, and sometimes it simply worked as expected, and each of these results on the same projects. So.... it would seem some other criteria are necessary for the smooth operation of the ability to squeeze/stretch all project's audio in one go. I wonder what they are. Ideas?
-
Yes, I know. I'm just asking my own question which came up for me while taking part in your discussion as to why the mouse wheel zoom settings don't apply in full PRV and, indeed, if it is a necessity that they need to be different, like you noticed in Waveform 10. For sure I don't get it. I can, for example maximize a MIDI track in Track view, choose Notes in the Edit Filter to show the inline PRV and use mouse wheel zoom here and it does honor the settings, where switching to the full PRV does not. Just curious if anyone in the know has an A for this Q
-
The issue of mouse wheel zoom, specifically in the PRV, has come up before and is currently discussed here - And the simple question it has brought up that I want to put to this Q&A here is: Why can't the Mouse Wheel Zoom settings apply to the PRV as well as the Track view ?? Does anyone know a reason?
-

Alt + Scroll Button SERIOUSLY Impeding My Workflow
winkpain replied to Helos Bonos's topic in Feedback Loop
Agreed. But what one thinks practical, another might not, I guess. Just think, it gets you to digging into the workings of your DAW and helps you learn a lot of new stuff! ? I know, I'd much rather spend more time working on actual music than making the DAW do what I think it should do, but it's basically another instrument we have to learn, so it needs a little time. -
Alt + Scroll Button SERIOUSLY Impeding My Workflow
winkpain replied to Helos Bonos's topic in Feedback Loop
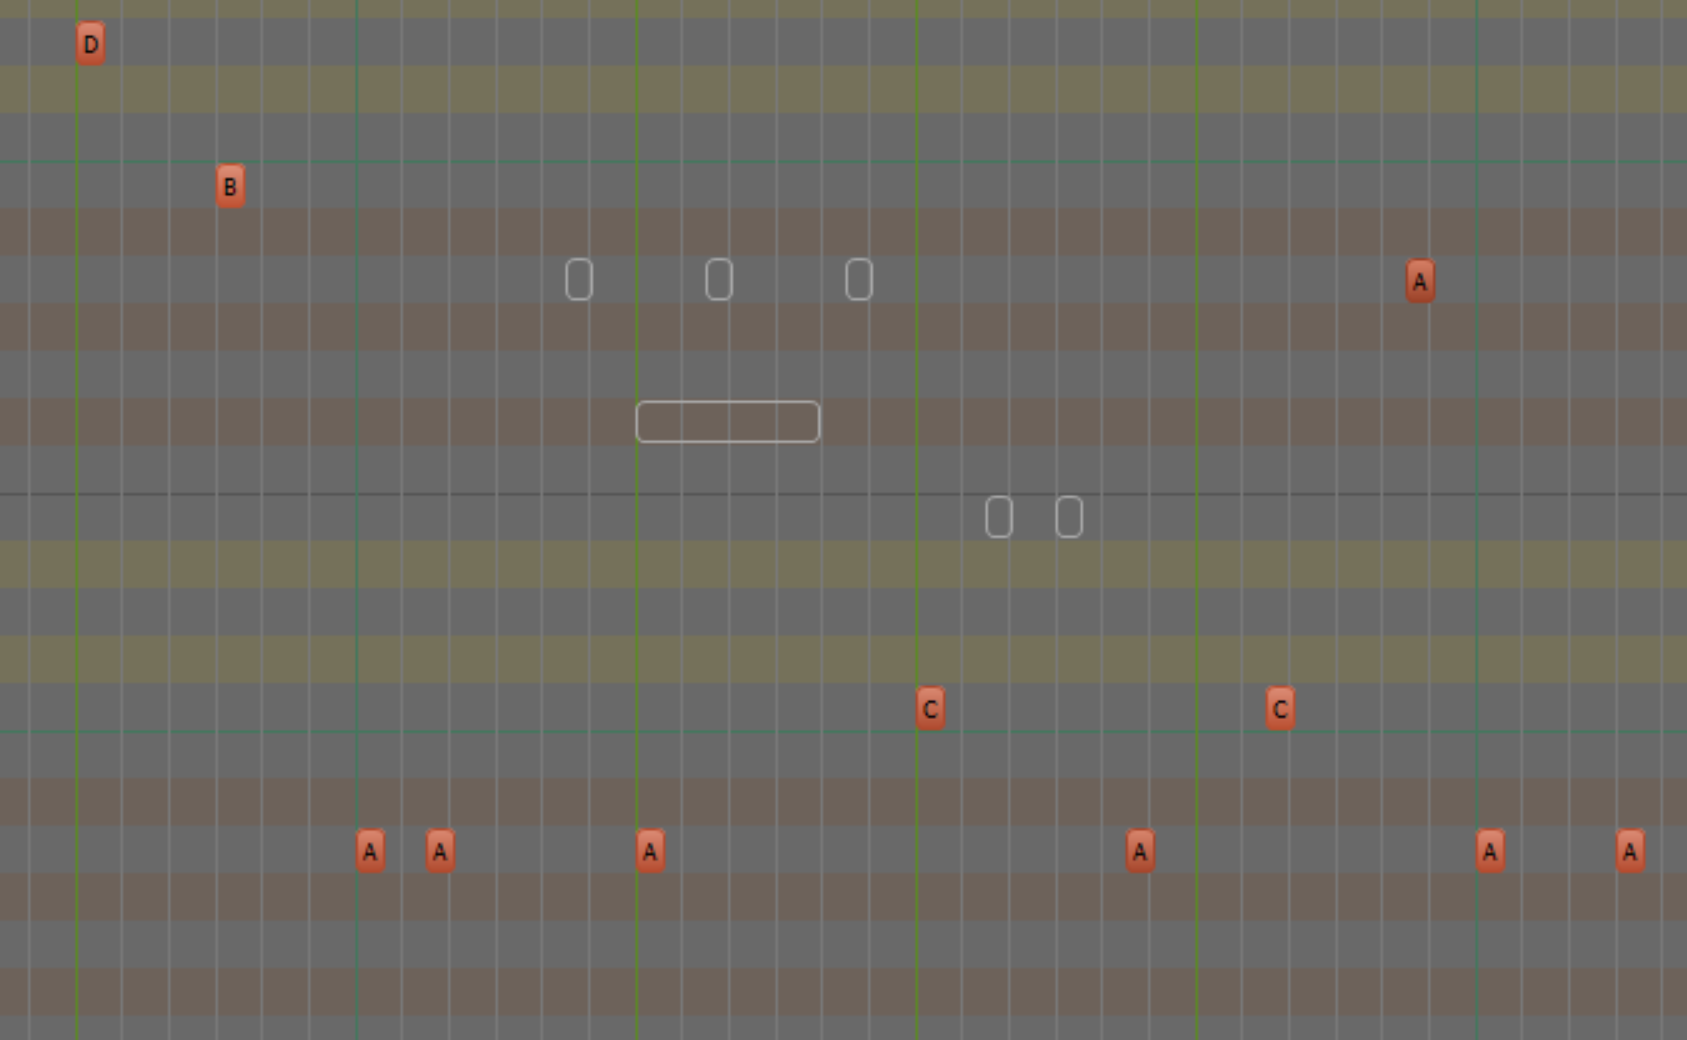
Now there I'm not quite with you. After all, they are muted, inaudible. So nearly invisible makes sense. ? HOWEVER, the situation could be improved in your case by going to Preferences/Customization/Colors then choosing the PRV category and playing with your colors there, specifically the PRV Grid Background Brightness slider, so that the muted notes' outlines are more obvious. I have a custom color scheme for my own PRV and the muted notes show well enough...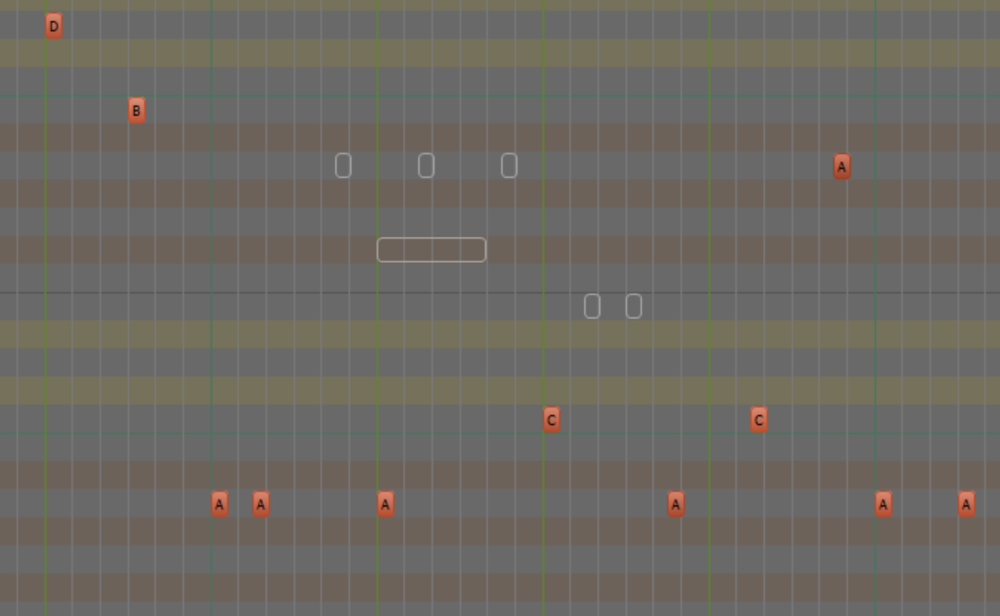
-
Alt + Scroll Button SERIOUSLY Impeding My Workflow
winkpain replied to Helos Bonos's topic in Feedback Loop
...It's strange that the Mouse Wheel Zoom Options settings don't apply to the PRV . They do make the wheel zooming in Track view a little better. -
Alt + Scroll Button SERIOUSLY Impeding My Workflow
winkpain replied to Helos Bonos's topic in Feedback Loop
I can confirm @Helos Bonos and @User 905133 experience with zooming out with Alt-Mouse Wheel (or ALT-Touchpad 2 finger scrolling on a laptop) making extreme jumps. I have always been similarly frustrated by it. In general it is a jumpy scroll, nothing like the s m o o t h scrolling shown in the video mentioned above. I my video here you see me starting to zoom with ALT-wheel. I am moving very slowly and smoothly with no halts on my part. The zoom-out process, however, simply jumps first from a view of about 10 measures width, then to 15, then to 30, then full zoom-out to over 300 bars width. 3 distinct jumps, not smooth at all. ?
-
Okee. Thanks for the confirmation and workaround suggestion.
-
Nope. No drum map involved. Hmmm. Well, yes there are because it's a multi-voice synth. But they're on different channels. I can, after all, insert a multi-voice synth with many simple instrument tracks automatically created, but if I try and set up my own by adding a multi-voice synth with separate MIDI/audio pairs and then try and combine pairs into simple instrument tracks (in essence, mimicking exactly what CW does automatically), it won't allow it.
-
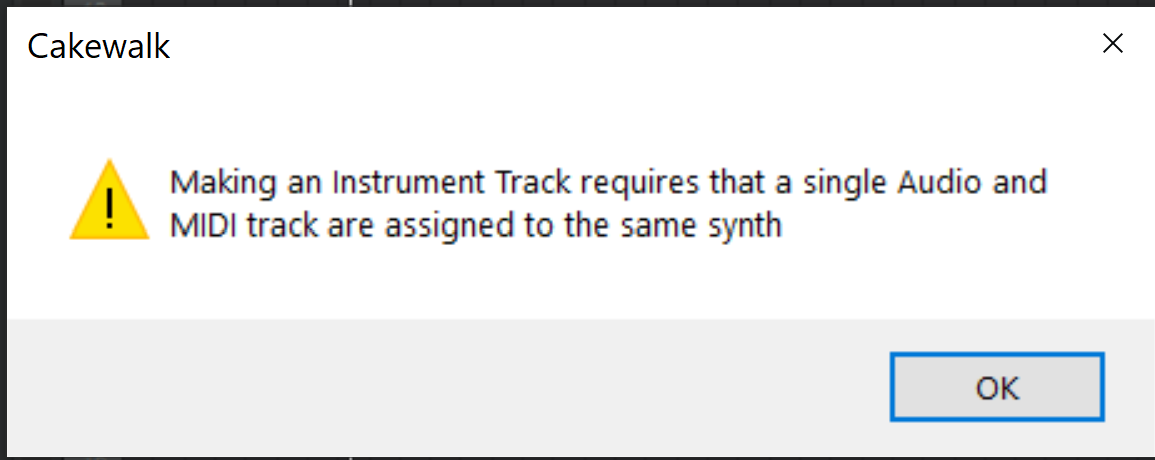
{I'm chiming in a lot here today - it's deal-with-issues-Sunday ! By no means does it mean that I don't continue to be delighted by this software and especially this community! } ...not that anyone is paying that close attention. Just sayin' The desire is to Make Instrument Track out of two associated MIDI and Audio tracks created originally not as a simple instrument track. Scenario is: I have a MIDI track that sends to a channel on Synth X. I have an Audio track whose input is set to receive from Synth X Neither of these tracks are associated in any was with another synth and they function and play as expected I select only these two tracks, right-click and choose "Make Instrument Track" I then receive the message in the attached image. I don't know what other assignment I need to have between these two tracks to make this work.

-
...a minor one, but... Would be nice if "Append Instrument Track" would add the appended track just after the last existing one of the associated synth. Or before it. Or indeed anywhere near it. The new track is simply added at the very end of all the tracks in the project, so potentially nowhere near the synth to which it is being appended. And if the synth and its associated tracks are in a folder, whether created when inserting the synth or after the fact, the appended track isn't even included in the folder. In larger projects, it took me a while to even realize that a new track had even been created when an "Append" request was made, as my focus was naturally in the area where the synth lived. A little counter- intuitive, no?
- 1 reply
-
- 1
-

-
Just saw this. Maybe doesn't help, but it did me.... https://www.cakewalk.com/Documentation?product=SONAR X2&language=3&help=Recording.35.html
-
I am finding my Duplicate clip command (with context menu or Ctrl-D) is not including the clip's envelopes with the duplication. I, of course, have "Select track envelopes with clips" chosen in Track view - Options. Selecting the clip and doing any of the other moving/sliding/copying (like standard cut/copy and paste operations) works as expected with the envelopes being copied as well. AND choosing a Section (in the new Arranger) and right-clicking and choosing "Duplicate" correctly copies clips with envelopes. Only the Duplicate Selected Clip command does not honor the envelope preference. Anyone else see this?
-
32bit plugins still work, but they must be bridged with BitBridge or JBridge Read here about BitBridge (about half way down) - https://www.cakewalk.com/Documentation?product=SONAR&language=3&help=Dialogs2.064.html
-
Ditto on all that. AND it's a great opportunity for "Secondary Snap" settings. With a much higher res snap setting or snap off in the secondary setting, you can temporarily engage it by holding the N key down while drawing out your envelope with the Freehand setting. This is made all the more brilliant with a touchscreen and pen!
-
can the sensitivity of the SMART grid be adjusted
winkpain replied to Gill20's topic in Cakewalk by BandLab
Indeed! It can be confusing. For sure the Key Bindings setup could use an update. Not sure if that is high on the list, given everything else being done. In the meantime, it definitely pays to familiarize oneself with the idiosyncrasies of how it "works" at present, if one depends of keyboard shortcuts and their customization like many of us do! -
I am still very much being frustrated by this problem first mentioned here Ripple edit continues to "randomly" stop functioning even when switched on or not persist 'though saved in the on state. This is especially true in the PRV view- selected notes when duplicated do not ripple edit the following material but layer over it as if Ripple were off. Choosing the exact same notes in the inline PRV (or as a clip) in the Track view and duplicating does ripple edit as expected.
-
Still getting this ghost cursor even with the 2020.4 release !
-
? Ah well. At least Auto-crossfades works! You're absolutely right, it's not a guarantee, but cutting at zeros is, on average, a better place to default your audio cuts to, always having the option to do otherwise if the situation demands. That's what gets me with this insistent, persistent defaulting to the off position. Not to mention (except that I am mentioning it - again. Whoops!) the oddness of having a chosen Preference setting being overridden in such an obscure way. And strange that your system acts differently than mine in that template versus "regular" project regard. But as it seems to be a bug, I guess that's why it behaves.... buggy. As always, thank you for your insight and time!
-
Sheesh! I will do... But, really? Snap to zero should be "on" by default. With a very nice, up front and obvious way to toggle it if needed. Who would not agree? Edit: Nuts! No good. Opening any other project with Snap to zero off will still have the exact same above mentioned effect of overriding that setting on whatever other project is open. For sure this would be considered a bug? Even if it only did this with templates as on your system.
-
And thank you, again, David! This was encouraging, but unfortunately, I am not finding this to be the case. I just double-checked again with this simple test multiple times: I open a project saved with Snap to Zero checked "on" in Pref. I confirm that it is on. I then open a new, blank project with it defaulted to "off". I can then immediately close this one without even opening up Preferences or doing anything at all. I can then be back in original project, and without even opening Preferences (or doing anything else, or with opening Pref., or doing whatever), if this project is then saved anew, it will be saved with Snap to Zero set to "off" . It just "wants" to persist at being "off". P.S. But yes - if I think of it and go to the setting, re-check it "on" and then re-save, it will stay on when re-opening. I'm just saying, in the above scenario it is very easy to have it unwittingly set to "off" and then, without thinking always to check this before re-saving....well, you get the picture
-
Thank you, David. I think I understand. This automatic compensation is, well, ...automatic, so we have no need to adjust it, I guess. I think I was trying to follow a process that is a standard procedure in Ableton (recording the met, noting the offset, and setting the compensation manually). It was mostly out of curiosity that came from following down another path I was on. I am not necessarily having a problem. But when I noticed this, I thought I was having a problem that I didn't know I was having! It's hard sometimes, not knowing every-bloody-thing like you guys do! ? So.... you're saying my above scenario is normal and not cause for concern?
-
OK. So, as I noticed - no default snap to zero crossings without snap to grid engaged? And no default "on" unless creating a template for it? Also as an example: I have created and saved a project or template with Zero Crossings set to "on" in Preferences, and I then open any project (most by this arrangement) with it "off" or a new project with it defaulted to "off". My previously saved project's zero crossings setting is then overridden and it reverts to "off" again. If I then re-save this project without thinking to double-check preferences, it is now saved with zero crossings reverted to "off"! Is this not odd? I understand an occasional need for sometimes wanting zero crossings turned off, but certainly not often. It saves so much time to not have to go into every audio clip, zoom in close and search out glitchy, off-zero cuts. And given the relative obscurity of the setting (no visible indicator or control module item) and it's insistence in Preferences of not sticking to what I prefer, wouldn't it be smarter to have it default to "on"??