

-
Posts
2,297 -
Joined
-
Last visited
Everything posted by Glenn Stanton
-

Is "Cronus" - V Vocal plugin no longer supported ?
Glenn Stanton replied to noynekker's topic in Cakewalk by BandLab
i have, but frankly since i upgraded to Melodyne Studio, i'm firmly in that camp now. i have about another 5-6 products but Melodyne is just fast, reliable, and i can tune guitar / piano (sampled) chords etc if needed. -
Is "Cronus" - V Vocal plugin no longer supported ?
Glenn Stanton replied to noynekker's topic in Cakewalk by BandLab
looks pricey - $399 -
as note: if people are interested in a reasonably priced tool - i've found hookpad (https://hookpad.hooktheory.com/) is very nice to rapidly create songs, parts with lots of useful features for chords, instrument generation, etc. a full set of MIDI which can be imported into Cakewalk and then have proper instruments applied. hookpad can also output the lead and score sheets. not a shill for hookpad, just a happy user of it for 2 years now...
-
hey, on the plus side, Cakewalk Sonar can start getting reviewed again as it will be a paid product, and they'll have to advertise in the reviewer magazines / blogs / etc to get people to purchase it. the reviewers can, ahem, erm, once again give their unbiased opinions ?and will no longer be unsupported by plugin developers who don't support free products...
-
yes, but your ability to shop major brand stores improved didn't it? ? not to mentioned the plethora of great information the ad bots stuff into your inbox as a result that your didn't even think about. plus those times you were speaking in a room which had an Alexa nearby and suddenly those product being to appear in your search results and inbox... like magic! ?
-
when setting up patch bays (i don't do it often) i print the connections reversed (as well as normal) so when i'm in the back the connections are shown so they line up correctly on the front. yes, after using the normal connections drawing on, say, erm, 2-3 bays each with a few hundred connections, then finding i reversed (compared to front) all the ones i did after lunch (apparently doing this on a full stomach is not good as it causes your brain to slow down...) i figured out that printing the connections with them reversed for the back, i made almost zero mistakes... fyi -- patchcad -- an excellent tool.
-
@msmcleod -- i forget -- is there a way to export just the notes? text? csv?
-
Rex -- you forgot the SETI program using AI on your system to crunch signals from space or are being transmitted to the Pleiades system... oh, wait, they cancelled that... wink wink...
-
Propellerhead Reason Grayed Out in Cakewalk
Glenn Stanton replied to Ed Driscoll's topic in Instruments & Effects
maybe you got a recent update from MS? i'd reinstall the C W redistributable files and check if some update to the propeller software - might need to reinstall. i didn't put the propeller on my new system but in the past had to reinstall it after some MS updates. -
another factor - amount of memory per core - my general guideline (from the enterprise application world) is 2GB per core - so 16 core -> 32GB RAM. at a bare minimum, 1GB per core. while the schedulers will still be swapping things, having a minimum amount per core (typically) means less time spent re-loading memory because its somewhat "p/reserved", rather than being pushed onto virtual memory or un/re/loaded due to memory constraints.
-
add a bass VI (like the SI Bass ? ) and point the MIDI track output to the bass VI and the output of that VI audio track to your master.
-
Export Entire Mix does not export entire mix
Glenn Stanton replied to Chris Boshuizen's topic in Feedback Loop
yeah, or you could have a couple of separate drum busses for percussive and cymbals and parallel compression etc. then combined on the final drums buss feeding the master. either way, if you were creating a stem for someone to use, you'd likely want all the bits included in that. -
well, sounds like the real short cut is using the "save as" feature ?
-
Export Entire Mix does not export entire mix
Glenn Stanton replied to Chris Boshuizen's topic in Feedback Loop
wouldn't busses be stems? thinking out loud - export entire mix - HW output (or equiv) - assume all unmuted tracks or only soloed ones; export tracks = tracks selected -- kick, snare, bass, guitar 1, guitar 1, vocal 1, back vox 1, etc, and export "stems" would be export busses - drums, guitars, keyboards, vocals, etc . at least this is how it seems to work for me. -
i export the tracks on project A (using export dialog and whole tracks) and import into project B (either import dialog or drag and drop). for MIDI, save the project A as a MIDI file and import the MIDI file into project B. then re-arrange the tracks as desired ? also helpful to make presets for effects and instruments if you need to re-use those and can re-apply them in the project B.
-
as a quick note -- reading the manual: https://eadn-wc05-7545739.nxedge.io/wp-content/uploads/2022/09/RP500_OM_EN.pdf "8. USB Jack The USB jack connects the RP500 to a computer and provides two purposes. First it is used to provide communication between the RP500 and the X-Edit editor librarian software. Second, it is used to stream four channels of audio (2 up / 2 back) to and from the computer when using the RP500 to record with the included Cubase LE4 recording software. Refer to the RP500 Software Installation Guide and Cubase LE4 online documentation on proper setup for this use." so it's says Cubase, but it might mean that ASIO4ALL could be the "driver" they recommend (which if this is the only IO unit, isn't the worst (RealTek is...)) with the understanding that the latency will not be as good as a quality IO unit would give you.
-
Looking for room treatment advice
Glenn Stanton replied to jwnicholson78's topic in Production Techniques
yes, the side wall could effectively be a "gobo" that has absorption on one side and hard on the other. i was thinking in terms of the idea that if you threw up a simple partition wall (2x3 frame, 1/2" gwb, packed with soft insulation) it would be effective as its dense enough to shape the sound pressures yet still absorb (plus the opening "vent" to further let LF "leave"), and useful later as a "room". for the wall -- probably $300 max + 2 days elapsed between fabrication (4 hours?) and the drywall joint material to dry, then paint. (paint is likely the single most expensive individual component ? ) the actual dimensions will depend on the ceiling height - here i've assumed 8ft -
-- never mind--
-
Looking for room treatment advice
Glenn Stanton replied to jwnicholson78's topic in Production Techniques
one interesting thing - if you put in the partition so the space is 11' wide x 13' deep, it's a decent working ratio... add some absorption and ceiling too. maybe a drape on the opening to reduce reverberant behaviour. -
Looking for room treatment advice
Glenn Stanton replied to jwnicholson78's topic in Production Techniques
you could still fit into your space - i'd still recommend the side partition (think cubicle wall w/ plywood ? ) SAF could even be higher since you'd now be hiding the clutter from the family's gaze... lol on the "back wall" - a set of absorbers and a small one on the door. and one on either side of the desk. -
Looking for room treatment advice
Glenn Stanton replied to jwnicholson78's topic in Production Techniques
where is the door on that 13ft wall? -
Looking for room treatment advice
Glenn Stanton replied to jwnicholson78's topic in Production Techniques
one option is to move to the wall adjacent to your TV area and put up a baffle (wall? partition? etc) to create a symmetrical space. then treat. -
Looking for room treatment advice
Glenn Stanton replied to jwnicholson78's topic in Production Techniques
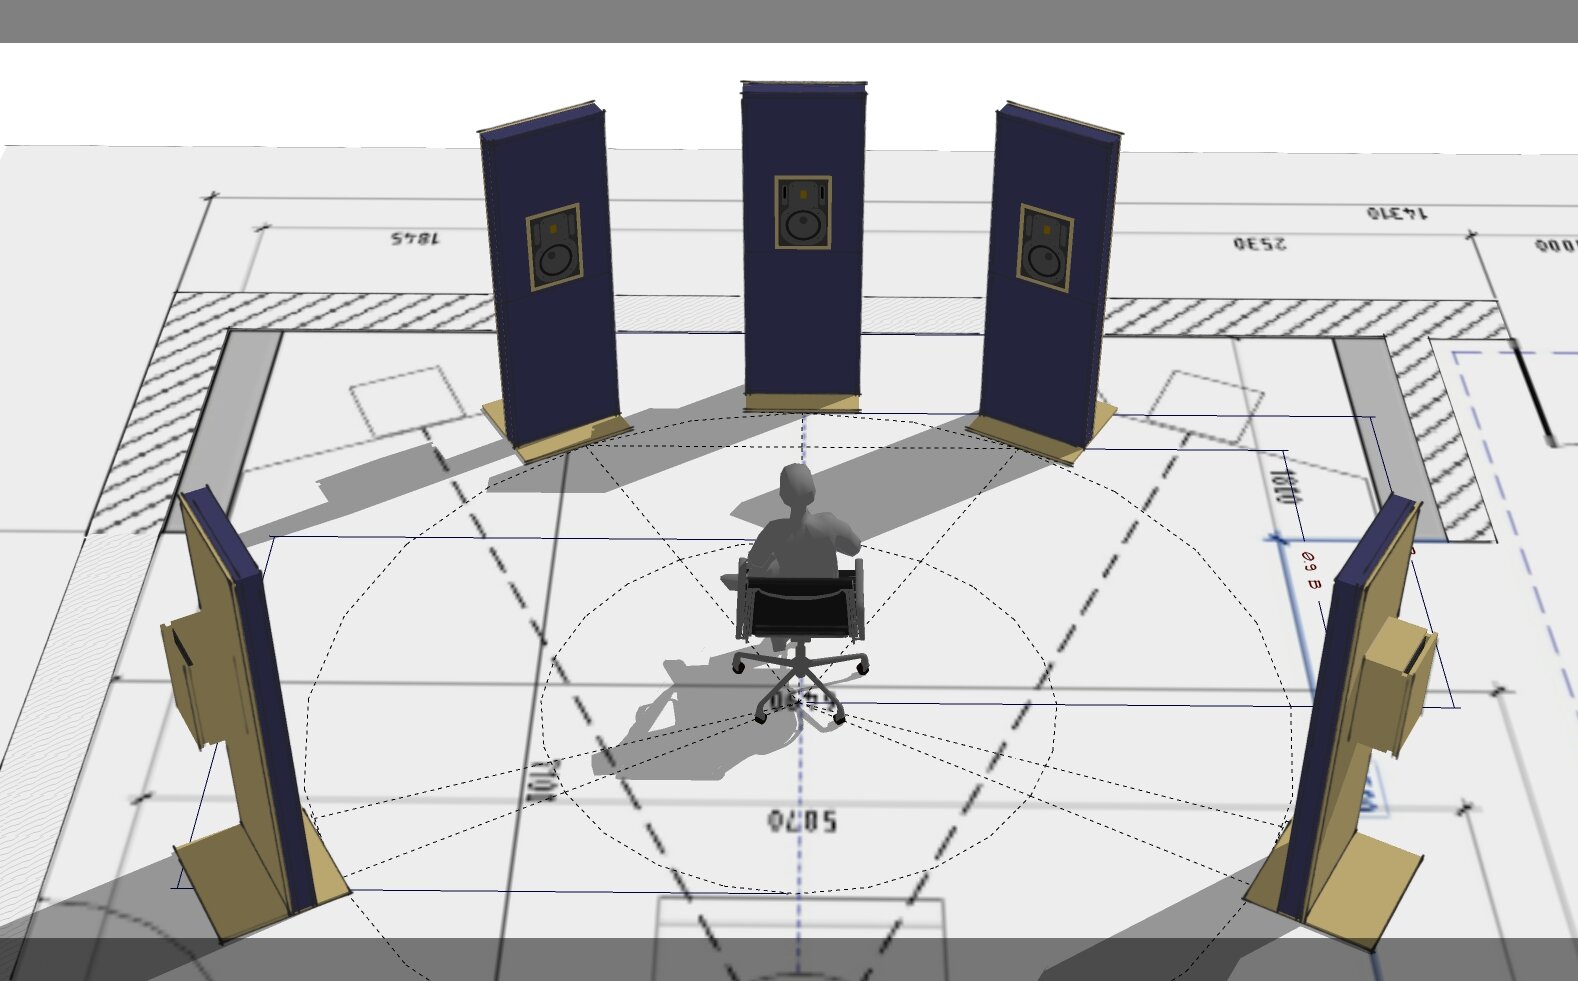
it would be helpful to know where there are doors and windows, things like fire places, utilities, SAF things which cannot be moved, etc. that helps to avoid long thread of oh, i forgeot to mention the ... cannot be moved or it's a door for the neighbor, etc ? that said - there are a few simple things to get started: 1) position for symmetry -- speakers -- start as 60° triangle (meaning from your seat they are each on 30°), and the speakers and seat form an equilateral triangle. aim the speakers to be focused about 18" behind your head and about 4-6" above your ears. 1a) you should seat yourself about 37.5% - 39.7% distance of the length. so if you have a 20ft room, you will START at about 7' 8", depending on speakers, and so on, you'll adjust positions. seating, speakers, etc. you are looking for: - least disruptive LF response - generally as smooth as possible - in as large a space as possible (the "sweet spot"). this means moving speakers close to the wall, farther from the walls, your seat closer, and further, etc. - solid phantom center (assuming you're doing stereo, surround is a different thing) with symmetry so you can hear panning etc. 2) position for backwall impulses (reflected sound) to be lower than your direct speaker sound - this is the reason people tell you to shoot down the long path, but it's not always an option - so more absorption behind you to attenuate the mid and high off that back surface. 3) add some treatment on walls and ceiling for first reflection points. a simple hand mirror and laser pointer (assuming no cats around) you can quickly spot the points to hang some absorbers. -
if you have created the region fx but not rendered them, can't you just select the clips and use "remove region fx"? just a quick test with a bunch of different clips across different tracks i could create the region fx and also remove them. if you rendered them, then the clips will have the region fx (in your case, declip) applied.
-
i use the task queue. by default, my templates have two "default export" which is simply a 2-track WAV or MP3 from the master buss with all (except the noise track) selected. in my record template a task to export each track into the /export audio/tracks folder. and then in my master, i have 10 generic tasks, one per track, and i tailor each one - duration, mp3 metadata, etc. which exports the track as mp3 into the mastering project /export audio folder. all this does a few things - i just check the box for which tasks i want to run, and done. the caveat is that if i add tracks, i have to recall task settings, do the updates, and save it. but reducing tracks is no problem. secondly i can export all tracks, a 2-track WAV, or 2-track mp3. each or all of the above.


