

-
Posts
2,302 -
Joined
-
Last visited
Everything posted by Glenn Stanton
-
 one option to capture the timing is to open the audio in Melodyne and export the MIDI which will have the tempo information.
 -
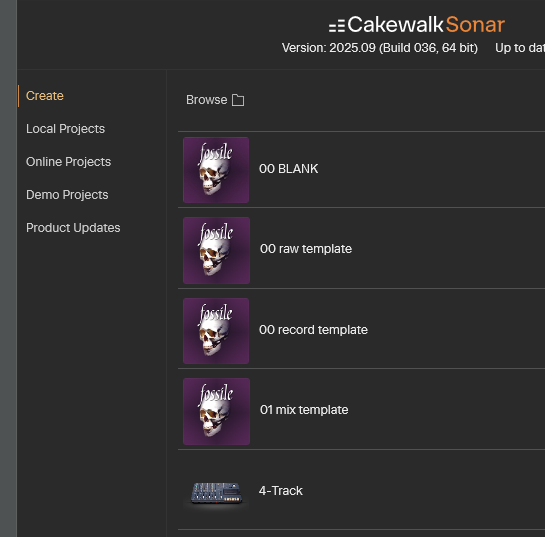
same as before. add the icon into the template project, save it. rename it with template extension. my templates all show their icon as expected, in the newest release:
-
Audio folders By default, Sonar stores audio data in an \Audio subfolder on a per-project basis. If you don’t immediately name a new project, audio data will temporarily be stored in a special folder called the Global Audio Folder, the location of which is listed in the Global Audio Folder field in Edit > Preferences > File - Audio Data. http://legacy.cakewalk.com/Documentation?product=CakewalkSonar&language=3&help=FileManagement.4.html also, if you're creating a New project from the file menu, you have the option to set a different folder for the audio, and in the back process under the consolidation options, choose a folder. new project dialog: back up http://legacy.cakewalk.com/Documentation?product=CakewalkSonar&language=3&help=FileManagement.7.html#1124610

-
yeh, not being able to punch in numbers in the UI and only depending on turning knobs or moving sliders makes things much hard than they need to be. maybe enable the editable value boxes for desktop OS and disable for non-desktop OS if that was the intent of making the UI harder to use. imho, honestly the old delay UI was great. finding another dual delay with the same ease of use and even functionality is limited.
-
using a pipe cleaner with some 800 or higher grit (i use 800 then 1500) polishing compound to pull back and forth through the nut, bridge saddles, and the string ferrules through the body to smooth and polish. i have found on my precision bass, even the badass bridge gets "string dimpled" over time so a quick smoothing works. so while i haven't seen it on my strat it seems possible to get string indentations over time as well (i still polish those every time that i'm also cleaning the neck and polishing frets).
-
couple of things to check then - if the tuners are tight, it's not likely they're the [main] cause of the guitar going out of tune. i'd first check the nut and bridge to make sure they're smooth and not potentially causing the string tension to change as you play. a rough bridge or nut can cause you to be in tune but as soon as you start playing, the string wrap slips a bit and now it's out of tune. also, a vibrato / tremolo bridge if it's too loose can make tuning painful. personally (on my strat) i seldom use the whammy bar, so i insert a block to set my bridge and then tighten the springs. if i'm doing something where i know i'll be using the whammy bar, i'll remove the block and loosen the springs so that the bridge is still mainly stable but can move enough also. the PRS site has some tutorials on adjusting this. lastly - making sure you stretch your strings sufficiently after changing them will help (a lot) to stablize the tuning.
-
i miss my DR-008 as well. and the Geist replacement is 150£ (or €) 😞 i know i can install it from my old install disks, but i have other options now. but it was a slick bit of synth/sampler
-
How the Beatles recorded "I'm Only Sleeping"
Glenn Stanton replied to T Boog's topic in Production Techniques
never sat in rush hour traffic in the NYC area then... LOL. we all need flying cars. agreed, many musicial types of people are as dedicated and creative. and some are even using much less capable equipment than commonly available DAW etc. at the end of the day, it's about the song. regardless of it someone simply singing it, or an orchestra. and then, what is the criteria? most popular? least popular? loudest? fastest? most notes? least notes? a number of notes which reflect being one with the universe? many people think Miles Davis was the last step in all future musical progress. i think it was Jeff Beck. -
How the Beatles recorded "I'm Only Sleeping"
Glenn Stanton replied to T Boog's topic in Production Techniques
what's a three letter abbreviation for IBM? a company i worked for had it listed as MMB (they simply took all computer related items and starting with AAA just assigned them a 3 letter abbreviation... and you have to use the look up chart to find the "official" abbreviation if you wanted service or new gear) i'd call it the "yellow abbey magical pepper machine"... although someone would likely turn it into a porno... 😈 -
sorry - SoundID Voice AI https://www.sonarworks.com/soundid-produce/voiceai my guess is the sale is over 😞 mine came with like 30 voices and a dozen instruments.
-
Does Sonar’s installation remove the TTS-1?
Glenn Stanton replied to Bass Guitar's topic in Cakewalk Sonar
if using the command center to install, just select the FX components rather than the entire DAW (unless of course you want to). it's how i installed all my older stuff into my new laptop without have all the DAW programs. -
How to affect one of the drum maps
Glenn Stanton replied to Ian Macpherson's topic in Instruments & Effects
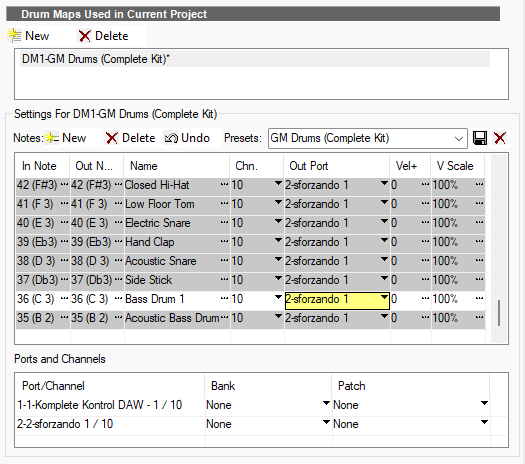
this one? -
i did that a lot of comping disparate vocals as well, then i discovered Synth V and feeding that into AI voice renders (just got the SoundID Voice AI on sale to keep my processes now local to my PC). problem (mostly) solved 🙂
-
How to rename multiple tracks at once
Glenn Stanton replied to evanking345's topic in Cakewalk Sonar
maybe as a starting point? if i added a drum synth and it loaded 12 tracks, i might rename them as "I## DRUM - " and then go edit each as "I01 DRUM - KICK" "I02 DRUM - SNARE" etc so firstly as i'm adding multiple output synths they're somewhat grouped already, and then renaming is tweaking each as i decide what i ultimately what to call it. "I## GUITAR - " and repeat for keys, etc. possibly more useful though it you have a several hundred tracks like orchestral productions might... -
if you add exceptions for Sonar (or Next) and any other standalone processes (like Kontakt for example which i use in standalone mode a lot), then you should be good. the processes will pull in DLL (FX, VI) which will also be excluded from live process AV activities. you don't really need to exclude the FX paths. i would recommend that your project and content paths are excluded though, as content and project files will be scanned . i have all my project files (non-executable) and content (also non-executable) on a wholly separate drive and folders, so a single entry for each suffices. my plugins and other possibly executable files are in program files directory and are scanned when installing or updating. executable code is the risk... using W11 defender. i excluded CW project files and WAV, and MP3 files as well. Melodyne temp folder is excluded, and picture cache as well. so beside my CAD and photo/video stuff, my DAW and related process exclusions are probably a few dozen. including ProTools, Audacity and Luna, RX, Izotope, Acon, and standalone audio apps like Kontakt, Synth V, Musescore, EZ series, etc.
-
Billie Eilish - her brother (& producer) did an interview showing how in one of her hits, they had almost 200 edits, some at the syllable level, to comp the lead track from some 80 takes. that was before applying the usual FX and automation... scarey thing is that this isn't the most fanatical someone has done for vocal edits... LOL
-
Allen & Heath CQ-18T Compact 18-Channel Digital Mixer with Touchscreen?
Glenn Stanton replied to Pathfinder's topic in Gear
looks like a great tool for a live performance role. parametric feedback killer, auto noise reduction, simplified settings for instruments with option to tweak. -
How to affect one of the drum maps
Glenn Stanton replied to Ian Macpherson's topic in Instruments & Effects
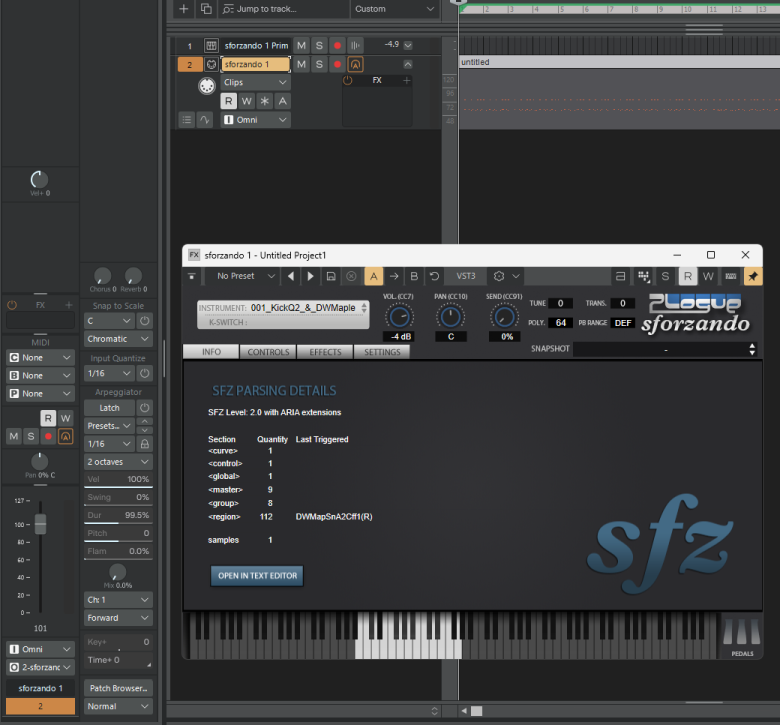
you go into preferences to set up the drum map, make sure the output is set to the Sforzando instrument. the select all the instruments, and shift-ctrl - right-click and select Sforzando. i pick the general midi map then set the input to the drum map (or in my case i didn't need it, i simply drg the MIDI to VI input track and hit play)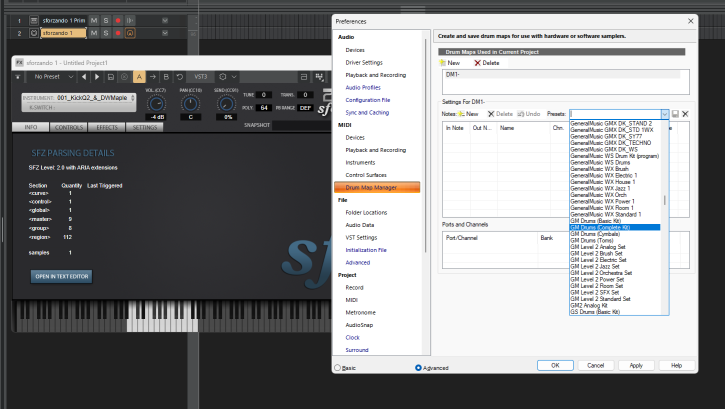
-
How to affect one of the drum maps
Glenn Stanton replied to Ian Macpherson's topic in Instruments & Effects
was the TTS-1 fed from a MIDI track? if so, fastest way to listen would be the SI-Drums assuming the MIDI is typ GM MIDI. Sforzando IMHO is not a great tool for drums (i actually don't use it much any more as i have a bunch of Kontakt instruments which are much nicer). for old projects (like circa 2003), i use the SI-Drums to replace to old SF player i used (like the Blue Jay SF which was terrific). gets me in the ballpark quickest. later, if i need to re-use that track i'll work on getting it fed into my AD2 or EZD via a drum map. if i absolutely must have the Blue Jay sound, i might use Sforzando or perhaps one of the other drum samplers i have. -
Impossible to choose a Si-Bass Program
Glenn Stanton replied to Ian Macpherson's topic in Cakewalk Sonar
i'd post a bug report -
perhaps learn the tools? learn about compressors, downwards and upwards "compression", learn the vocal rider - it's a subtle effect. Melodyne is also very nice (but more subtle than the compression approach). it might be several FX to get a solid leveling of the vocals - but be aware of lost dynamics in doing so. another option, use an EQ on the instruments buss which is sidechained to the vocal(s) to trim 1-2db off the frequencies used by the voice (or could be a solo instrument as well) to let it fit better. and definitely learn to use the clip gain envelopes - this is a skill which would be useful in any modern DAW. as nas Base57 noted, won't take long to grasp and do. for me - i mainly start with a) good vocals; b) melodyne and RX cleanup with some leveling applied; c) clip gain adj where needed; d) moderate levels of compression in a couple of stages; e) the EQ carve out in the final submix stage on instruments. keeps the vocals mainly natural sounding while keeping a good level throughout.
-
Impossible to choose a Si-Bass Program
Glenn Stanton replied to Ian Macpherson's topic in Cakewalk Sonar
just curious - i now if you move the SI UI (say to the center of your screen) initially i've found the drop list stays in the corner (where it opened) until i close the UI and re-open it. you might go ahead and file a bug report in case it is something to do with screen resolution - maybe try 1920x1180 first though. -
Projects suddenly not remembering saved View [SOLVED]
Glenn Stanton replied to tdehan's topic in Cakewalk Sonar
i use workspaces to define my views, not screen sets etc. however workspaces are universal, so whatever the last setting used will be the one you open with. so you'd want to set your workspace to "none" and then set the screenset. -
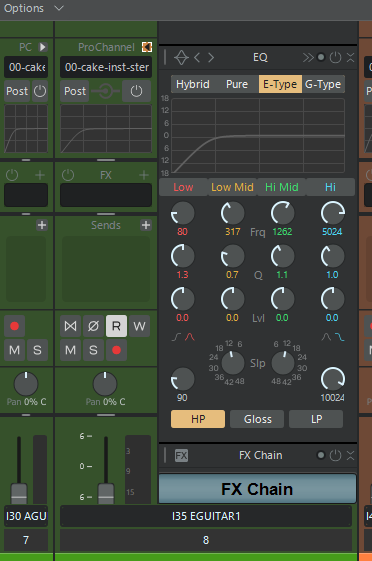
curious - if you go to your track console view and click on the PC>, does it display the PC strip?
-
in my paid Sonar, that line shows up if i toggle the PC off, but double clicking on it causes my inspector side bar to minimize. otherwise the toggle is working. according to the Sonar tier differences chart, the PC is enabled for the free tier. so something else is not right . maybe reinstall Sonar? maybe rename your program INI files to .INI.OLD and relaunch Sonar to see if that solves it? you can delete the news ones created and rename back if that isn't it.


