-
Posts
4,917 -
Joined
-
Last visited
-
Days Won
5
Everything posted by David Baay
-
The selection markers allow you to easily change a selection by dragging the marker, and the new pointer tools allow you to select the desired marker when two or more (loop, punch, selection) markers are on top of each other.
-

Clarification on transport ‘return to zero’ control.
David Baay replied to Jean's topic in Cakewalk by BandLab
Just curious... do you use a touchscreen? I almost never use the UI transport controls with a mouse; the keyboard shortcuts are so much more convenient. -
Adding Controller to PRV...default to current Channel
David Baay replied to RobertWS's topic in Feedback Loop
I'm guessing you mean the current forced output channel of the track. If the track has a forced output channel assigned, the channel embedded in the events doesn't matter. In the age of soft synths, most users write/record everything as channel 1, and depend on independent ports and/or forced output channels on tracks to route events to the proper synth and channel. -
Cakewalk keeps crashing when loading in plugin
David Baay replied to Lorenzo Stolk's topic in Cakewalk by BandLab
I have a problem with the VST3 version of AAS Chromophone 2 causing a crash that the VST2 does not. Others don't experience this, (including AAS themselves, apparently). If re-installing/re-scanning doesn't solve the problem, you might try replacing the VST2 with the VST3 after its loaded, which works with Chromophone. -
A 64-bit plugin can address more memory, though I can't imagine an FX plugin needing more than the 4GB supported by 32-bit addressing. And I would challenge you to hear the difference between 32-bit and 64-bit audio processing, especially in a plugin that is probably already introducing subtle distortions in the signal by the nature of its DSP algorithms. I'm not a devleoper, but I believe making plugins use 64-bit addressing is primarily just so that ithey can run in a 64-bit environment without address translation a.k.a. 'bridging'.
-
That would be audio bit 'depth' as opposed to data bus 'width'. I don't know for sure whether CA-2A was included in the IP package that Bandlab bought; maybe Steve does. But it doesn't appear Cakewalk are putting any energy into plugin development right now, and the return on investment of updating CA-2A to use a 64-bit signal path would likely not be very attractive.
-
You're confusing x64 memory addressing and data buses with 64-bit audio processing. If you're running x64 Cakewalk on an x64 operating system, the matching version of CA-2A will using 64-bit addressing and data bus, but apparently it does not support 64-bit audio processing. Some other high-end plugins don't either. You'd have to ask the developers why not.
-
Workflow for changing articulations in MIDI
David Baay replied to David Rubenstein's question in Q&A
Yeah, that works. I think it will be a little easier to keep track of the process - and know at a glance what's doing on after the fact - if you put the different articulation in different lanes. -
No, that has never been implemented. The only visual guide is that 6dB intervals are marked in the track scale, and each 6dB change in the Gain line will halve/double the amplitude. Ultimately, you have to use your ears.
-
64-bit signal path shows two ticks close together for each channel of the stereo path:
-
Workflow for changing articulations in MIDI
David Baay replied to David Rubenstein's question in Q&A
Drum maps aren't just about labeling notes, they can remap the output channel of each event (as well as note number and port). Assuming the different articulation presets are assigned different channels in the synth, a drum map could help with that. But you would need to write the different articulations in different octave ranges of the track, and the loss of easy duration editing with the notes moved to the drum pane of the PRV makes it not a very practical solution. Using separate tracks with appropriate forced output channels assigned is probably preferable overall. Once you have it all worked out, you can consolidate by embedding the channel assignments in the events, and moving them to lanes of a single track. -
Have never paid much attention to this. But, yes, CA-2A shows single, 32-bit signal path marks.
-
Incidentally, I found that I didn't have to first create a fade to reproduce this. I guess it is unexpected that a single click slip-edits the track when clicking with the context menu open whereas it would normally require a click and drag. Workaround (and probably a best practice) is to exit the context menu using the Esc key instead of by clicking.
-
Can only repro that here if the Edit tool is active, in which case it's not too surprising. Does not happen with the Smart tool.
-
Edges of the clips must be perfectly abutted to the sample. If the clips or their boundaries have been moved (other than moving the split point itself) it might not be possible to heal the split.
-
IBe sure to click in the lower half of the clip where the Comp tool is showing.
-
Appears to be something going on with the Clip Gain automation. Deleting the automation eliminates the problem, and after re-creating the clip automation, nudge from the keyboard continues to work as expected. If you can re-create the condition from scratch, you should report it to the Bakers. Even if you can't, they might be able to see where the problem is in this project file.
-
Bounce the selection to a new track named Master Bounce that routes directly to Main Outs, and group that track's mute button in opposition with the Master bus. Always maintain that track's position as the last track in the project. Whenever you need to do another export/bounce, start by selecting the Master Bounce track and clicking the clip to define the time range, Then Shift+click the first track in the project to select the same range on every other track, and export/bounce with Source = Buses, and only the Master Bus selected. The Master Bounce track is both muted and not routed through the Master bus, so it won't be included. I usually bounce to a new track, and then drag that clip to a new lane of the Master Bounce track and solo the lane. That way, 'masters' are saved with the project, and I can toggle the track mute to A/B between the bounced mix and the live mix on the Master bus to verify everything rendered correctly. I can also toggle between different master bounces, using the lane solo buttons.
-
Showstopper VSTi Issue in Cakewalk by Bandlab
David Baay replied to noynekker's topic in Cakewalk by BandLab
Do have an un-modified copy of that frozen project somewhere? That would probably be a good one for the Bakers to look at. -
Yes. Inadvertently left out to click "with the Comp tool" as mentioned in the other post.
-
This sounds like expected behavior when the track's Edit Filter is set to Clips. Haven't double-checked the beahvior, but make sure the Edit Filter is set to Automation. EDIT: I interpreted "selects the envelope itself" to mean "selects the clip itself. Also, I just checked, and lassoing individual envelope nodes works as expected here if the Edit Filter is set correctly.
-
Need the function of cutting MIDI clips into separate notes!
David Baay replied to Сzeslaw's topic in Cakewalk by BandLab
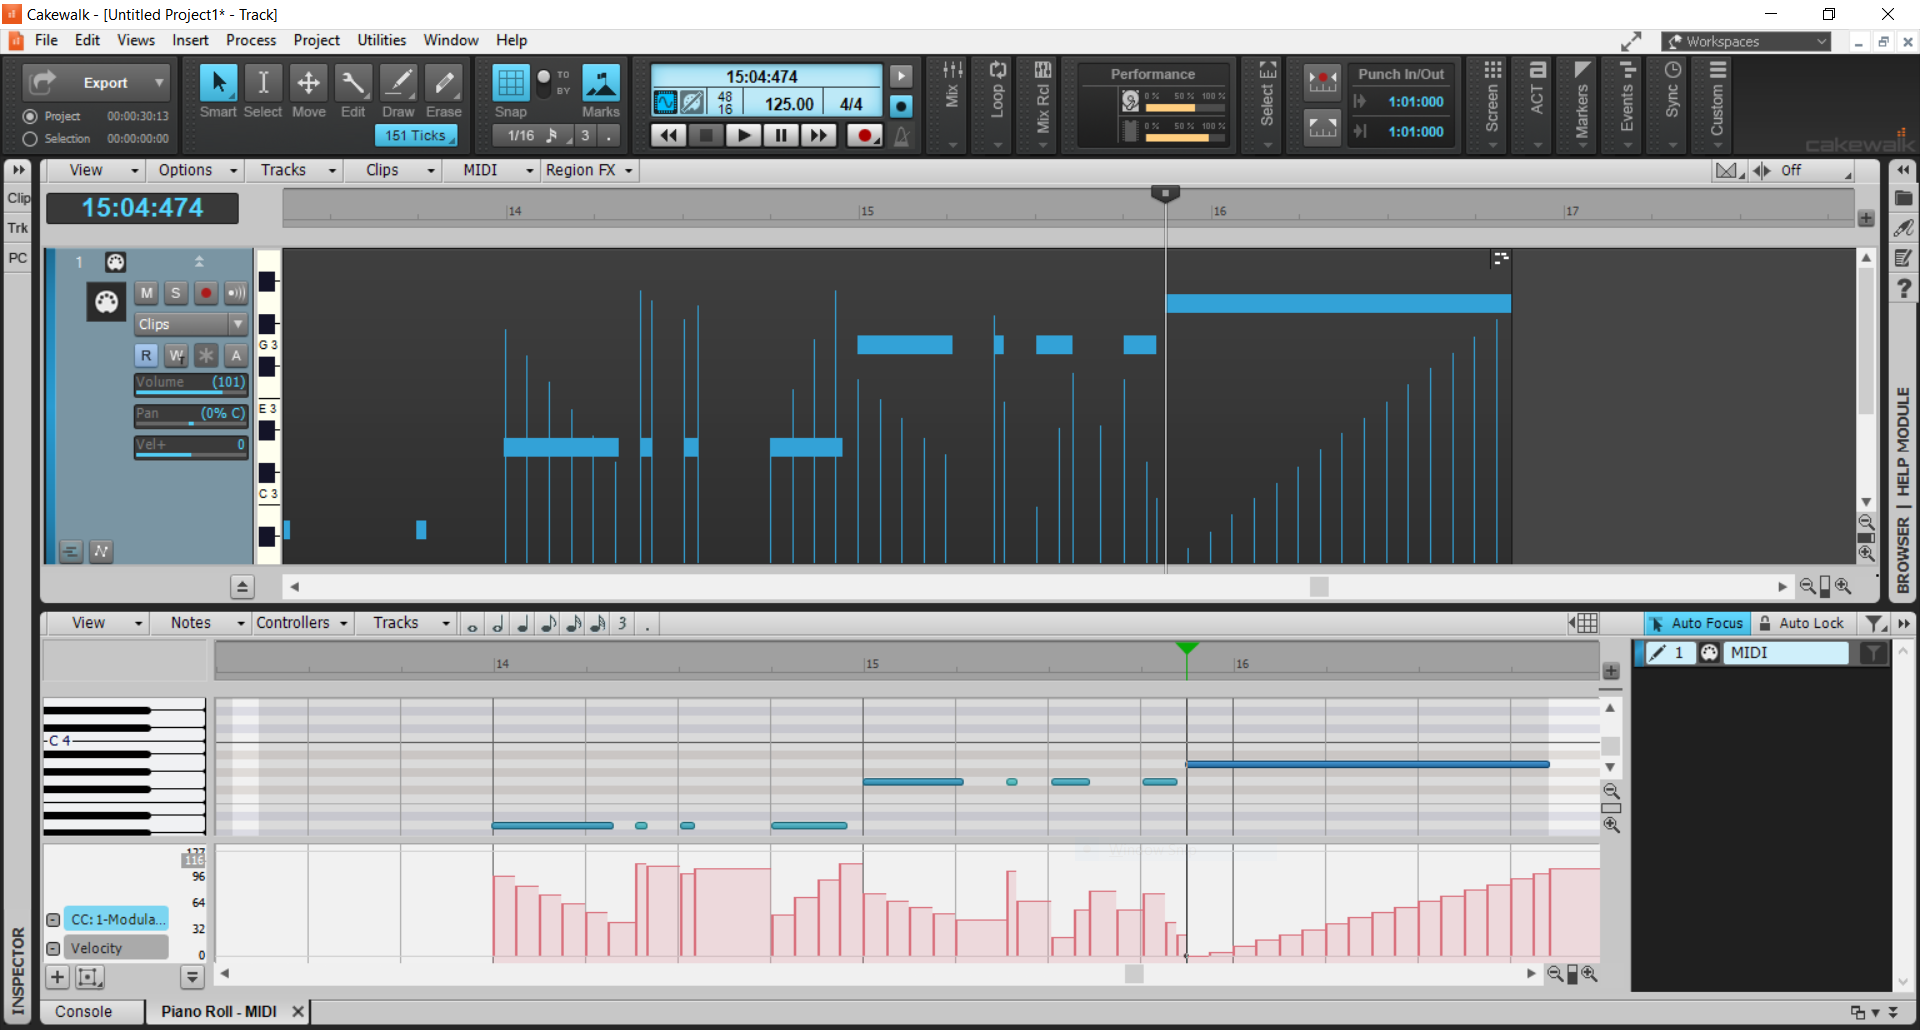
Totally agree. In fact, I deliberately used snap to landmarks precisely because the MIDI wasn't quantized. Helpfully CbB remembered the last-specified musical snap value, so I could set that at the desired resolution (16ths for demo purposes though a higher frequency might be more appropriate in practice to give 'smoother' transitions), and then disable it and have the first and last event aligned to the note boundaries with the intermediate controllers drawn at the musical resolution. -
Posted in your other thread: To 'heal' a split, select the clips on either side, and Ctrl+click on of them. You might want to enable snap at an appropriate level of precision to prevent 'duplicate' splits.
-
Select the clips on either side of the split, and Ctrl+click one of them with the Comp tool.
-
Need the function of cutting MIDI clips into separate notes!
David Baay replied to Сzeslaw's topic in Cakewalk by BandLab
A. He's already said he doesn't like working in the PRV. B. I think he prefers the precise alignment and perfectly linear slopes of automation envelopes (the curse of making music with your eyes instead of your ears, and becoming too enamored of the graphical and numeric perfection that computers make possible IMHO). But it is possible to achieve that kind of precision in the PRV controller pane with relative ease, using the Line drawing tool and Snap to MIDI Landmarks.