


Robert Bone
-
Posts
1,273 -
Joined
-
Last visited
Everything posted by Robert Bone
-

Crash (with dump) when trying to export OMF
Robert Bone replied to Sean Aitken's topic in Cakewalk by BandLab
Please send the dump to supprt@cakewalk.com and they can see if that is an issue within Cakewalk. You might also want to make sure your Windows Update maintenance is all up to date - sometimes, even with automatic updates set, some maintenance requires explicit clicking by the user, on the Install Updates, for some of the maintenance to be applied. Go into Windows Update (for Win 10 go to Start button > Settings > Updates and Security > and that will get you into Windows Update. Once there, look under the Check for Updates button, and any optional maintenance that requires you to actually explicitly click on the Install Updates to get it applie should be shown there. IF there is such maintenance to apply, and it might require a subsequent restart or update and restart, then get back into Windows Update one additional time, and even if it says you are up to date on updates, there might have been further updates to apply, that had to wait until THAT set of updates was applied, so c;ocl on Check for Updates one additional time, to make sure there weren't additional updates to apply. This is because Windows Update didn't actually check for updates on its own, after you had applied that last set of maintenance, and that is why the clicking one more time on Check for Updates helps make sure there are not any additional ones needing to be applied. One for thing to check - that error, which is an Access Violation, can also happen if one or more dependencies are in the code, and require one or more of the Microsoft Visual C++ Runtime Redistributable libraries and that/those library or libraries are not installed on your computer. Those libraries are not a part of normal Windows Update maintenance, but can be needed by programs written in C++, and if a particular coding call only got exercised once your project got to some particular size, for whatever reason, if the code made a runtime call to one of the functions that is from a missing runtime library, well, that can produce an Access Violation. SO - in addition to making sure your Windows Update maintenance is all caught up, I suggest you also download and install, directly from Microsoft, the 15-20 Microsoft Visual C++ Runtime Redistributable libraries. They can all be installed, and they released the series of them, going back to the early 2000's, so there are a few of them, and that is just how it works - where programs can have dependency requirements for any one of those particular libraries, which is why installing all of them is a good thing to do. I have them all installed on all 3 of my music production computers, and have installed them on every other computer I have built for my other music production minded folks. I put together a post in the forums, with a list of all of the download links - again directly from Microsoft, of the complete set of these runtime libraries, and they are ordered from oldest to newest, so you can just start at the top of the list and work your way down. Please note that even though you are running a 64-bit Windows, you still need to install both the x64-bit versions as well as the x32-bit versions - both sets are needed, even though you wouldn't think so. Any questions, please post back. Still, send the dump to the Cakewalk folks at the above email address for support, and install any missing Windows Update maintenance, and also download and install the runtime libraries as noted above, and see if that fixes your crash issue. Installing those libraries will not do anything adverse - those libraries just need to be installed to be there if any programs require routines that only can be found in one of them. These being installed may also prevent additional crashing from apps and/or plugins that have those library dependencies, so it is a good idea to install them, in any case. Here is the link to the forum post I refer to, with the download links to the runtime libraries: Forum Post with Microsoft Visual C++ Runtime Redistributable library download links Bob Bone -
Midi rescan utility or on midi device fail
Robert Bone replied to DamianAdams's topic in Feedback Loop
By the way - even though I have the USB Selective Suspend parameter disable, in my custom power plan, sometimes, regardless, specially after those big cumulative updates to Windows, I sometimes go back in and check, and find that, somehow, the Power Management tabs for some of the USB hubs are checked back on - to allow Windows to turn off USB devices connected to that hub. Pisses me off, that this occasionally happens, but sometimes it does - so I suggest folks take a look at the propeties dialogs for the various USB hubs, after those major updates, just to make sure Windows hasn't sneaked those paramaters under Power Management, back on. Bob Bone -
Midi rescan utility or on midi device fail
Robert Bone replied to DamianAdams's topic in Feedback Loop
I agree - as I understand it, Microsoft never built a means of retrieving some set of information needed to be properly able to do that - I have, on a couple of occasions, tried to look into any programmatic way to find out what devices are connected to which ports, and came up empty - I did so early this morning, and went into a whole bunch of the fields you can select on Device Details of the Properties dialog for my USB-connected audio interface, just as an example, because I do not currently have a midi controller connected, because I am moving stuff around. Anyways, I also went into the Registry, looking at the Device Parameters, and other places, trying to figure out any way to get enough information to be able to write some sort of utility program to ferret out the info - and still, I have not yet found anywhere I can get that information. I am just not good enough at Microsoft Windows 10 internals to figure it out, though I WILL keep trying. IF I can figure out a way to programmatically get the info, I will create a litle utility to display everything, and I will, of course, pass that along to the Bakers. VERY frustrating - ALWAYS has been like that, and I KNOW that the Bakers have approached Microsoft with the issue, on more than one occasion, and never were able to get Microsoft to do anything whatsoever about any of it. The Bakers have been frustrated with this issue for many, many, years. I will continue my quest, because SOMEWHERE, buried in Windows, that information must exist, so perhaps there is a way to do the digging to find it, and that is what I will continue to pursue. Apologies for my Windows internal skills not being better - am workingh on it. I have built some little utility programs for myself, going all the way back to 32-bit XP Pro, but most of my programming languages and experience (38 years) was on mainframe systems, (COBOL, Assembler, DB2, CICS, was a DBA, etc..). Most of my PC-level coding has been in C#, which is fine, but I do not yet know all the routines and API calls to easily know where to go look for the info - I am working to correct that, because it will help me when I want to write utilities or whatever. I WILL get there, because I am also stubborn. Bob Bone -
Looking for some guidance on gain staging with amp sims
Robert Bone replied to Robert Bone's topic in Instruments & Effects
I think I will fire off a couple of emails, to Overloud and Native Instruments, support, to get their thoughts and recommendations. When I get responses, I will post them here, in case anyone is interested. Bob Bone- 4 replies
-
- 2
-

-

-
- amp sims
- gain staging
- (and 1 more)
-
Looking for some guidance on gain staging with amp sims
Robert Bone replied to Robert Bone's topic in Instruments & Effects
Thanks - that is about how I figured it. So, I guess I will audition presets, or build them, as they are, and then if I decide to track with one, I will for now do the individual component-level gain staging, and save off that preset, hopefully into a bank or category, that contains all the other presets I did the gain staging for. Then again, at some point, I might just cave, and do a gain plugin reduction after the amp sim. I will see how it goes, over time. Fortunately, as primarily a keyboard player, though I do also play guitar, this issue won't likely crop up too often. Bob Bone -
OK - so I am looking for guidance from folks who have delved into dealing with gain staging between the different effects and the amps used in amp sims presets, such as from TH3 and Guitar Rig 5 Pro. Almost every preset I check, in either of those two amp sims, and indeed any amp sims I have, jack up the signal by anywhere from 8 to 10 dB at their output. While the easy fix is to reduce the output volume, either in the amp sim, or by inserting a gain plugin after the amp sim, in the FX bin, that ignores what should be gain stage points between each of the effects in the amp sims preset - chorus, delay, distortion, amp, reverb, whatever. Before I adjusted any of the input gains and output volumes, between the effects for a given preset chain, I looked at how these levels were, compared with the input gain of -18 dBFS going into the preset, and they were all over the place, with the output volumes from any of the effects adding several decibals to the signal, before feeding the next effect, so that by the end of the chain, there were usually about 10 decibals added. Each of those components in an amp sims preset have an input gain, and an output volume, and my understanding is that many of these effects are designed with a 'sweet spot', which as I understand it, tends to be at the -18 dBFS mark. Further, it is my understanding that any and all effects should really be 'gain/volume neutral', where their processing output should not be higher or lower than their input, so that with the effect(s) on or off, the output levels should be the same as what their input gain levels were at - that -18 dBFS sweet spot. SO - why aren't the hundreds, or thousands, of presets that come with these commercial amp sims, set up to honor the above? Also, what are considered 'best practices' for dealing with the out of whack levels most, if not all, of those presets have? What do YOU folks do with the above? I would also like to point out that many of the knobs for output levels, do not pop up any actual dB level when hovering over them, and some don't even bother to tell you how much change is occurring when you drag them up or down, they are just knobs that respond to dragging the mouse, but they leave me in the dark for how much change is actually occurring. Further, often - for a given preset - the output level knob of the amp sim often doesn't have enough range to properly compensate for how much volume was added above the target of -18 dBFS, so I have to reduce gain beyond the amp sim plugin - which seems pretty silly to have to do. I know that if I just turn down the output volume of the amp sim, no matter what is going on between the individual effects for a given preset, but that seems to me to not be operating with the 'best' quality of sound that can be produced, as compared to going through the hassle of adjusting gain/volume between all of the components, etc..... By the way, at the moment, when I settle on whatever combo of effects, or on a given preset, in ony of the amp sims, I currently start off with just the leftmost effect in the chain turned on, and then adjust the output level to meet my target of around -18 dBFS, and then turn on the next effect in the chain and repeat, etc., until I work through the whole chain. That way, at the end of it all, I am 'gain/volume' neutral. I have no idea if there is a better way to approach it - but it does seem to work between each effect, to do it that way. This would be similar to having a series of effects outside the amp sims, in the FX bin, and if doing that, I would approach it in the same manner, between each effect, to maintain neutrality.... SO - thanks for any guidance with the above. I am a keyboard player, but would indeed like to create the best quality sound in any of my projects, for any guitar tracks that use amp sims. This should be an interesting discussion - hopefully I am not just off in left field with the above. Bob Bone
-
I'm stuck, can't get Cake by BandLab to open
Robert Bone replied to Wayne Smith's topic in Cakewalk by BandLab
The Cakewalk folder in the Roaming folder above, contains some files for Cakewalk\Core, so I went ahead and added it to the Avast Exceptions, though it is not a bottleneck if I had not done that. But, I figured why not, and added it. If you open File Explorer, and enter the following (just copy and paste it into File Explorer: %appdata%\Cakewalk You can look at the files and folders within - the Cakewalk Core folder has some misc files, and the drum maps. Again, skipping that entry in your exceptions/exclusions paths of your antivirus won't really slow things down any. I just had a 'why not?' moment when I added it to my Avast exceptions. Really, your sample libraries, Cakewalk Content, and Cakewalk Projects, and the paths to your VST2 plugins and the C:\Program Files\Common Files\VST3 are your biggest bang for the buck, for having the antivirus software skip scanning files accessed/written/manipulated. And, it is not anything to do with the Bandlab Assistant that I have those paths skipped by Avast. Those paths are there because they are accessed by Cakewalk, so Cakewalk performs better by not having extra overhead from the antivirus program. Bob Bone -
Thank you Noel. When I finish up a drum map, I will check it out.
-
Fantastic - thank you guys SOOO much.
-
How to start mixing: volume fader level
Robert Bone replied to Lummy Keen's topic in Cakewalk by BandLab
In Cakewalk, when you insert a bus, you can choose either a stereo bus or a surround bus. Bob Bone -
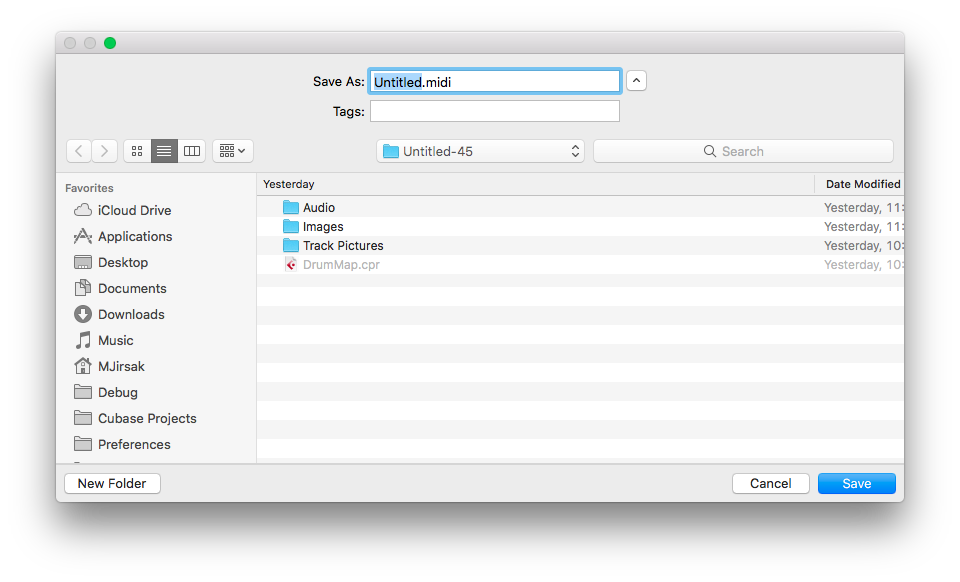
I was not classifying my request as a bug fix - for the record - it does seem that as I had noted, Cubase on a Mac was what my friend had used to create the midi files he sent me, and it apparently did export those files with the .midi extension. I would point out that Cakewalk is currently inconsistent with handling files of type *.midi, as when I double-click such a file, it opens with Cakewalk, and Cakewalk does process the file properly and set it up ready to play with TTS-1, however Cakewalk does not show those files in either the File > Open dialog box, or in the File > Import > MIDI dialog box, or by default in the Media Browser. I have the current workaround of renaming those *.midi files to *.mid, so my request is certainly not earth-shattering, nor stopping me in my tracks, should you guys elect to skip this one. I just thought that since at least one established, and widely-used music production program does create files with that extension, and since to the best of my awareness, the implementation of adding that extension to the filters in the dialog boxes wouldn't need any additional logic, that perhaps you guys would be OK with adding it. Here is a screen shot from the Cubase export for midi files, showing their default extension in this pic, as "Untitled.midi"
-
If you download the Native Instruments free "Komplete Start", it comes with several of the synth engines, and Guitar Rig 5 Player, which has a tuner in it that I like, but as noted, lots of other free ones out there. (The Komplete Start bundle has a free Kontakt Player - and a set of sample-based instruments, along with a 'lite' version of Reaktor - Reaktor Player, and I forget what else, but for free, you would get the tuner from Guitar Rig 5 Player, and the other components too, so not a bad deal - hard to beat free). And that free bundle from MeldaProduction is amazing - very high quality in all of their components - they also make other non-free components, that are worth checking out. Bob Bone
-
Mysterious GPU spikes causing constant dropouts.
Robert Bone replied to Misha's topic in Cakewalk by BandLab
OK - the icons you show changing are by design, to give you some visual information. That 2nd icon lets you know that the audio track is assigned to pick up its input from a soft synth. I am still looking at the rest of your post so will post back after I finish that. -
The Insert Soft Synth dialog box allows you to set options to automatically do things like insert a midi track, as well as one or more audio tracks. I just generally choose to add tracks manually, so HOW the tracks get inserted is a matter of personal preference, but in any case, you have to end up with a synth, a midi track that sends data to that synth, and one or more audio tracks that pick up the output of the synth. Bob Bone
-
Mysterious GPU spikes causing constant dropouts.
Robert Bone replied to Misha's topic in Cakewalk by BandLab
Can you please explain what you mean by "heavy synth track"? I want to make sure I understand. Thanks, Bob Bone -
While you can double-click on a midi file to get Cakewalk to automatically set up things to play that midi file using TTS-1, I almost never do that, unless I just want to get a quick and dirty listen to the file. What I normally do is to load up whatever soft synths I think I would like to use, into the synth rack, which is part of the Browser Pane, and I load an instrument into each of those soft synths. I usually manually insert the audio and midi tracks needed, for the midi data, and set the inputs on the audio tracks to pick up the output from each of the loaded synths, and I set the outputs for the midi tracks to the corresponding soft synth. If I am using a soft synth that can play different instruments on different midi channels - in a single instance of the synth, like Kontakt, I also set the Midi Output Channel on each of the midi tracks that are triggering sounds from the instruments loaded into Kontakt, to the corresponding midi channel of each instrument in the Kontakt instance. SO, if I have 3 soft synths loaded intro the synth rack, SI-Piano, SI-Drums, and SI-Strings, I would set up 3 midi tracks, and either 3 or 6 audio tracks (3 stereo audio tracks, or a left and right audio track for picking up the audio output from the 3 soft synths. Each midi track would have the Input set to None (Omni), and its output would be set to one of the 3 soft synths. For the audio tracks, assuming I just went with 3 stereo audio tracks, I would set the Input for each audio track to pick up the stereo output from one of the 3 soft synths. If I instead had used 6 audio tracks (3 pairs of left and right mono tracks, panned appropriately), I would set the Input of each pair of left and right audio tracks to pick up the output - one of them to the Left mono output from one of the soft synths, and the other Input would be set to the Right mono output from one of the soft synths. The Output routing assignments for the audio tracks, in this example, are just left to default to the Master Bus. (If I wanted to set up additional buses I could route the audio output of the tracks to some other bus, if desired, and then those buses would route their output to the Master bus). After finishing the above setup, I can then either create midi and record that to populate the different midi tracks with data, or - per your example - I could import a midi file to each of the 3 midi tracks. Because I have set it up with 1) a soft synth, 2) a midi track sending its data to a soft synth, and 3) one or two audio tracks that pick up the audio output from a soft synth, and 4) midi tracks that are populated with midi data - either created in the project, or imported to the midi tracks, I am in business. When I hit Play, the midi data will get sent to the 3 soft synths, which will produce audio output from being triggered by the midi data, and the audio tracks will pick up the audio output from the soft synths, and route the sound to the Master bus. You can replace synths or change instruments/presets in a given soft synth instance, without having to do any of the above setup again. You would just be sending the midi data to whatever soft synth your midi track(s) point to. If you right-clck on a midi track, there is an option to Replace Synthfor that trackm and it is a painless operation to do that. Bob Bone
-
Mysterious GPU spikes causing constant dropouts.
Robert Bone replied to Misha's topic in Cakewalk by BandLab
Have you looked at Patch Points? They function like buses, but are tracks - here is the documentation for those: http://www.cakewalk.com/Documentation?product=Cakewalk&language=3&help=Mixing.13.html Here is the 1st paragraph from the above documentation: "A patch point is an internal routing path used to route audio from a track output, bus output, or send to an audio track input. The virtual inputs can then be input monitored or recorded. You can think of patch points as virtual patch cables." Bob Bone -
Mysterious GPU spikes causing constant dropouts.
Robert Bone replied to Misha's topic in Cakewalk by BandLab
For creating an audio track from a midi track, I usually export the midi track (change the Source in the dialog box to tracks, rather than the entire mix). or I will freeze the Kontakt instance, and it will render the audio track(s) in that process. You can always unfreeze the Kontakt instance, if additional midi data manipulation is needed. If I send tracks/stems off to someone else for either mixing, or for populating a project in the DAW of their choice, to add guitar tracks, or vocals, or whatever, that is when I usually do the exports - sometimes as a simple stereo track, or if they want to adjust individual track levels I send each exported track. I know there is the option now to route output to an empty audio track, to record it from the output of a Kontakt instrument, for example, I just never played around with it. I will do some playing around with it shortly, to see what I discover in the process - might help me with additional options I never had pursued in the past. I will post back with anything I figure out. Bob Bone -
Thanks, just making sure. Had always used the Export as Track Template, and was just wondering.
-
Quick question - is there any difference between Export as Track Template, and Save as Track Template? Thanks, Bob Bone
-
Migrating to Win 10 - plugin best practice
Robert Bone replied to Bristol_Jonesey's topic in Cakewalk by BandLab
I haven't run into any UAC issues with my J-Bridged 32-bit plugins living in a sub folder to VST32, which is in C:\Program Files (x86). I have set that hierarchy up on multiple computers for years and years, with no issues. -
Migrating to Win 10 - plugin best practice
Robert Bone replied to Bristol_Jonesey's topic in Cakewalk by BandLab
Wow! Good thing I only strongly suggested there weren't any 32-bit Vst3 plugins. DOH! Thanks, Bob Bone -
Migrating to Win 10 - plugin best practice
Robert Bone replied to Bristol_Jonesey's topic in Cakewalk by BandLab
There are no 32-bit VST3 plugins, to the best of my awareness, the spec does not allow them. Further, VST3 64-bit plugins MUST be in C:\Program Files\Common\VST3 I place 64-bit VST2 plugins in: C:\Program Files\VST64 and when possible I go on level deeper, with a sub-folder within VST64 for each plugin, as there are often additional files for presets or documentation, etc., and I like to keep it all organized that way, so within VST64, there will be a folder for Arturia, and its plugins and files live there, another folder for Native Instruments (I abbreviate it as NI), another folder for Korg, etc.... I have 32-bit plugins in: C:\Program Files (x86)\VST32, again using sub-folders to group plugins by the company they came from Additionally, I happen to have J-Bridge, so I have a folder in VST32 called J-Bridged Plugins and that is the only 32-bit path in my VST Settings Scan Paths in Preferences - the whole path to that is: C:\Program Files (x86)\VST32\J-Bridged Plugins Bob Bone -
I'm stuck, can't get Cake by BandLab to open
Robert Bone replied to Wayne Smith's topic in Cakewalk by BandLab
Well, yes, generally those steps are correct (except that initial launch does an internal authorization), however, per Wayne's earlier comments in the thread, he did install Bandlab Assistant, and did the installs, and it does not open, nonetheless, so something else is going on. -
Does it make sense to use compressor at master bus
Robert Bone replied to Lummy Keen's topic in Cakewalk by BandLab
Compression is also applied to things like drums, (parallel compression), guitars, whatever tracks need taming. I myself try to use it sparingly. I purposefully use dynamics in my songs, so not a big fan of compressing at the master bus level. Others may choose to do it. Bob Bone