msmcleod
-
Posts
7,120 -
Joined
-
Last visited
-
Days Won
39
Everything posted by msmcleod
-

Latest MMcL MackieControl.dll available with HUI Support
msmcleod replied to msmcleod's topic in Cakewalk by BandLab
@u-man - I was going to suggest you tried using the C4 with the Commander Software, but I see this what you're already doing. Unless Steinberg implement something themselves (unlikely since the C4 is EoL), this is the only thing you really can do, unless you write something that emulates some other protocol such as the Akai Advance/VIP or Native Instruments Komplete Kontrol protocols. -
These are common ones to add to your scan path: C:\Program Files\Steinberg\VSTPlugins C:\Program Files\VSTPlugins and if you've got any NI stuff (e.g. Kontakt) C:\Program Files\Native Instruments\VSTPlugins 64 bit
-
How do I report a problem with a Cakewalk product?
msmcleod replied to Jesse Jost's topic in Frequently Asked Questions
https://www.bandlab.com/products/cakewalk -
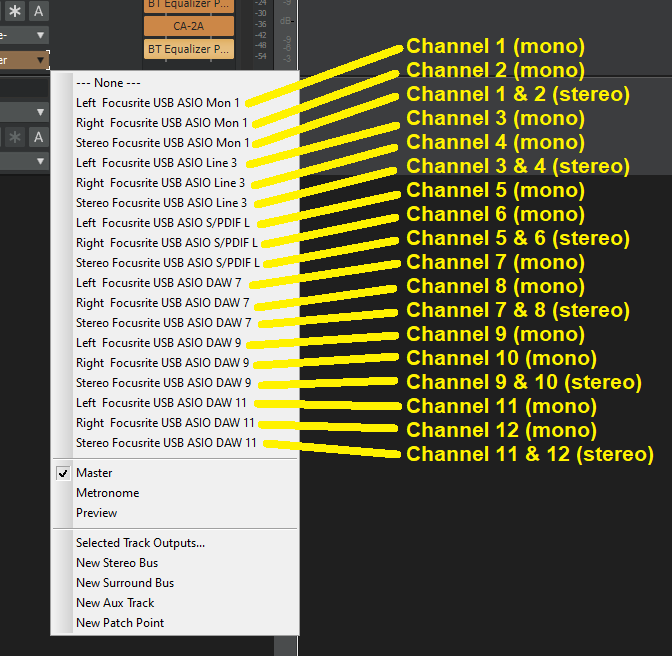
Scarlett 3rd gen 18i8 connection issues
msmcleod replied to Ken Peabody's topic in Cakewalk by BandLab
This is just how the driver reports the names to Windows, which is displayed by Cakewalk. First make sure "Show Mono Outputs" is checked: Now when you pick an input / output device within a track you'll see something like the following for inputs: And something like this for outputs: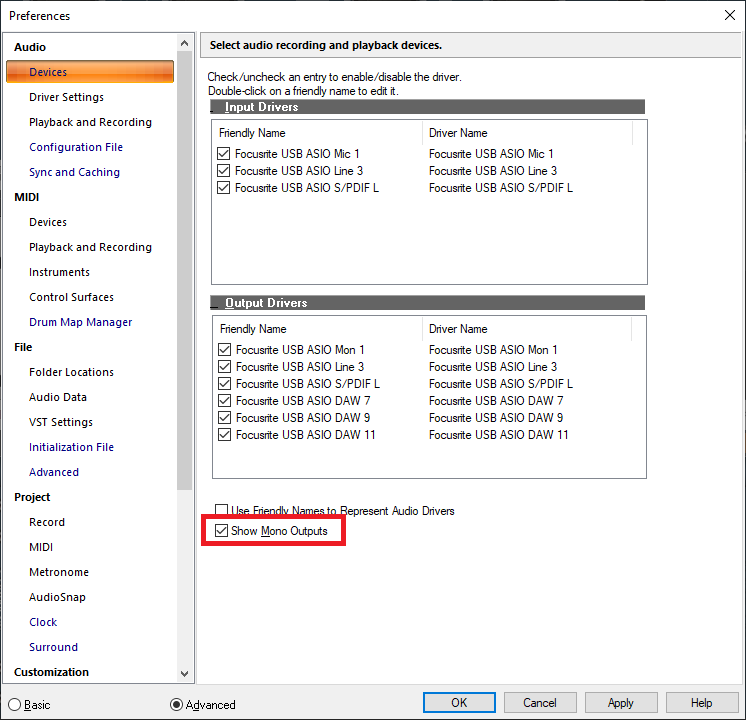
-
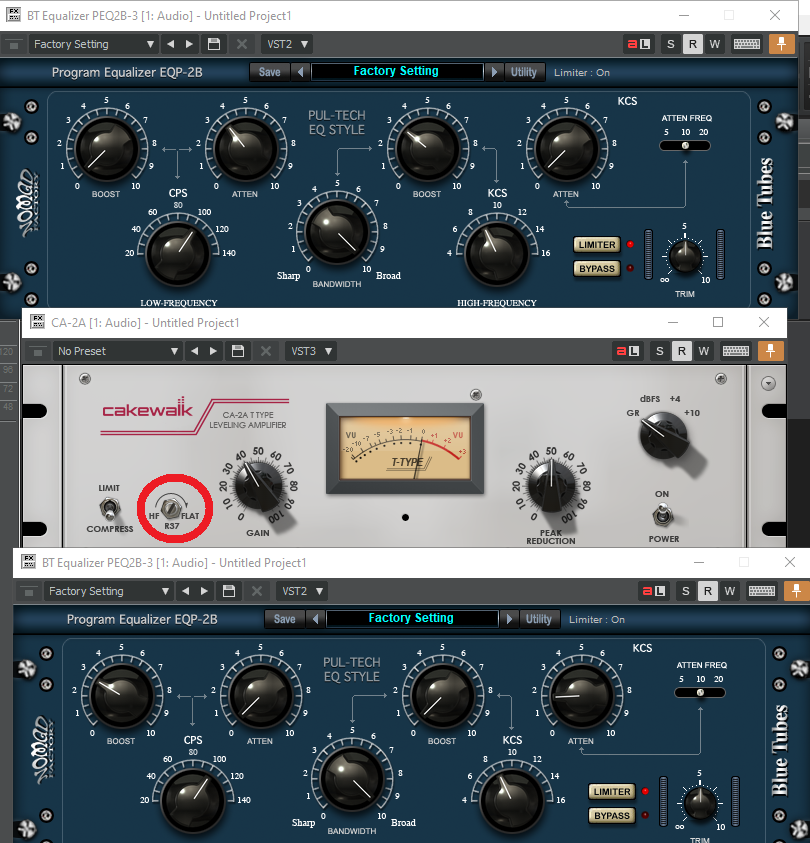
Andrew Scheps vocal mix chain Any ideas how to do this in CW?
msmcleod replied to jm52's topic in Instruments & Effects
The CA-2A's frequency control is between the Limit/Compress and the Gain knob: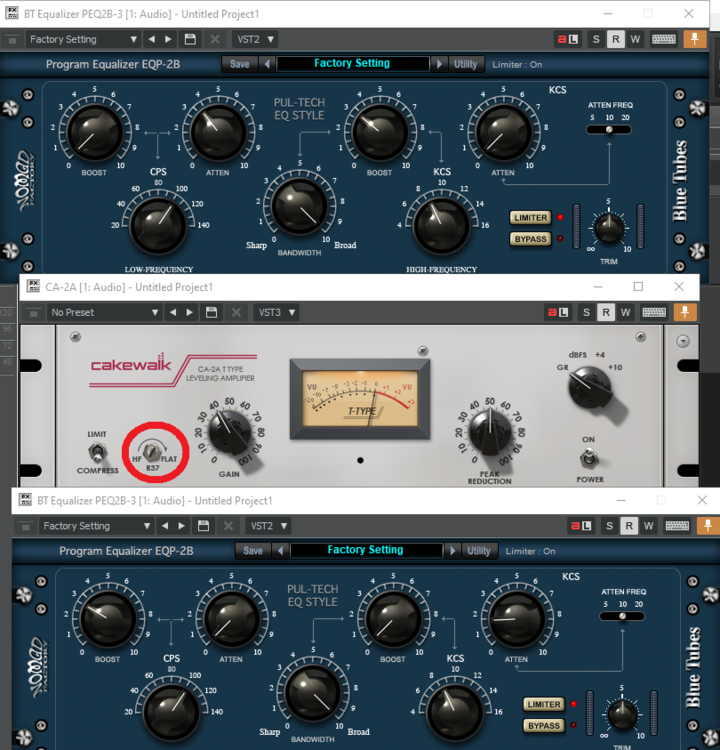
-
You should also make sure your running the correct drivers for your motherboard. For example, the network card / ATAPI drivers are showing high usage - this could be down to your PC using the Microsoft generic drivers rather than the Intel ones. You can download the drivers for your motherboard here (note there's no Win 10 drivers, but Win 8.1 drivers should work ok) https://support.hp.com/gb-en/drivers/selfservice/hp-compaq-elite-8300-small-form-factor-pc/5232852
-
This: CPU SPEED _________________________________________________________________________________________________________ Reported CPU speed: 3392 MHz Measured CPU speed: 10 MHz (approx.) Note: reported execution times may be calculated based on a fixed reported CPU speed. Disable variable speed settings like Intel Speed Step and AMD Cool N Quiet in the BIOS setup for more accurate results. First I'd make sure your power settings are set to "High Performance". I normally edit this plan and make sure nothing is set to go to sleep, e.g. USB, drives, screen etc, and make sure the CPU is set to 100% all the time. But also take LatencyMon's advice and disable Intel Speed Step in the BIOS.
-
Why is my latency so slow...only in a single project?
msmcleod replied to Steve Patrick's question in Q&A
Have you got a look-ahead plugin in that project (e.g. LP EQ or LP MB) ? -
Latest MMcL MackieControl.dll available with HUI Support
msmcleod replied to msmcleod's topic in Cakewalk by BandLab
From what I remember, the C4 protocol is similar to the MCU protocol, but obviously different as it's a different device with different buttons, rotaries etc. Also, IIRC the C4 is pretty dumb - in other words the UI and behaviour is provided by the DAW integration and not internal to the C4. You should be able to get the technical docs from Mackie, but how you'd go about interfacing that with Cubase is another matter. -
Latest MMcL MackieControl.dll available with HUI Support
msmcleod replied to msmcleod's topic in Cakewalk by BandLab
I'm pretty sure this is ok, but I'd have to try it out. All of my changes are now in Cakewalk's standard MackieControl control surfaces, so just add "Mackie Control C4" as your control surface within Preferences->Midi->Control Surfaces. Technically, you don't need to edit the MackieControl.ini as it will present each parameter on the C4 in the order they're defined in each plugin. However, you probably want to download my C4Mapper tool to arrange them into a more sensible order and/or edit the parameter names: http://msmcleod.co.uk/cakewalk/C4Mapper.zip You need to run this as admin for it to update MackieControl.ini Note that the plugin parameters are taken from %APPDATA%\Cakewalk\ACT Data\genericpluginparams.xml , which is only populated for each plugin when: You've added a control surface defined You've opened that plugin with a control surface defined So once you've added your C4, you may have to go through adding your plugins to an audio track for it to populate genericpluginparams.xml. Don't do too many plugins at once, and restart Cakewalk regularly during this process (genericpluginparams.xml gets written when Cakewalk closes). Holding down the Track button on the C4 will give you access to the menu, from which you can choose what to edit (e.g. track parameters, Eq, dynamics, synth rack etc). -
MAutoPitch is free, and pretty good - it's part of their free fx bundle: https://www.meldaproduction.com/MFreeFXBundle
-
That's the BandLab website - not BandLab Assistant. You can download BandLab assistant here: https://www.bandlab.com/products/cakewalk
-
Thought I'd check - the apps tab definitely doesn't appear on the Mac version
-
If you've got the Melodyne installed, either the trial version (installed under "Addons" in BandLab Assistant) or any of the licensed versions, you can simply drag the audio track to the time ruler and it'll create a tempo map for you. If you'd prefer to use the Audio Snap Palette, the keyboard shortcut is now ALT + A.
-
Are you running BandLab Assistant on a Mac ? Cakewalk is for 64-bit Windows only.
-
Yeah - I thought that would work, but it didn't... so I deleted the post. AFAIK BitBridge hasn't been touched in years, so something else is stopping it working. I've no idea whether it's a Windows security thing or a Cakewalk thing. FWIW I run JBridge as adminstrator which works without issue.
-
The problem with the DSK plugins (and other synthedit based plugiuns) is they try to write to a subdirectory once loaded, however C:\Program Files and C:\Program Files (x86) are protected from non-admin users. The answer is to install them in a different directory, e..g "C:\FreeVST\VST32\".
-
TTS-1 is relevant if you want to do general MIDI - even more relevant if it's GS, as it'll perfectly match MIDI files geared towards Roland GS (sound canvas) modules. Xpand!2 & Z3ta+ are both rompler synths. Z3ta+ has way more editing options, but it's very much a synth. I find the Xpand!2 sound set far more usable for a wide range of genres.
-
Unchecking the "Select Events with Sections" option under the Track View "Options" menu is a real time saver if you only want to do section operations. When it's unchecked, it won't change your clips when doing section operations.
-
Dragging the cwp file from the browser into the new project is a pretty quick way of doing it, however it does have limitations - especially with regard to synth tracks. I've found the most reliable way of copying tracks between projects is: 1. Open up both projects 2. Select the tracks you want to copy and save them as a track template 3. In the destination project, insert the track template you just saved 4. Copy Special / Paste Special the tracks from the source project to the destination project starting at where the track template was inserted.
-
Xpand!2 is a great source of sounds... it's pretty old now, but great sounds nonetheless. Soundwise it definitely has the edge on TTS-1, but Xpand!2 is not GM so you'll have to manually remap your sounds if you're using GM MIDI files. As a synth, the editing options are limited... but then they're pretty limited in TTS-1 too. And Xpand!2 has way more sounds to choose from. Plugin boutique are doing it for £9.99 / $12.44 at the moment which is a steal for that price: https://www.pluginboutique.com/products/1560 Once you have one AIR synth, you can upgrade to the complete bundle for less than $75, which is an awesome set of VSTi's - a sampler, drum vsti, organ & a few more synths: https://www.pluginboutique.com/product/1-Instruments/58-Inst-Bundle/2294-AIR-Instrument-Expansion-Pack-3-COMPLETE-UPGRADE-
-
Ok, it looks like there's a bug here. As a workaround, temporarily set all the MIDI tracks except one to point to another synth. You should then be able to make the instrument track. Then go through one by one assigning each MIDI track back to the original synth, and making it an instrument track.
-
If you have any other MIDI track pointing to that synth it will also cause this message. This can happen when an existing MIDI track is set to output to none, and you subsequently add a synth - orphaned MIDI tracks will be assigned to the first MIDI output, which is your new synth.
-
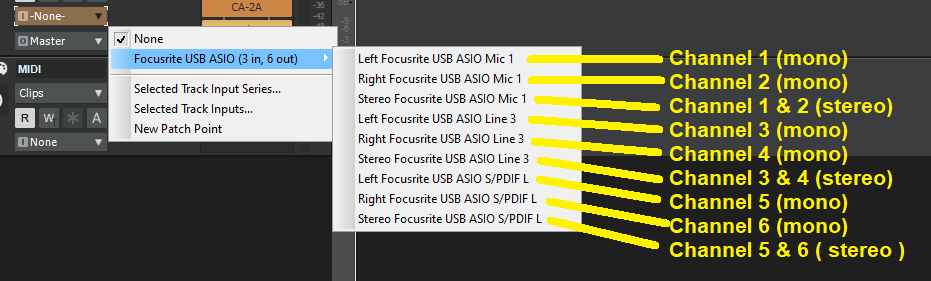
Cakewalk thinks I have different audio interface
msmcleod replied to Anya Kinsella's question in Q&A
That's fine as the 2i2 only has 1 x stereo pair. However, when you go to your track inputs you'll now get the choice of choosing the channels: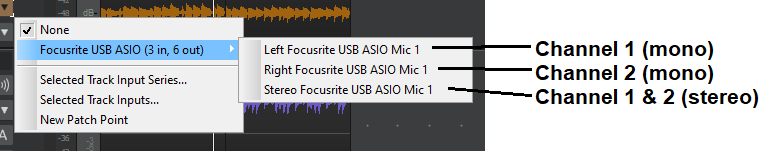
-
If you can hear a difference then your frequency is too high. The whole point it to cut at the point where you CAN'T hear a difference. The low E on a standard 6 string is 82.41 Hz. So you want to pick a frequency somewhere below that. The frequency is likely to be different for each track, depending on the guitar sound and what notes you're playing. The purpose is to stop a build up of inaudible low frequencies which will (a) Make your mix muddy, and (b) Essentially end up making your total mix quieter - the reason being, that a build up of low frequencies show up as being loud (although you may not hear them), and the audible frequencies are quieter in comparison.