-
Posts
7,120 -
Joined
-
Last visited
-
Days Won
39
Everything posted by msmcleod
-
Whitesea Studio did an interesting video comparing one of those cheap mic's with a U47 - AFAIK the NW-8000 / BM-800 are basically the same mic rebadged by 1000 different companies: He also did a follow up, using EQ to try to match them:
-
All of the NI Stuff has always been relatively slow in loading for me - there's a tonne of samples involved that need loading. But all of it runs rock solid. You might be able to tweak how much is loaded from within Kontakt itself, but I'm just using the defaults.
-
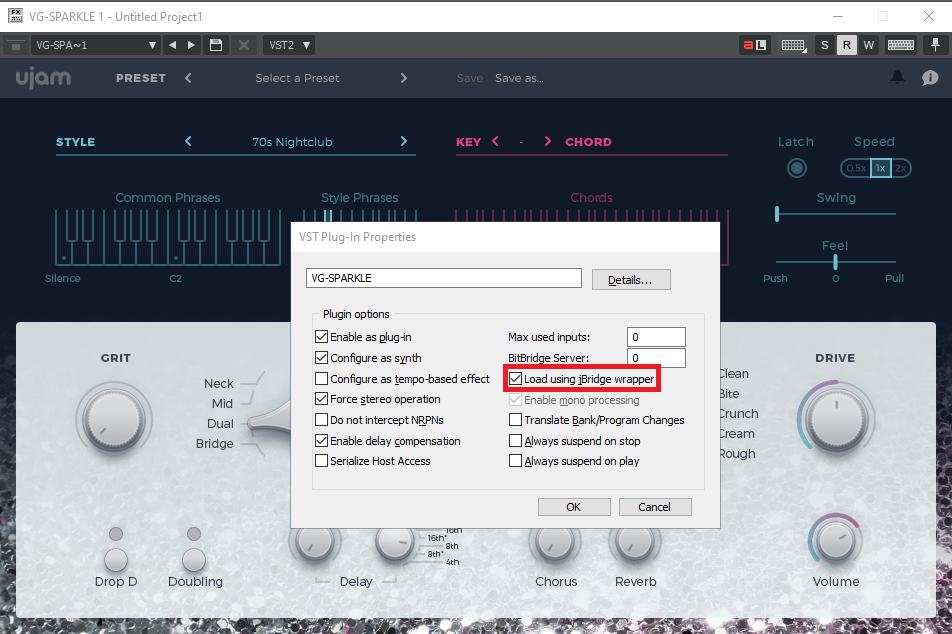
No, jBridge is a 3rd party product: https://jstuff.wordpress.com/jbridge/ Although JBridge is primarily for bridging 32 bit plugins to 64 bit hosts, it also supports: 64 bit plugin -> 32 bit host 64 bit plugin -> 64 bit host (which is what I'm doing with Sparkle) 32 bit plugin -> 32 bit host (which gets around the memory limit per process)
-

Selection in ruler on clip range - how to change behavior?
msmcleod replied to LarsF's topic in Cakewalk by BandLab
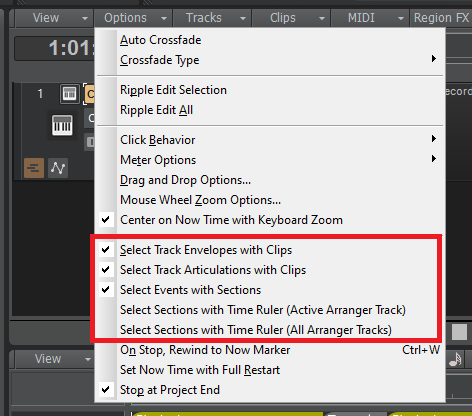
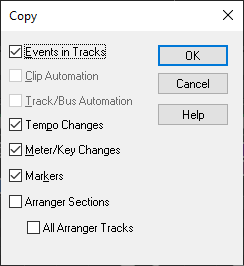
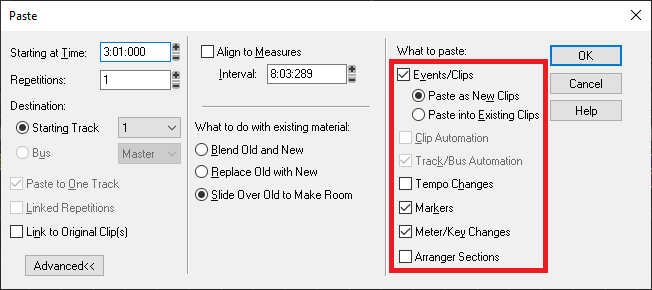
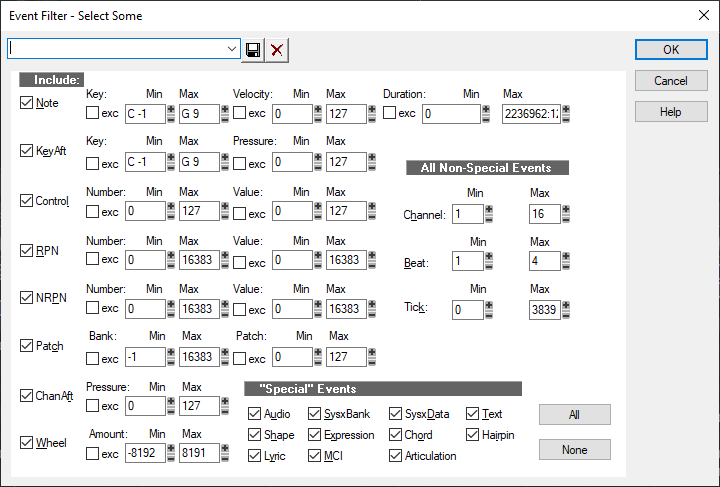
The most common options are defined in the Track View Options menu: As far as Markers, Tempos and Meter/Key go, these are automatically selected with the time range... however by default, the drag/drop operations and cut/copy/delete/paste operations won't take these into account (unless you're ripple editing). The cut special / copy special / delete special / paste special operations allow you to check/uncheck which of these you want to include / exclude, e.g. for "Copy Special" / Paste Special: In addition, you can also further filter out your selection by using the Edit->Select->By Filter dialog: The cool thing about the Event Filter dialog, is that you can save your own presets. -
I got this too - using the "Load using jBridge wrapper" totally fixed it for me. I get perfect playback at a buffer size as low as 32: Of course, this is assuming you have JBridge installed...
-
I bought VG Iron, VG Amber & VG Sparkle as a bundle when they first came out. I added VG Silk & VG Carbon later. They're all really good, but I probably use VG Sparkle & VG Carbon the least. VG Sparkle is pretty much a chord riffer, which it does very well... but for me to find use for it, I'd like to see everything from VG Silk incorporated into it (i.e. the bass notes & arpeggiated notes), but with the VG Sparkle sounds. I'd like to see the same in VG Amber too. Until they do that, for me, NI Electric Sunburst is my go to for that type of sound. VG Amber / NI Strummed Acoustic are pretty much on par IMO, and I'll quite often use both in the same project doubled up.
-

Cubase Expression Map list for importing into Cakewalk.
msmcleod replied to Steve Harder's topic in Cakewalk by BandLab
Yeah, I noticed that... we'll be releasing a fix for that shortly. -

Cubase Expression Map list for importing into Cakewalk.
msmcleod replied to Steve Harder's topic in Cakewalk by BandLab
@Maestro - can you post (or PM) a small project that demonstrates this so we can get to the bottom of it? -
@John Roynon - is this still happening for you in the EA release? Some work was done to remedy this in that release.
-
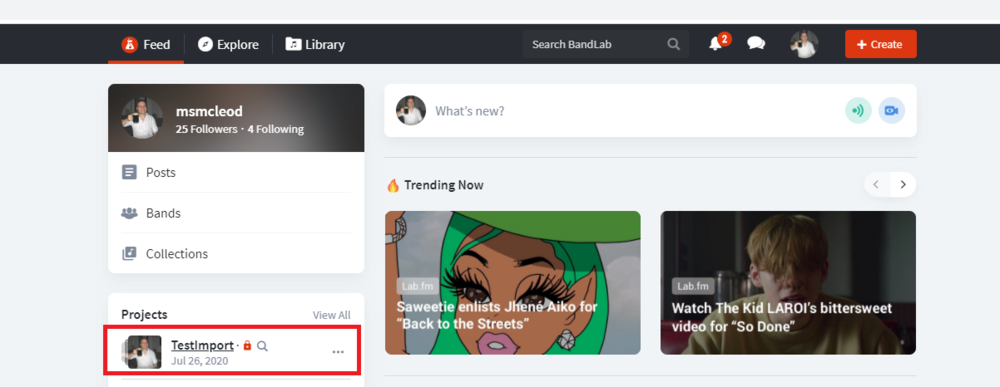
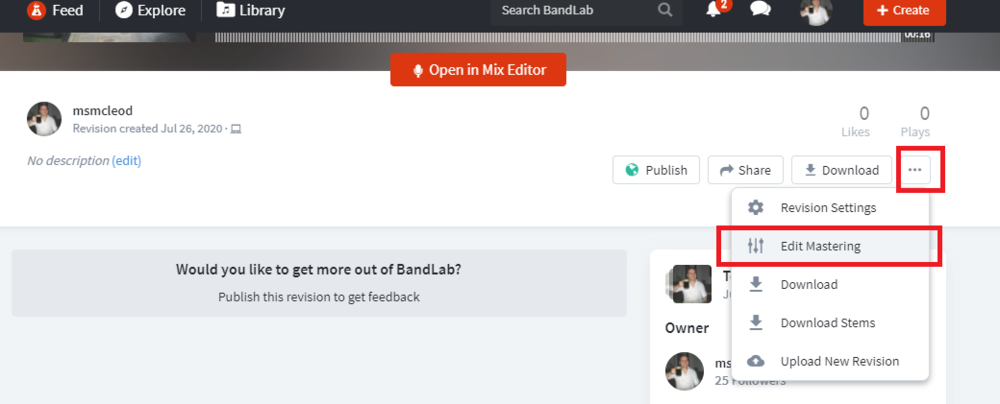
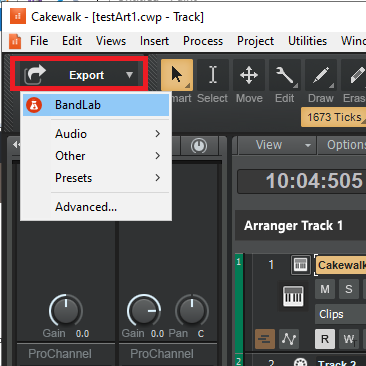
You first need to export your Cakewalk project to BandLab using the Export Module, then log in to BandLab via your browser to access the project that has been uploaded: Once you're logged in, click on your project, e.g.: Next, select the menu on the right to master your track:
-
This is no longer available with CbB, as BandLab offer their own free mastering service. Re-installing SONAR Artist through the Cakewalk Control Center should make this available again. I can't recall whether a custom install will allow you to only install the LANDR export utility, but it might be worth giving it a try. Normally we recommend installing SONAR first (to get all the included 3rd party software), then Cakewalk by BandLab afterwards as it updates some shared components, but in theory, the SONAR Artist installer should leave any newer shared components alone.
-

Understanding Cubase expression maps
msmcleod replied to Steve Harder's topic in Cakewalk by BandLab
FWIW, CbB articulation maps are for the most part like Direction expression maps. The attribute type expression maps is closely linked with MPE (MIDI polyphonic expression), as it relates to adding specific control information on a per-note basis. When we come to implement MIDI 2.0 & MPE within CbB, we'll look at implementing a similar feature for per-note articulations at that point. There is actually a way to emulate per note articulations using the transforms and the input filters, but it's messy as you have to create a separate articulation for each note, and you end up with a separate articulation lane for every articulation/note combination. -

Cubase Expression Map list for importing into Cakewalk.
msmcleod replied to Steve Harder's topic in Cakewalk by BandLab
There's a couple of collections of Cubase expression maps in github: https://github.com/r-koubou/ArticulationMappingFiles https://github.com/mvy/symseries-exprmap -
I managed to upgrade to 20H2 using the media creation tool, and selecting the "Keep my files" option... which deletes all your program files (and all your stuff in ProgramData), but keeps your "personal" files intact. Copies of your program files / program data are in the windows.old directory, so it's easy to copy stuff over (e.g. VST's that don't have an installer) if need be. I got about 1/2 way through re-installing programs before a reboot refused to boot again. I've gone through this procedure TWICE this week (so wasted around 30 hours). The second time around I was running sfc /scannow before every reboot, just to make sure no installation had screwed anything up. The last time it failed was just after installing Antares AVOX 4. I seriously doubt that would have caused the issue, but it was rebooting fine up until that point. So now I'm back to square one having restored my 1909 image yet again. I'm gonna re-enable system restore the next time I try this, in the hope I'll be able to rollback the state if this happens again, but I'm very close to losing all confidence in these Microsoft upgrades.
-
When you say time code, do you mean the time code display within CbB itself ? The "Pause" key (next to scroll lock) puts CbB into low CPU usage mode by reducing the UI refresh rate. Pressing pause again will take it out of that mode.
-

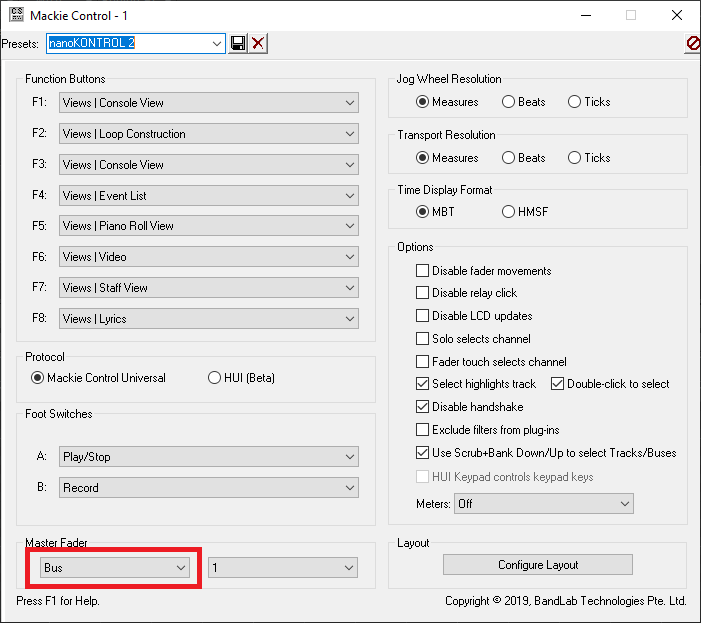
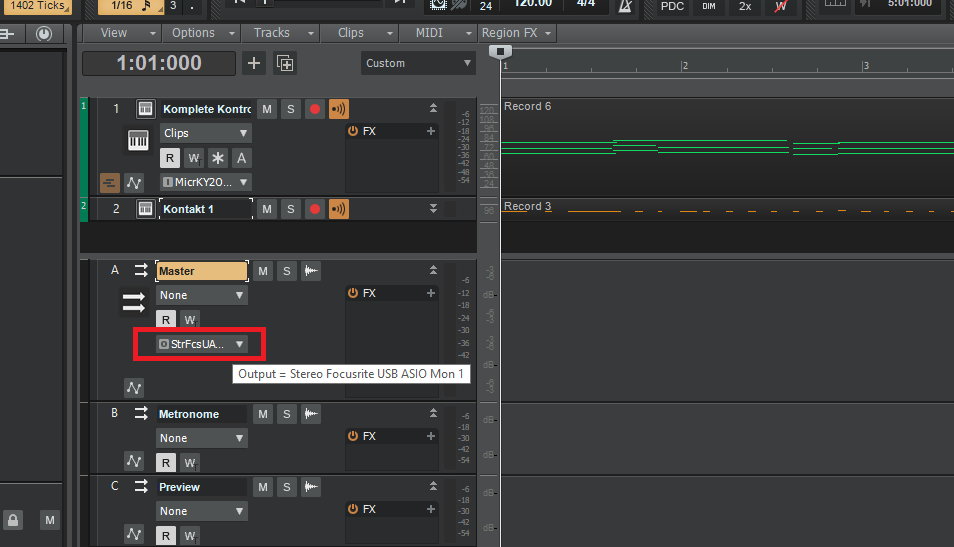
Midi controller unwillingly sets left master fader to INF
msmcleod replied to Gijs Verhoeff's topic in Cakewalk by BandLab
-

SoundFonts... menu option, Version Control & Latency
msmcleod replied to Caldur's topic in Feedback Loop
At one point I moved all my projects into MS Sourcesafe, and later SubVersion to give me version control. But to be honest, the extra hassle of checking out projects / checking them back in far outweighed the benefit of the very few times I needed to go back to an earlier version of my projects. My current solution is just to use cloud storage. I have a couple of batch files which copy my CbB project directory to and from a directory that is synced to the cloud. It's important that the sync directory is different from your actual projects directory to avoid the cloud client app accessing project files at the same time as Cakewalk (although an alternative might be to just manually run the cloud client app). I run the download script when I start up (once the cloud sync has finished), and the upload script when I finish a session and wait for it to upload everything. This has a few advantages: I have a backup of my projects in the cloud The cloud storage gives me access to previous versions of files I decide when a project gets synced All my Cakewalk projects are in sync across all my PC's. I've always got access to my previous version in the sync directory. The disadvantages: The initial upload to the cloud took ages... but it was just a one off. Delta updates only take a couple of minutes at most. I've got two copies of my projects on each machine, which takes up disk space When working on another machine, I might forget to run the batch files to copy the latest to my project directory. The annual cost of cloud storage... not a biggie though for the piece of mind. -
-
@micv - there's two ways to edit only a specific envelope: 1. Use the Track filter to select the envelope you want to edit: 2. Use the automation lanes: Also another thing to bear in mind: Deleting an automation lane does not delete the envelope - it only removes the lane. You can get the "hidden" lanes back by SHIFT + clicking on the show/hide automation button...
-
This is a pretty good video for getting you started:
-
For piano, I find a buffer size of 64 at 44.1K is the maximum I can tolerate with my Focusrite Scarlett (4.6 msec latency, 9.3msec roundtrip). Any higher, and I notice the latency. Increasing the sampling rate to 96K will more than half these figures, giving a input/output latency of 2.2 msec (4.4 msec roundtrip)... but this also increases the CPU usage. For a CPU intensive project, that might mean temporarily bypassing FX or freezing tracks to avoid drop-outs. A more extreme version of this would be to mix down the whole project to a stereo track, and temporarily archive all the other tracks. In some ways this can be more convenient as there's very little "thought" about it when switching - i.e. you select all, unselect the mixdown track, and archive everything else. Another alternative is to use an external MIDI sound module. I used to use my old Yamaha MU10 for this purpose, however depending on the part I was recording, the differences in response (e.g. velocity / feel) may or may not work as well when the part is played on a different piano sound. Which method I choose depends largely on where I am in the project. In the early stages, I'll use FX bypassing or freezing. The mixdown/archive approach is more useful for last minute overdubs. In all honesty though, I rarely need to any of this as I tend to treat tracking / mixing / mastering as separate tasks - i.e. I avoid trying to mix as I go along, and only use effects that contribute to the sound during the tracking stage.
-
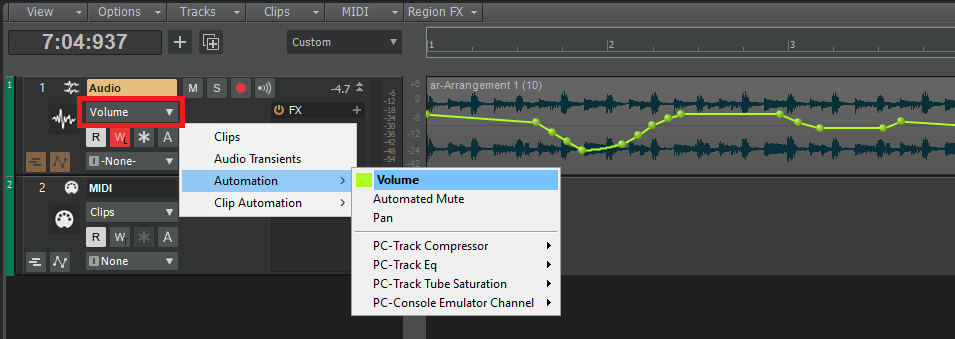
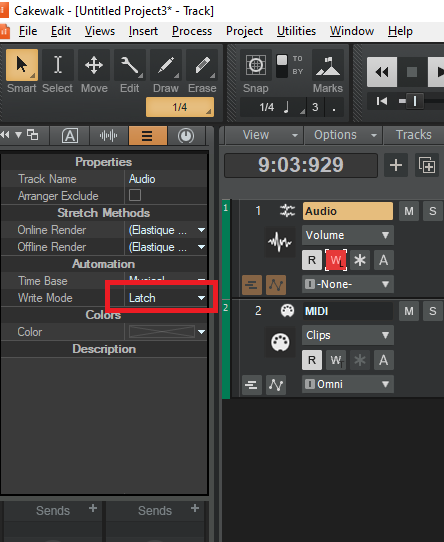
You'll probably get more consistent results recording automation in Latch mode: This will stop the jumps from being created when recording automation. Notice the "W" button has an "L" in the corner rather than "T". An explanation of the automation modes can be found here: http://www.cakewalk.com/Documentation?product=Cakewalk&language=3&help=Automation.04.html ...but in essence, if you're creating automation for the first time on a track use Latch or Overwrite mode. Touch mode is more for tweaking existing automation, but to be honest, you'll probably find it easier sticking with Latch mode even for altering existing envelopes. The only gotcha is remembering to move your fader to the correct position when you stop your edits, and of course stopping the transport so it doesn't overwrite the remaining automation. @Will_Kaydo / @Simon Wilkinson - I did manage to repro your delete issue twice, but had difficulty reproducing again. What I did notice was that once the Jumps were all changed to Linear, the issue went away. So it looks like there's a corner case where it sometimes gets confused with jumps between nodes. We'll look into it. In the meantime, you can always delete the remaining nodes in a second pass. For the meantime though, give Latch mode a try and see if this works better for you.
-

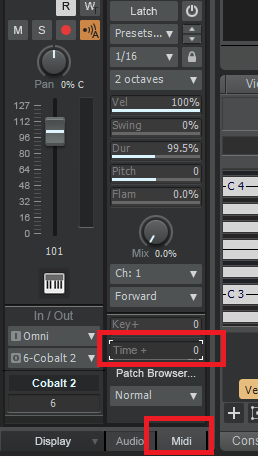
Where is the "Time+" feature in Cakewalk?
msmcleod replied to Riccardo66's topic in Cakewalk by BandLab
-
FYI Amazon UK are doing 2TB Crucial MX500's for £159.66 for the next 10 hours...
-
As @Noel Borthwick says, arranger tracks should be able to do this for you. You can do the two tier thing already by having two arranger tracks, or you can use one arranger track in combination with markers if this works better for you. You can also convert markers to / from arranger sections by using the time-ruler selection and the time ruler context menu.


